.NET Aspire: Building Cloud-Native Applications
This article will introduce you to .NET Aspire, and its core features, and provide practical examples to help you get started.
Join the DZone community and get the full member experience.
Join For FreeIn today's fast-paced software development landscape the demand for resilient and easily manageable applications is more crucial than ever. .NET Aspire steps in to cater to these needs by offering a framework that streamlines the creation of native applications. This article will introduce you to .NET Aspire, and its core functionalities and present real-world examples to kickstart your journey.
What Is .NET Aspire?
.NET Aspire comes as a structured framework packaged in a set of NuGet packages that tackle aspects of cloud-native app development. It's specifically crafted for constructing distributed systems making it an ideal fit for microservices architectures. The framework emphasizes standardization, uniformity, and user-friendliness to empower developers in building and managing applications.
Key Features of.NET Aspire
- Orchestration
- Components
- Project Templates
1. Orchestration
.NET Aspire elevates the development process by simplifying the handling of application configurations and connections between components. It offers tools for service discovery, managing environment variables, and configuring containers to ensure a setup, across services and elements. You can easily modify the configure method and add different configurations.
public class Startup
{
    public void ConfigureServices(IServiceCollection services)
    {
        services.AddAspireOrchestration();
        // Other service configurations
    }
    public void Configure(IApplicationBuilder app, IWebHostEnvironment env)
    {
        app.UseAspireOrchestration();
        // Other middleware configurations
    }
}
2. Components
.NET Aspire comes with an easy way to use NuGet packages for different services, like Redis and PostgreSQL, etc... There are multiple Aspire-related NuGet packages that you can install directly. These packages make it easier to incorporate and set up services in an application addressing cloud-related issues using established methods. Let's take a look at two simple steps for how to add the "Redis" component to an Aspire application.
Firstly, add the NuGet Package to the project.

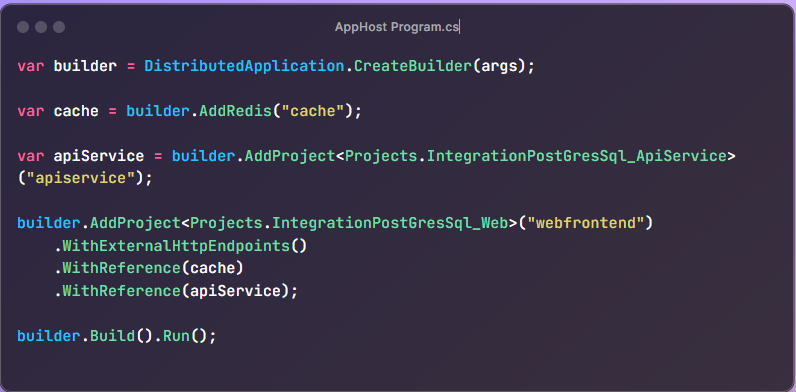
AppHost program.cs file will be automatically updated with AddRedis methods.

 var builder = DistributedApplication.CreateBuilder(args);

var cache = builder.AddRedis("cache");

var apiService = builder.AddProject<Projects.IntegrationPostGresSql_ApiService>("apiservice");

builder.AddProject<Projects.IntegrationPostGresSql_Web>("webfrontend")
    .WithExternalHttpEndpoints()
    .WithReference(cache)
    .WithReference(apiService);

builder.Build().Run();
3. Project Templates
.NET Aspire offers a range of tools and project templates to assist developers in establishing and managing their applications. These templates adhere to a framework based on the core principles of.NET Aspire.
Getting started with a project template is so easy and with one single command or using UI, we can get started with the Aspire starter template.
Use the following command line.

This command sets up a new Aspire project with a standardized structure, including an app host and default service configurations.
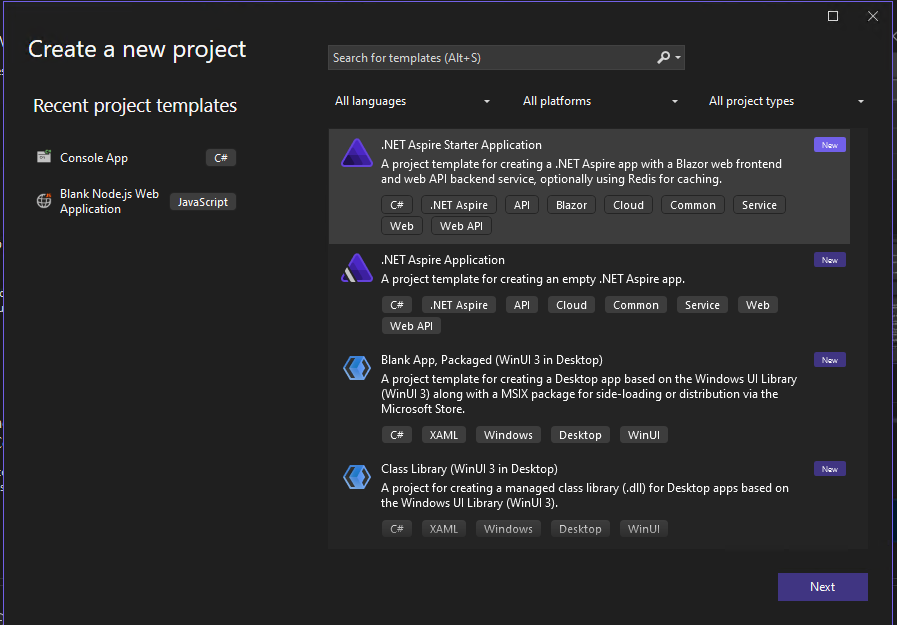
If you want to use Visual Studio, click on File -> New project and select the below template to get started with boilerplate code.

Example: Integration of PostgreSQL Into .NET Aspire
Step 1: Getting Started
To kick off your work, with.NET Aspire initiate a project using the Aspire template. This template lays down a framework encompassing orchestration, default services, and sample configurations.
Command to Create a New Project or directly use Visual Studio starter template.
dotnet new aspire -n IntegrationPostGreSqlThis directive creates a project structured as follows;
IntegrationPostGreSql: The primary projectIntegrationPostGreSql.ApiService: Inbuilt API project, comes with default weather API serviceIntegrationPostGreSql.AppHost: Oversees coordinationIntegrationPostGreSql.ServiceDefaults: Supplies default settingsIntegrationPostGreSql.Web: Web project with weather API client.
Step 2: Incorporating PostgreSQL db. Services
Incorporating services into a.NET Aspire project entails utilizing elements. For instance to include a PostgreSQL database service:
1. Install the NuGet Package
dotnet add package Aspire.PostgreSQL2. Configure PostgreSQL in Startup.cs
public class Startup
{
    public void ConfigureServices(IServiceCollection services)
    {
        services.AddAspirePostgreSQL(options =>
        {
            options.ConnectionString = Configuration.GetConnectionString("PostgreSQL");
        });
        // Other service configurations
    }
}
Step 3: Managing Orchestration
In general, orchestration in .NET Aspire involves managing service discovery and connection string configurations, coordination, and middleware to ensure seamless communication between services.
It involves managing the lifecycles of containers and services, health checking, providing discovery mechanisms, and more.
Here's a high-level overview of what orchestration might involve in a microservices architecture:
- Service discovery: Orchestration tools often provide a way for services to register themselves and to discover other services.
- Load balancing: Orchestration might involve distributing the network traffic or load evenly across services to ensure that no single service becomes a bottleneck.
- Scaling: Orchestration tools can often automatically scale your services based on the load.
- Health checking: Orchestration might involve periodically checking the health of services and restarting or replacing instances that are not responding.
- Configuration management: Orchestration can involve managing the configuration of your services, ensuring that they have the necessary environment variables, configuration files, etc.
Inside IntegrationPostGreSql.AppHost project, you will see below code which automatically adds references to the builder object when you add different NuGet Projects.
Press F5 or click on the green button in VS or "start without debugging" to run the application.
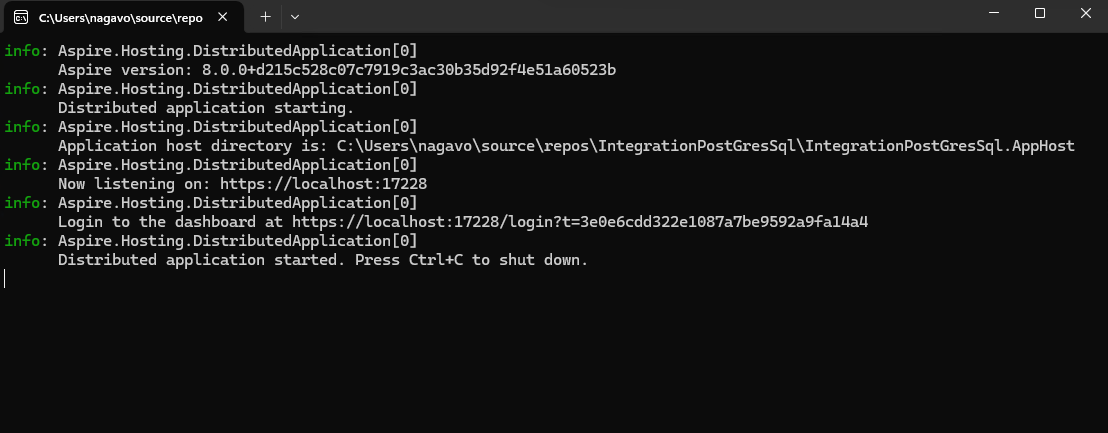
The console window will open with all the logs followed by a browser opening Aspire Dashboard as shown below.
Aspire Dashboard will have a list of all the resources and we can open the API service or Blazor web application by clicking on the listed endpoints.

The Benefits of .NET Aspire
- Consistency: Using tools and patterns, in development ensures an approach to reducing mistakes and discrepancies.
- Scalability: Designed for cloud-based environments, .NET Aspire facilitates the creation of applications that can expand as needed.
- Developer productivity: With tooling and project templates setting up and managing projects becomes simpler allowing developers to concentrate on feature development.
To demonstrate the power of .NET Aspire let's create a simple microservice that interacts with both a Redis cache and a PostgreSQL database inside your API Controller. Add Redis NuGet package
dotnet add package Aspire.Redis
Add the Redis connection string to the ConfigureServices method.
public class Startup
{
    public void ConfigureServices(IServiceCollection services)
    {
        services.AddAspireOrchestration();
        services.AddAspireRedis(options =>
        {
            options.ConnectionString = Configuration.GetConnectionString("Redis");
        });
        services.AddAspirePostgreSQL(options =>
        {
            options.ConnectionString = Configuration.GetConnectionString("PostgreSQL");
        });
        // Other service configurations
    }

    public void Configure(IApplicationBuilder app, IWebHostEnvironment env)
    {
        app.UseAspireOrchestration();
        // Other middleware configurations
    }
}
Create RedisCacheService.cs.
public class RedisCacheService
{
    private readonly IConnectionMultiplexer _redis;

    public RedisCacheService(IConnectionMultiplexer redis)
    {
        _redis = redis;
    }

    public async Task<string> GetValueAsync(string key)
    {
        var db = _redis.GetDatabase();
        return await db.StringGetAsync(key);
    }

    public async Task SetValueAsync(string key, string value)
    {
        var db = _redis.GetDatabase();
        await db.StringSetAsync(key, value);
    }
}
Create DatabaseService.cs.
public class DatabaseService
{
    private readonly DbContextOptions<MyDbContext> _options;

    public DatabaseService(DbContextOptions<MyDbContext> options)
    {
        _options = options;
    }

    public async Task<List<MyEntity>> GetEntitiesAsync()
    {
        using var context = new MyDbContext(_options);
        return await context.MyEntities.ToListAsync();
    }

    public async Task AddEntityAsync(MyEntity entity)
    {
        using var context = new MyDbContext(_options);
        context.MyEntities.Add(entity);
        await context.SaveChangesAsync();
    }
}
Create a new API Controller named MyController.cs.
[ApiController]
[Route("api/[controller]")]
public class MyController : ControllerBase
{
    private readonly RedisCacheService _cacheService;
    private readonly DatabaseService _databaseService;

    public MyController(RedisCacheService cacheService, DatabaseService databaseService)
    {
        _cacheService = cacheService;
        _databaseService = databaseService;
    }

    [HttpGet("{key}")]
    public async Task<IActionResult> GetValue(string key)
    {
        var value = await _cacheService.GetValueAsync(key);
        if (value == null)
        {
            return NotFound();
        }
        return Ok(value);
    }

    [HttpPost]
    public async Task<IActionResult> SetValue([FromBody] KeyValuePair<string, string> keyValue)
    {
        await _cacheService.SetValueAsync(keyValue.Key, keyValue.Value);
        return NoContent();
    }

    [HttpGet("entities")]
    public async Task<IActionResult> GetEntities()
    {
        var entities = await _databaseService.GetEntitiesAsync();
        return Ok(entities);
    }

    [HttpPost("entities")]
    public async Task<IActionResult> AddEntity([FromBody] MyEntity entity)
    {
        await _databaseService.AddEntityAsync(entity);
        return CreatedAtAction(nameof(GetEntities), new { id = entity.Id }, entity);
    }
}
When you run the project, Visual Studio will automatically spin up the new API controller called My Controller with all the endpoints inside the Aspire Dashboard. Service discovery will automatically take care of endpoints without mentioning the actual HTTP address in your client project, which is a huge advantage when building Microservice applications that talk to each other. We can clearly see how we take advantage of dependency injection and how easy to integrate with both Redis and PostgreSQL databases. Developers can concentrate on writing actual service code while the low-lying infrastructure, service discovery, monitoring, and logging everything is automatically taken care of by Dotnet Aspire. Huge Kudos to the Aspire team for coming up with this product and it went GA during MS Build 2024.
For More Reference
Dotnet E-shop "AdventureWorks" built on Aspire.
Conclusion
In summary, .NET Aspire is an opinionated cloud-ready stack that streamlines the creation of native applications. With its methodology, for orchestration, component integration, and project oversight it empowers developers to construct durable and easily maintainable cloud-native applications. This article has offered insight into .NET Aspire highlighting its attributes and providing illustrations to kickstart your journey. By adopting .NET Aspire, developers can ensure their applications are equipped to meet the challenges of contemporary cloud environments fostering creativity and productivity.
Opinions expressed by DZone contributors are their own.

Comments