Introducing JMeter Mainframe Testing With the New RTE Plugin
Learn how to set up the new RTE plugin for JMeter to use JMeter for your mainframe performance and load testing needs.
Join the DZone community and get the full member experience.
Join For FreeBlazeMeter has just released a new plugin that enables performance testing the mainframe with Apache JMeter™. Previously, mainframe system testing could only be conducted through legacy tools and was dependent on performance engineers in Performance Centers. Now, everyone can use JMeter's easy to use GUI to run a load or functional performance test on mainframe servers.
The new RTE plugin, which can be found through JMeter plugins, supports IBM mainframe protocols and server protocols TN5250 and TN3270. The JMeter RTE plugin simulates a mainframe terminal sending actions and keystrokes to the mainframe server. The terminal types that can be simulated are:
TN5250:
- IBM - 3179 -2: 24x80
- IBM - 3477 -FC: 27x132
TN 3270:
- IBM - 3278 -M2: 24x80
- IBM - 3278 -M2-E: 24x80
- IBM - 3278 -M3: 32x80
- IBM - 3278 -M3-E: 32x80
- IBM - 3278 -M4: 43x80
- IBM - 3278 -M4-E: 43x80
- IBM - 3278 -M5: 27x132
- IBM - 3278 -M5-E: 27x132
By using the plugin, developers and testers can simulate filling forms or calling processes, specify the position of fields on the screen and the text to set on them, and simulate the keyboard attention keys like ENTER, F1, F2, F3..., ATTN, CLEAR, etc.
Let's see how it works.
The RTE plugin is made up of two elements:
- RTE Config - for configuring the server and terminal connection
- RTE Sampler - for establishing a connection, determining which actions to send to the server, and disconnecting
1. First, add a Thread Group and configure the number of threads, ramp-up, loop count, etc.
2. Then, add the RTE Config element: Thread Group -> Add -> Config Element -> RTE Config
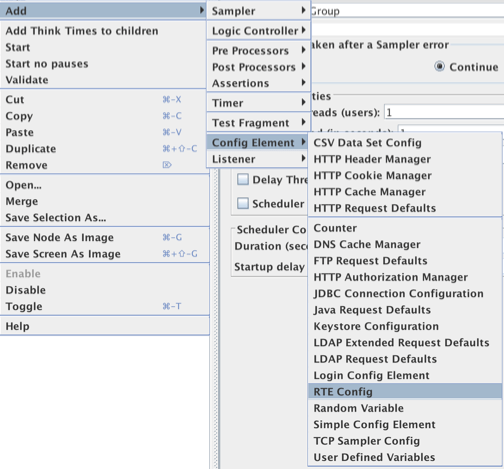
This is the RTE Config interface:
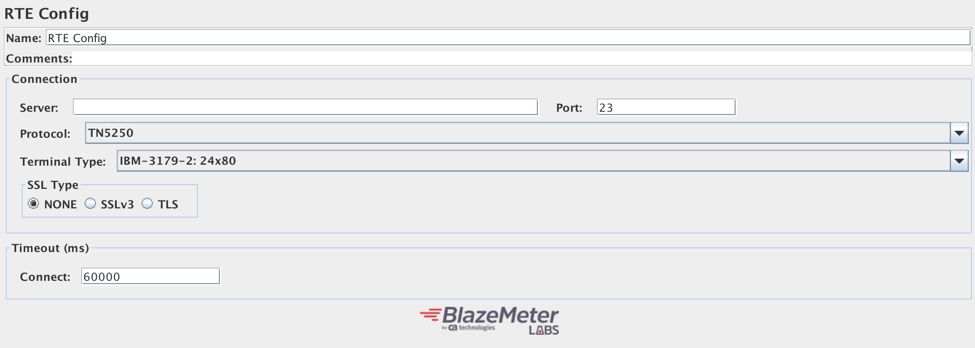
3. Fill in the following fields:
- Name: Change the name according to your preferences.
- Server: Add the URL or IP of your IBM Server.
- Port: The port number to connect to. 23 is the default.
- Protocol: Choose the protocol your server uses, either TN5250 or TN3270.
- Terminal type: The terminal you want to simulate. If your server doesn't support the terminal type you chose, a default value will be used.
- SSL Type: If your server requires a SSL protocol, choose SSLv3 or TLS. You can specify the keystore file and password in the system.properties file by adding the lines javax.net.ssl.keyStore=</keystore_path/file.keystore>, javax.net.ssl.keyStorePassword=<changeit>. You can specify the truststore file in the same system.properties file with javax.net.ssl.trustStore=</keystore_path/file.keystore>.
- Timeout: How long JMeter should wait to establish the connection, which means the time that goes by until the client receives a response screen from the server.
4. Add a RTE Sampler to the Thread Group. Thread Group -> Add -> Sampler -> RTE Sampler
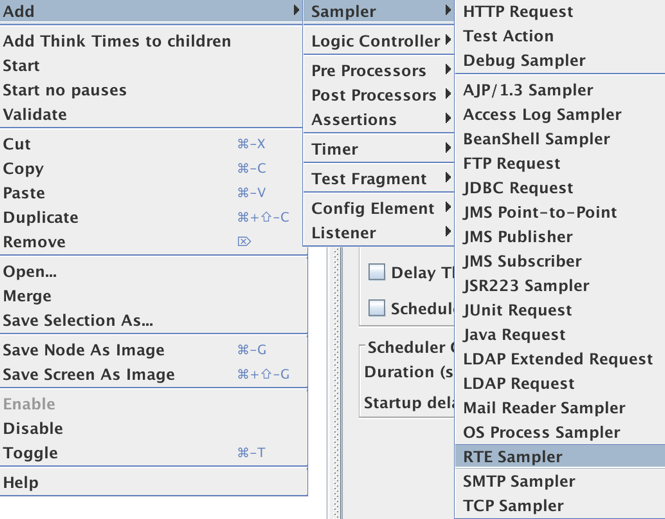
5. You should add a sampler for each action you take. So first, choose the "Connect" radio button:
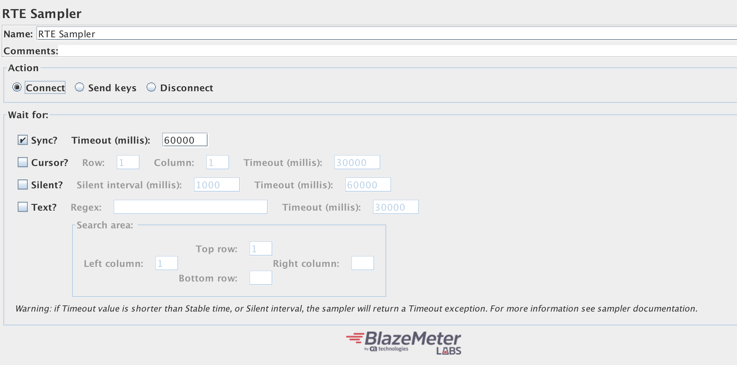
I will explain the "Wait for" options in the next step.
6. Now, add an RTE sampler and choose "Send keys":
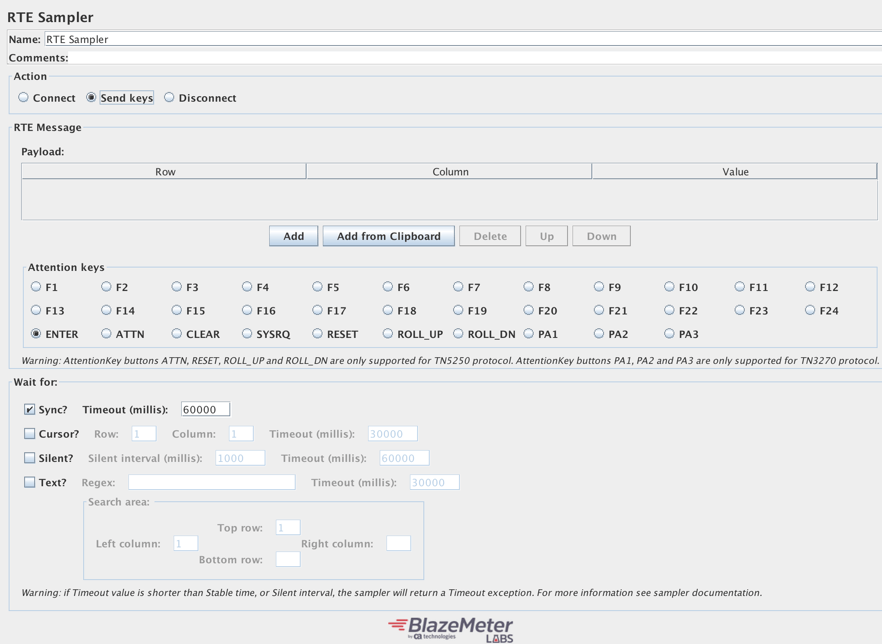
This is where it get interesting. The RTE Message section enables you to specify fields to send to the mainframe server.
7. Choose the row and column to send to, and the value you want to send. You can use variables or exact values:

8. Now, choose the Attention Keys to be sent to the server, after sending the fields.

Enter is the default choice. Please note that some keys are protocol-specific.
9. You can also configure the sampler to Wait For specific conditions. These are configured per action, and can also be configured for the connection, as mentioned before:

- Sync: How long to wait for the system to return from X SYSTEM or Input Inhibited mode. This field is checked by default, because it's good practice to always ensure the system is not in Input Inhibited mode.
- Cursor: Wait until the cursor appears in the specified row/column.
- Silent: Wait for the connection to go silent for the configured amount of time.
- Text: Wait for the specified regex to appear in the specified row/column.
By the way, if you want to get a validation for any of these waits, you should add assertions that check them as child elements for the sampler.
10. Finally, add an RTE sampler and choose the "Disconnect" radio button:

As I mentioned, you should add a sampler for each action. So your JMeter scenario might look like this:
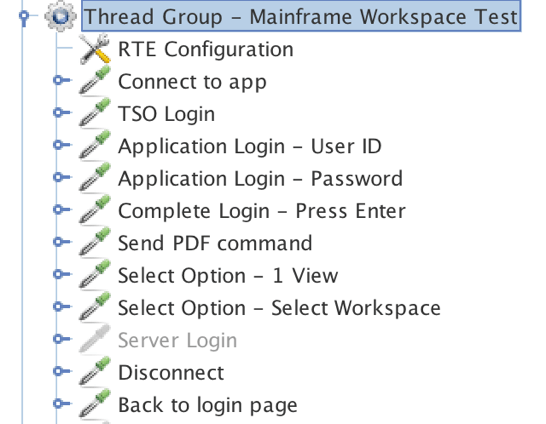
11. Now, add a View Results Tree listener and run your test. The Response Data field will let you see the exact test from the mainframe screen.
That's it! As you can see - testing the mainframe with JMeter is super easy and you can do it yourself. Now you can run your performance tests any time you need, after any change, every night or when you need. This lets you shift left and saves you time and prevents boring work. You can also integrate JMeter with Continuous Integration tools like Jenkins, TeamCity and Bamboo, for automating your entire agile testing process.
Learn more about continuous testing for the mainframe from this free webinar with Refael Botbol Weiss, Software Engineering Director at BlazeMeter.
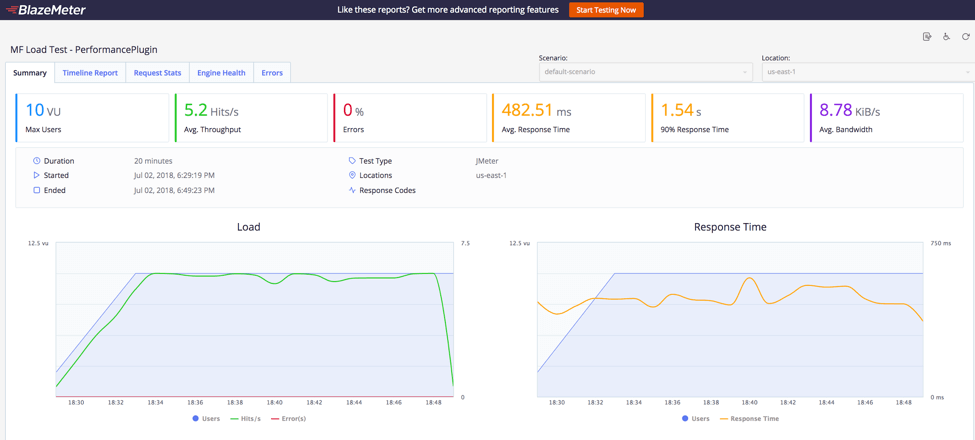
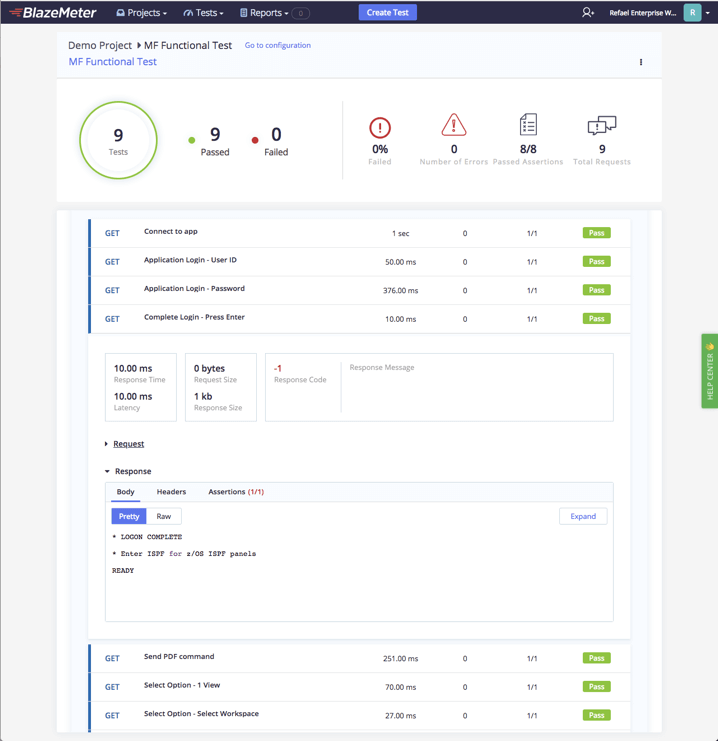
After easily creating your JMeter script, you can upload your script to BlazeMeter. BlazeMeter enables collaborating on tests and reports, lets managers manage team tasks, enables massive scaling and provides insightful reports.
Performance report:
Functional report:
Published at DZone with permission of Noga Cohen, DZone MVB. See the original article here.
Opinions expressed by DZone contributors are their own.

Comments