Interaction With Autonomous Database via Docker Container
In this article, I will show you to access the Autonomous Database service, one of the database services offered on Oracle Cloud infrastructure, through a Docker image.
Join the DZone community and get the full member experience.
Join For Free In this article, I will show you to access the Autonomous Database service, one of the database services offered on Oracle Cloud infrastructure, through a Docker image. I hope it will be a useful article in terms of awareness.
As we all follow, one of the indispensable components of the application development world is container technologies. Container technologies have long been the main factor that triggers the transformation in the world of application development with the opportunities and advantages it offers. For this reason, software developers continue to build their solutions on containers.
The sample application we will develop will connect to Oracle Cloud Infrastructure with a container image and insert a record to the Autonomous Database service from within the container.
Prerequisites
First of all, we need to install docker on our computer to develop this application.
Another thing we need for this application is to launch an Autonomous Database service in Oracle Cloud. Obtaining an Oracle Cloud account and opening this service is completely free.
Demonstration
Since I already have an Oracle Cloud account, I started the Autonomous Database service.
Since the database I created is a cloud service, I need a wallet to connect to this service. Now let's see how to download this wallet. First of all, we click on the database and go to the page with the details about the service.
Then, we clicked DB CONNECTION and press the button of Download Wallet.
Now that we have downloaded the wallet, we can establish a secure connection to the database.
Now let's create a table in the database to develop the example use-case.
DROP TABLE DOCKER_TEST;

CREATE TABLE DOCKER_TEST (
    COL_A  VARCHAR2(100),
    COL_B  VARCHAR2(100)
);
Now we can move on to creating our docker image. When the image we will create runs, it will connect to the Autonomous Database that we have created above and insert a record in the docker_test table. However, in order to perform this operation, some setups are needed in our image.
First of all, since I will do this work with the python programming language, python must be installed in the docker image. We can use the python:3.8 image in the docker hub for this. It comes with a python installation automatically in this image. On top of that, cx_oracle and sqlalchemy libraries will need to be installed in order to connect to the Oracle database from python. I write all the libraries that I want to be installed in the image into a file called requirements.txt. Then, I will write the command that will install all the libraries written in the requirements.txt in the Dockerfile into the image.

I will download and configure an Oracle Client so that the image I will create can connect to an Oracle database. Then I will put this client inside the image. For this operation, we first need to download the Oracle Client. Since the image we created is a Linux image, I downloaded the 64-bit Linux version.
Now let's configure the client we downloaded. The first thing we need to do is to open the wallet file that we downloaded from Oracle Cloud and move all the files under the "instantclient_19_5/network/admin" directory in the instant client. After doing this process, it will be to change the DIRECTORY path in the sqlnet.ora file in the "instantclient_19_5/network/admin" directory. The path we write here is the information in which directory our instantclient file will be in the image. We can write it as follows or if we are going to move it to a different place in the image, we can specify it here.
WALLET_LOCATION = (SOURCE = (METHOD = file) (METHOD_DATA = (DIRECTORY="/usr/src/app/instantclient_19_5/network/admin")))
SSL_SERVER_DN_MATCH=yes
Now that this process is finished, we can now write the python code (app.py) that will connect to the database and record the test.
import sqlalchemy as db
from sqlalchemy import (MetaData, Table, Column, Integer,Date, select, literal, and_, exists,String)
import os

os.environ['TNS_ADMIN']='/usr/src/app/instantclient_19_5/network/admin/'
engine = db.create_engine('oracle://ADMIN:dbMl19c_123!@dbml19c_high')

metadata = MetaData()

db_table = Table('docker_test', metadata,
    Column('col_a', String, primary_key=False),
    Column('col_b', String, primary_key=False)
)

upsert = db_table.insert().from_select([db_table.c.col_a,db_table.c.col_b],select([literal("TEST"),literal("TEST")]))
engine.execute(upsert)
Now that we have developed our code, let's collect all the parts in the same folder.

Now that all the preparations are completed, let's write the Dockerfile that will create our image and build our image through docker.
FROM python:3.8
RUN apt-get update
RUN apt-get install libaio1
COPY requirements.txt /usr/src/app/
RUN pip install --no-cache-dir -r /usr/src/app/requirements.txt
COPY app.py /usr/src/app/
COPY instantclient_19_5 /usr/src/app/instantclient_19_5
ENV LD_LIBRARY_PATH=/usr/src/app/instantclient_19_5:$LD_LIBRARY_PATH
CMD ["python", "/usr/src/app/app.py"]
Dockerfile created. Now let's build the image.
docker image build -t docker_oci .
Let's check if the image we created is in the docker registry.
docker image ls
Now our image is ready. Now, let's run the image on a container and check if the record goes to the database.
docker container run docker_oci
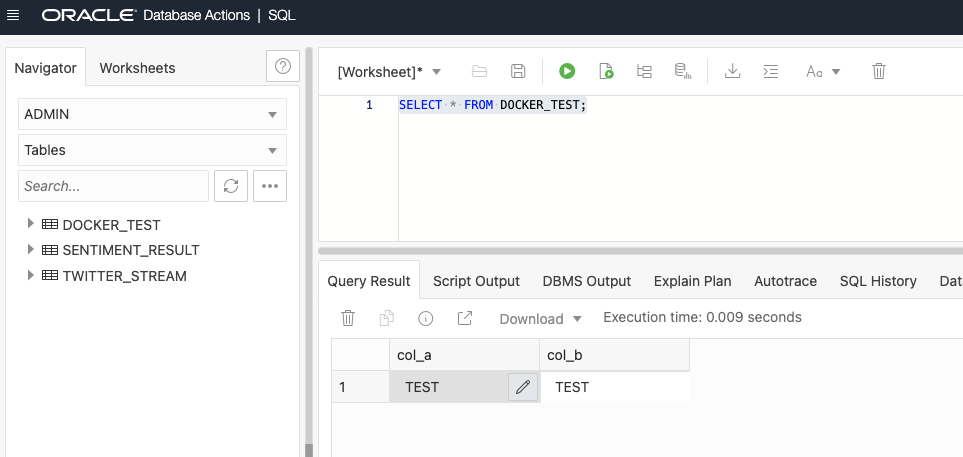
As you can see, the container worked and triggered the python code we wrote and stopped. Now let's connect to the database and look at the status of the record.
SELECT * FROM DOCKER_TEST;
Conclusion
Our application running on the container was able to connect to our database service on the cloud and write the test record to the table we created.
We can keep this image we have developed in our container registry and use this image automatically whenever we need an Autonomous Database connection on OCI.
Opinions expressed by DZone contributors are their own.

Comments