Integrating FitNesse with Selenium
This tutorial demonstrates how to integrate testing validation tool FitNesse with Selenium to define testing criteria and display pass/fail results.
Join the DZone community and get the full member experience.
Join For FreeIn this article, we will understand how to integrate Selenium, an open-source functional automation tool with FitNesse with a simple example.
Scenario Outline
Harry is working in Selenium on the Demowebshop application. This is a demo application given by Tricentis for public usage. Let's assume Harry wants to test the login screen of this application with three sets of data as given below:
Username |
Password |
Result |
remi.jullian@accenture.com |
test@1234 |
Valid User |
peter.john@accenture.com |
Selenium |
Invalid User |
test@1234 |
Valid User |
Let's help Harry use FitNesse and create a neat acceptance test framework defining the given sets of data, and link it with Selenium code to show whether the username/password combination has passed or failed.
Sample Acceptance Criteria - During Test Plan Stage:

Sample Acceptance Criteria - After Test Execution Stage:

Solution Steps
FitNesse is an open-source acceptance testing framework that is used to define understandable acceptance criteria. These test cases are validated against the actual test scripts created using conventional tools like Selenium or Protractor.
Validating acceptance tests generally takes place at the end-user site. These tests are black box in nature. We will not worry about the internal functionalities, but instead we will ensure that for valid inputs, we are getting the expected outcome. Similarly, for invalid inputs we are getting the invalid output.
Selenium is a open-source test automation framework used to automate browsers. It supports testing in various operating systems and browsers. Selenium is used for mobile testing also.
How to Configure FitNesse in Windows
To set up FitNesse, the prerequisites are:
1. Fitness jar (It can be downloaded from the official website of FitNesse.)
2. Java 8 and above
3. Eclipse IDE
Step 1: Download the FitNesse jar.
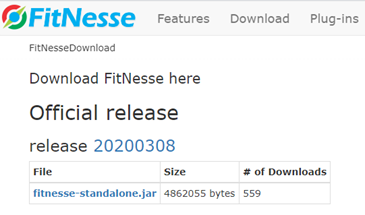
Step 2: In the command prompt, type java -jar fitnesse-standalone.jar -p 8080. This will setup FitNesse in port - 8080. Wait for the success message from FitNesse.
Step 3: Open any browser and type http://localhost:8080. This will launch FitNesse Server. We call this the "FitNesse Wiki."
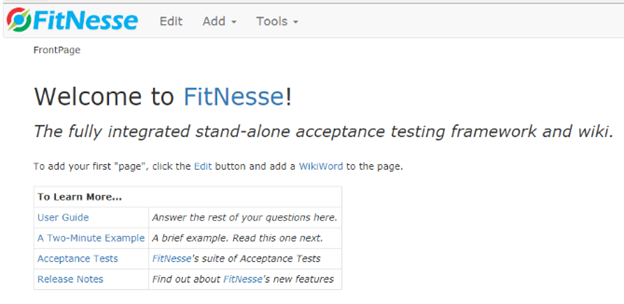
How to Create a Test Case in FitNesse
In FitNesse, we must use the CamelCase convention to name a page.
Step 1: Go to FitNesse Wiki home page and click “Edit.”
Step 2: Delete the default contents and add a text “LoginTestDemo” and click Save. This will create an empty test page.
Step 3: We will now add a test case “LoginTest” in the “LoginTestDemo” page. To do this, go to “LoginTestDemo” page -> Add -> TestPage and give the name “LoginTest” and save it.
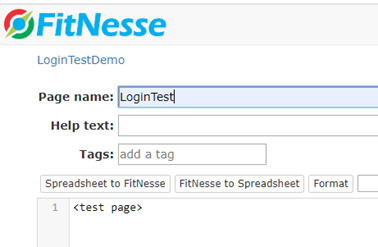
Step 4: This will create a LoginTest case as a link. Click the link to add logic to our Login test case.
Step 5: In FitNesse, test cases are written in the “Datatable” format using the “|” symbol. A sample test combination is given below:

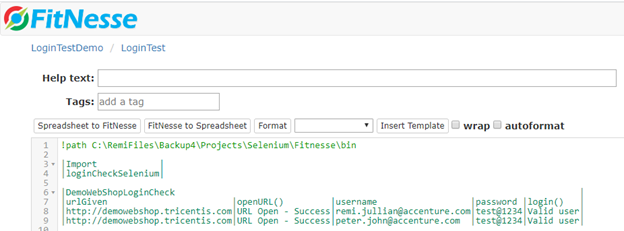
DemoWebShopLoginCheck is the name of the test, urlGiven, username , and password are parameters, and openURL()and login() are functions.
I'm creating a test case logic so that when I give the url http://demowebshop.tricentis.com with username remi.jullian@accenture.com and password test@1234. The openURL function will return “Success” if the URL opens successfully and the login function will return “Valid user” testing the credentials given against the web application.
This data are tested again in the application using conventional tools like Selenium and the result is captured and displayed in FitNesse.
We can create multiple test scenarios to test valid and invalid credentials by adding more rows in the test case page.
Please refer to one sample test combination added for an invalid user.

Step 6: Once we save the test, the LoginTest case page will look like:

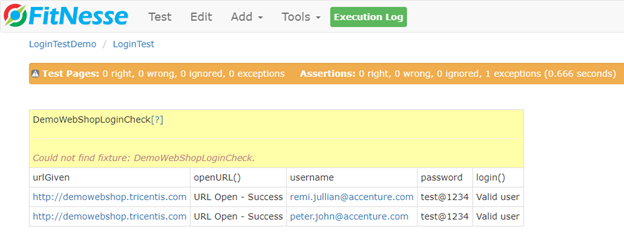
Step 7: We have created the test page, and to test it we must click the “Test” link in the main menu of FitNesse Wiki.
Step 8: If we click “Test,” FitNesse will execute the page and we will now get a result saying “Could not find fixture: DemoWebShopLoginCheck” as below:
What is a Fixture?
The actual code available to test the login logic created in our FitNesse Wiki is called "Fixture Code." In other words, Fixture is the final code or the application to test. We will use the FitNesse wiki page to test the fixture created by the development team.
Step 1: In our case study, we are going to write the fixture code in Java. For this, we are going to use Eclipse IDE.
Step 2: Create a Java project “FitNesse” and create a package inside called “demoWebshopLogin." Create a class file named “DemoWebShopLoginCheck.” This class file is our fixture code.
Step 3: Import Selenium jars and the FitNesse jar to our Java project

Step 4: The sample application “Demo Web Shop” which we are going to test with the data provided in FitNesse Wiki using Selenium is as below:
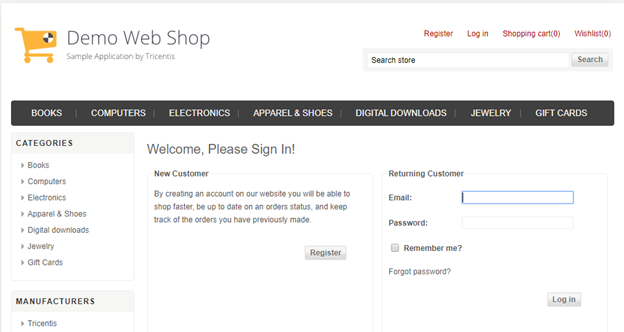
Note: This is a demo application from http://www.demowebshop.tricentis.com. You can use this application for practicing demos.
Step 5: Create the fixture code in Selenium to interact with the application testing both valid and invalid data and extend the fixture code to ColumnFixture built-in class of FitNesse library.
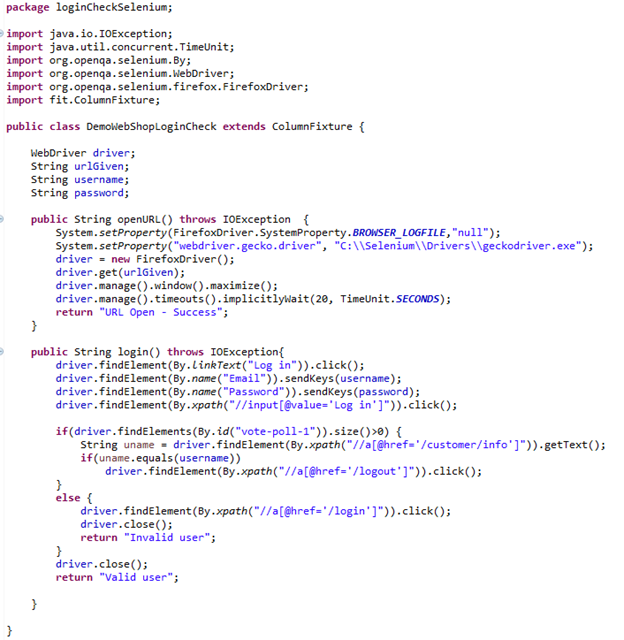
Step 6: Edit the FitNesse wiki code, mentioning the path of the fixture code class file and the package name loginCheckSelenium using the Import keyword as below:
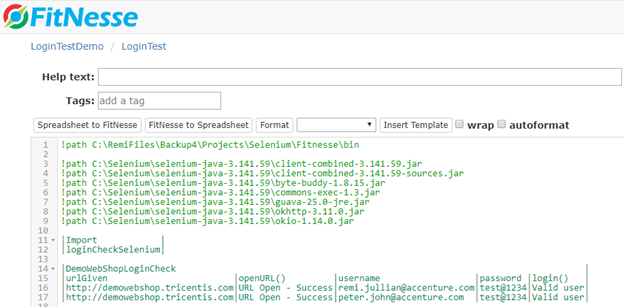
Step 7: Refer all the Selenium jar files used in fixture code in the wiki page:
Step 8: Run the test. FitNesse will look for the fixture code and execute it through Selenium. Selenium will return the results back to the FitNesse page.
Step 9: Outcome page defining the acceptance criteria will look like:

Conclusion
We have linked FitNesse successfully with Selenium and executed our tests and got the status back from Selenium and displayed in the FitNesse wiki. FitNesse helps to define the acceptance criteria, link it with a traditional test automation tool like Selenium, and get the results back as show whether the criteria passed or failed. This tool helps the customers/end-users to understand the acceptance criteria correctly and see finally how many defined criteria passed and failed.
Opinions expressed by DZone contributors are their own.

Comments