Improving Alerts With Reverse AJAX (Part 2)
Implementing Reverse AJAX can keep users updated with the latest data without adding an unnecessary load to the server.
Join the DZone community and get the full member experience.
Join For FreeThe Story Continues...
Max closes his eyes, enjoying two melancholic songs in a row from his radio. He hopes the next song will be his favorite one. While listening to the end of the second song, he quickly takes off his headset and grabs the mouse on his laptop. He opens some documents from his repository and also starts to browse articles on the Internet.
He just realized that the song being broadcasted without a request from a listener is slightly similar to his problem right now. With his situation, patients do not need to send a request for their schedule at the hospital. They can just wait until there is an update on the server, then the system will notify them. There doesn't need to be any unnecessary processes in the backend. The system will proceed with the operation only when it needs to. In this case, we can retrieve the current examination information and provide a prediction for the next one.
The Theoretical Basis
Basically, the web browser and web server interaction is started by a request from web browser. The web server will then respond to that request with the associated information. In order to get the updated information, the web browser must frequently send a request to the web server — because this interaction is not designed to make a reverse call. The web server is not allowed to call the web browser.
Polling
Polling is the simplest solution to get the updated information. It makes a frequent request in a certain time period. For example, every minute, the system can check if there any update on the server. But as a consequence, it might lead to unnecessary work.
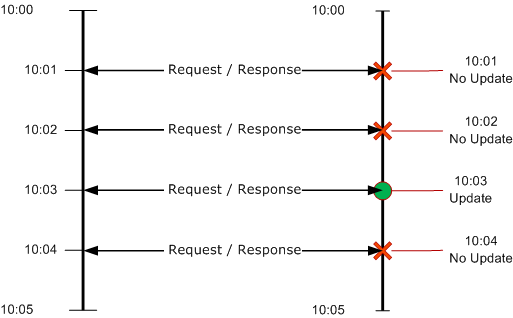
Extending the frequency interval can reduce the unnecessary process, but it increases a possibility that user missed the update. Therefore, this option will not be chosen as the solution.
Reverse AJAX
Reverse AJAX is another direct approach to keep the connection open between the web browser and web server. So, it will allow the web server to push information to the web browser. By using this approach, a developer can bypass the web design limitation.
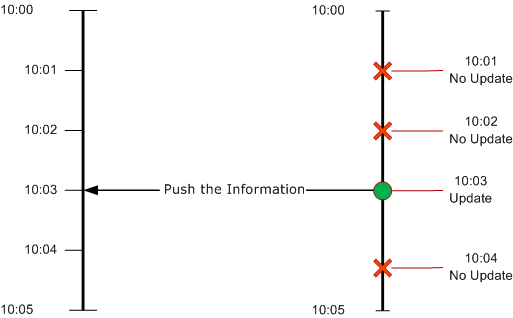
The web browser does not need to send requests anymore to get the updated information. The server will handle it.
The Proof of Concept
After a quick observation, Max chooses an open source library, Direct Web Remoting (DWR). DWR is an open source Java library that enables interaction between Java on the web server and JavaScript in a web browser. This library allows two-way communication, so both sides can call each other.
1. DWR Installation
As the first step, he creates a new Dynamic Web Project by using Eclipse IDE. He then installs a DWR and commons-logging JAR files. These two files must be placed into the WEB-INF/lib directory of this project, because DWR depends on commons-logging.
2. DWR Servlet Definition
The first time project is created, Eclipse will automatically create a web.xml file, the web application’s deployment descriptor. This file is located in WEB-INF/web.xml. DWR-related definitions must be added to this file.
<servlet>
<display-name>Examination Queue</display-name>
<servlet-name>dwr-invoker</servlet-name>
<servlet-class>org.directwebremoting.servlet.DwrServlet</servlet-class>
<init-param>
<param-name>activeReverseAjaxEnabled</param-name>
<param-value>true</param-value>
</init-param>
<init-param>
<param-name>debug</param-name>
<param-value>true</param-value>
</init-param>
<load-on-startup>1</load-on-startup>
</servlet>

<servlet-mapping>
<servlet-name>dwr-invoker</servlet-name>
<url-pattern>/dwr/*</url-pattern>
</servlet-mapping>
It defines that the Active Reverse AJAX is enabled — and the debug/test page is also enabled. This definition will be prioritized and loaded at project deployment time or during server start. To invoke the DWR service, users should add “/dwr” to the URL path. It will redirect the user request to the list of DWR modules.
3. DWR Configuration
This configuration must be placed in the same folder as the web.xml file. It defines which Java classes will be use in the interaction with JavaScript. In this example, only one class which is used. It has two methods registered to DWR that can be called by JavaScript.
Referring to the code below, JavaScript can refer to the ExamQueueService to call the Java class methods.
<dwr>
<allow>
<create creator="new" javascript="ExamQueueService">
<param name="class" value="com.his.examination.services.ExamQueueService"/>
<include method="initExamination"/>
<include method="nextExamination"/>
</create>
<convert converter="bean" match="com.his.examination.services.*"/>
</allow>
</dwr>
4. Java Class
To support this POC, Max creates a simple Java class. This class will simulate the server process. Right now, this class only has two main methods:
initExamination (String serviceCode)
The initial method, which will be executed the first time web page is loaded. It will return the first examination information for a specific service.
nextExamination (String serviceCode, int seq)
This method simulates the examination process for a certain service. Users can pass the service code and the sequence number, and it mimics the actual process. Once this method is executed, it will return the specific examination information based on those parameters. It will then push the information by calling the JavaScript function, named: updateExamQueue.
For testing purposes, the mock-up data will be prepared in the class constructor. It contains a list of JSON messages that hold the examination queue-related information.
public class ExamQueueService extends HttpServlet implements Servlet {

    private static final long serialVersionUID = 1L;
    Map<String, List<String>> mockServices = new HashMap<String, List<String>>();

    public ExamQueueService() {
        List<String> gp = new ArrayList<String>();
        gp.add("{ \"serviceCode\": \"SV01\", \"serviceName\": \"General Practitioner\", \"serviceStart\": \"12:00\", \"currentNo\": 1, \"timeAvg\": 20 }");
        gp.add("{ \"serviceCode\": \"SV01\", \"serviceName\": \"General Practitioner\", \"serviceStart\": \"12:20\", \"currentNo\": 2, \"timeAvg\": 20 }");
        mockServices.put("SV01", gp);

        List<String> car = new ArrayList<String>();
        car.add("{ \"serviceCode\": \"SV02\", \"serviceName\": \"General Surgery\", \"serviceStart\": \"10:00\", \"currentNo\": 1, \"timeAvg\": 30 }");
        car.add("{ \"serviceCode\": \"SV02\", \"serviceName\": \"General Surgery\", \"serviceStart\": \"10:30\", \"currentNo\": 2, \"timeAvg\": 30 }");
        mockServices.put("SV02", car);
    }

    public void initExamination(String serviceCode) {
        nextExamination(serviceCode, 0);
    }

    public void nextExamination(String serviceCode, int seq) {
        List<String> examSeq = mockServices.get(serviceCode);

        Browser.withAllSessions(new Runnable() {
            public void run() {
                ScriptSessions.addFunctionCall("updateExamQueue",
                examSeq.get(seq));
            }
        });
    }
}
5. HTML Page and JavaScript Code
Max knows that the POC will be more intuitive if he can display it in a user-friendly appearance. Therefore, he creates a simple HTML page to show the examination queue simulation. This page will display the current examination information and allow users/patients to predict the next turn.
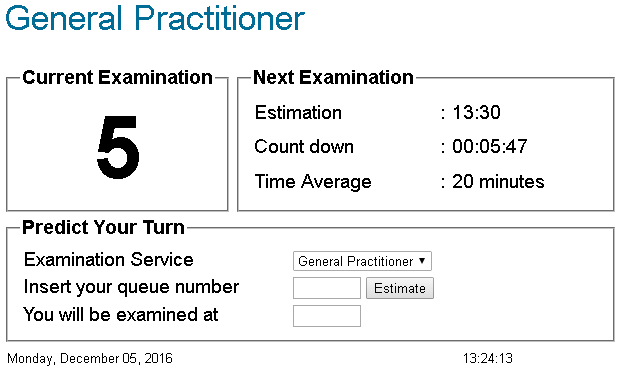
This UI appearance can be achieved with the following HTML code:
<!DOCTYPE html>
<html>
<head>
<meta charset="ISO-8859-1">
<title>Examination Queue</title>
</head>
<body onload="onload()">
<table>
<tr><td colspan="2"><h1 id="serviceName">General Practitioner</h1></td></tr>
<tr>
<td><fieldset><legend>Current Examination</legend><span id="currentNo" class="currentNo">5</span></fieldset></td>
<td>
<fieldset><legend>Next Examination</legend>
<table class="nextExam">
<tr><td>Estimation</td><td>:</td><td><span id="estimation">13:30</span></td></tr>
<tr><td>Count down</td><td>:</td><td><span id="counter">00:05:47</span></td></tr>
<tr><td>Time Average</td><td>:</td><td><span id="timeAvg">20 minutes</span></td></tr>
</table>
</fieldset>
</td>
</tr>
<tr>
<td colspan="2">
<fieldset><legend>Predict Your Turn</legend>
<table class="prediction">
<tr><td>Examination Service</td><td><select onchange="refreshExamQueue(this.value)" id="service"><option value="SV01">General Practitioner</option><option value="SV02">General Surgery</option></select></td></tr>
<tr><td>Insert your queue number</td><td><input type="text" size="5" maxlength="5" id="queue" /><input type="button" value="Estimate" onclick="predictExamQueue()" /></td></tr>
<tr><td>You will be examined at</td><td><input type="text" size="5" readonly="readonly" id="prediction" /></td></tr>
</table>
</fieldset>
</td>
</tr>
<tr>
<td colspan="2">
<table class="footerDate">
<tr><td><span id="todayDate">Monday, December 05, 2016</span></td><td><span id="todayTime">13:24:13</span></td></tr>
</table>
</td>
</tr>
</table>
</body>
</html>
The next important step is defining a request for an Active Reverse AJAX on this web page. The definition will be put in the beginning of the page when it is loaded (1). Then, it can be continued by getting the initial examination information from the server through a DWR call (2) and show the current date and time (3).
function onload() {
    dwr.engine.setActiveReverseAjax(true);//1

    refreshExamQueue("SV01");//2
    showCurrentDate();//3
}
The JavaScript code can call the Java class by using the creator, ExamQueueService, as defined in the DWR configuration. To connect to the Java class by using this creator, the following scripts must be included in the JavaScript code.
<script type='text/javascript' src='/examqueue/dwr/util.js'></script>
<script type='text/javascript' src='/examqueue/dwr/engine.js'></script>
<script type='text/javascript'
src='/examqueue/dwr/interface/ExamQueueService.js'></script>
Based on the code below, the system will validate the cookie to refrain from a double submission to the server (4). If it is the first attempt, then the creator can execute the registered method from JavaScript (5). If data has already been retrieved, then it will be just displayed (6).
function refreshExamQueue(serviceCode) {
    if (validateCookie(serviceCode)) {//4
        ExamQueueService.initExamination(serviceCode); //5
    } else {
        showExamQueue();//6
    }
}
Back to the Java class description above, ExamQueueService.initExamination(serviceCode), it will return the first piece of exam information for a specific service. In this example, it is the first examination of the general practitioner. Eventually, it will push the information back to JavaScript by calling the updateExamQueue function.
This function will then parse the data, become a JSON object, and store it to the cookie. Before the HTML page is updated with the new information, this function will validate whether it is addressed to the same exam. The page will be updated if it contains the information for the same service currently being accessed by the user.
function updateExamQueue(data) {
    var jsonData = JSON.parse(data);
    document.cookie = jsonData.serviceCode + "=; expires=Thu, 01 Jan 1970 00:00:00 UTC";
    document.cookie = jsonData.serviceCode + "=" + data + ";path=/";
    queueData[jsonData.serviceCode] = jsonData;

    if (jsonData.serviceCode == dwr.util.getValue("service")) {
        showExamQueue();
    }
}
If the information is for the same examination, then it will be simply be populated to the available fields.
function showExamQueue() {
    var jsonData = queueData[dwr.util.getValue("service")];
    var today = getDateString(null);
    var serviceStart = jsonData.serviceStart;

    startDate = new Date(today + " " + serviceStart);
    estimationDate = new Date(startDate.getTime()
    + (jsonData.timeAvg * 60 * 1000));
    dwr.util.setValue("estimation", getTimeString(estimationDate));
    dwr.util.setValue("serviceName", jsonData.serviceName);
    dwr.util.setValue("currentNo", jsonData.currentNo);
    dwr.util.setValue("timeAvg", jsonData.timeAvg + " minutes");
    dwr.util.setValue("queue", "");
    dwr.util.setValue("prediction", "");
}
By default, the first time the page is accessed, it will display information for the general practitioner. In order to retrieve other services, users can update it by selecting the Examination Service dropdown menu. Once the new service is selected, it will trigger a call to the function refreshExamQueue. The process is slightly similar to the first time the page is loaded, but now it is specific to the selected Examination Service.
When it already displays the expected examination service, patients can predict their turn. Insert the queue number and then press the Estimate button. A simple calculation will suggest the prediction.
function predictExamQueue() {
    var jsonData = queueData[dwr.util.getValue("service")];
    var currentNo = jsonData.currentNo;
    var timeAvg = jsonData.timeAvg * 60 * 1000;
    var userQueue = dwr.util.getValue("queue");
    var prediction = startDate.getTime();
    var delta = Number(userQueue) - currentNo;

    if (delta > 0) {
        prediction += delta * timeAvg;
    }

    dwr.util.setValue("prediction", getTimeString(new Date(prediction)));
}
6. Reverse AJAX Testing
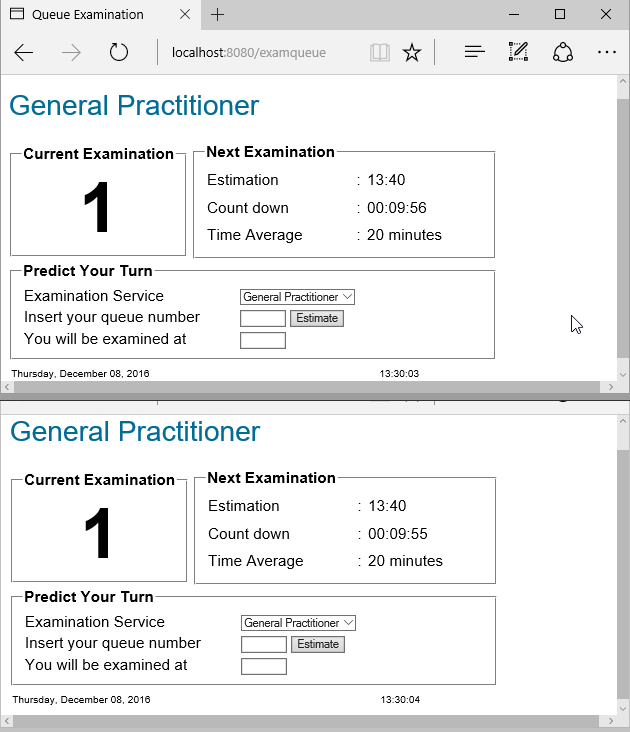
This is the final step of this POC. Adding in a Tomcat server, Max starts the project. He opens two different browsers to simulate the request from different clients. Initially, both of them display information for the general practitioner.
To test the Reverse AJAX, he then opens the DWR invoker page through another browser: http://server/project/dwr. It displays the list module, which is registered in the DWR configuration. For this purpose, he chooses ExamQueueService, and it is redirected to a new page.
The new page displays a list of methods for the ExamQueueService. Through this page, he can invoke the preferred method to simulate the server process. As mentioned above, he must invoke the nextExamination method. The required parameter for the first tests are: SV01 and 1. Update the next examination of General Practitioner, sequence number 1.
Simultaneously, all browsers are updated with the new examination information:
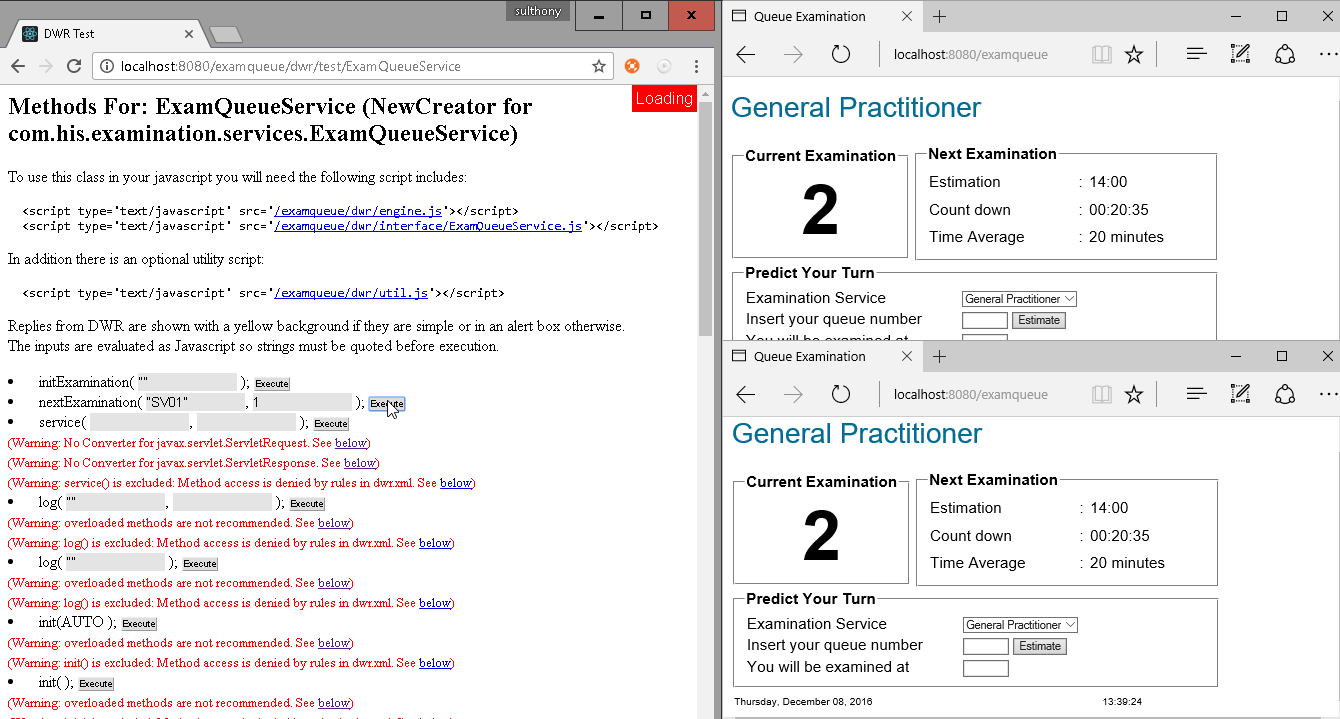
For the second test, he then changes one of the browsers to access another service. So currently, each browser access different exams: general practitioner and general surgery. He re-invokes the nextExamination method to simulate the process of the general practitioner for the next sequence. Different from the previous result, now only one browser displays the same service, which has been updated. He repeats the test with different combinations and is satisfied with the result — only the associated service will be updated.
Based on this result, he decides to end the testing and starts preparing the report to his boss.
The Result
Now Max's boss is happy with his achievement and promises to bring this proposal to the next panel meeting. However, he reminds Max to prepare another approach. The fact is that the current company budget probably doesn't have room to purchase a new PC and big screen TV/monitors.
To encourage him, his boss has promised to reimburse his expenses and give an additional bonus if Max can propose this solution without the need of a PC and the monitor. As Max thinks about it, it looks like his boss wants him to pack this solution inside the NodeMCU/Arduino microcontroller board.
Is that possible? What do you think, Max?
Opinions expressed by DZone contributors are their own.

Comments