Implementing MuleSoft as an OAuth Provider for Securing a Mule Application
Join the DZone community and get the full member experience.
Join For FreeIntroduction
The OAuth2 Provider module allows a Mule runtime engine (Mule) app to be configured as an Authentication Manager in an OAuth2 dance. With this role, the application will be able to authenticate previously registered clients, grant tokens, validate tokens, or register and delete clients, all during the execution of a flow.
MuleSoft supports various third-party OAuth 2.0 providers, as listed below:
- Okta.
- OpenID Connect.
- Open AM.
- PingFederate.
MuleSoft can be also used as an OAuth provider for securing the applications. In this article, we will see how we can implement OAuth using a MuleSoft OAuth provider for securing an application's APIs.
Setting Up OAuth2 Provider Module in AnyPoint Studio
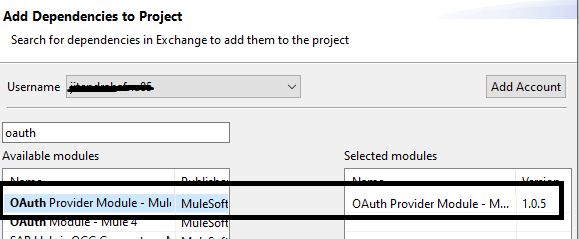
By default, you will not find the OAuth2 provider module in AnyPoint Studio. You need to search in exchange and install it in AnyPoint Studio. This OAuth2 provider module is used to create clients, generate tokens, validate, delete or revoke tokens.

Setting Up Object Store in AnyPoint Studio
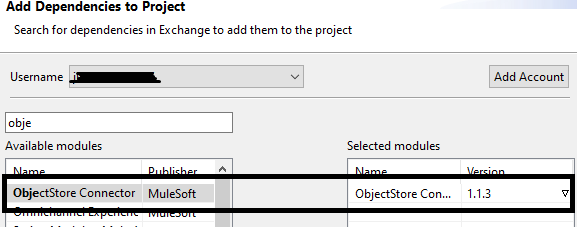
You will be requiring the persistent Object Store for storing the clients and tokens. So, we need to install Object Store Connector in AnyPoint Studio from exchange.
Creating a Project in AnyPoint Studio and Implementing MuleSoft as an OAuth Provider
Create a MuleSoft application in AnyPoint Studio (i.e. mule-oauth-provider).
Create two persistent Object Stores in Global Configuration, one for storing clients and the other for storing tokens (i.e. token_os and client_os).
Create an OAuth2 Provider configuration in Global Configuration.
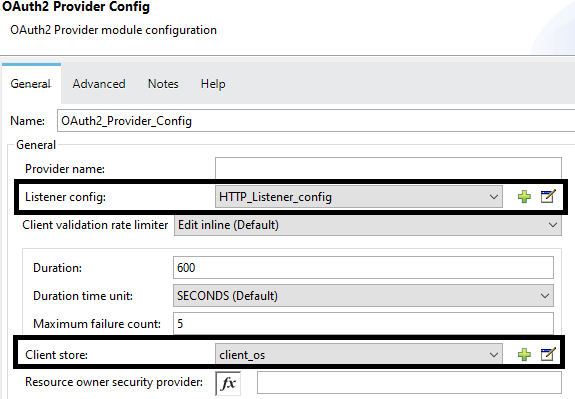
- Configure Listener config and keep everything default.
- Set Client store to Object Store (i.e. client_os) for storing clients.
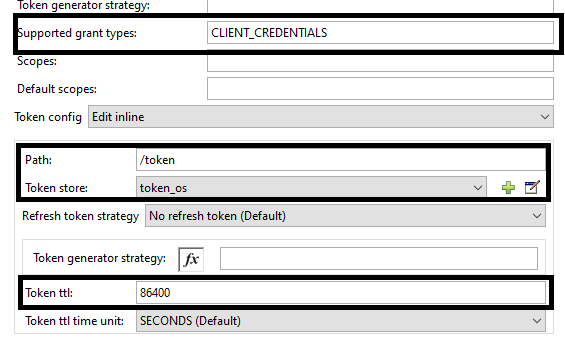
- Set Supported grant types to CLIENT_CREDENTIALS.
- Set Token path to /token. This will be used to generate a bearer token.
- Set Token store to Object Store (i.e. token_os) for storing tokens.
- Set Token ttl to 86400 (i.e. this is expiry time for token).
Implementing OAuth2 Provider Create Client Flow
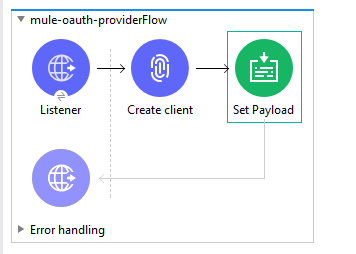
Drag and drop HTTP listener into Mule flow. Use the same HTTP listener config that we created above. The path must be /createClient.

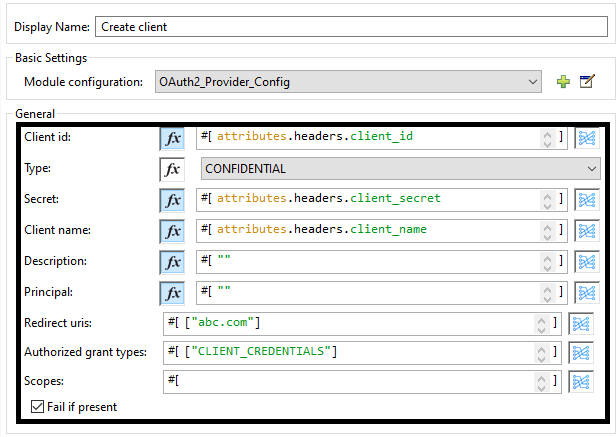
Drag and drop the OAuth2 Provide Create client component in the message processor and configure it. This will be used to generate our client_id and client_secret.
We will be sending client_id and client_secret in the header, so the client component will read client_id and client_secret from the header in a request.
Configure the Create client component as shown below in the screenshot.
Finally, place the set payload at the end of flow in the message processor and set the value "Client Created".
Implementing OAuth2 Provider Validate Client Flow
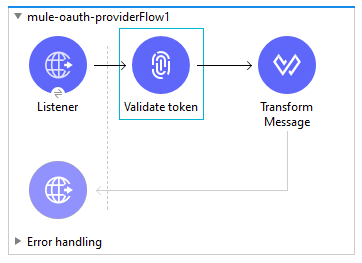
Drag and drop the HTTP listener into the Mule flow. Use the same HTTP listener config that we have created above. The path must be /validate.

Drag and drop the OAuth2 Provide Validate client component in the message processor and configure it. This will be used to validate a token.
Configure Validate client as shown in the following screenshot:

Finally, place the Transform message component at the end of the flow in the message processor to transform the payload into a JSON message.
Now, we have three endpoints, as shown below:
| Endpoint | Description |
| /createClient | This endpoint will be used to create client_id and client_secret. |
| /token | This endpoint will be used to generate the bearer token. |
| /validate | This endpoint will be used to validate the bearer token. |
Code
<mule xmlns:sftp="http://www.mulesoft.org/schema/mule/sftp" xmlns:ee="http://www.mulesoft.org/schema/mule/ee/core"
xmlns:oauth2-provider="http://www.mulesoft.org/schema/mule/oauth2-provider"
xmlns:http="http://www.mulesoft.org/schema/mule/http" xmlns:os="http://www.mulesoft.org/schema/mule/os" xmlns="http://www.mulesoft.org/schema/mule/core" xmlns:doc="http://www.mulesoft.org/schema/mule/documentation" xmlns:xsi="http://www.w3.org/2001/XMLSchema-instance" xsi:schemaLocation="http://www.mulesoft.org/schema/mule/core http://www.mulesoft.org/schema/mule/core/current/mule.xsd
http://www.mulesoft.org/schema/mule/os http://www.mulesoft.org/schema/mule/os/current/mule-os.xsd
http://www.mulesoft.org/schema/mule/http http://www.mulesoft.org/schema/mule/http/current/mule-http.xsd
http://www.mulesoft.org/schema/mule/oauth2-provider http://www.mulesoft.org/schema/mule/oauth2-provider/current/mule-oauth2-provider.xsd
http://www.mulesoft.org/schema/mule/ee/core http://www.mulesoft.org/schema/mule/ee/core/current/mule-ee.xsd
http://www.mulesoft.org/schema/mule/sftp http://www.mulesoft.org/schema/mule/sftp/current/mule-sftp.xsd">
<os:object-store name="client_os" doc:name="Object store" doc:id="25ba20fa-2c77-4f23-b771-576bebe34ace" ></os:object>
<os:object-store name="token_os" doc:name="Object store" doc:id="1fdbceb1-1aa9-425c-be8f-3b7801215131" ></os:object>
<http:listener-config name="HTTP_Listener_config" doc:name="HTTP Listener config" doc:id="977752c7-ead6-4b98-984d-bca9a74209b0" >
<http:listener-connection host="0.0.0.0" port="8081" ></http:listener>
</http:listener-config>
<oauth2-provider:config name="OAuth2_Provider_Config" doc:name="OAuth2 Provider Config" doc:id="7f95caec-2f0d-4d85-b574-75cb537b6de1" listenerConfig="HTTP_Listener_config" clientStore="client_os" supportedGrantTypes="CLIENT_CREDENTIALS" >
<oauth2-provider:token-config tokenStore="token_os" ></oauth2>
</oauth2-provider:config>
<flow name="mule-oauth-providerFlow" doc:id="0c63b1ef-940b-4bff-b19e-b9a37e7bf800" >
<http:listener doc:name="Listener" doc:id="a3ce980f-65e1-41a6-8b7a-4cf6625102a0" config-ref="HTTP_Listener_config" path="/createClient"></http:listener>
<oauth2-provider:create-client doc:name="Create client" doc:id="7b06f2ce-cb7a-4b8c-bc6a-f0e5896a1b26" config-ref="OAuth2_Provider_Config" clientId="#[attributes.headers.client_id]" type="CONFIDENTIAL" secret="#[attributes.headers.client_secret]" clientName="#[attributes.headers.client_name]" description='#[""]' principal='#[""]' redirectUris='#[["abc.com"]]' authorizedGrantTypes='#[["CLIENT_CREDENTIALS"]]' failIfPresent="true"></oauth2>
<set-payload value='#["Client Created"]' doc:name="Set Payload" doc:id="e6bed6e3-a147-4f13-b149-a96d904ca983" ></set>
</flow>
<flow name="mule-oauth-providerFlow1" doc:id="bc93aa72-741f-47c2-9ff7-91daa137c8cd" >
<http:listener doc:name="Listener" doc:id="eb9b62ae-1a37-489e-9eaf-df95e054b708" config-ref="HTTP_Listener_config" path="/validate"></http:listener>
<oauth2-provider:validate-token doc:name="Validate token" doc:id="645d9c42-c475-4727-b884-94ecfc95ccd9" config-ref="OAuth2_Provider_Config"></oauth2>
<ee:transform doc:name="Transform Message" doc:id="3ef979ad-899f-49e3-bc5c-7f923e090636" >
<ee:message >
<ee:set-payload ><![CDATA[%dw 2.0
output application/json
---
payload]]></ee:set-payload>
</ee:message>
</ee:transform>
</flow>
</mule>
Deploying the Application To CloudHub
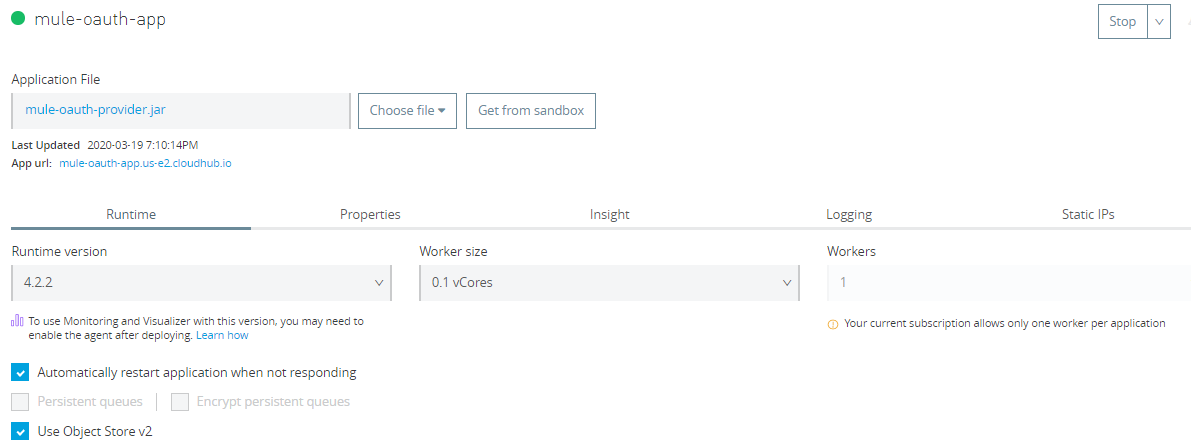
Once you have completed development, you can deploy the application to CloudHub. Generate a Jar file and deploy the application to the CloudHub Runtime Manager.
Testing the Application Using Postman
Step 1: First, we need to generate a client_id and client_secret. We will be using the /createClient endpoint.

We will be calling the CloudHub URL and will pass the client_id, client_secret, and client_name as the header in our request. Once we post the request, it will create the client_id and client_secret and store them in the client object store.
Generally, we use this endpoint whenever there is a need for generating a new client_id and client_secret.
Step 2: Once we have the generated client_id and client_secret, we can generate a bearer token using the /token endpoint. Pass the client_id and client_secret as the header, which has been generated in Step 1.
One more Header needs to pass, and that is the grant_type.
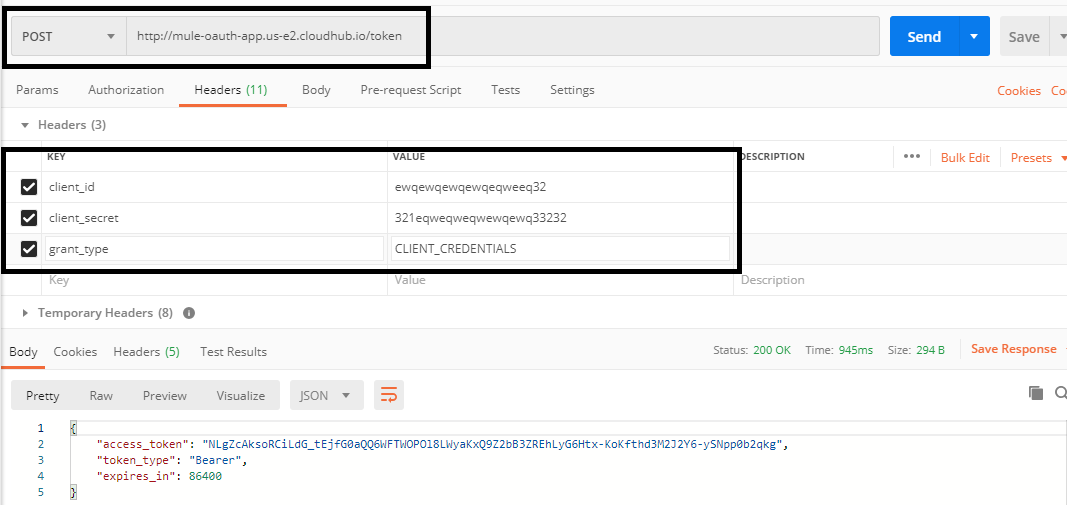
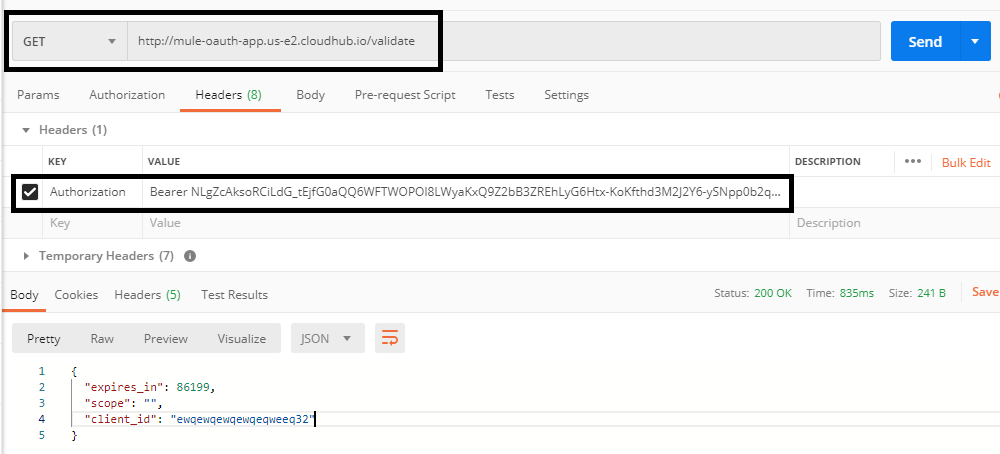
Step 3: Once we get a bearer token, it can be validated using the /validate endpoint. This token needs to be passed as the Authorization header.
Applying the Policies OAuth 2.0 Access Token Enforcement Using the Mule OAuth Provider
You have some application deployed to a Runtime Manager and an API has been created in API Manager, but no authorization has been set up. So, you can apply "OAuth 2.0 access token enforcement using Mule OAuth provider" policy, as shown in the screenshot below in API Manager.
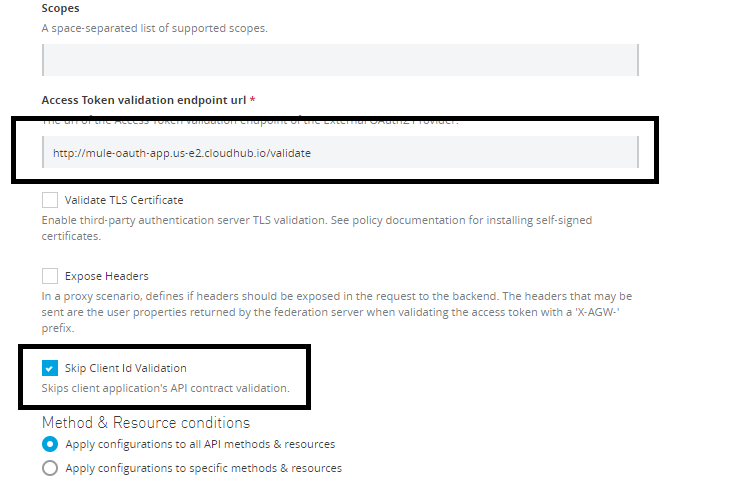
You need to provide a /validate URL to your OAuth CloudHub application. This will apply policies on your application. You need to pass the bearer token with your request in the Authorization header for the request to get authorized.
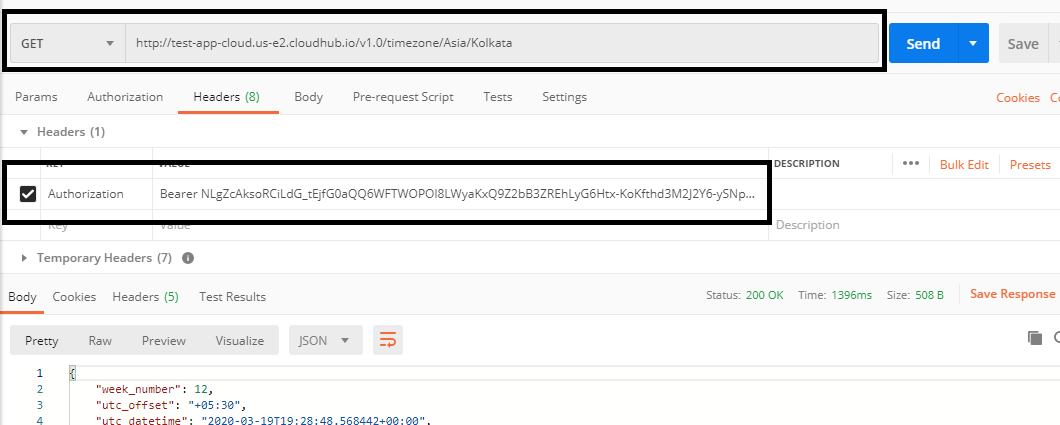
This is how you can use MuleSoft as an OAuth provider for securing Mule Applications.
Opinions expressed by DZone contributors are their own.

Comments