Implementing Low-Code Data Mapping in Java
AtlasMap is a tool supporting a wide range of transformation functions, providing options to generate code for seamless integration into your applications.
Join the DZone community and get the full member experience.
Join For FreeData mapping is an integral part of integration, plugins, and connectors development projects. Developers spend days researching the data/filed mapping followed by converting those mappings to technical requirements and writing code for them.
Many times, code is repeated and homogeneous. One way to optimize it is to create a utility and library that is reused across the implementation. But the challenge is each data source has its own schema, which makes those utilities highly configurable and thus, less maintainable.
To solve this problem, there is a solution that is extremely low code and intuitive. One can simply translate their mapping analysis/research to this tool using an interactive web-based user interface and create a mapping configuration that the runtime engine will consume and produce target output.
Introduction
An available open-source solution is AtlasMap. You can access and extend the code on GitHub.
It provides a web-based UI and runtime engine as base tooling. In addition to plain Java API provided by the runtime engine, it supports Apache Camel via the camel-atlasmap component and Quarkus via the Quarkus extension. The easiest way to use it is to use the standalone mode, but you can also access it through the VS Code plugin.
Installation
You can download the pre-built binary or check out the code and customize/build on your local. You can obtain the standalone AtlasMap binary from the Maven Repository.
Steps
- Go to AtlasMap Standalone Application on the Maven Repository.
- Browse the most recent version.
- Download the jar file from the File section.
You can also run the command below to download it via the command line (replace {VERSION} with the most recent version ).
wget https://repo1.maven.org/maven2/io/atlasmap/atlasmap-standalone/$ {VERSION}/atlasmap-standalone-${VERSION}.jar
Running the Tool
You need Java runtime to run the tool. Run the following command to start the UI.
java -jar atlasmap-standalone-${VERSION}.jarNow you can browse the UI on your local browser with the http://127.0.0.1:8585 URL.
Preparing the Mapping

- At the top of the Source panel, click the arrow to import a JSON or XML file from which you need to map fields.
![Arrow icon]()
- At the top of the Target panel, click the arrow to import a different JSON or XML file to which you need to map fields.
![Arrow icon]()
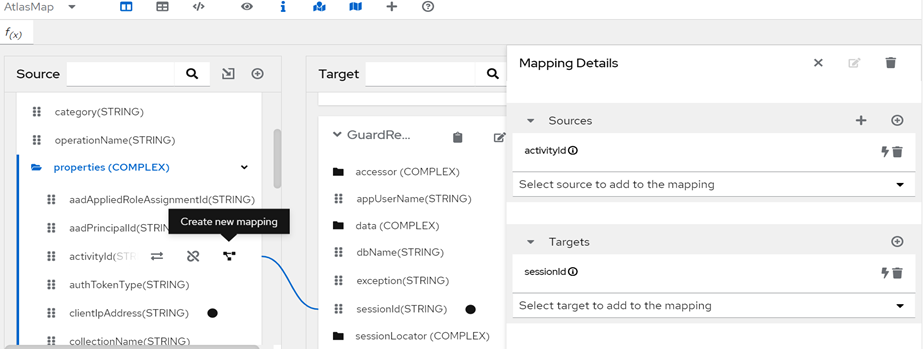
- To map fields: Navigate to a source field and click the link icon. This will open the Mapping Details panel, where you can add a target field. Or navigate the target field and click the link icon to map the source field.
![Link icon]()
- With a data mapping selected, explore the optional transformations.
- You can preview a data mapping result with the preview icon and enter sample data in the source Mapping preview fields.
![View icon]()
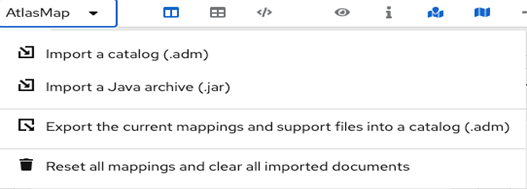
- To save your work, click the AtlasMap menu and select Export the current mappings and support files into a catalog (.adm).
Executing the Mapping/Transformations
Using Java API
1. Load the mapping files:
URL mappingUrl = Thread.currentThread().getContextClassLoader().getResource("atlasmap-mapping.adm"); 2. Prepare Atlas mapping context:
AtlasContextFactory factory = DefaultAtlasContextFactory.getInstance(); AtlasContext context = factory.createContext(mappingUrl.toURI());3. Load the source file:
URL sourceUrl = Thread.currentThread().getContextClassLoader().getResource("source.json");
String source = new String(Files.readAllBytes(Paths.get(url.toURI())));
4. Create the session and process the source document:
AtlasSession session = context.createSession();
session.setSourceDocument("JSONSchemaSource", source);
context.process(session);
5. Finally retrieve the target document from the session:
String target = (String) session.getTargetDocument("target");Using Camel Component
Using Apache Camel, you do not need to write custom code to read/write the file or invoke the transformation. It can be done on the fly using a camel component with just a straightforward configuration.
<camelContext xmlns="http://camel.apache.org/schema/spring">
	<route> <from uri="direct:start" />
		<to uri="atlas:atlasmapping.adm" />
		<to uri="mock:result" />
	</route>
</camelContext>
This way you can design the mapping and transform any Java/JSON/XML object to any target object with just configuration and extremely low runtime code.
AtlasMap provides various transformation functions like string manipulation, date formatting, arithmetic operations, etc., that you can use to transform data during mapping. It also supports complex mappings involving arrays, lists, and nested objects.
It also provides comprehensive documentation and tutorials on its official website. You can refer to them for detailed information and examples. You can also find community support and forums where you can ask questions and get help with using AtlasMap.
Conclusion
AtlasMap offers a user-friendly graphical interface to create, manage, and implement data mappings between various data formats. By defining source and target data structures, applying transformations, and testing the mappings, you can efficiently transform data from one format to another. The tool supports a wide range of transformation functions and provides options to generate code for seamless integration into your applications.
Opinions expressed by DZone contributors are their own.


Comments