Image Generation in Action: 3 Methods With Code Samples and Image Generation API
In this article, learn possible solutions needed to generate images programmatically, possible caveats and pitfalls you may hit, as well as best practices.
Join the DZone community and get the full member experience.
Join For FreeIn this article, we share our experience generating millions of images with DynaPictures in the last months. We will go over possible solutions needed to generate images programmatically, possible caveats and pitfalls you may hit, as well as the best practices that emerged from our experience using dynamic image generation.
So let us dive in and discuss what image generation is and then review the available options.
What Is Image Generation?
Image generation is the process of creating images automatically. It usually requires the creation of an image template first and specifying the basic image layout, colors, etc. Then, during the generation process, you would have to specify texts and images that will be added to the image template as overlays programmatically and a final image is produced.
Available Options
When you need to add text to an image or overlap one image over another, here are the options available today:
Option #1: Advanced Image Generation API
![DynaPictures]()
Image generation platforms like DynaPictures can be used via API to generate images on the fly. You still need to create image templates for the designs that you want to automate, but you don’t need to write code for that. You use a Canva-like editor to create your design, and then just send REST API requests to replace different parts in the design and generate a final image.
Each object in your design is a layer that can be customized via API.
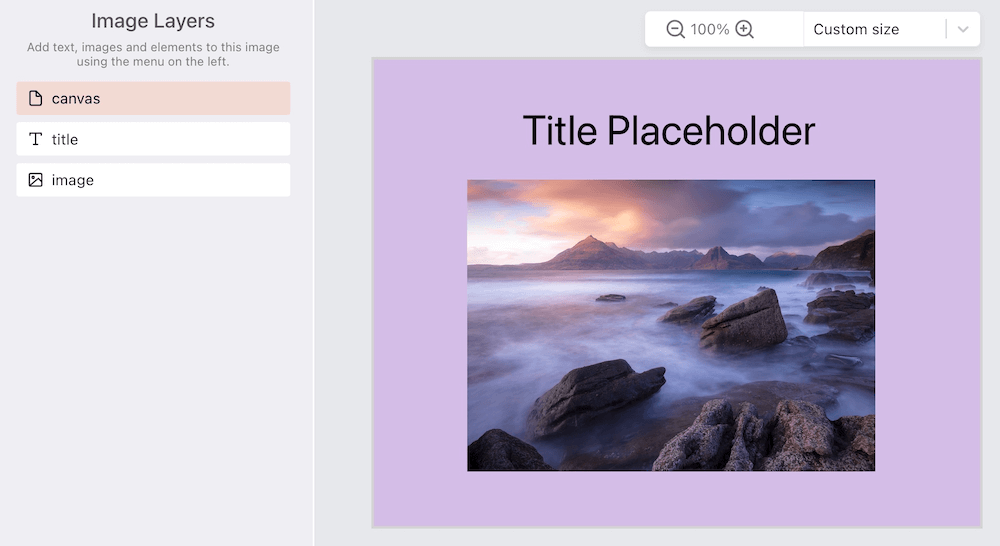
Let's take a simple image template as an example. Each template contains a canvas layer, which is a system layer that’s needed to specify image dimensions and background color. Then, we add text and image layers to be able to specify a title and an image below it:
Then the sample API request will look like this:
POST http://api.dynapictures.com/designs/12345

With body:
{
  "format": "jpeg",
  "metadata": "",
  "params": [
    {
      "name": "canvas",
      "backgroundColor": "rgb(103,176,197)"
    },
    {
      "name": "title",
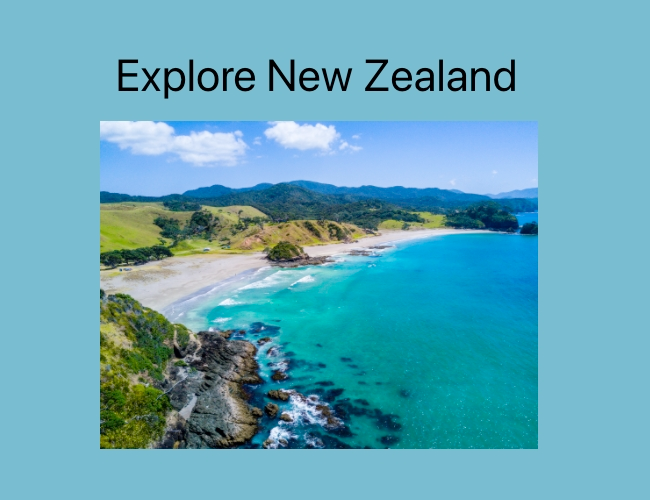
      "text": "Explore New Zealand"
    },
    {
      "name": "image",
      "imageUrl": "https://images.unsplash.com/photo-1508971607899-a238a095d417?ixlib=rb-1.2.1&ixid=MnwxMjA3fDB8MHxwaG90by1wYWdlfHx8fGVufDB8fHx8&auto=format&fit=crop&w=2274&q=80"
    }
  ]
}
In the image generation API, we specify the image format that we need (jpeg), and then the list of parameters for the layers in the template. We change the background color of the canvas, the text content of the title layer, as well as specify another image for an image layer.
Once the request is sent, we get a response from the server that will look like this:
{
  "id": "42dfd61224",
  "templateId": "9001f2512d",
  "imageUrl": "https://api.dynapictures.com/8eb9e4869b/42dfd61224.jpeg",
  "thumbnailUrl": "https://api.dynapictures.com/8eb9e4869b/42dfd61224-thumb.jpeg",
  "retinaThumbnailUrl": "http://localhost:9333/8eb9e4869b/42dfd61224-thumb-2x.jpeg",
  "fileName": "42dfd61224.jpeg",
  "metadata": "",
  "width": 650,
  "height": 500
}
You can open or download a generated image specified in the imageURL field:

This approach is the most cost-effective, considering it is relying on monthly subscriptions. It also may save weeks or months of implementation time, therefore speeding up the go-to-market process for new product features.
At the same time, you depend and rely on the image generation API, so you need to spend time on research and evaluation of the vendor and your future partner. You need to check the SLAs provided, the server location, capacity, bandwidth limitations, as well as data privacy aspects and implementation of the GDPR regulation.
Option #2: Image Generation Library
The next option is to use an image generation library and implement the full solution yourself. Libraries like ImageMagick, Python Imaging Library (PIL), and Sharp in Node.js provide an API for image processing. Such libraries are typically used for resizing, cropping, changing image format, compressing images, etc.
However, these libraries have evolved in recent years and now offer image composition as well. With image composition, it’s possible to combine two or more individual images to create a single image.
Here is the image composition example using Sharp library based on Node.js:
await sharp('input.gif')
  .composite([
    { input: ”logo.png”, gravity: 'northwest' },
    { input: “button.jpg”, gravity: 'southeast' },
  ])
  .toFile('combined.png');
In this example, we take the input.gif as a background image and put logo.png at the upper left corner using gravity set to ‘northwest’ and the button.jpg at the bottom right corner specified by gravity ‘southeast’ accordingly. We save the result into a combined.png file that will contain the combination of these three images.
If you need precise positioning of the image overlays, you can use images[].top and images[].left properties instead of gravity to provide pixel offsets from the top and the left of the background image. You can check the API documentation for more information.
Using a library for image generation makes sense when your use case is very simple and you don’t have to build complex designs or creatives with multiple images and text overlays inside. However, the implementation may be tedious to do pixel-perfect positioning of the overlays in the code and also difficult to maintain in the future.
Another limitation is the possibility of design customization and brand-specific styling. You may quickly hit the limit of what’s possible, for example, when you need to implement shadows, custom gradients, etc.
Option #3: Generate Images Using a Browser and Puppeteer Screenshots
Another possible option is to build your design by adding texts and overlapping images directly using HTML. You can open this HTML page in the browser programmatically using a library like Puppeteer and then generate a final image by taking a screenshot of the opened page.
Here is a quick code sample for that:
const puppeteer = require('puppeteer');

(async () => {

  const browser = await puppeteer.launch({args: ['--no-sandbox', '--disable-setuid-sandbox']});

  const page = await browser.newPage();

  await page.goto('https://dynapictures.com');

  await page.screenshot({path: 'dynapictures.png'});

  await browser.close();

})();
This approach gives more freedom and flexibility compared to the first option, as it becomes much easier to create and maintain image templates. It’s also more resource-intensive as you need to host and run a cluster of browser instances on the server.
You also have to care for maintenance, updates, emojis functioning, and make sure that your setup is secure. It is crucial to also ensure that no one can download sensitive information from the server filesystem by tricking a browser to open some file on the server and then render it as an image.
Additionally, you have to hire a system administrator and make sure that your service stays up and running when the hard drive gets full at any given moment.
This option requires significant server resources as well as browser instances may take lots of RAM and computing power.
Start here if you decide to go down this path.
Conclusion
All that to say, image generation is a new area that has grown rapidly in the last few years. Choosing a reliable vendor for image generation may save weeks or even months of implementation time, it is cost-effective and also helps speed up the go-to-market process for the new product features.
Did you have any experience with dynamic image generation in the past? Should we cover any specific details in the next articles? Tell us in the comments below!
Opinions expressed by DZone contributors are their own.


Comments