IBM App Connect Enterprise Change Data Capture With PostgreSQL
This tutorial serves as a guide on how to capture data changes from a PostgreSQL database and write that data into an external text file using IBM's ACE Toolkit.
Join the DZone community and get the full member experience.
Join For FreeThis tutorial serves as a guide on how to build a message flow on IBM’s App Connect Enterprise Toolkit (on a Windows system) using a Change Data Capture (CDC) node to record all the changes within a PostgreSQL database.
Change data capture is a process of identifying and capturing changes that are made within a data source (e.g., databases). Those changes are then delivered in real-time to a process downstream. Businesses may use data capture to help keep systems in sync, ensure reliable data replication, and help users detect and manage incremental changes at the data source, as well as integrate the source event data with applications.

For example, consider a database that holds customer information and a processor that analyses the customer database and presents that data on a dashboard. Therefore, whenever a customer’s data changes, it is important that the processor operates the new information in real-time to prevent incorrect information from being displayed on the dashboard.
This tutorial will describe how to create a sample table within a database in Postgres and how to build an IBM App Connect flow using the CDC node, Trace node, and FileOutput node. Simple testing of the integration flow will then be carried out using the IBM App Connect built-in flow exerciser. There may be other things required in your system; this document describes how to build a basic flow.
Prerequisites
Ensure you have downloaded the IBM App Connect Enterprise Toolkit Version 12.0.10.0 or a later version after this guide was written. (Follow steps 1 – 3).
Instructions
1) Download and Install PostgreSQL
The database will be created in Postgres, so firstly, Postgres needs to be installed.
a) Download here.
b) Select your operating system under ‘Packagers and Installers’ (I selected Windows).

c) Click ‘Download the installer’ under ‘Interactive installer by EDB.'

d) Download the latest version for your operating system (I downloaded PostgreSQL Version 16 on Windows x86-64).
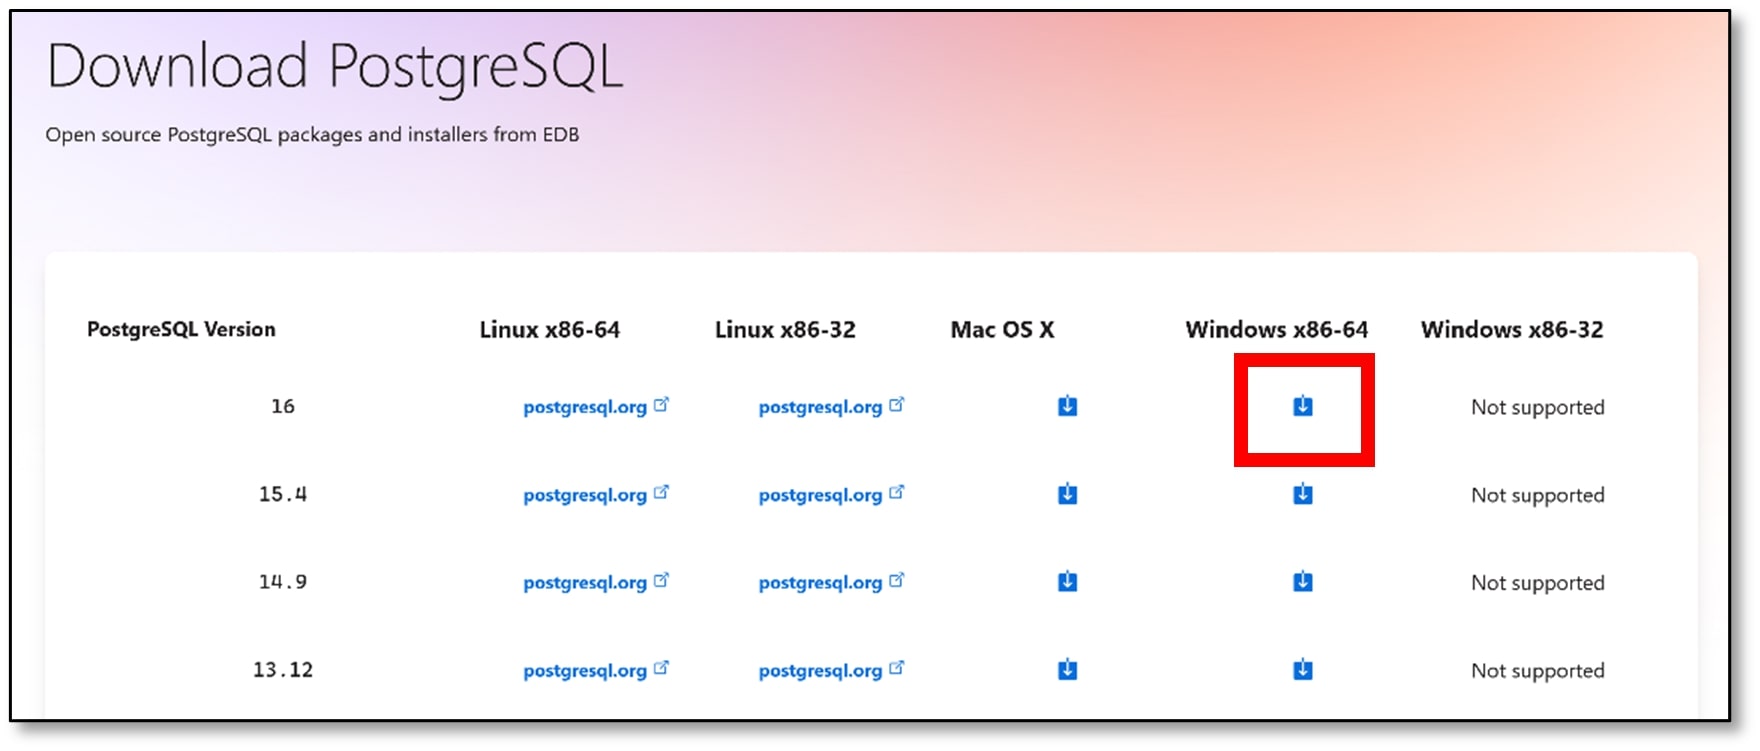
e) Once the download is complete, open the .exe file (mine was postgresql-16.0-1-windows-x64.exe). I opened mine by double-clicking on the file from Downloads in File Explorer.

f) If a window appears asking whether ‘you want to allow this app to make changes to your device?’ Click ‘Yes’.
g) Click ‘Next’ on the install welcome screen.
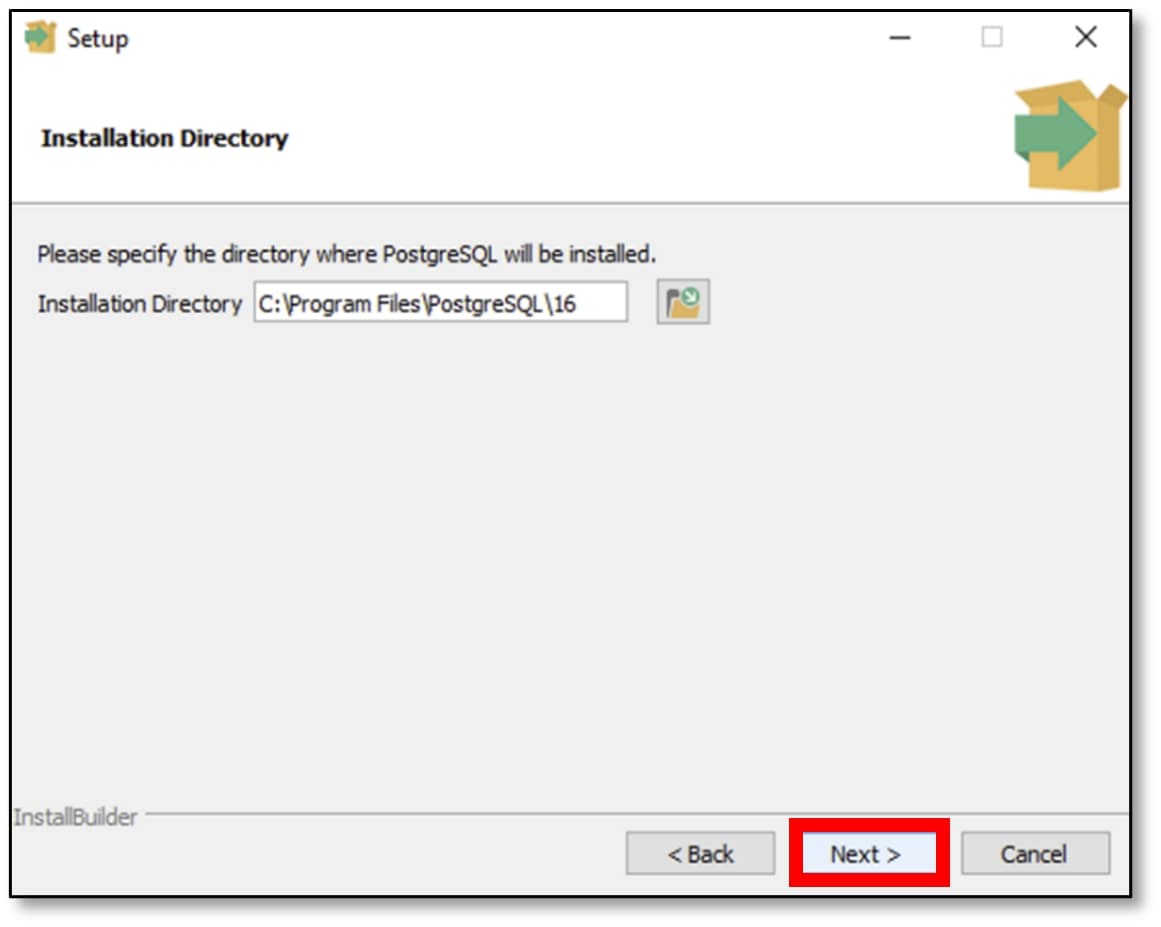
 h) You may change the installation directory if you want or leave it as it is (I left mine as default). Then click ‘Next’.
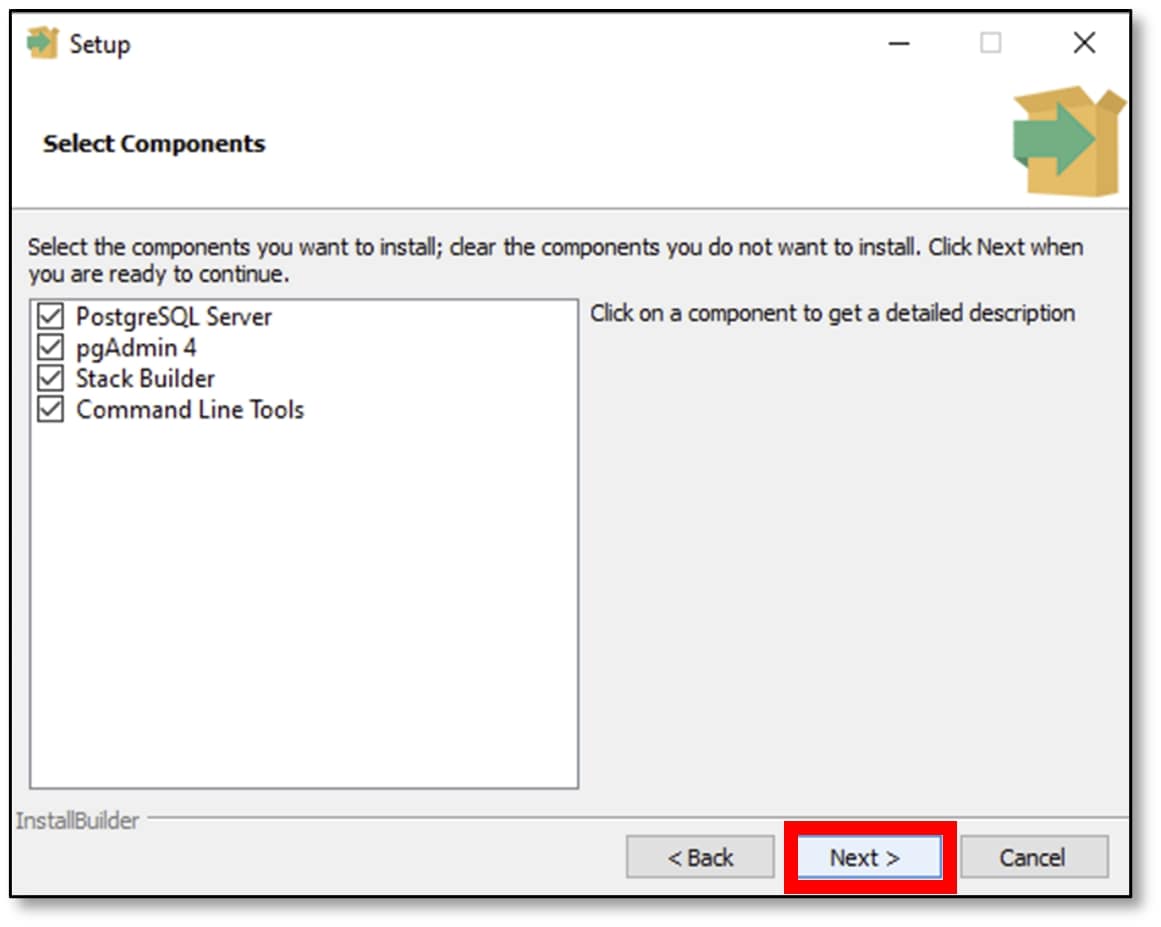
i) Select the components that you would like to install (I selected all of them). Then click ‘Next’.
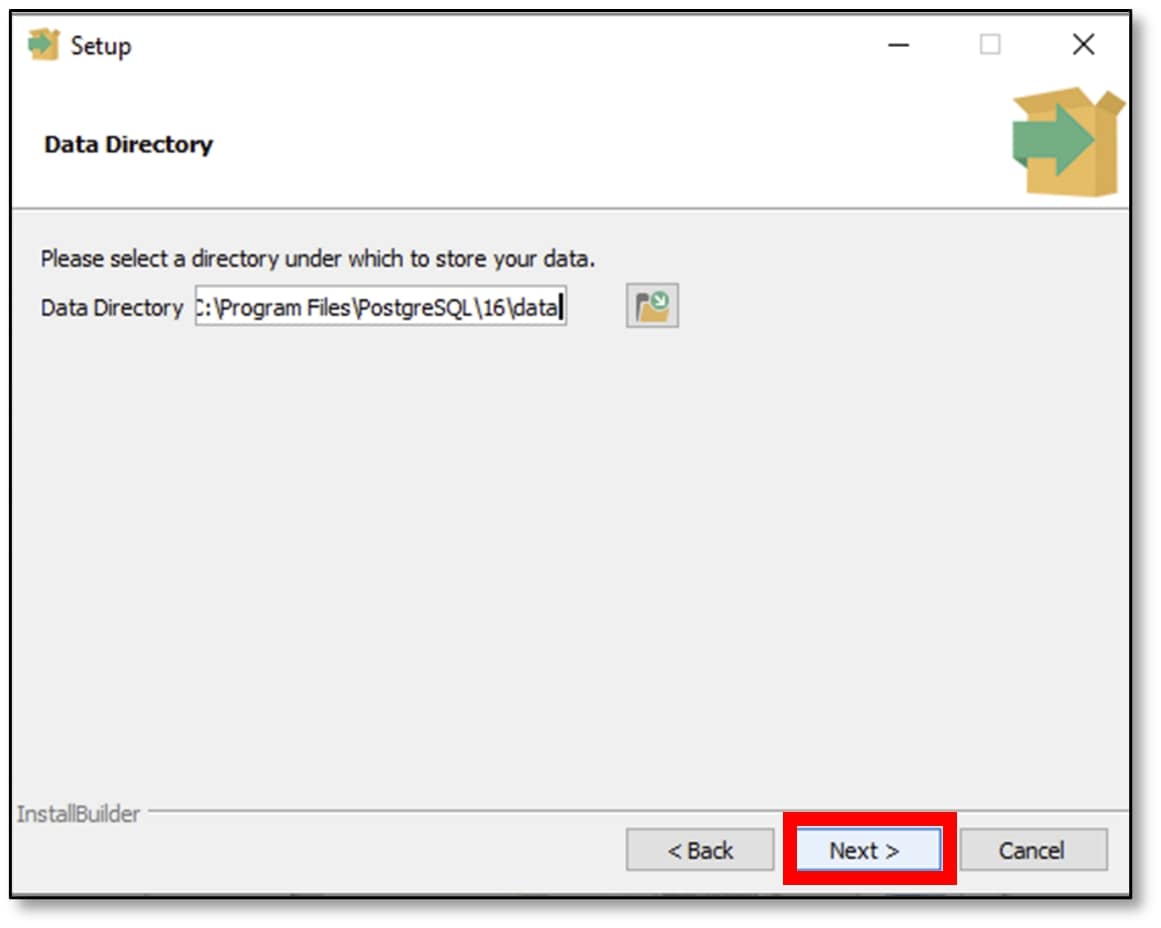
j) You may change the data directory if you want or leave it as it is (I left mine as default). Then click ‘Next’.
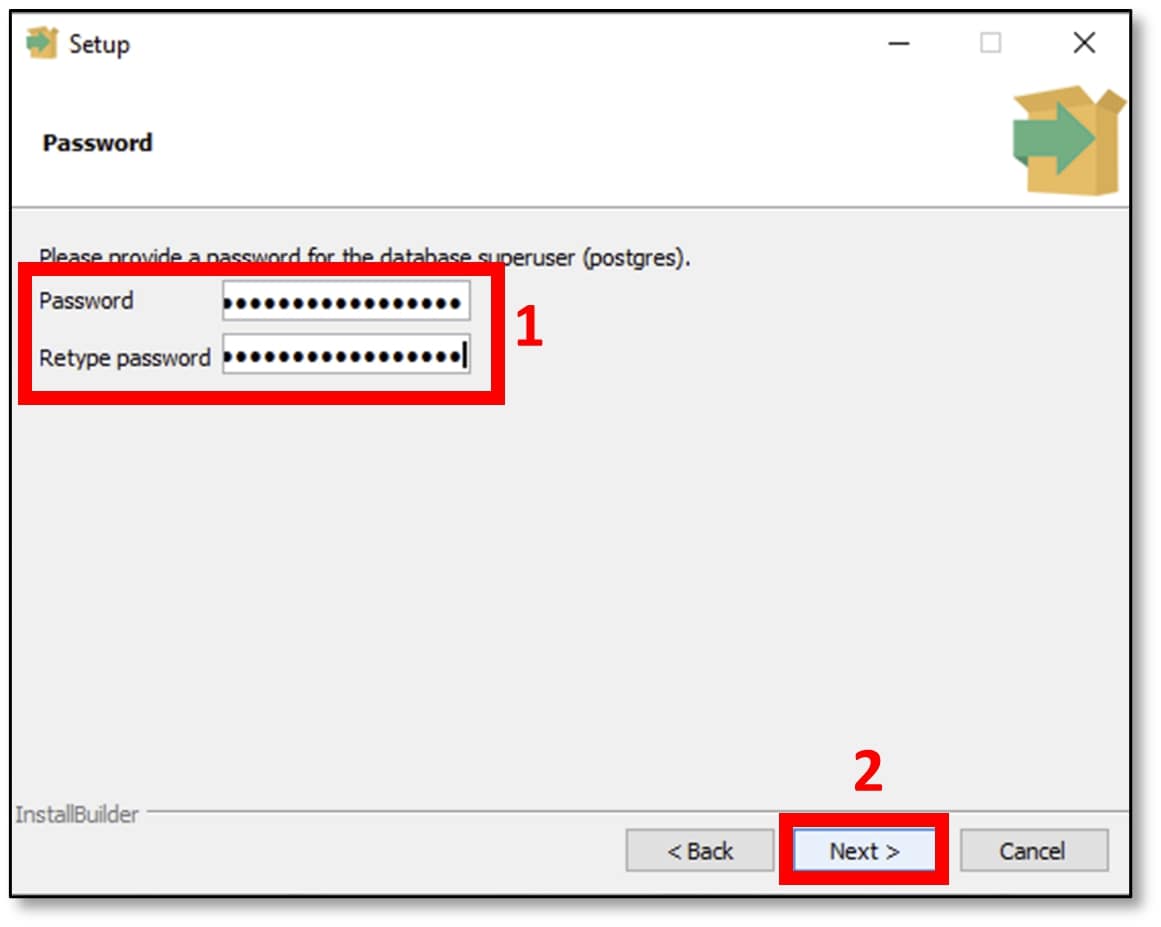
k) Choose and enter a password – it doesn’t need to be complicated, and don’t reuse another one of your passwords. This is the password for the user ‘postgres,’ so keep a note of it. Then click ‘Next’.
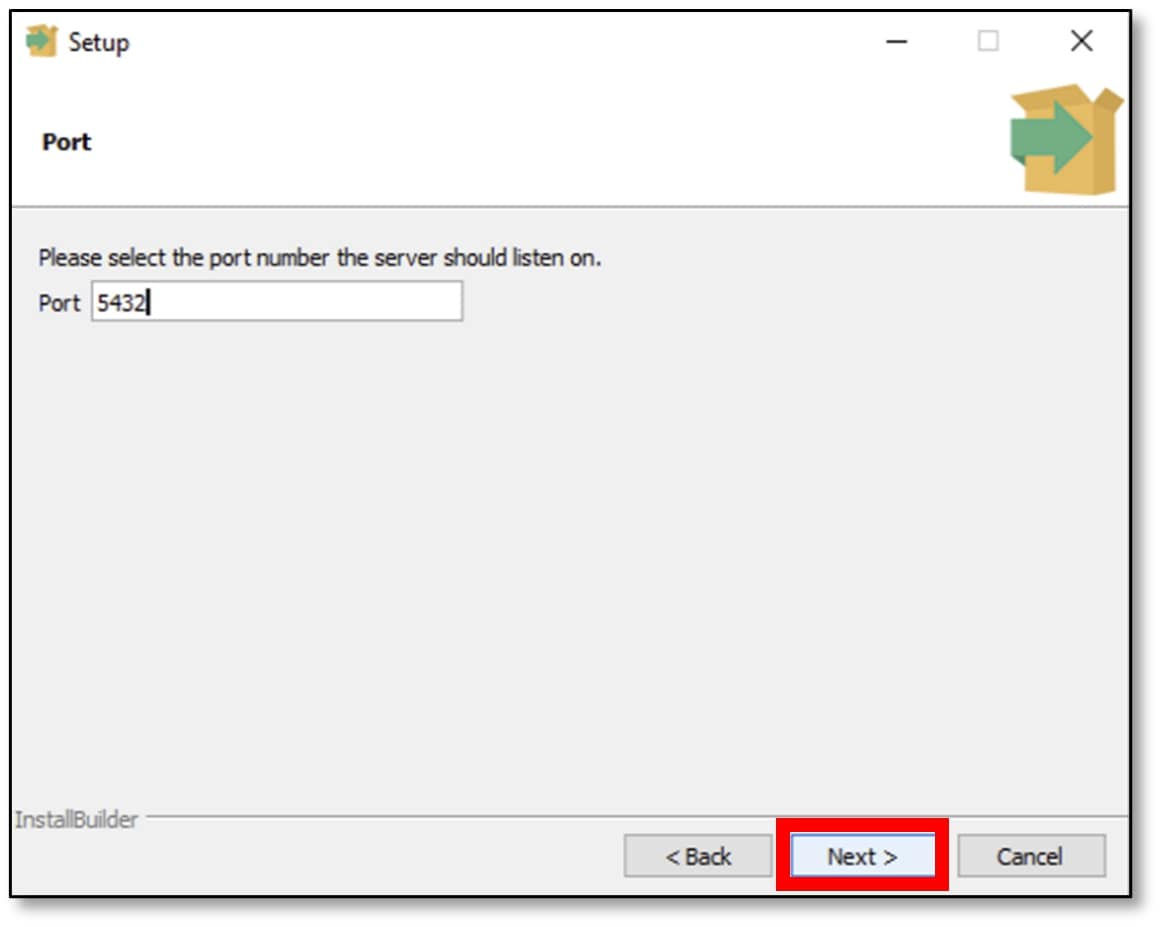
l) Leave the Port number as is. Then click ‘Next’.
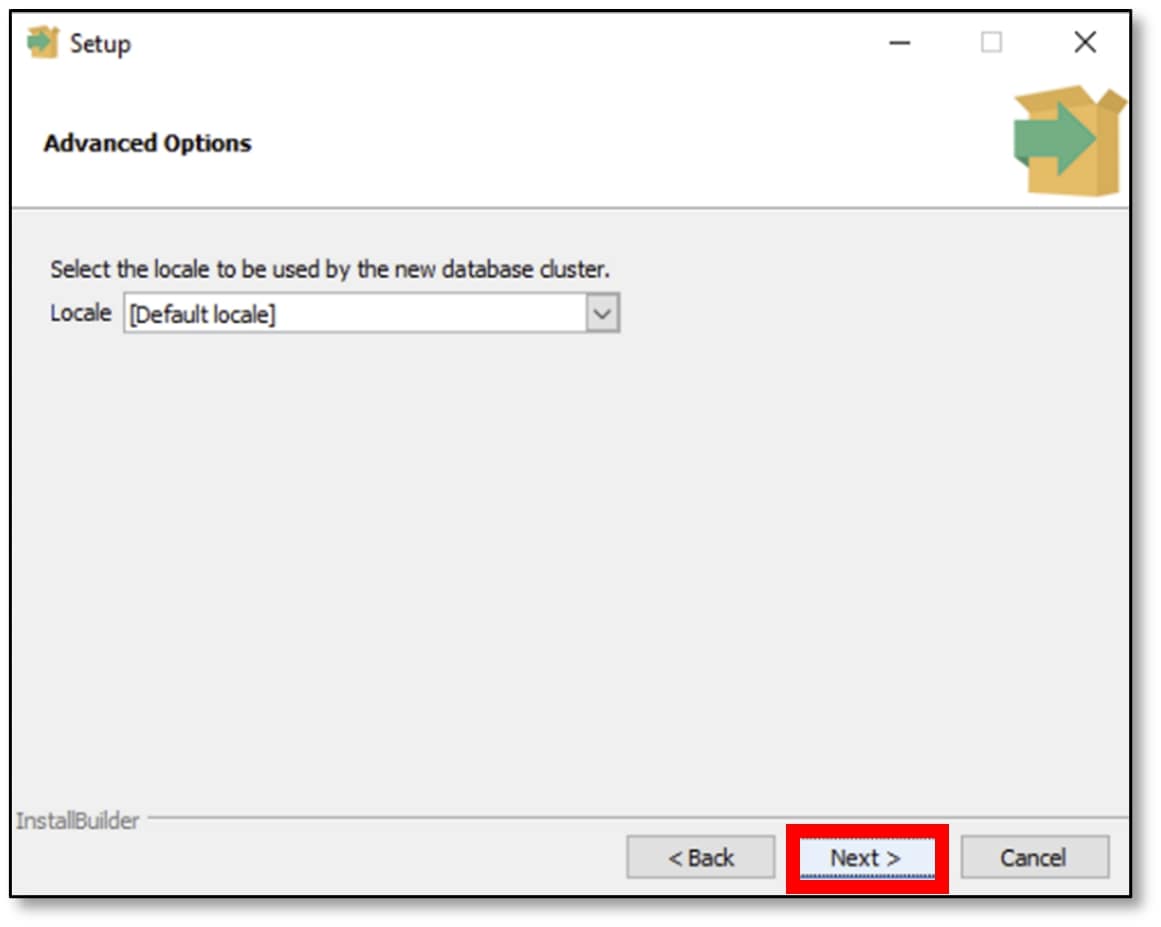
m) Leave the Locale as is. Then click ‘Next’.
n) A Pre-Installation Summary will appear. Click ‘Next’.
 o) Postgres is now ready to be installed. Click ‘Next’. The installation will take a couple of minutes to complete.
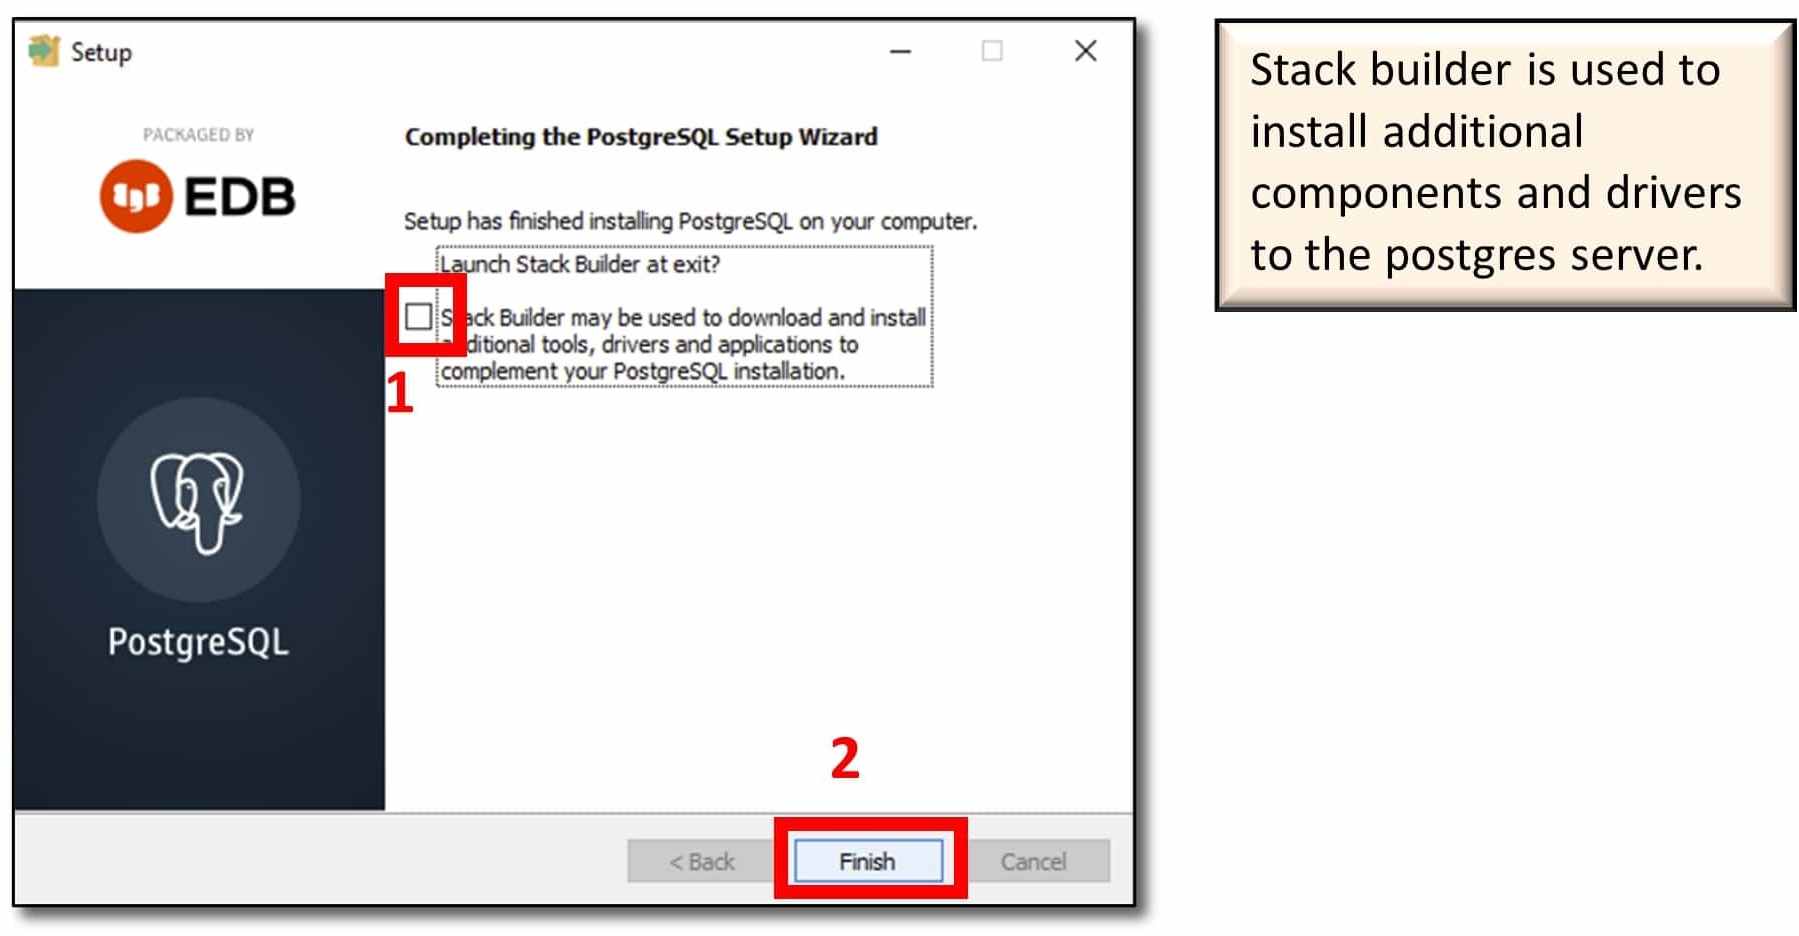
 p) Unselect the ‘Stack Builder’ option and click ‘Finish.’
2) Configure PostgreSQL
The Postgres server needs to be configured correctly in order for IBM App Connect to connect to the database.
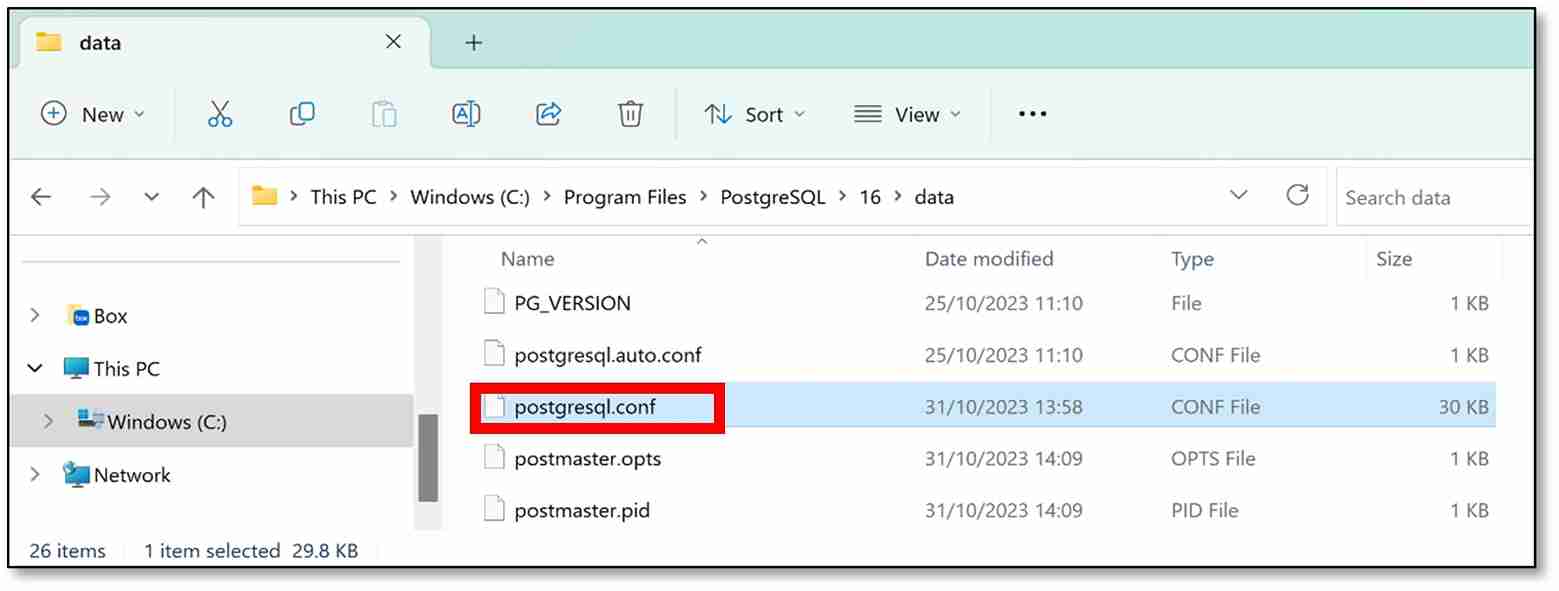
a) Find the ‘postgresql.conf’ file which is found in the directory where Postgres is installed. (Mine was in C:\Program Files\PostgreSQL\16\data).
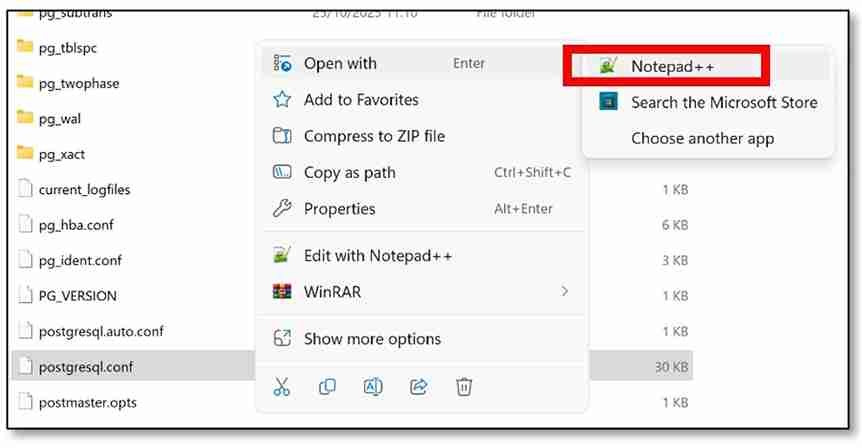
b) Open the file. (I used Notepad++ to open it. Right-click on the file → ‘Open with’ → ‘Notepad++’).
Note: Notepad++ is a free source code editor and it can be downloaded from here. You can also use Notepad to open the file.
c) Find the variable name ‘wal_level’ in the file. It should be under the ‘WRITE-AHEAD LOG’ category. You can do Ctrl+F (Control Find) to search for the variable name. Change the value from ‘replica’ to ‘logical.’ If the line is commented (written in green with a ‘#’ in front of it), uncomment the line by removing the ‘#’.

d) Find the ‘max_wal_senders’ variable under the ‘REPLICATION’ category. As before, you can do Ctrl+F to find the variable. Set the value to ‘4’ and uncomment the line if required. Find the 'max_replication_slots’ variable (it should be under the ‘max_wal_senders’ variable). Set the value to ‘1’ and uncomment the line if required.

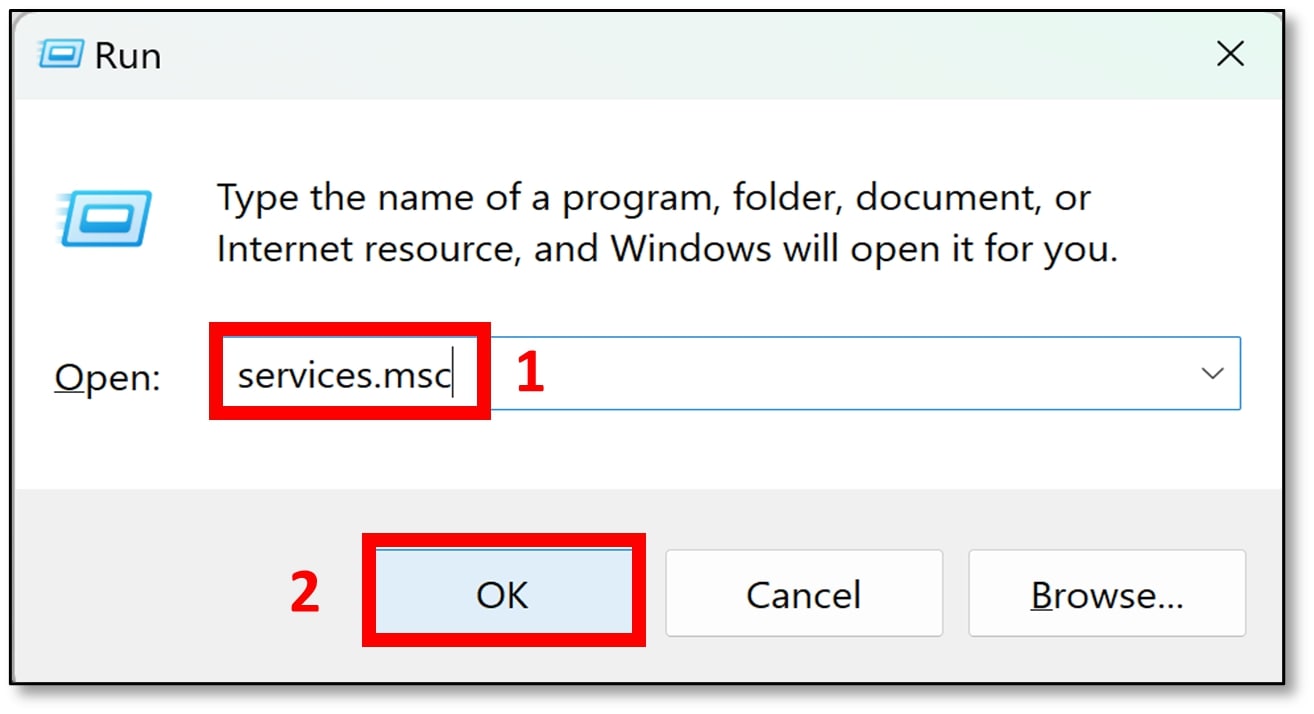
e) Save the file (Ctrl+S), then close the file. Whenever the ‘postgresql.conf’ file is edited, the Postgres server needs to restart for the edits to be recognised. Open the ‘Run’ window.
 f) Type ‘services.msc’ and click ‘OK.’
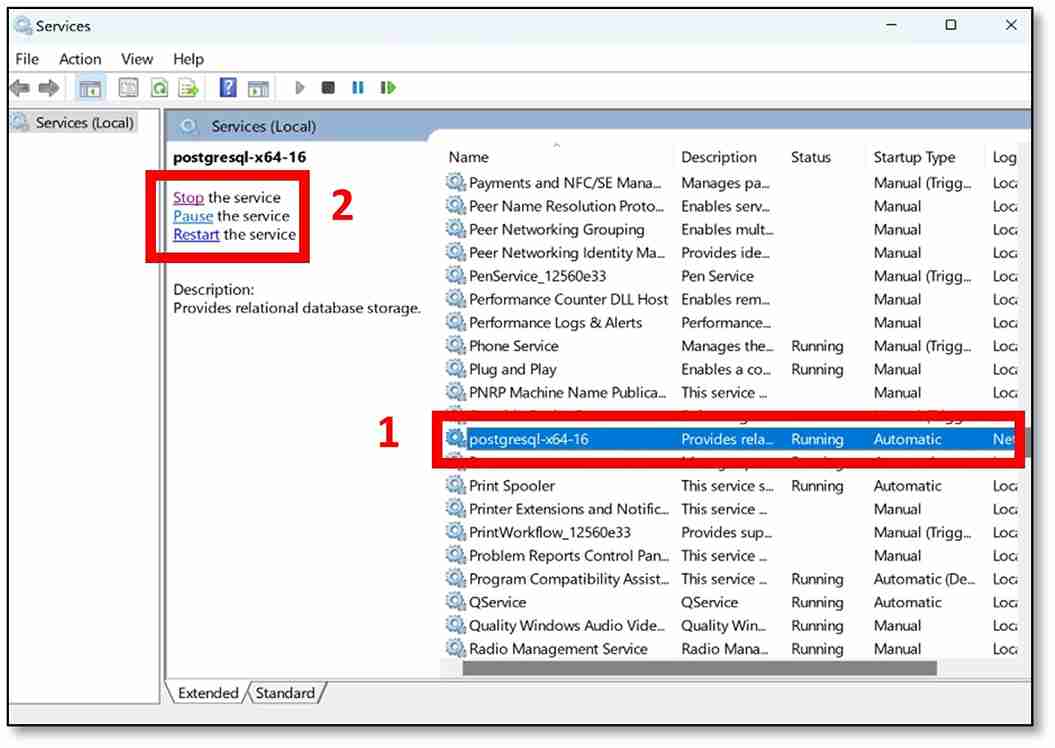
g) Scroll down to find the Postgres service (mine was called postgresql-x64-15). The services are listed in alphabetical order. Click on the service, then click ‘Restart’. Once finished, close the window.
3) Create a Database
Firstly, a database needs to be created in Postgres.
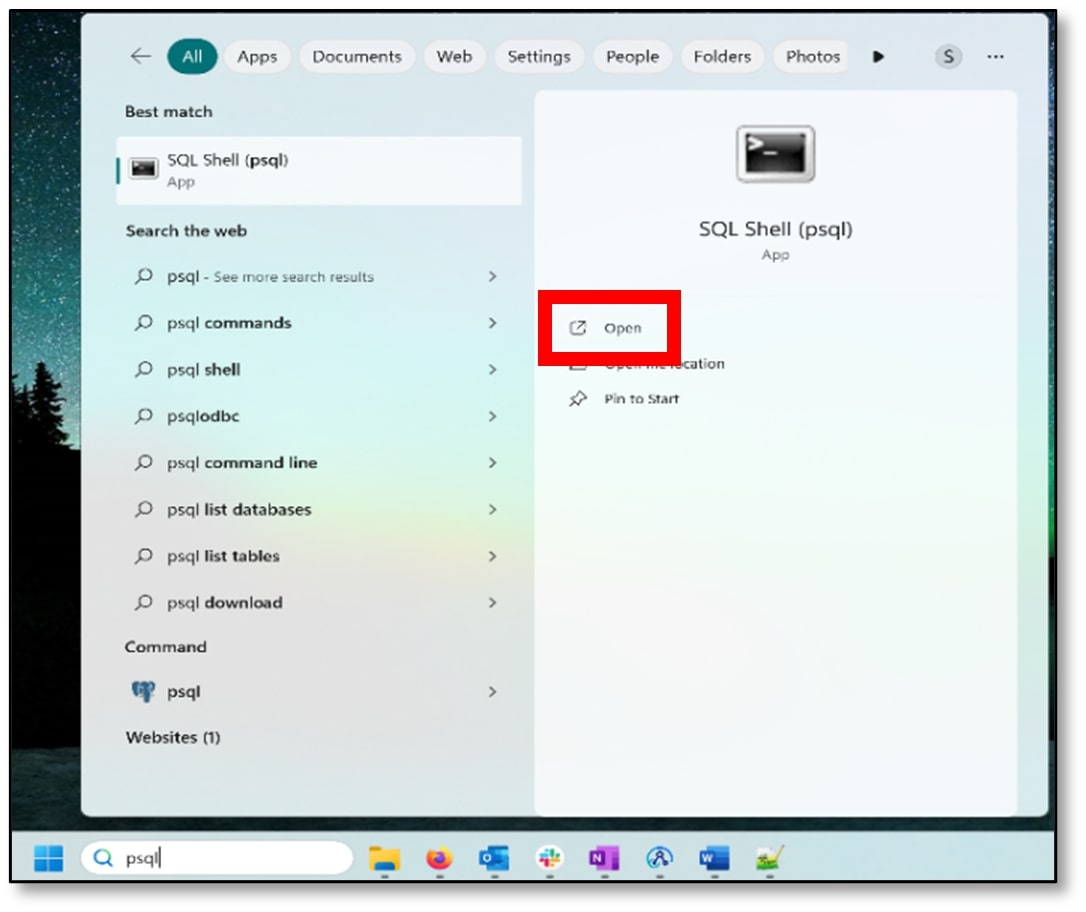
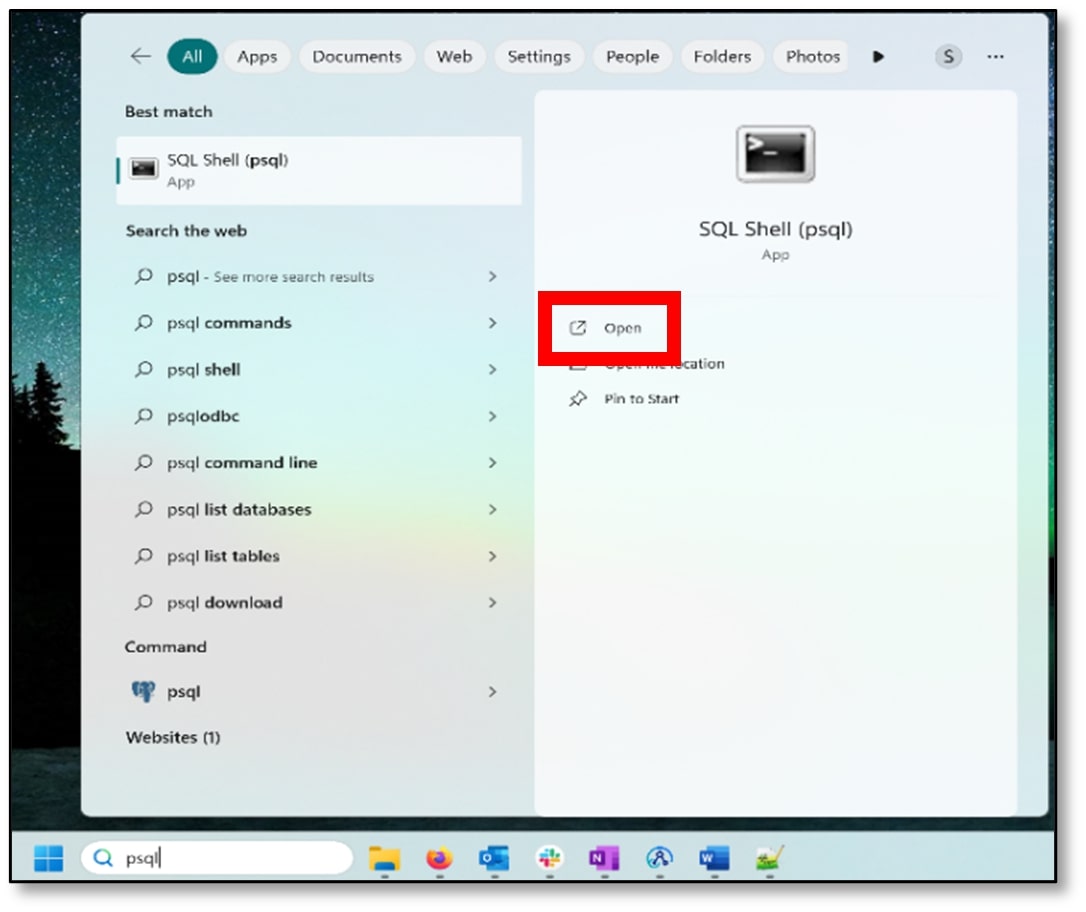
a) Open SQL Shell (psql).
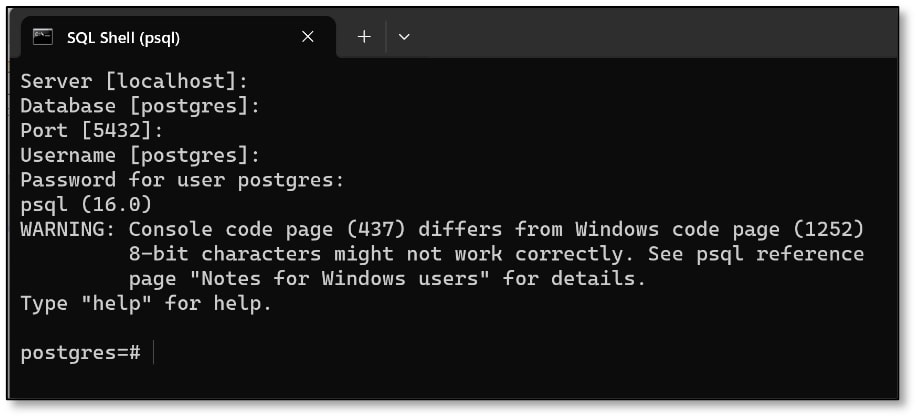
b) Press the ‘Enter’ button until ‘Password for user postgres:’ appears (I pressed enter four times). Enter the password that was created in the installation setup process (Step 1k) and press ‘Enter.’ The password will not appear on the screen when you are typing it, but it is being recorded.
c) Create a database by using the syntax CREATE DATABASE DatabaseName;
(I used CREATE DATABASE SAMPLE; but you can name your database anything). Then press ‘Enter’.

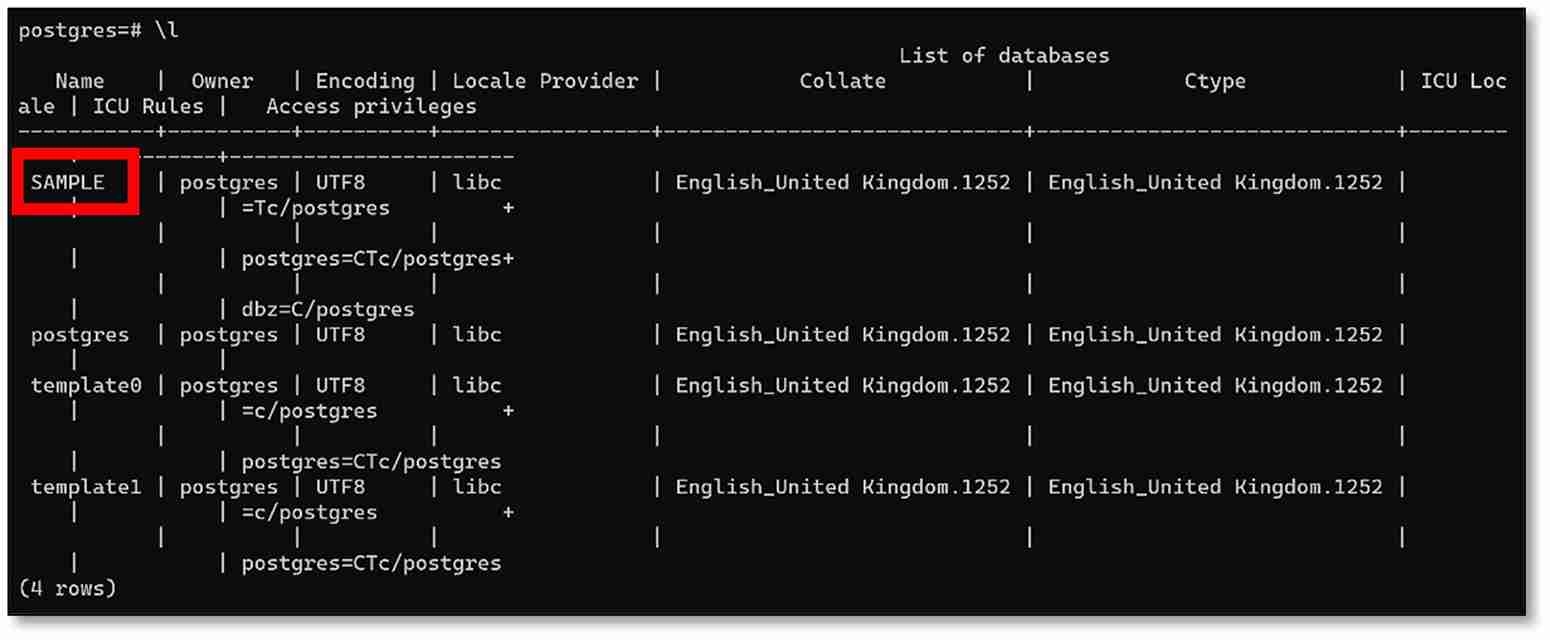
d) The command to list all the databases is \l
Then press ‘Enter’. The database created in the step above should be visible in the following list.
e) Connect to the database by using the syntax \c DatabaseName
(I used \c SAMPLE). Then press ‘Enter’. A confirmation message should appear to show that you are now connected to the database.

4) Create a Table
The next step is to create a table within the database (with dummy data). The table does not have to be large – my table contains five columns and 24 records.
a) Ensure Step 3e is completed — connected to the database on SQL Shell (psql).
b) Create a table by using the syntax
CREATE TABLE TableName (

ColumnNameA DataTypeA,
ColumnNameB DataTypeB,
ColumnNameC DataTypeC,

... );
• The TableName is the name you want to give to your table (I named mine student).
• The ColumnName is the header name of each column you want to have (I have five columns: id, first name, last name, age, and gender).
• The DataType defines what type of information will be stored in each column. For example, in the id column, I want to store whole numbers, so the data type is int.
Then press 'Enter'.
Below is the table I created:
CREATE TABLE student (

id int,
firstname varchar (30),
lastname varchar (30),
age int,
gender char (1)

);
Note: There are many data types to choose from, but the most common ones are char(size), varchar(size), int, real, and bool. More information on data types can be found here.
c) There are many ways to alter the table, such as adding/removing columns, inserting columns, changing column data types, renaming columns, and deleting tables. More information (like the syntax and examples) can be found here.
5) Add Records to the Table
Firstly, the primary key needs to be determined for the table. Then, since the table is currently empty, it needs to be filled with some example data. Each entry into the table is called a ‘record’ (so one record implies one row).
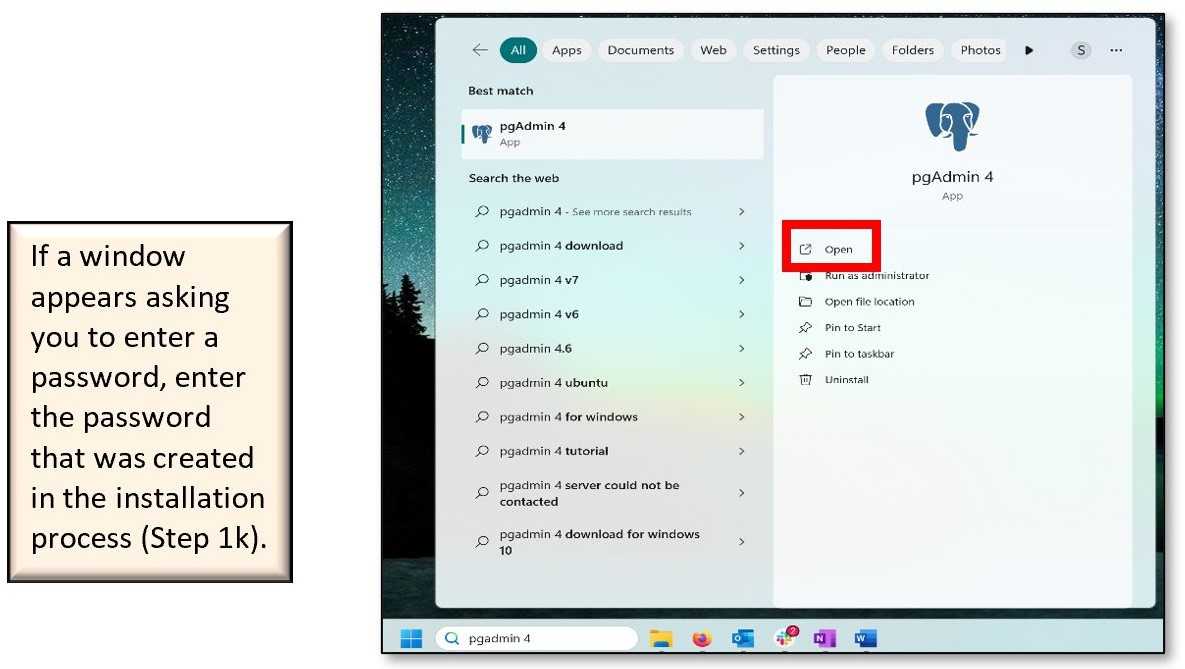
a) Open the pgAdmin 4 application.
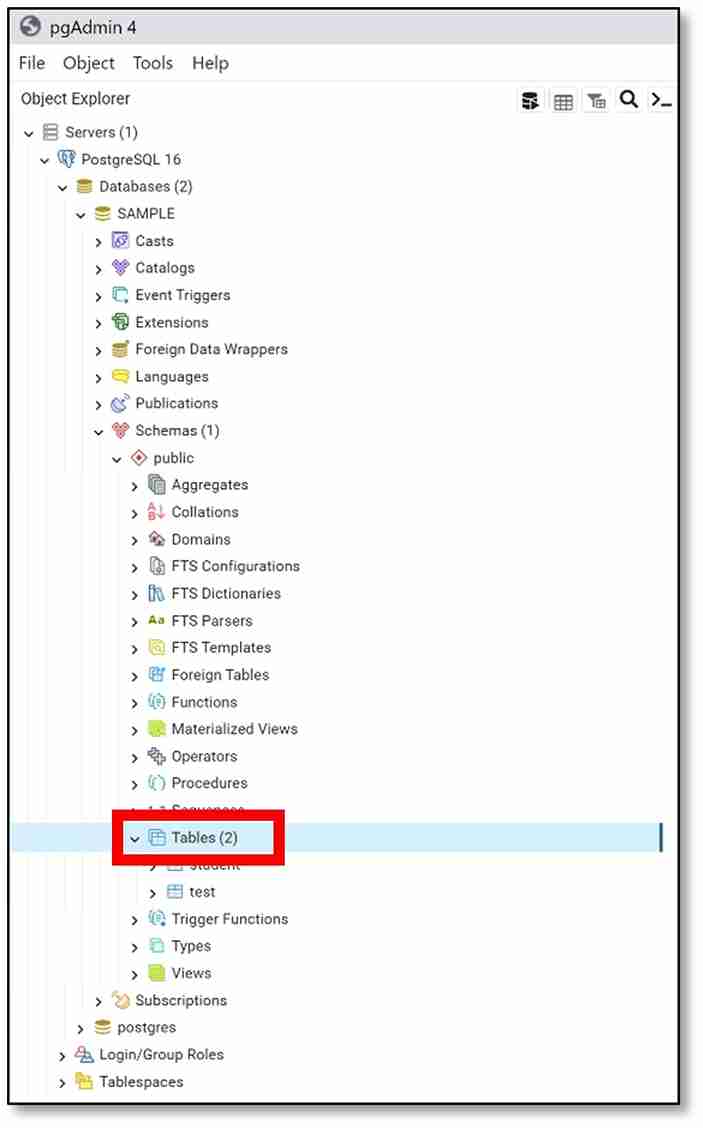
b) Once the page has loaded, find the ‘Object Explorer’ section on the left-hand side of the screen.
Double click on ‘Servers (1)’
→ ‘PostgreSQL 16’
→ ‘Databases (2)’
→ the name of the database that you created (Step 3c) (mine is SAMPLE)
→ ’Schemas (1)’
→ ‘public’
→ ‘Tables’.
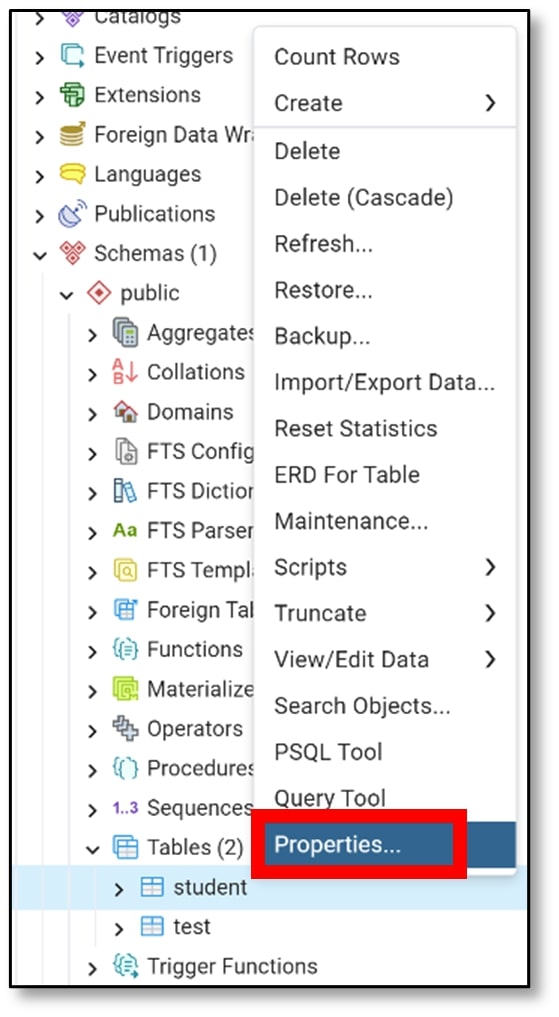
c) Right-click on the name of the table that you created (Step 4b) (mine is student). Then click on ‘Properties’.
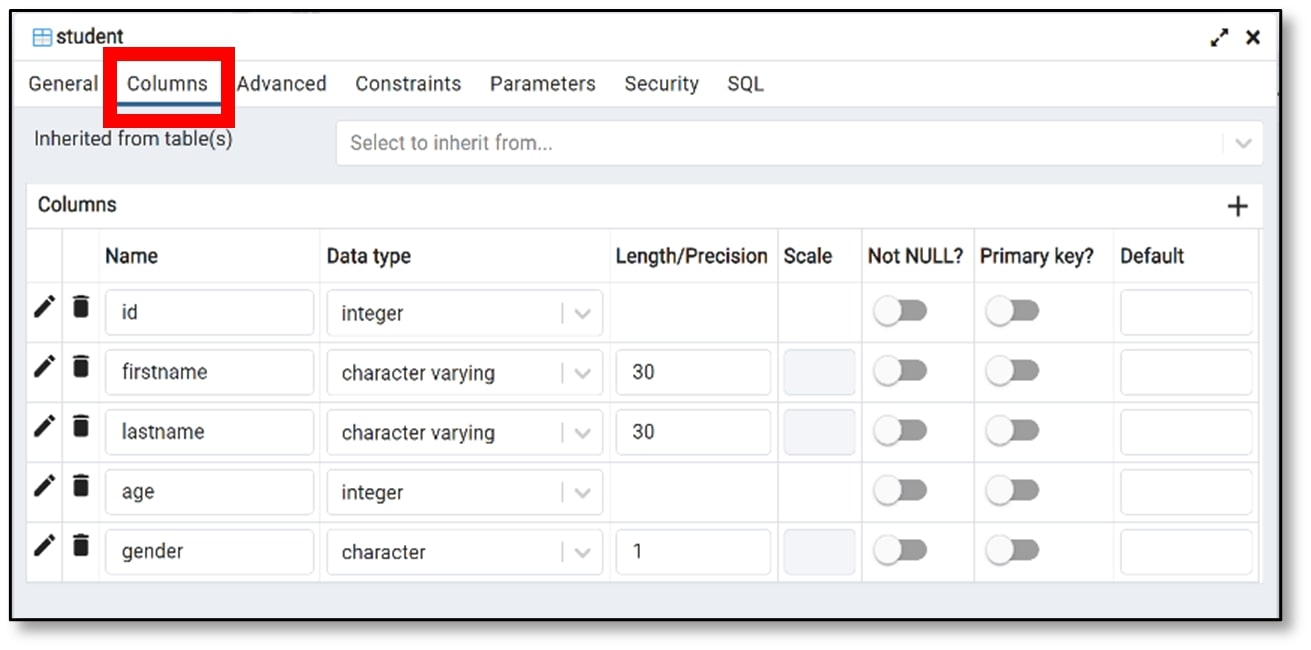
d) A pop-up window should appear, and on the ribbon at the top, click on ‘Columns.’
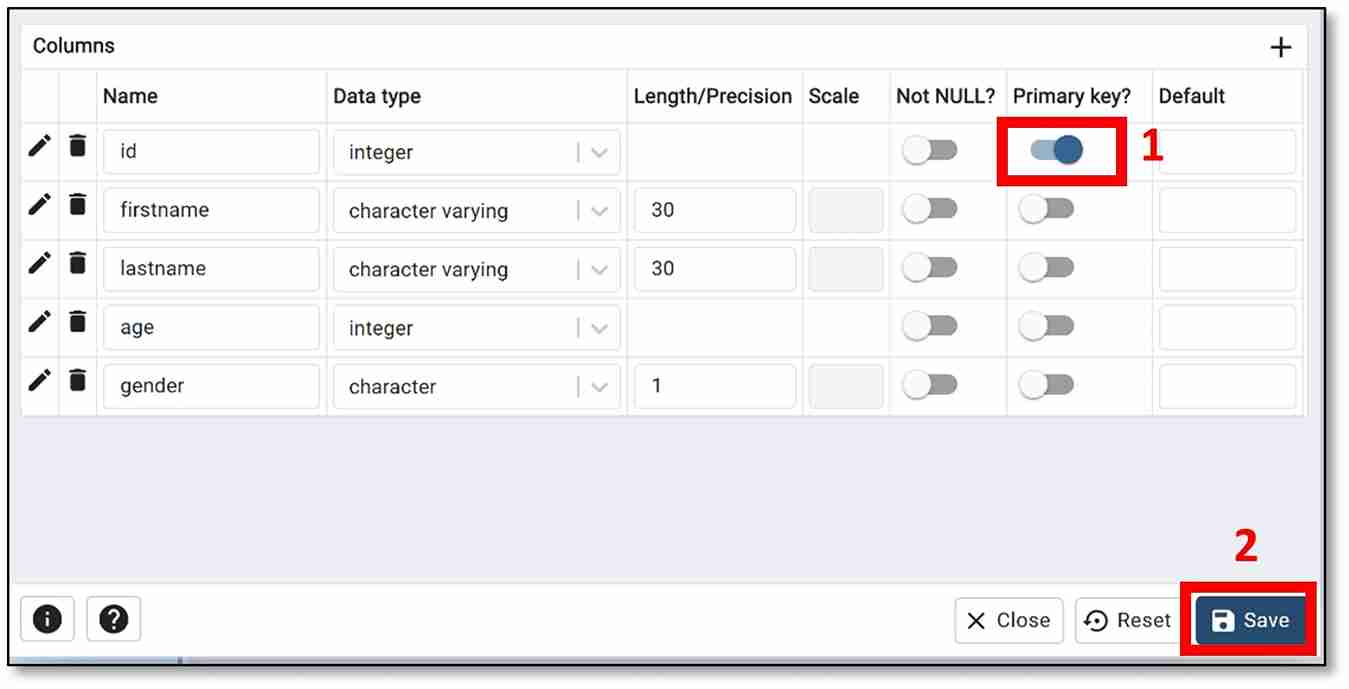
e) On the ‘Primary key?’ column, select the column name that you want to be declared as the primary key (I selected id). Then click ‘Save’.
f) Right-click on the name of the table that you created (Step 4b) (mine is student). Then click on ‘View/Edit Data’ → ‘All Rows.’
 g) An empty table with the names of each column should appear at the bottom of the screen. Click on the ‘Add row’ icon, which is under ‘Data Output’.

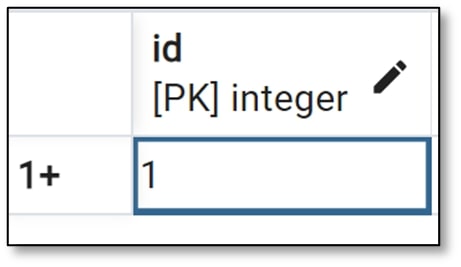
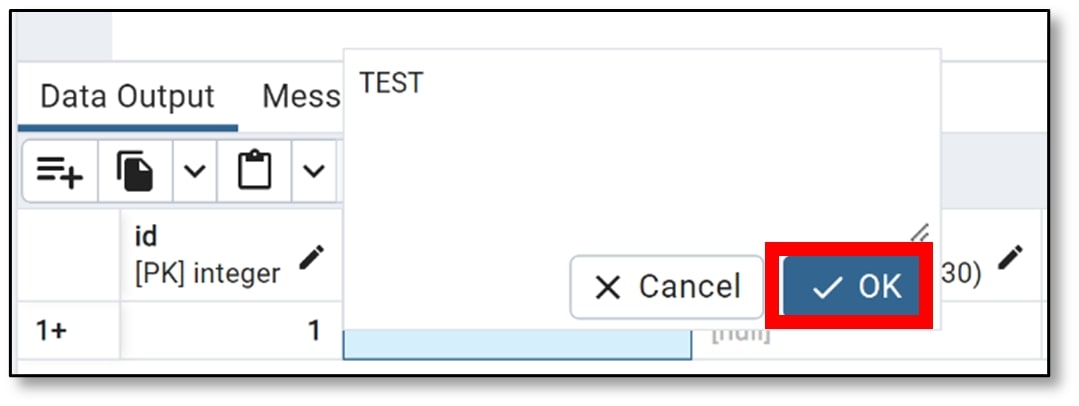
h) A row should appear with ‘[null]’ written as the values. Double-click on a table cell to add a value to that cell.

If the data type is an integer (like id), press ‘Enter’ after inputting the cell value.
If the data type is a string (like first name), click the ‘OK’ button after inputting the cell value.
i) Repeat the above two steps to add more records to your table (I recommend at least ten records). Below is a screenshot of my final table — I used names of characters from movies :)
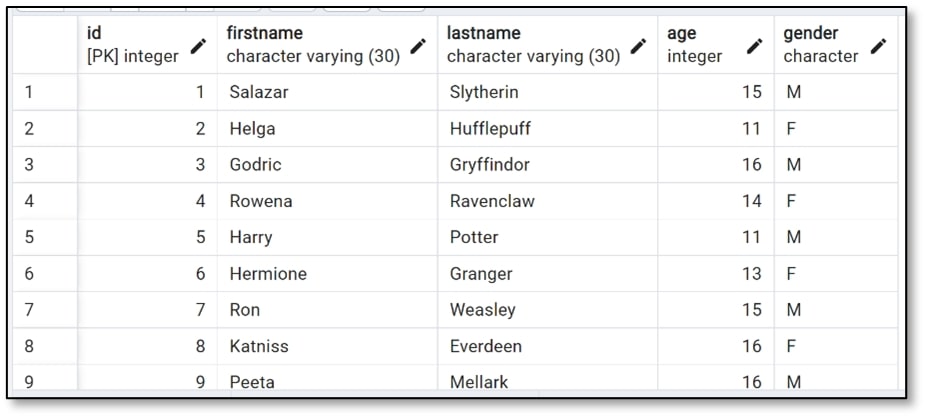
j) Save the table by clicking on the ‘Save Data Changes’ icon on the top row. Remember, any future changes to the table also need to be saved.

6) Set Up Permissions and Privileges
These permissions and privileges will be compiled from the SQL Shell (psql), so if that window was closed, open psql and connect to your database (Step 3e).
a) Create a replication user using the syntaxCREATE ROLE Username REPLICATION LOGIN PASSWORD 'Password';
Choose a Username and Password. Then press ‘Enter’.

(I used CREATE ROLE debezium REPLICATION LOGIN PASSWORD 'dbz123';).

b) Set privileges to the role created above by using the syntaxGRANT CREATE ON DATABASE “DatabaseName” TO Username;
• The DatabaseName is the name chosen when creating the database (Step 3c).
• The Username is the name chosen for the replication user (Step above).
Then press ‘Enter’.

(I used GRANT CREATE ON DATABASE "SAMPLE" TO debezium;)

c) Transfer the ownership of the table to the replication user by using the syntaxALTER TABLE TableName OWNER TO Username;
• The TableName is the name of the table created (Step 4b).
• The Username is the name chosen for the replication user (Step 6a).
Then press ‘Enter’.
(I used ALTER TABLE student OWNER TO debezium;)

d) Add the original user to the replication user by using the syntaxGRANT Username TO OriginalUser;
• The Username is the name chosen for the replication user (Step 6a).
• The OriginalUser is the user that was initially created in the installation process of Postgres (‘postgres’).
Then press ‘Enter’.
(I used GRANT debezium TO postgres;)

Overall, the set of commands listed above should look similar to the screenshot below.

7) Create a Publication
Now, the publication can be created for the table because all the necessary permissions and privileges have been set up. This is done on psql by logging in as the replication user (that was created in Step 6a).
a) Open a separate SQL Shell (psql) terminal – a fresh terminal.
b) Press the ‘Enter’ button until ‘Username [postgres]:’ appears. (I pressed enter three times).
Type the username that was chosen for the replication user (Step 6a) and press ‘Enter.’
Type the password that was also chosen for the replication user (Step 6a) and press ‘Enter.’
The password will not appear on the screen when you are typing it, but it is being recorded.
(My username was debezium and my password was dbz123).
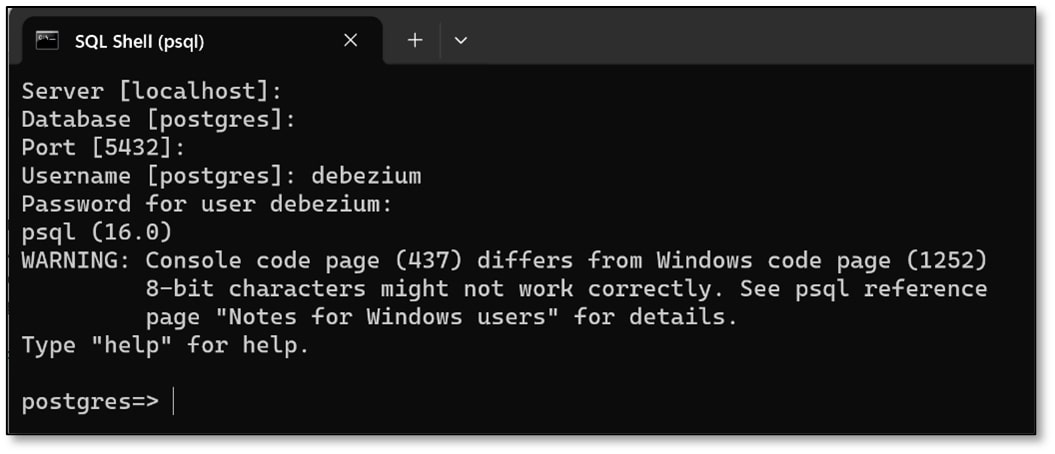
c) Connect to your database by using the syntax \c DatabaseName
• The DatabaseName is the name chosen for your database (Step 3c).
Then press ‘Enter’.
(I used \c SAMPLE). A confirmation message should appear to show that you are now connected to the database.

d) Create the publication by using the syntaxCREATE PUBLICATION Username_publication FOR TABLE "public"."TableName";
• The Username is the one chosen for the replication user (Step 6a).
• The TableName is the name of your table (Step 4b).
Then press ‘Enter’.
(I used CREATE PUBLICATION debezium_publication FOR TABLE "public"."student";)

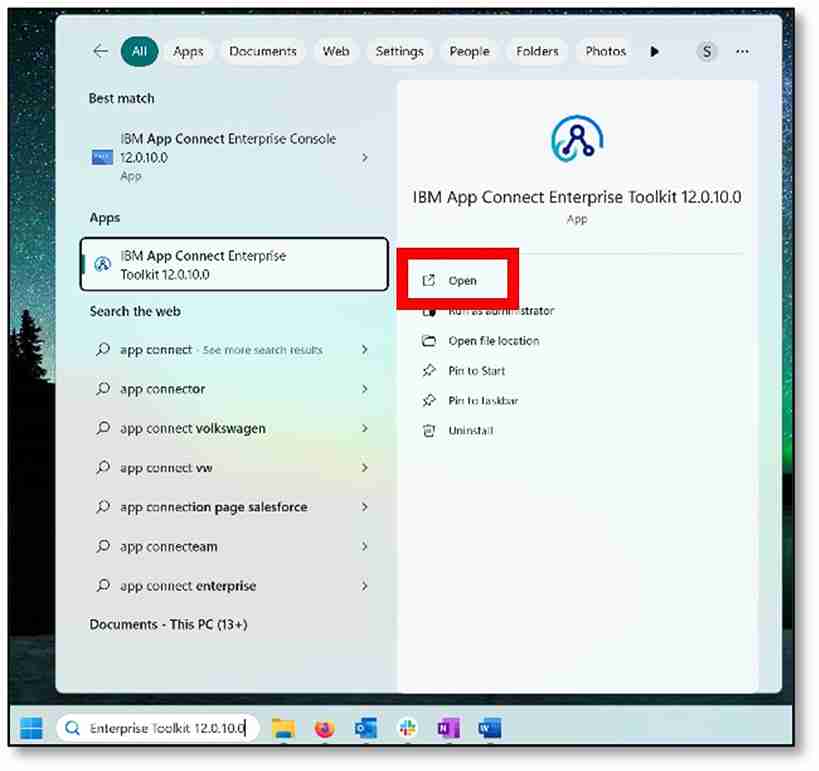
8) Start App Connect Enterprise Toolkit V12
a) Open the toolkit app.
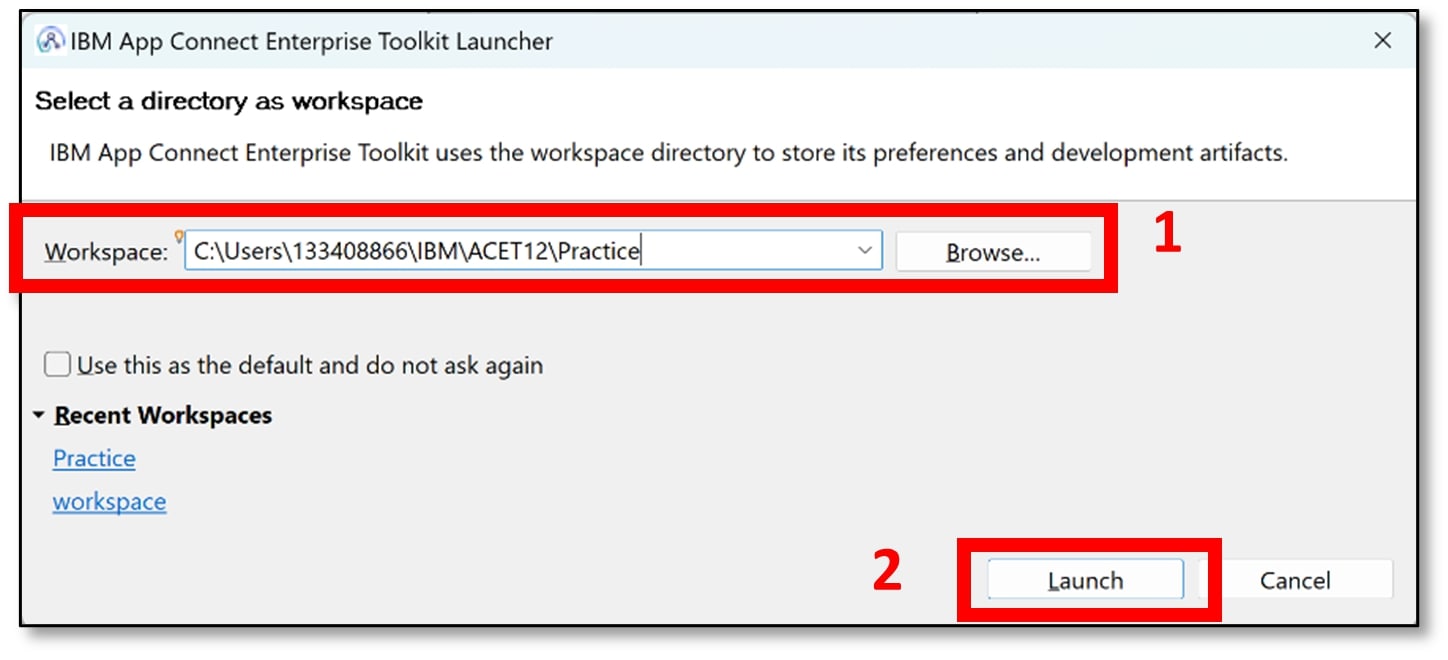
b) Select your preferred workspace (mine is C:\Users\133408866\IBM\ACET12\Practice) and click ‘Launch.’
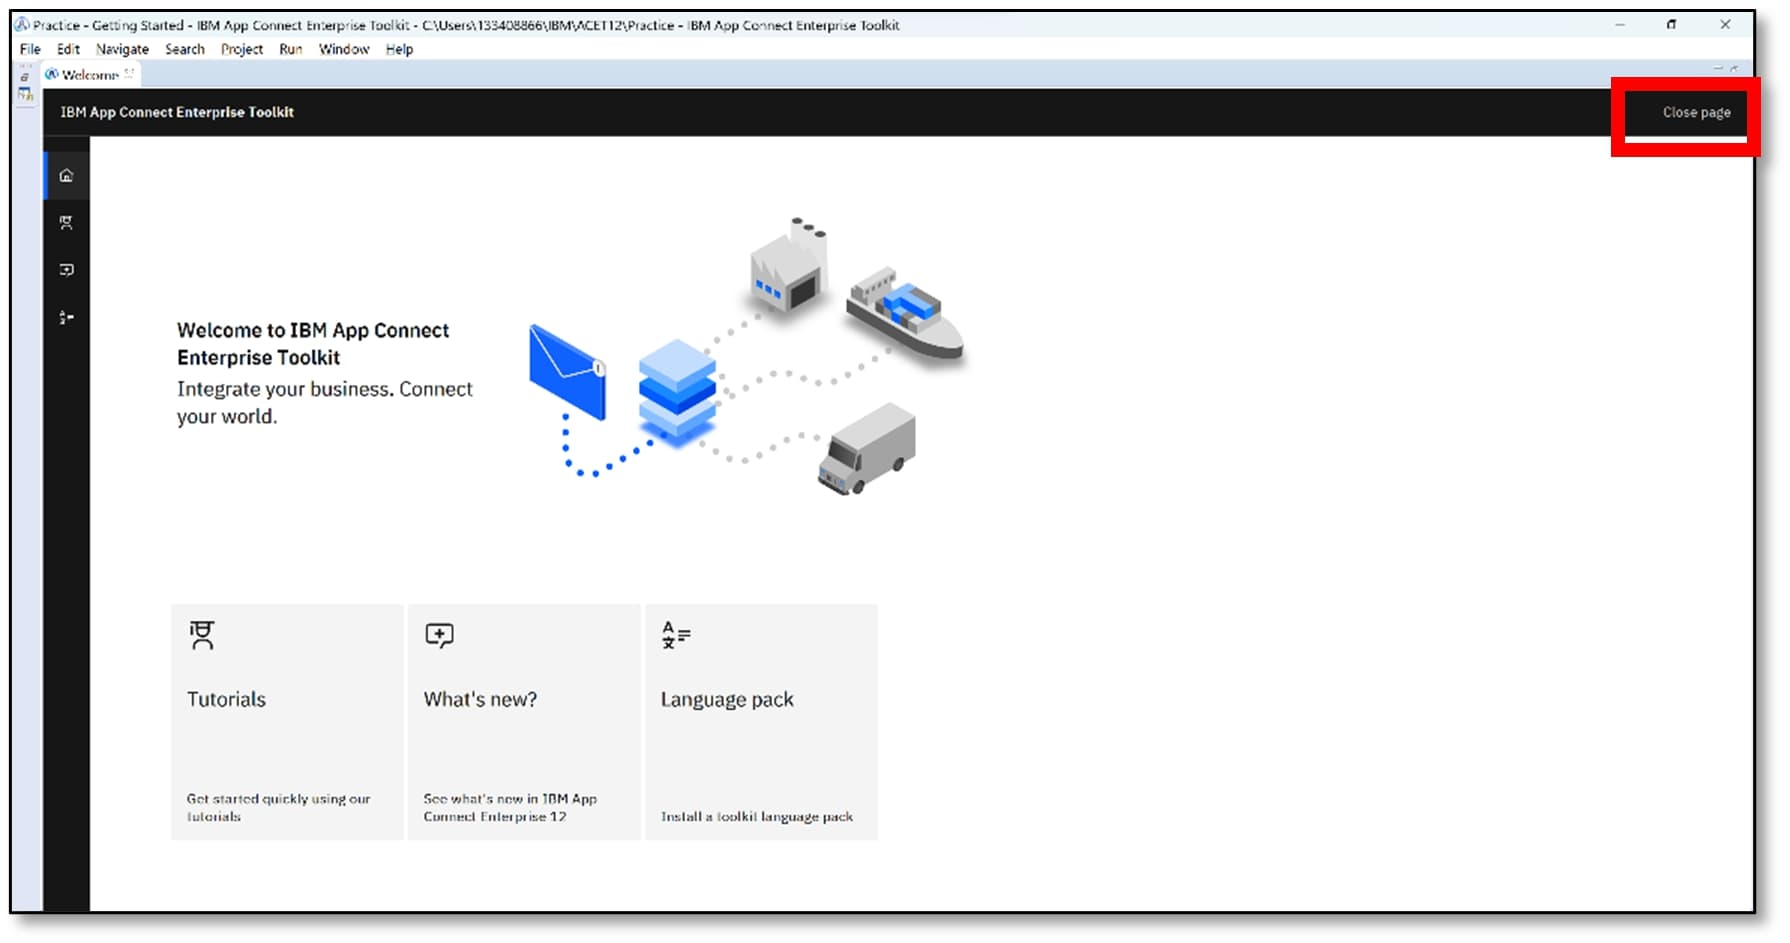
c) The home screen will be visible on a new start-up. Click ‘Close page’ (top right).
9) Create a Security Identity (DSN)
A security identity (or a credential) needs to be generated before creating a policy (Step 10).

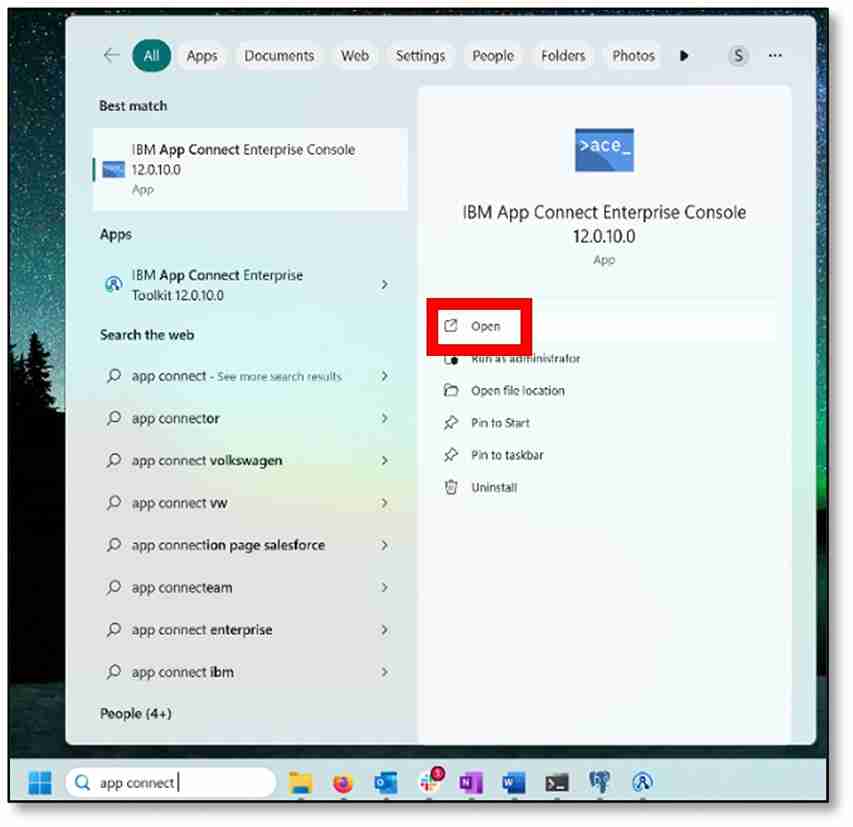
a) Open the App Connect Enterprise Console.
b) Create a new directory to be used as the integration server’s work directory by using the syntax mqsicreateworkdir DirectoryName• The DirectoryName is the name of the file path where your vault will be stored. Store the vault in a separate folder in the same workspace that you launched in Toolkit (Step 8b).

Then press ‘Enter’.
(My workspace was C:\Users\133408866\IBM\ACET12\Practice, so I used
mqsicreateworkdir C:\Users\133408866\IBM\ACET12\Practice\CDClocalIS).
This automatically creates the folder CDClocalIS if it did not already exist.

c) In the work directory created above, a vault needs to be created. The vault can be used to store multiple sets of credentials if desired. The syntax for creating a vault ismqsivault --create --vault-key VaultKeyName --work-dir DirectoryName
• The VaultKeyName is the name you want to give to the vault.
• The DirectoryName <is the one chosen for the file path (Step above).
Then press ‘Enter’.
(I used mqsivault --create --vault-key CDCVaultKey --work-dir
C:\Users\133408866\IBM\ACET12\Practice\CDClocalIS)

d) Now, the credentials for the database can be created within the vault mentioned
above. The syntax for creating a CDC credential ismqsicredentials --create --credential-type cdc --credential-name CredentialName -- username Username --password Password --vault-key VaultKeyName --work-dir DirectoryName
• The CredentialName is the name you want to give to the credential.
• The Username is the one chosen for the replication user (Step 6a).
• The Password is the one chosen for the replication user (Step 6a).
• The VaultKeyName is the name chosen for the vault (Step above).
• The DirectoryName is the one chosen for the file path (Step 9b).
Then press ‘Enter’.
(I used mqsicredentials --create --credential-type cdc --credential-name CDCpostgres --username debezium --password dbz123 --vault-key CDCVaultKey -- work-dir
C:\Users\133408866\IBM\ACET12\Practice\CDClocalIS)


10) Create a Policy
Policies help to control node properties, such as connection credentials and certain behaviors of the message flow. Policies also provide a shared and managed definition that is reusable. A policy of type CDC needs to be created, which will then be deployed alongside the message flow.
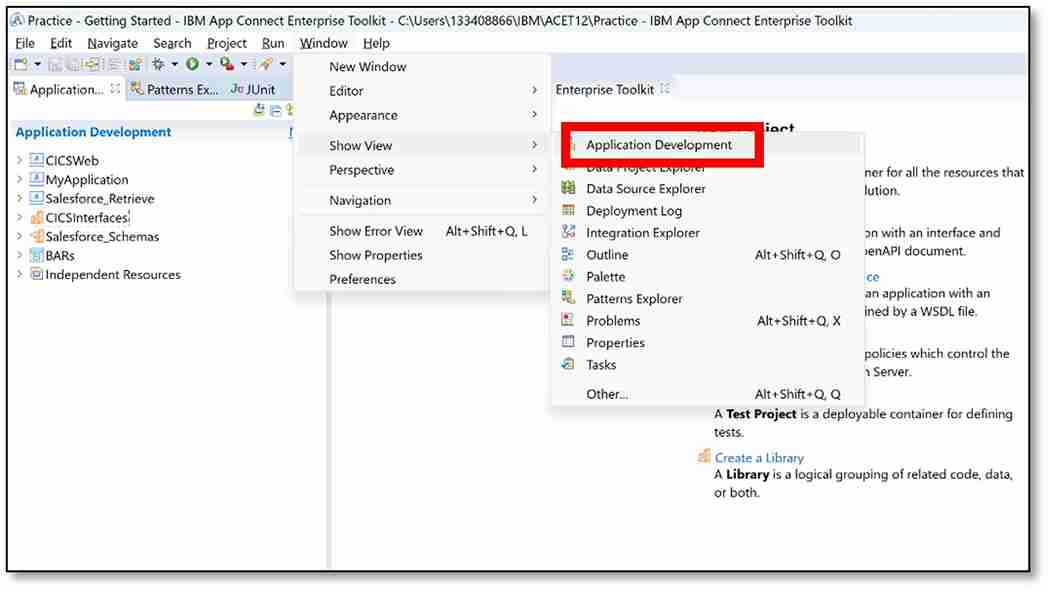
a) The 'Application Development' view should already be visible in the top left-hand corner. If not, from the top bar, click ‘Window’ → ‘Show View’ → ‘Application Development.’
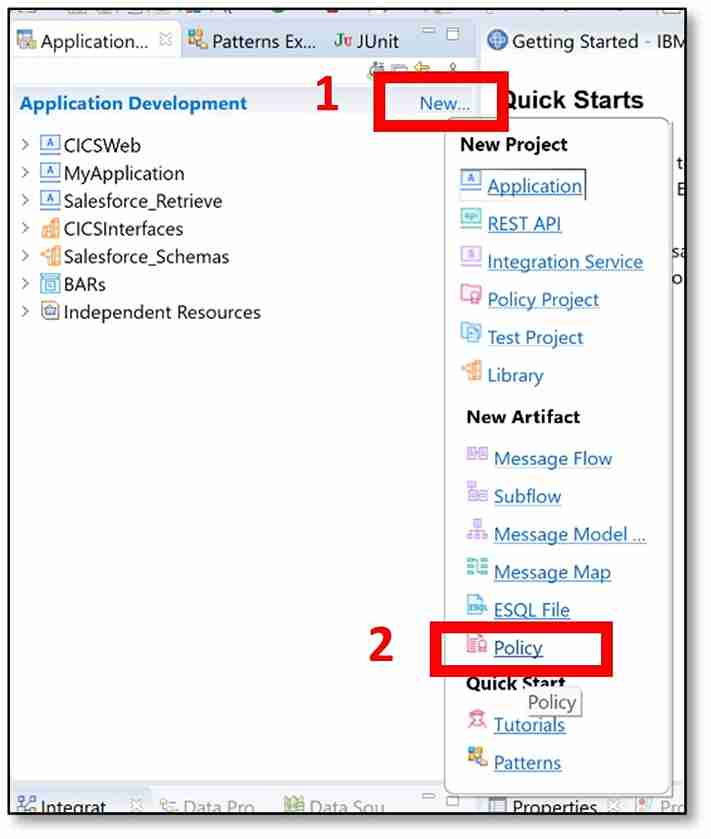
b) Next to Application Development, click ‘New…’ → ‘Policy.’
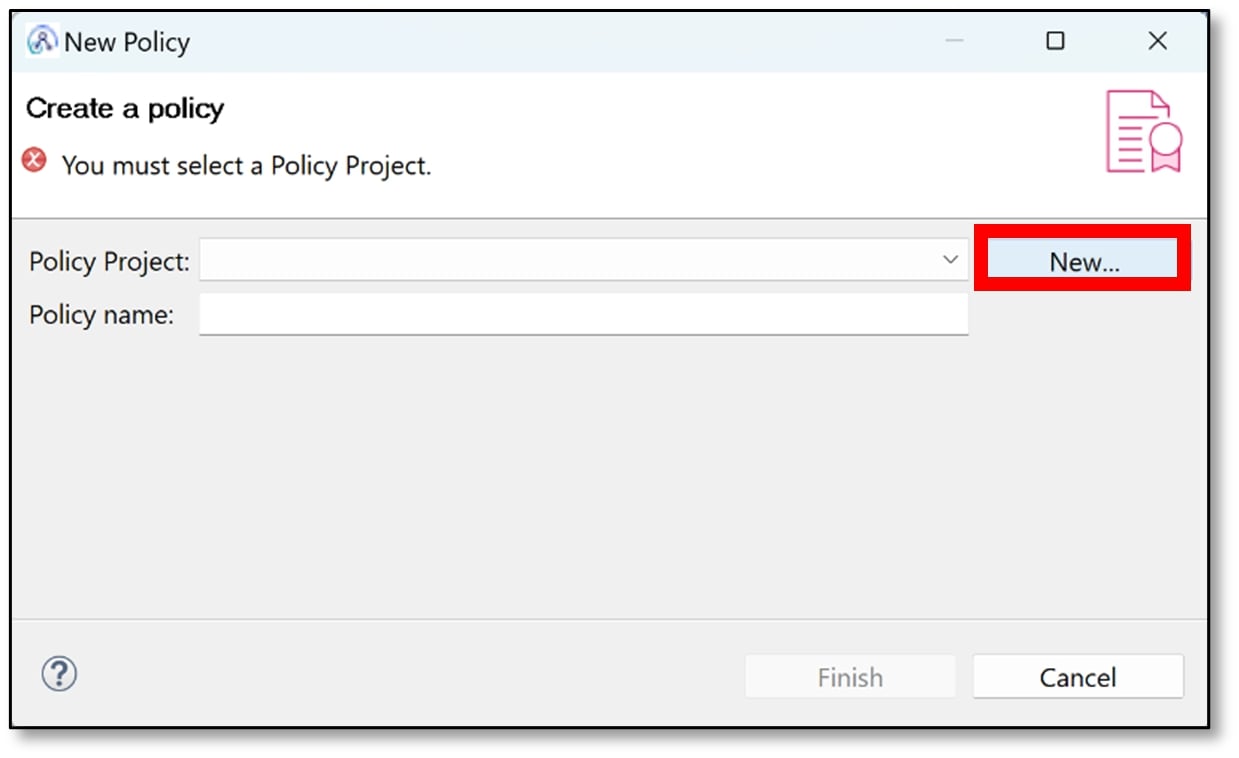
c) A pop-up window should appear. A policy is created within a policy project, so first, a policy project needs to be created. Click the ‘New…’ button.
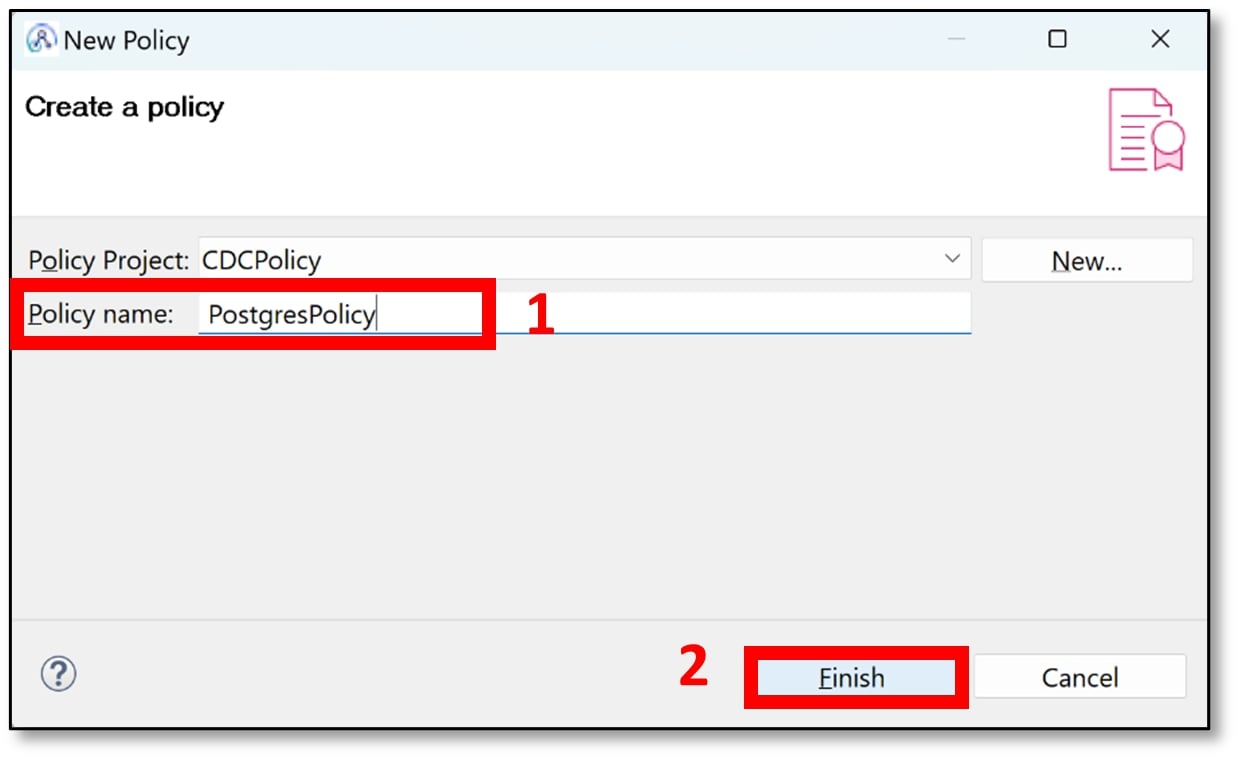
d) Enter a suitable policy project name (I used CDCPolicy). Then click ‘Finish’.

e) Now enter a suitable name for the policy (I used PostgresPolicy). Then click ‘Finish’.
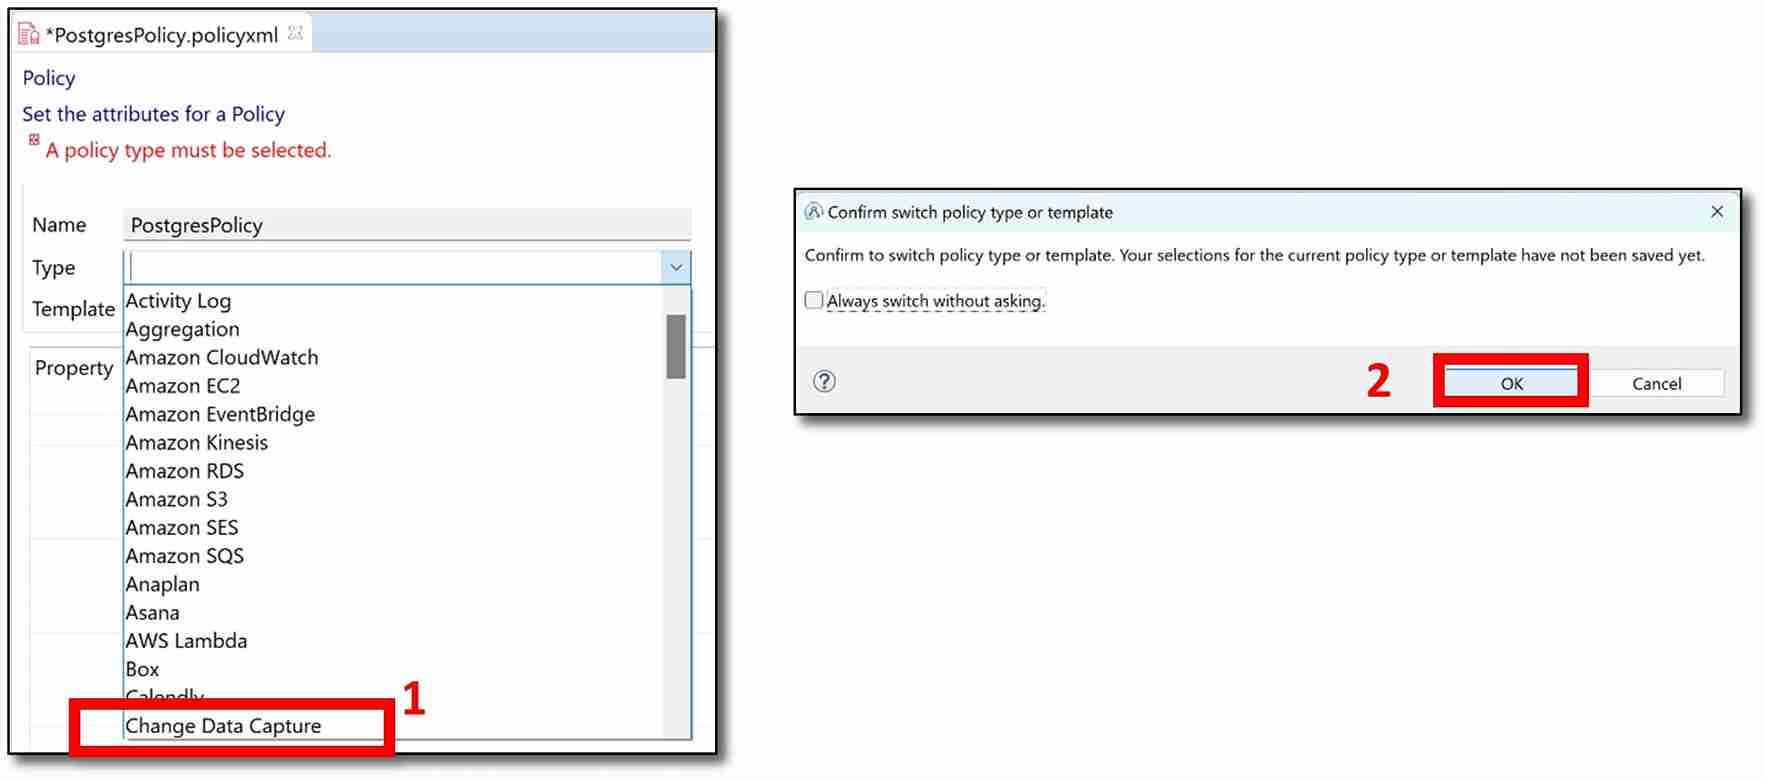
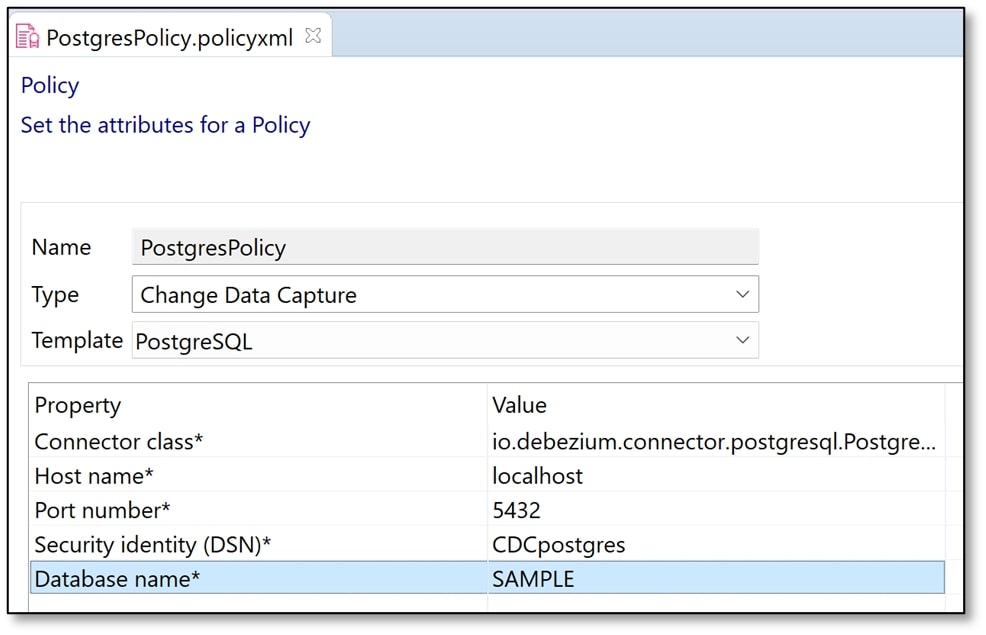
f) The newly created policy should now appear on the main body of the screen. Under the ‘Name’ variable, there should be a ‘Type’ variable. Next to ‘Type’ click on the drop-down menu and select ‘Change Data Capture’. A confirmation message will pop up, click ‘OK.’
g) Next to ‘Template,’ click on the drop-down menu and select ‘PostgreSQL’. A confirmation message will pop up. Click ‘OK’.
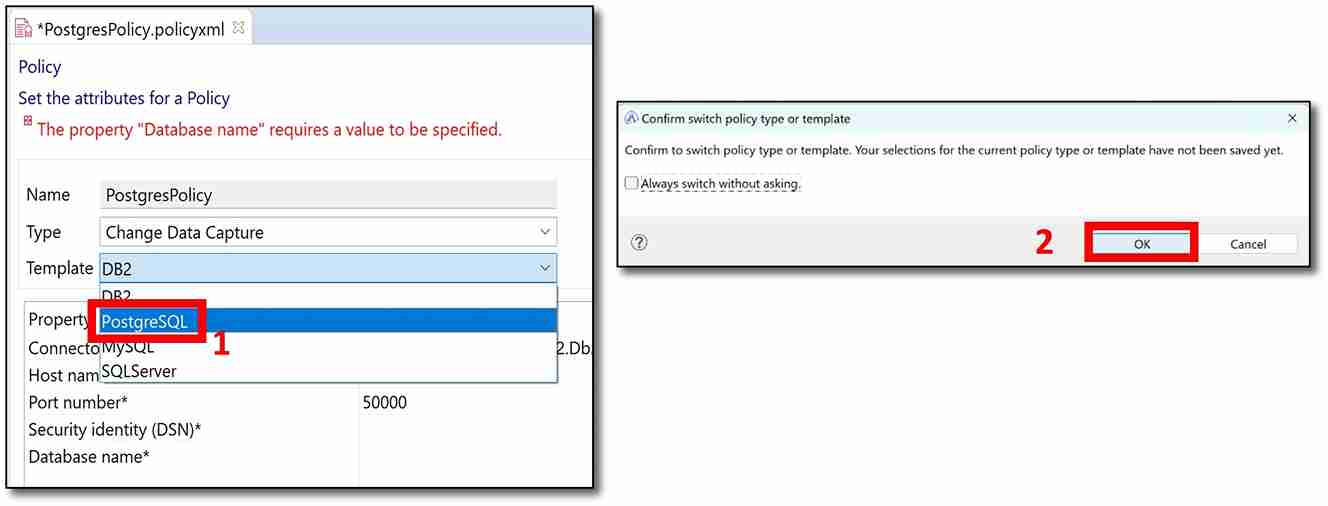
h) Now, the missing values in the table need to be filled in.
• Connector class: io.debezium.connector.postgresql.PostgresConnector (This should already have automatically been filled in)
• Host name: localhost
• Port number: 5432 (This should already have automatically been filled in)
• Security identity (DSN): The security identity you created (Step 9d). (Mine was CDCpostgres).
• Database name: The name of the database you created (Step 3c). (Mine was SAMPLE).
Then save the policy (press Ctrl+S). Below is a screenshot of my policy.
11) Configure the Integration Server
It is possible to run different Java versions on different integration servers, even if they are owned by the same integration node. The IBM App Connect CDC node needs to run on java11 so an integration server needs to be created that runs java11 and not java8 (which is the default).
a) Open the App Connect Enterprise Console if it has been closed.
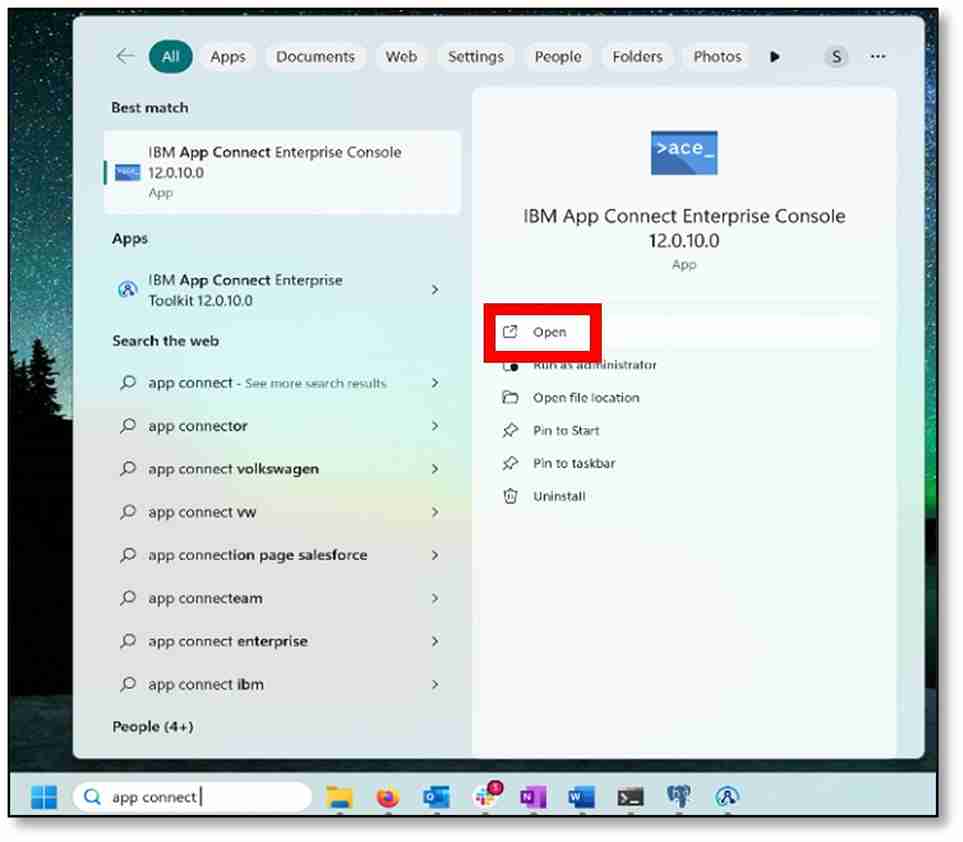
b) Specify the Java version as Java11 by using the syntaxibmint specify jre --version 11 --work-dir DirectoryName
• The DirectoryName is the one chosen for the file path (Step 9b).
Then press ‘Enter’.
(I used ibmint specify jre --version 11 --work-dir
C:\Users\133408866\IBM\ACET12\Practice\CDClocalIS)

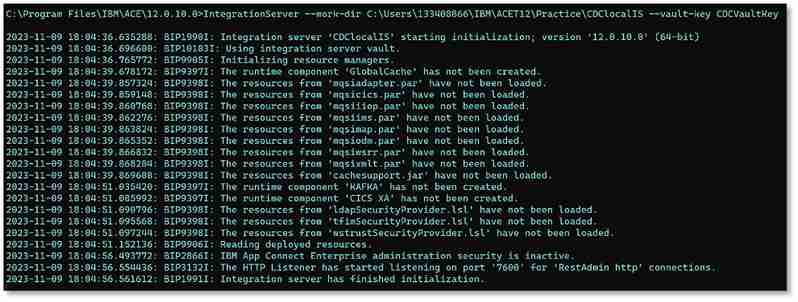
c) Start the integration server by using the syntaxIntegrationServer --work-dir DirectoryName --vault-key VaultKeyName
• The DirectoryName is the one chosen for the file path (Step 9b).
• The VaultKeyName is the name chosen for the vault (Step 9c).
Then press ‘Enter.’
(I used IntegrationServer --work-dir
C:\Users\133408866\IBM\ACET12\Practice\CDClocalIS --vault-key CDCVaultKey)
d) Now, go back to the App Connect Enterprise Toolkit and find the ‘Integration Explorer’ window which is in the bottom left-hand corner of the screen.
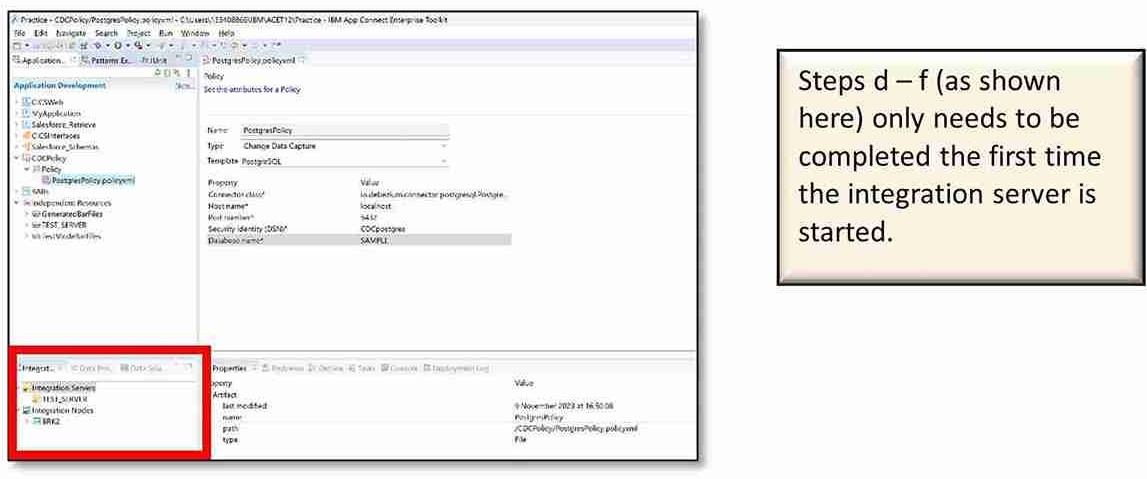
e) Right-click on ‘Integration Servers’ → ‘Connect to an Integration Server.’

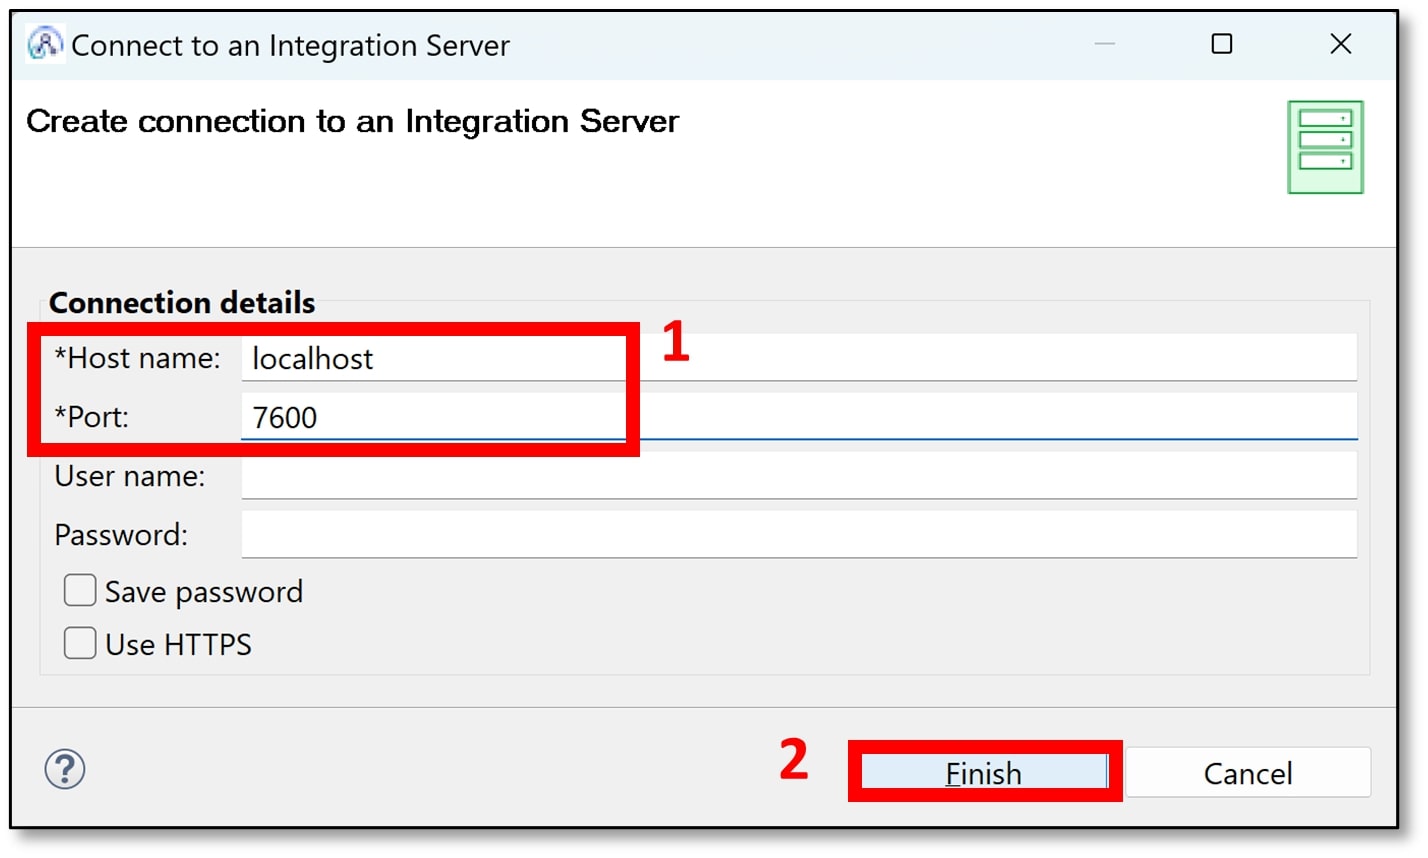
f) A pop-up window should appear. Enter the Hostname as ‘localhost’ and the Port as ‘7600’. Then click ‘Finish’.
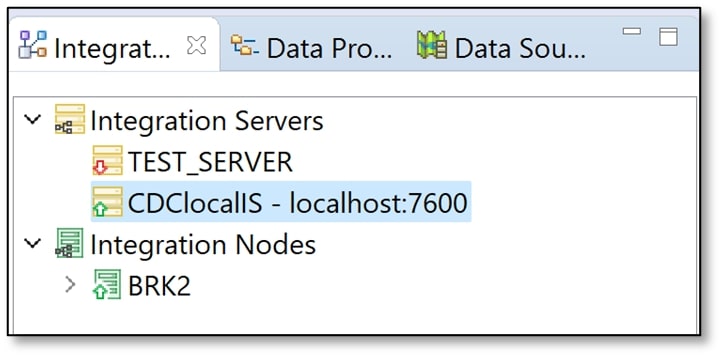
Under the ‘Integration Servers’ drop-down menu, you should now see the integration server that was started from the App Connect Enterprise Console. There should be a small green arrow on the folder icon indicating that the server is running.

12) Configure the CDC Node
For the change data capture node to work properly, it requires extra jar files specific to the database being used (in this case, Postgres).
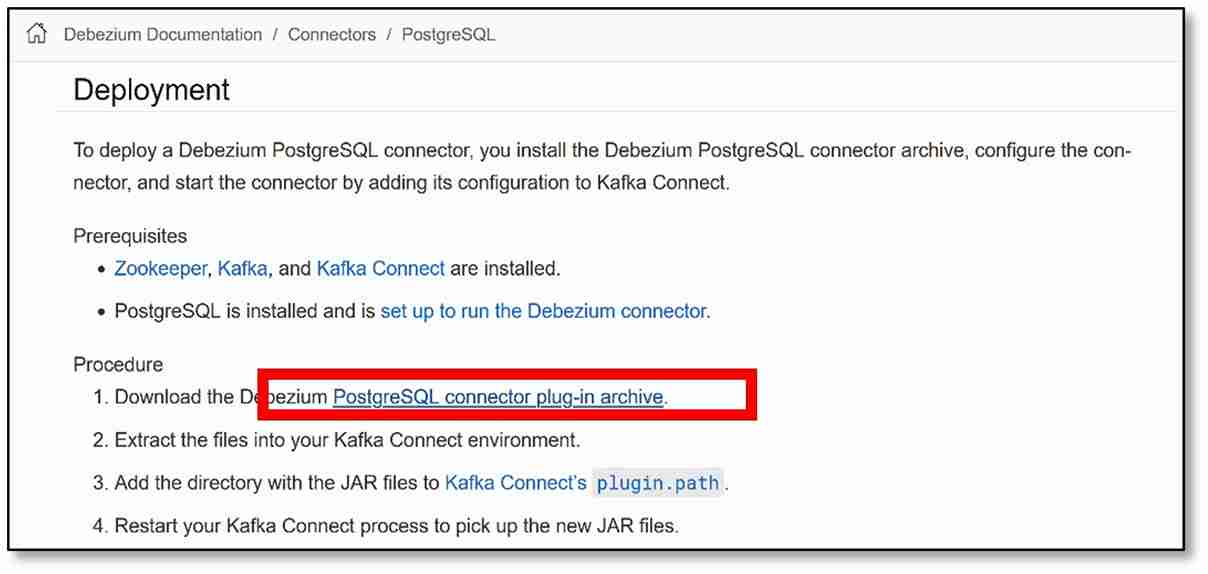
a) Visit the ‘Deployment’ section for the Postgres database by clicking here.
b) Under ‘Procedure,’ Step 1, click on the link to download the ‘PostgreSQL connector plug-in archive.’
Once the download is complete, open Downloads in File Explorer and locate the file (mine was named debezium-connector-postgres-2.3.4.Final-plugin.tar.gz). Open the file using 7-Zip File Manager by right-clicking on the file → ‘Open with’ → ‘7-Zip File Manager’ or use your own zip utility to extract the zipped file.
(On modern Windows systems, you can also extract the file on Command Prompt; open the ‘Command Prompt’ app from the Start menu → type ‘cd Downloads’ then press ‘Enter’ → type ‘tar xzf debezium-connector-postgres-2.3.4.Final-plugin.tar.gz’ or the equivalent name of your downloaded file → press ‘Enter.’ The extracted folder should now be visible in Downloads in File Explorer with a name similar to ‘debezium-connector-postgres’).
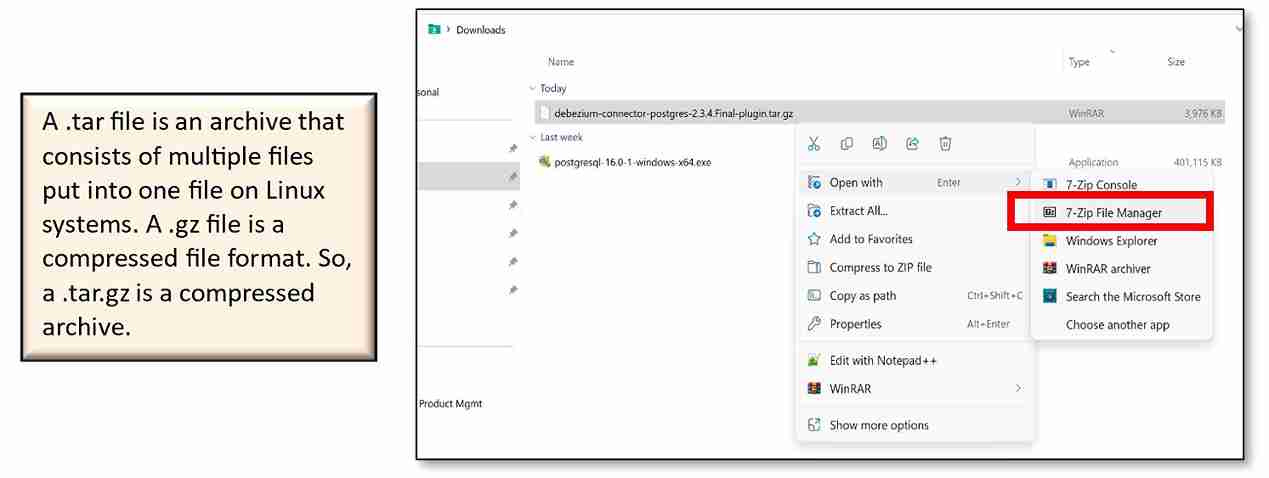

Note: 7-Zip File Manager can be downloaded from here.
c) A pop-up window should appear. Select the downloaded file, then click ‘Extract’.

d) A pop-up window should appear. Leave the file path as is, and then click ‘OK’.

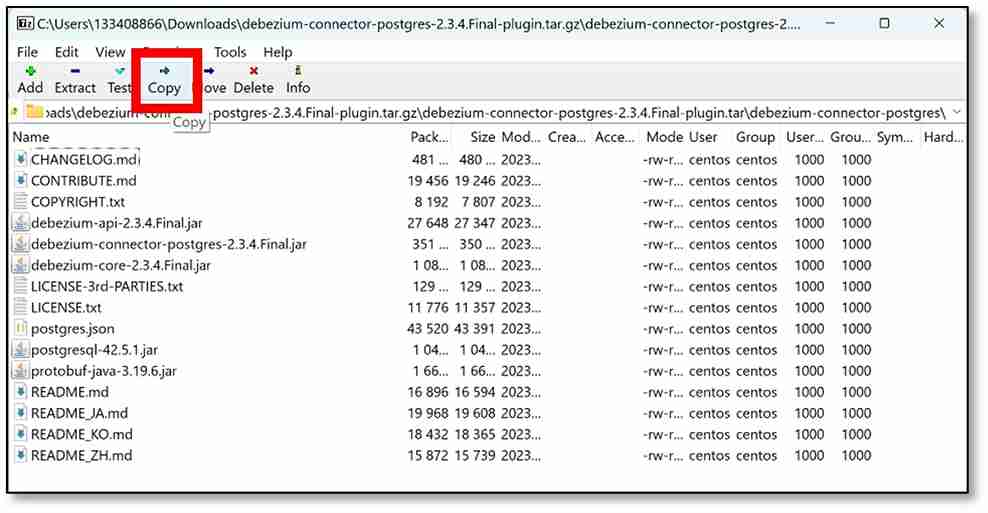
e) Double-click on the .tar file, then double-click again on the ‘debezium-connector-postgres’ folder to see the list of files. There should be 15 files in total. Click ‘Copy’ on the top of the screen.
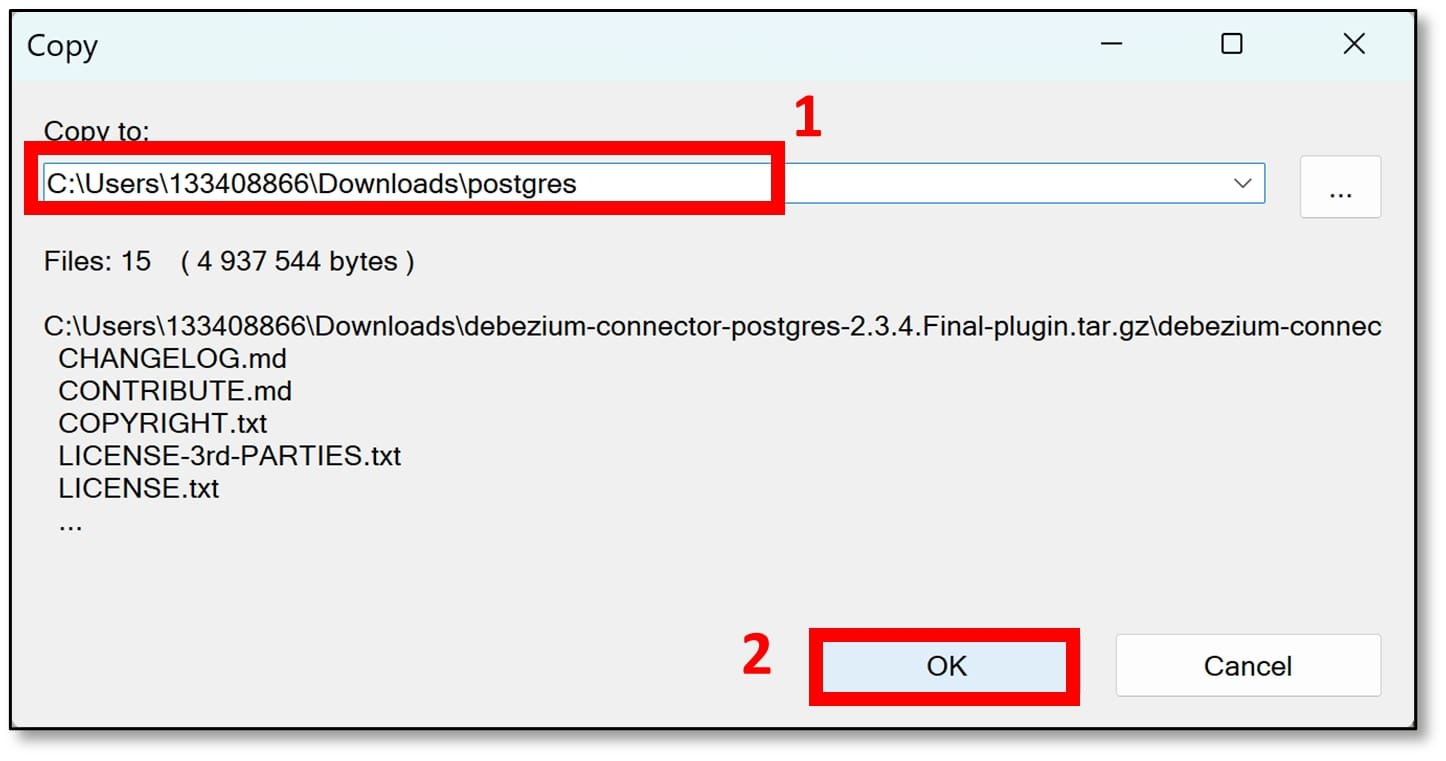
f) On the pop-up window, add ‘postgres’ onto the end of the file path already given – similar to C:\Users\...\Downloads\postgres, then click ‘OK.’
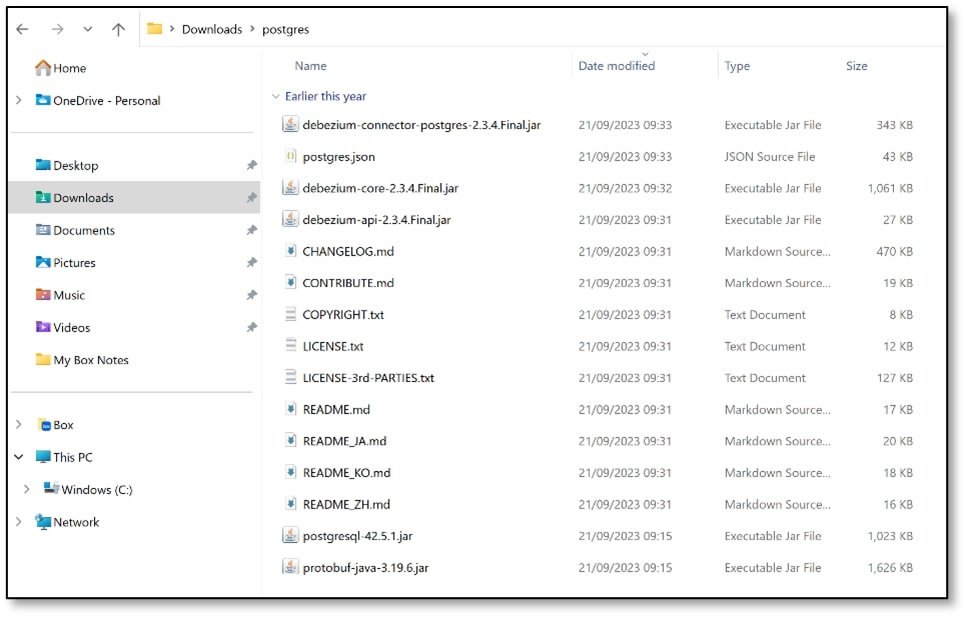
g) You should now see in your Downloads folder that there is a new folder called ‘postgres’, which contains all the extracted files from the Debezium Connector Postgres plug-in.
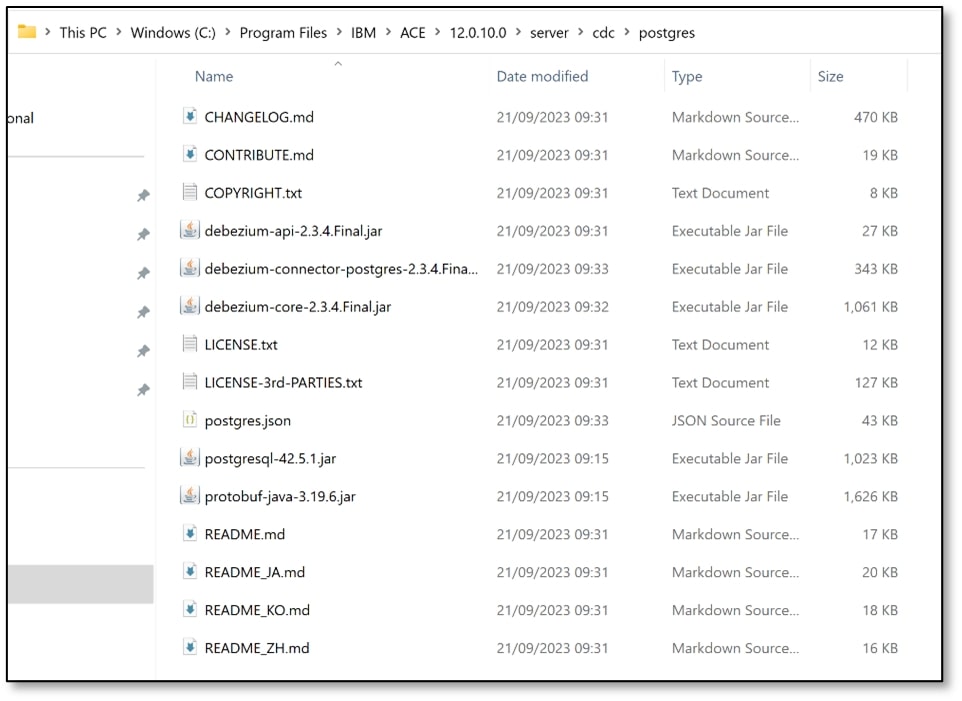
h) Copy that ‘postgres’ folder into the cdc server directory where you installed ACE (mine was C:\Program Files\IBM\ACE\12.0.10.0\server\cdc). For other systems, copy that folder into an equivalent path; on Linux, the path will be similar to opt/mqsi/server/cdc.
13) Build the Message Flow
The message flow can now be built in the ACE Toolkit. This flow will capture any changes that are made to the database that was created in Step 3. Open Toolkit if it was closed (Step 8).
a) The 'Application Development' view should already be visible in the top left-hand corner. If not, from the top bar, click ‘Window’ → ‘Show View’ → ‘Application Development.’
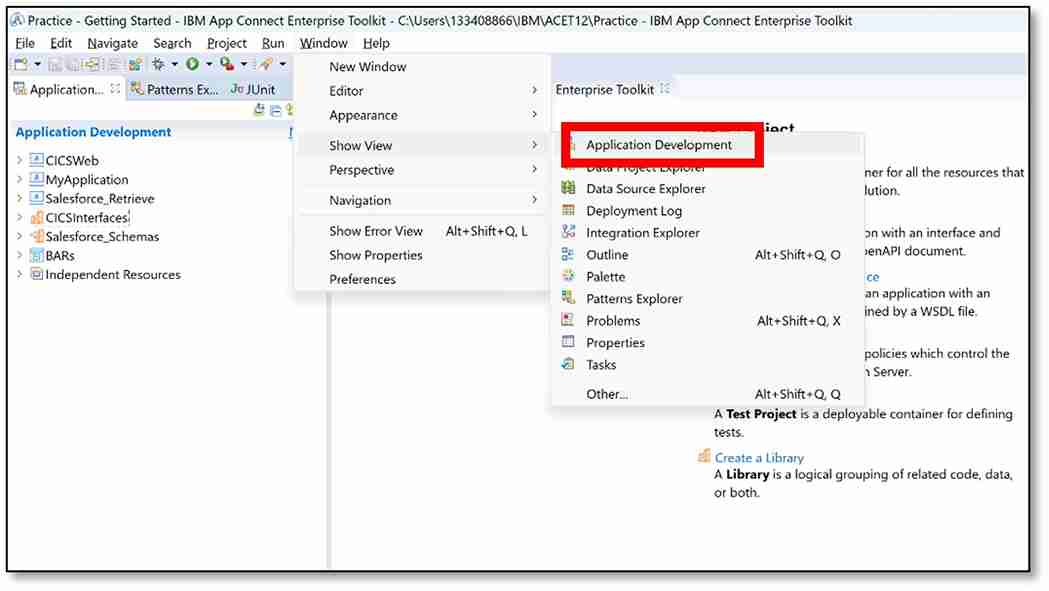
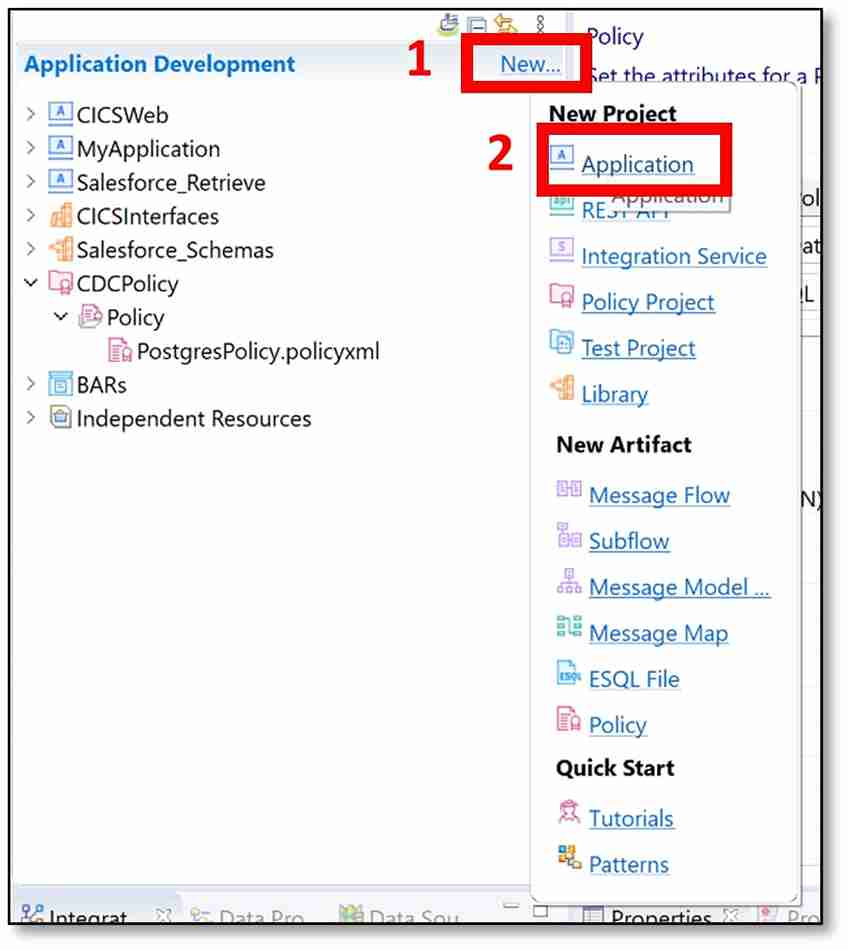
b) Next to Application Development, click ‘New…’ → ‘Application.’
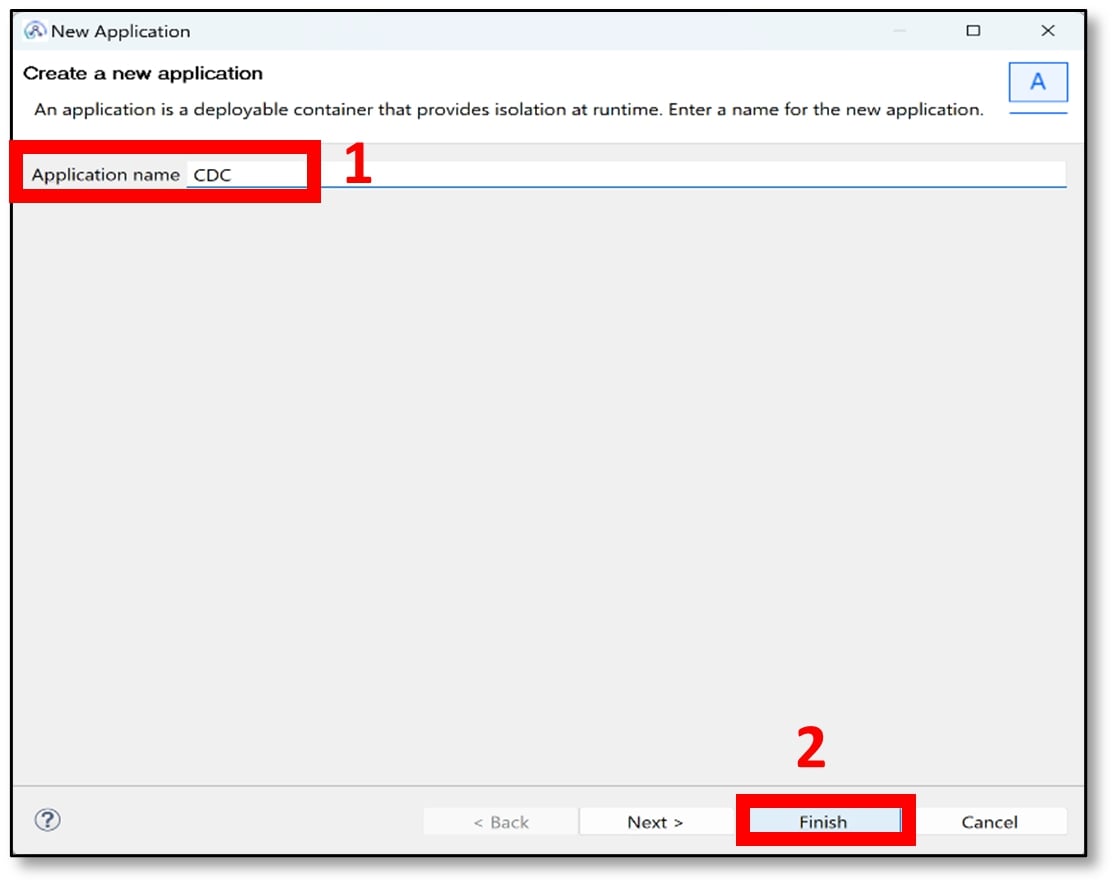
c) A pop-up window should appear. Name your application with something appropriate (I used CDC). Then click ‘Finish’.
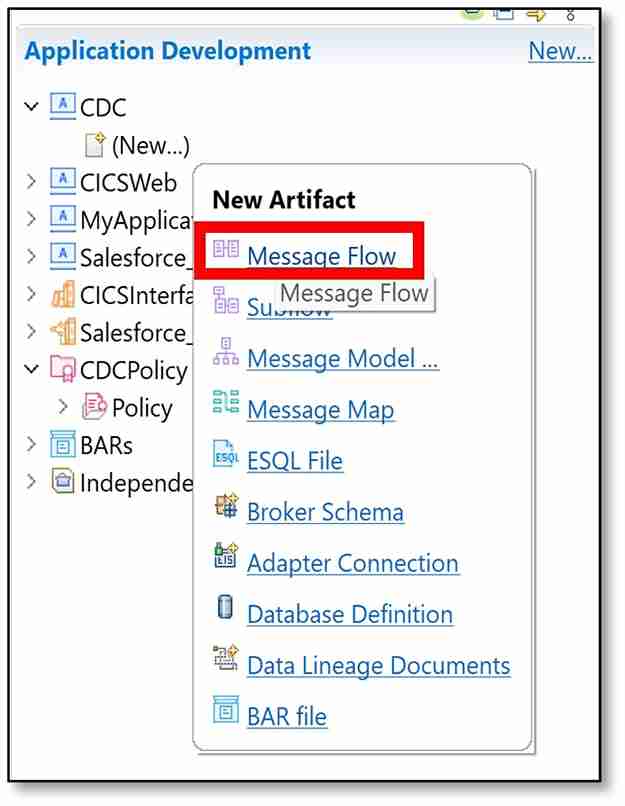
d) Under the newly created application, click ‘(New…)’ → ‘Message Flow’.
e) Name your flow with something appropriate (I used CDCFlow). Then click ‘Finish’.
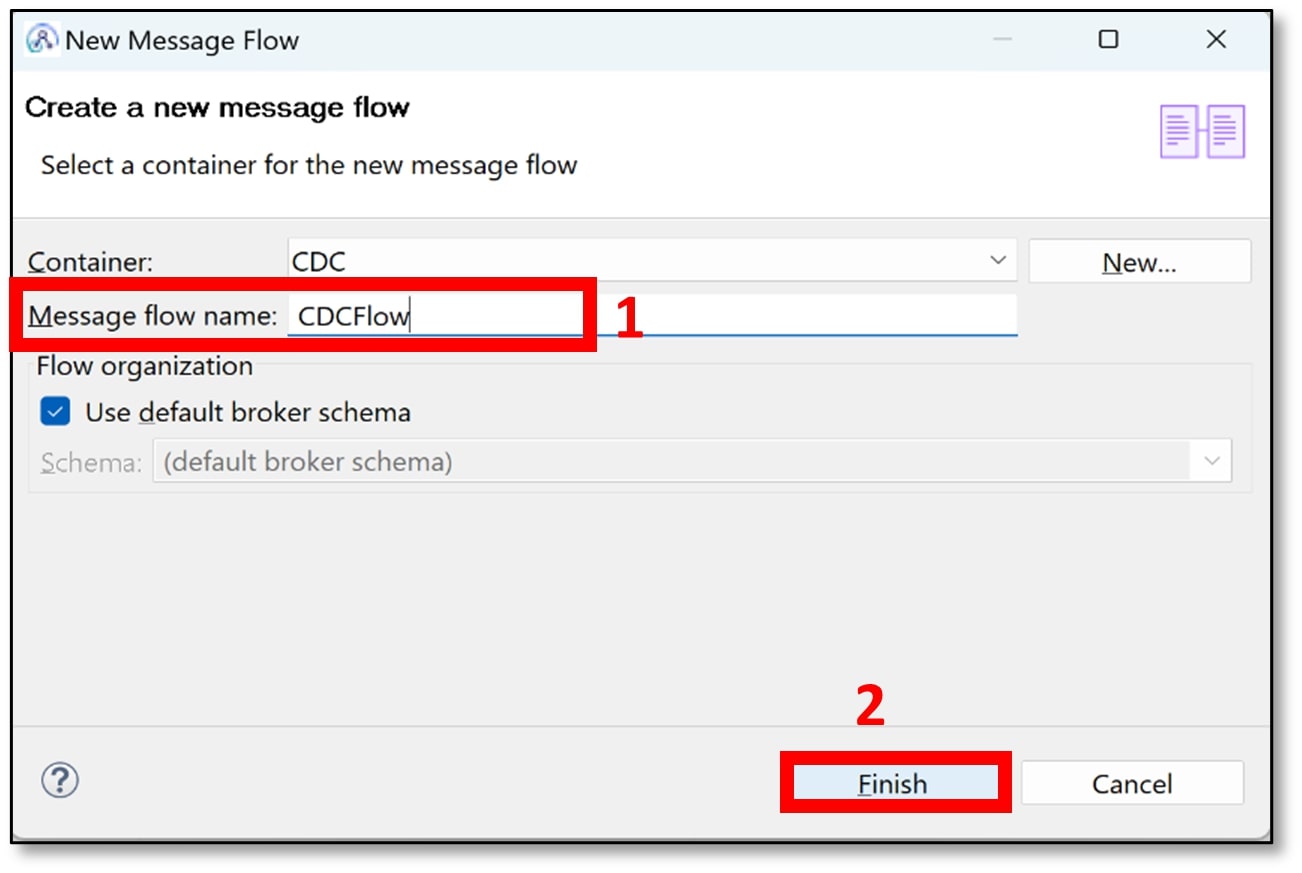
The little orange triangle warning sign is just to tell you the message flow currently does not contain any input nodes – you can ignore it.
f) In the ‘Connectors’ section of the Palette, scroll down to the ‘Database’ connector and click on ‘Database’.
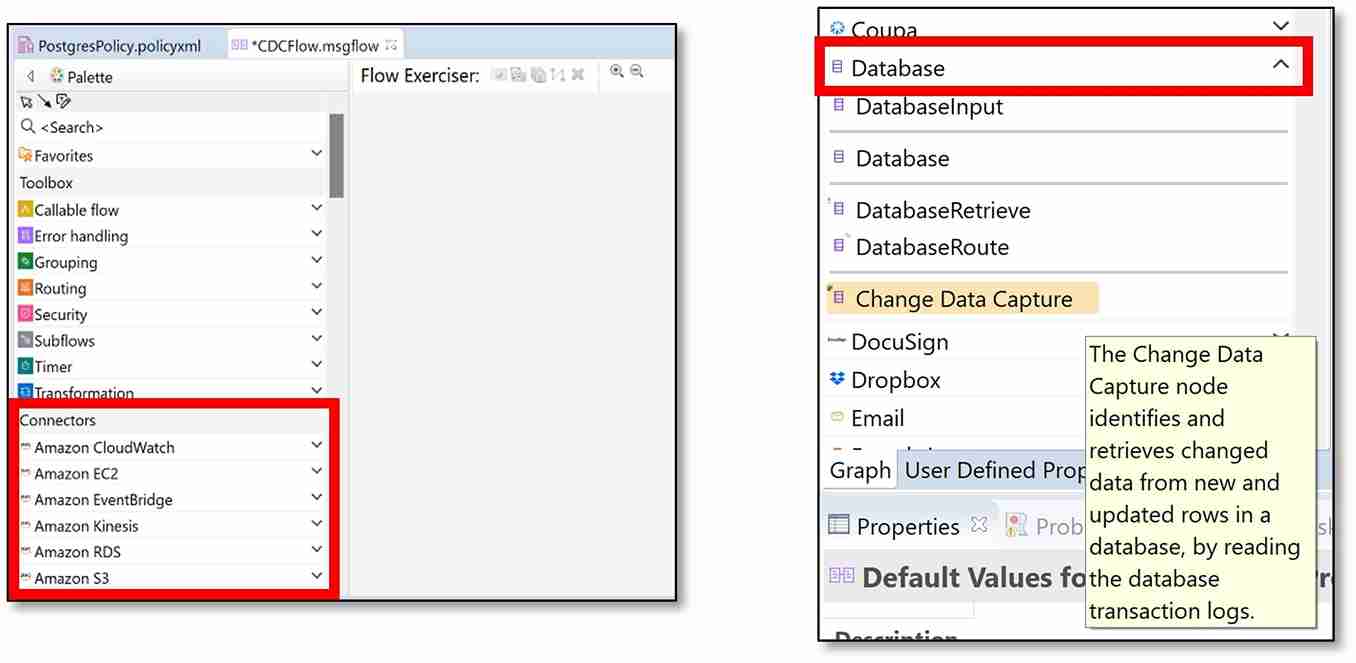
g) The CDC node should be visible under the Database section. Select the ‘Change Data Capture’ node and drag it onto the message flow canvas.
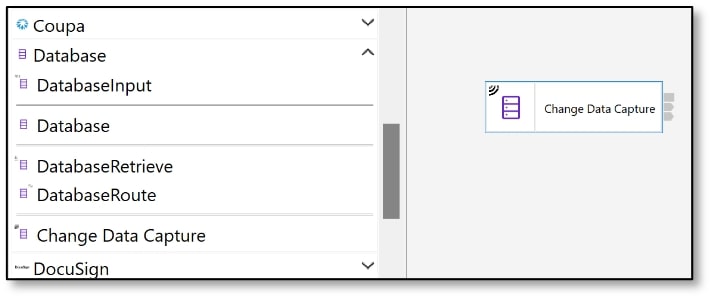
h) Scroll back up to the ‘Toolbox’ section of the Palette and click on ‘Error Handling.’
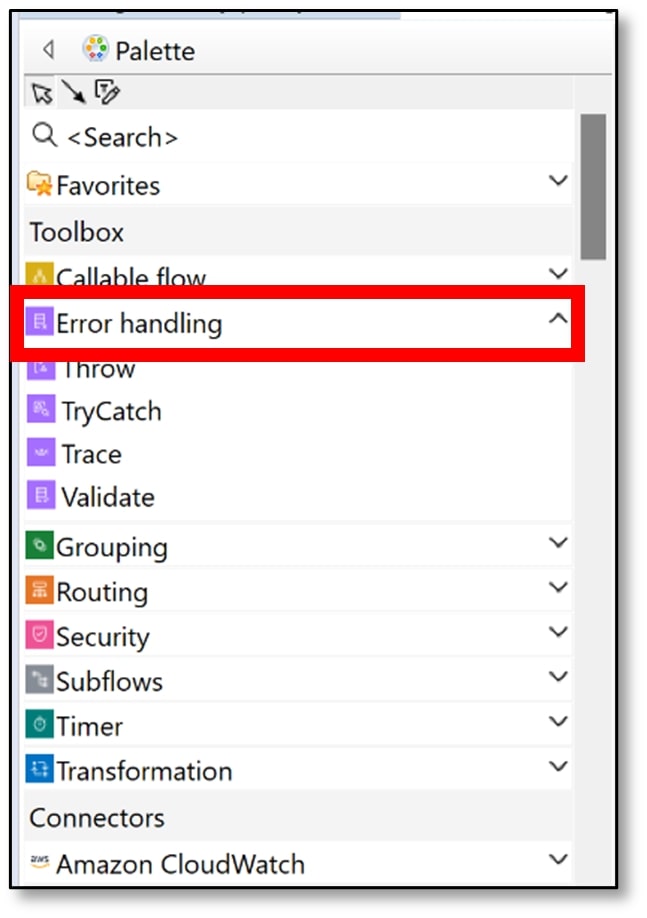
i) Select the ‘Trace’ node and drag it onto the message flow canvas, next to the CDC node.

j) Scroll back down to the ‘Connectors’ section of the Palette and click on ‘File.’
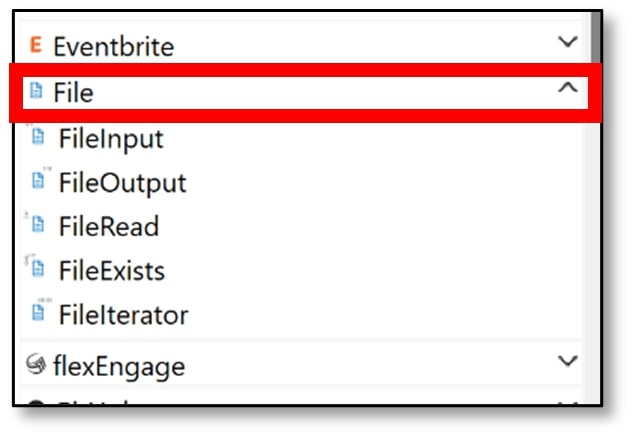
k) Select the ‘FileOutput’ node and drag it onto the message flow canvas, next to the Trace node.

l) Connect the ‘Out’ terminal of the ‘Change Data Capture’ node to the ‘In’ terminal of the ‘Trace’ node. Then, connect the ‘Out’ terminal of the ‘Trace’ node to the ‘In’ terminal of the ‘File Output’ node.
m) Save the flow (using Ctrl+S). You will see a small red cross appear on the CDC node on the canvas. Click on the ‘Change Data Capture’ node, then click on the ‘Properties’ tab under the message flow.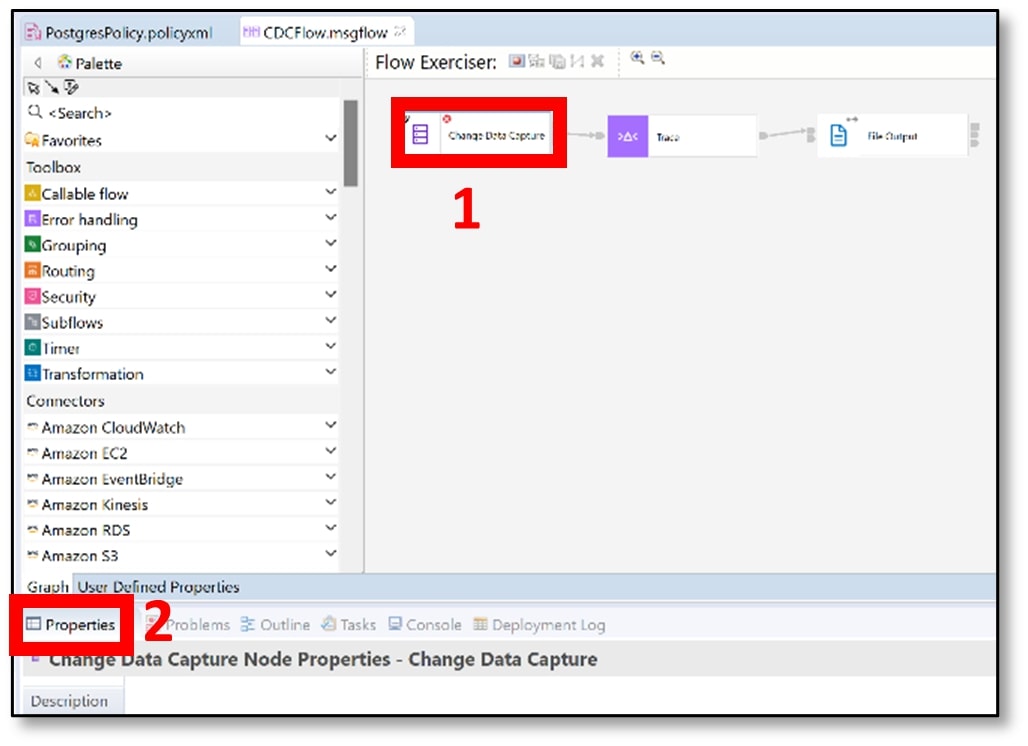
n) On the ‘Basic’ tab, click on ‘Browse’.

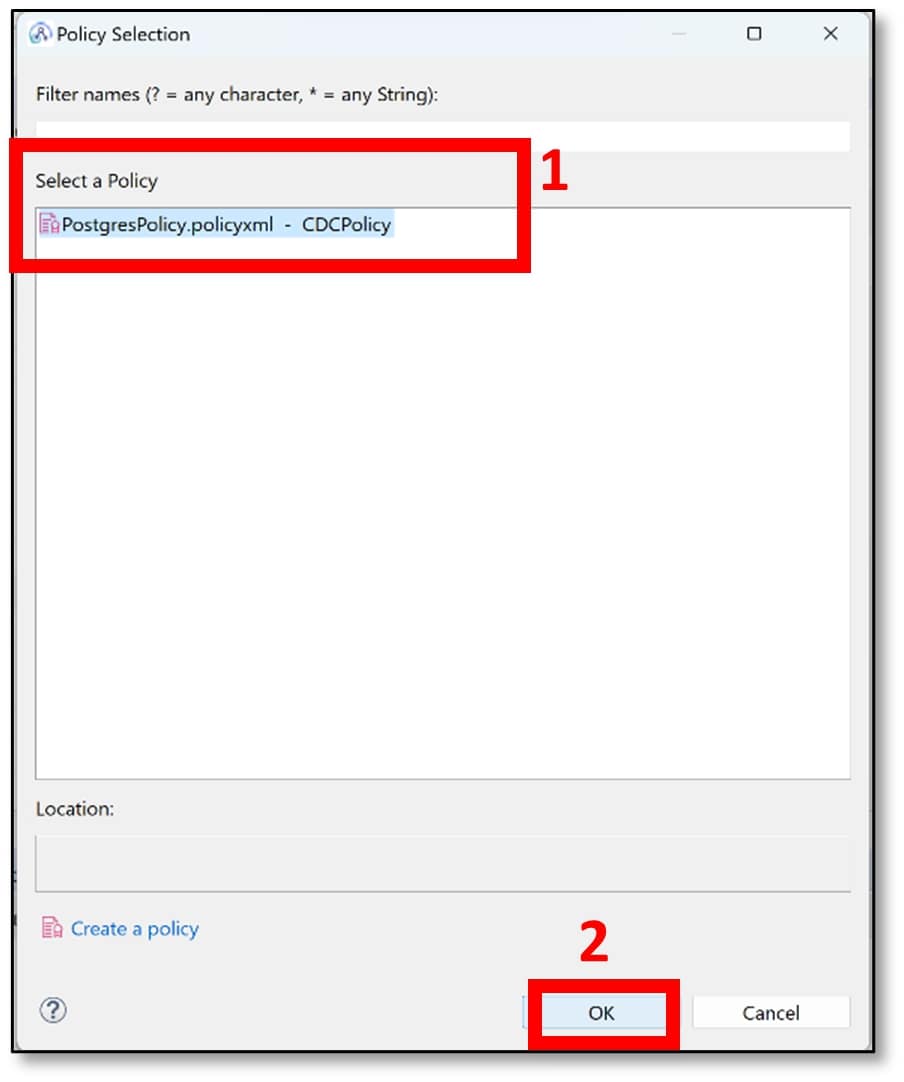
o) A pop-up window should appear. Select the name of the policy that was created (Step 10e) and click ‘OK.’ (My policy was called PostgresPolicy).
p) Now, the table that was created earlier needs to be added. Click ‘Add’.

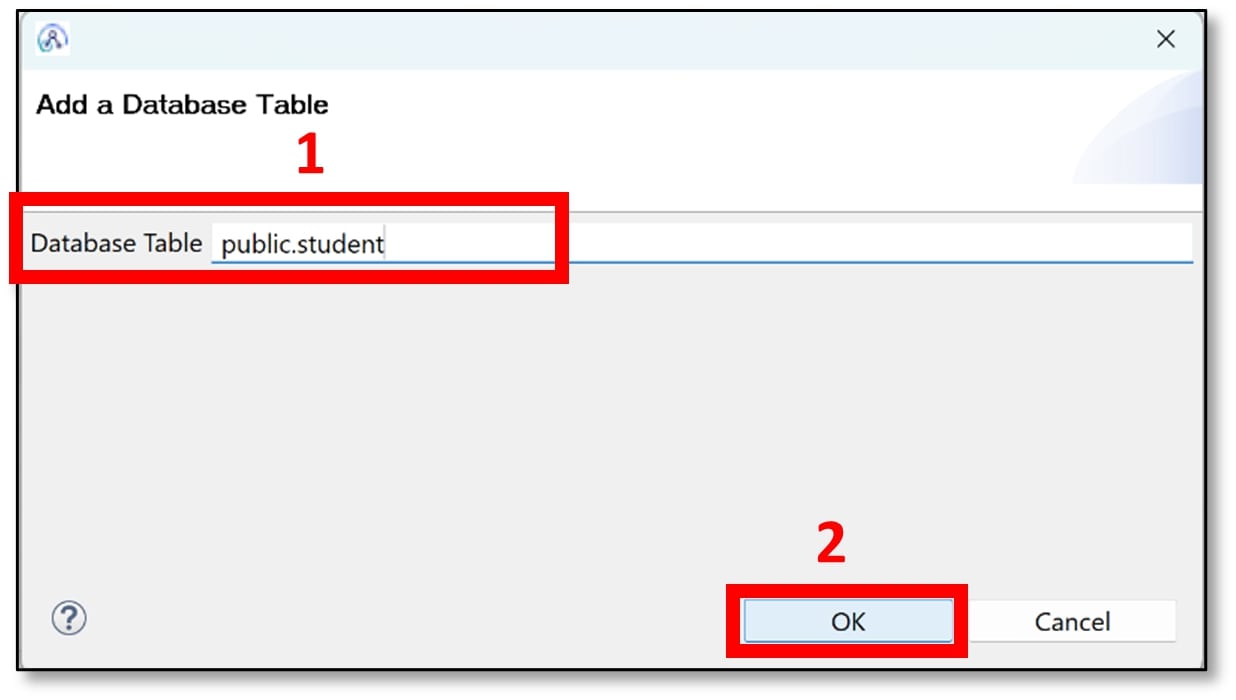
q) A pop-up window should appear. Enter the name of the table using the syntax public.TableName
• The TableName is the name of the table created (Step 4b).
Then click ‘OK’.
(I used public.student)
r) Save the flow (Ctrl+S). The small red cross should disappear now from the CDC node.
s) Now, click on the ‘Trace’ node from the canvas and click on the ‘Properties’ tab under the message flow.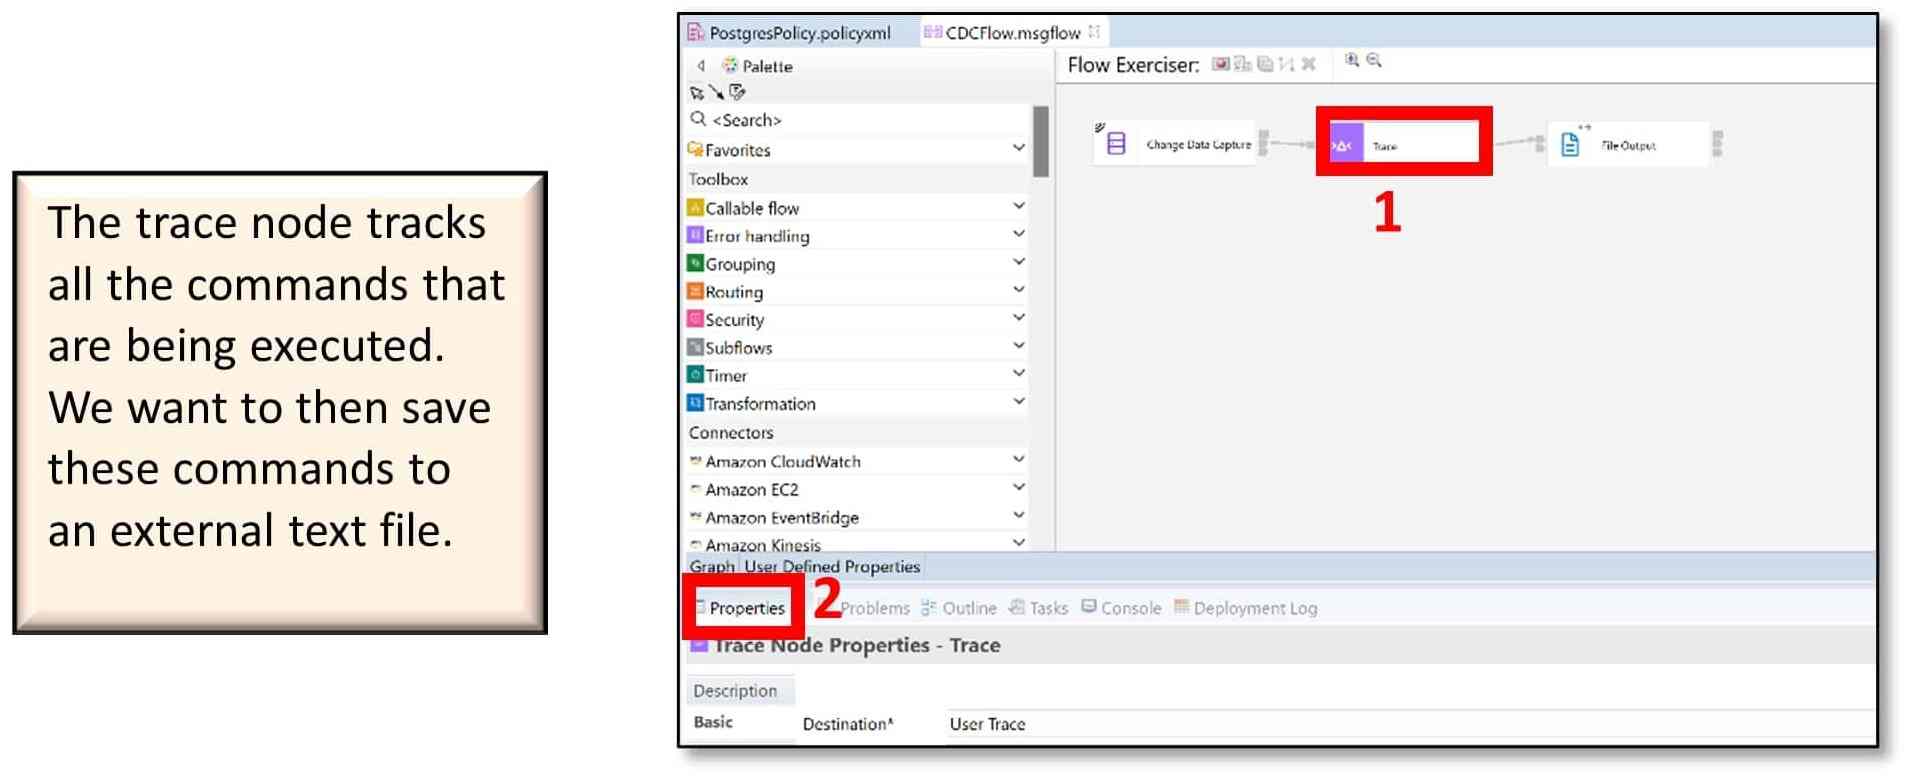
t) Click on the ‘Basic’ tab.
For Destination, select ‘File’ from the drop-down menu.
For File path, use the syntax Directory\TraceFileName.txt
• Directory is the directory where you want to store the trace file
• TraceFileName is the name you want to give to the trace file
(I used C:\Temp\CDC4Flow_Trace.txt).
For ‘Pattern,’ copy and paste the two lines below into the box.================= START ${CURRENT_TIMESTAMP} ================= ${Body}
Then save the flow (Ctrl+S).

u) Finally, click on the ‘File Output’ node from the canvas and click on the ‘Properties’ tab under the message flow.
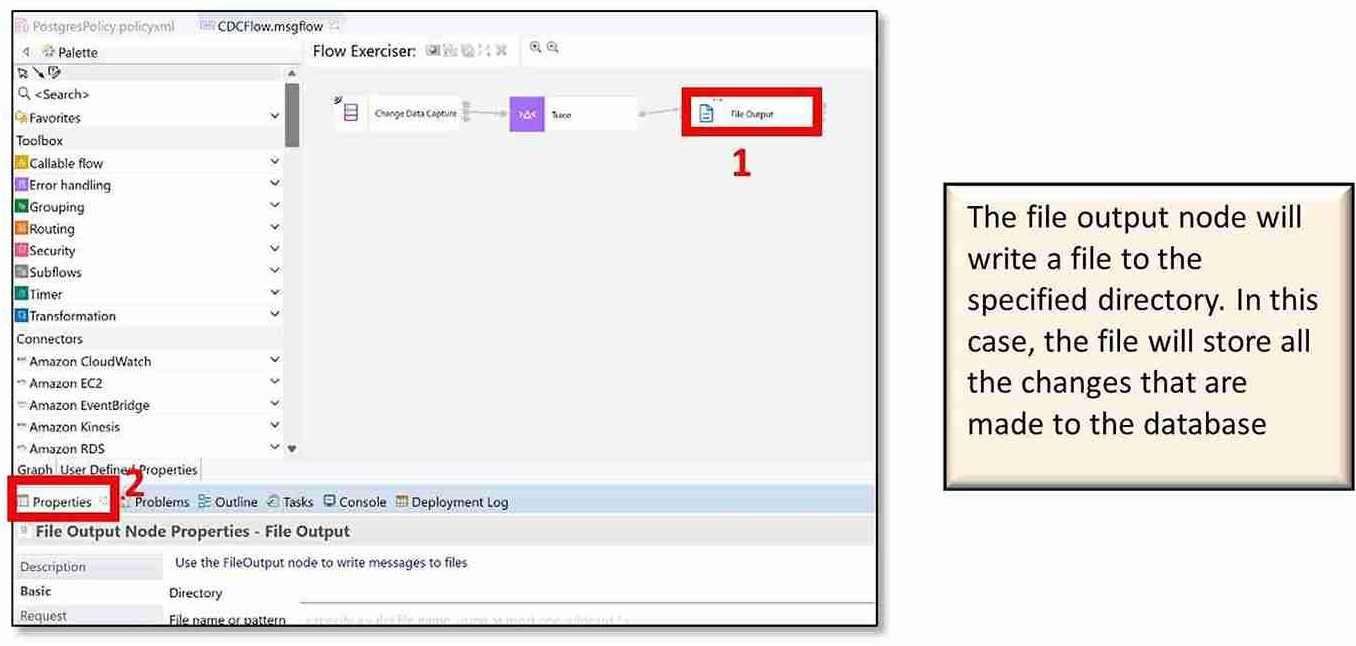
v) Click on the ‘Basic’ tab.
• For ‘Directory,’ use the same path that you chose to store the trace file (Step 13t). (I used :\Temp).
• For ‘File name or pattern,’ enter a suitable file name with the text file extension (.txt). (I used CDCFlow_File.txt)
• For ‘Mode for writing to file’ under ‘File action,’ I selected ‘Stage in mqsitranist directory and move to output directory on “Finish file.”’ However, if preferred, you may select the other option. Then save the flow (Ctrl+S).

14) Deploy the Message Flow
Now the message flow can be deployed to the integration server. Firstly, make sure your integration server is running (Step 11c) if you stopped it before.
a) Drag the policy project that was created (Step 10d) down into your integration server (I deployed CDCPolicy to CDClocalIS).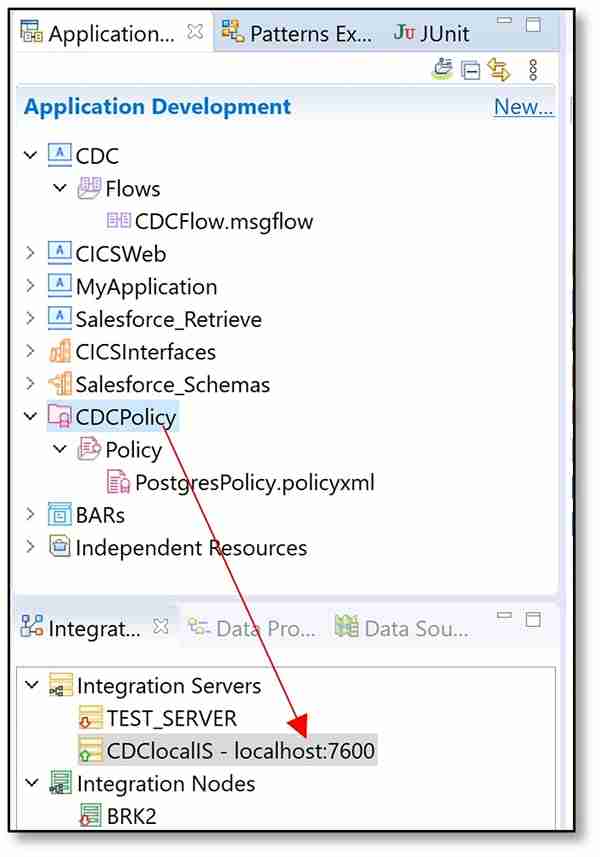
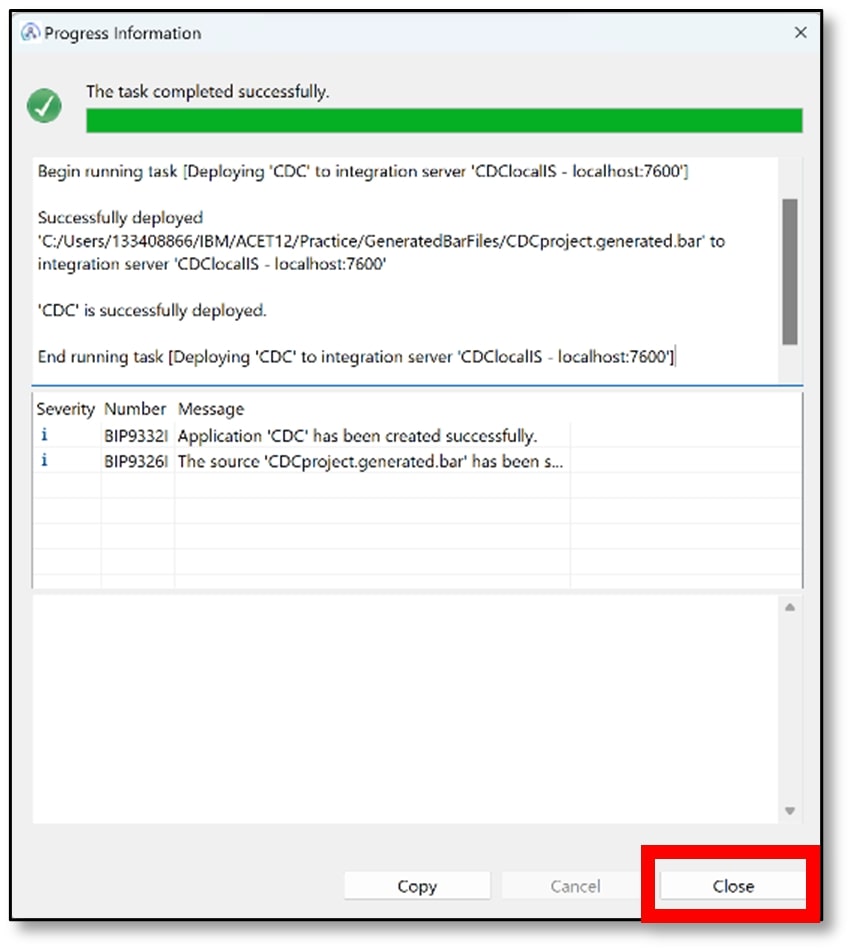
b) A successful deployment dialog will be shown. Click ‘Close’.
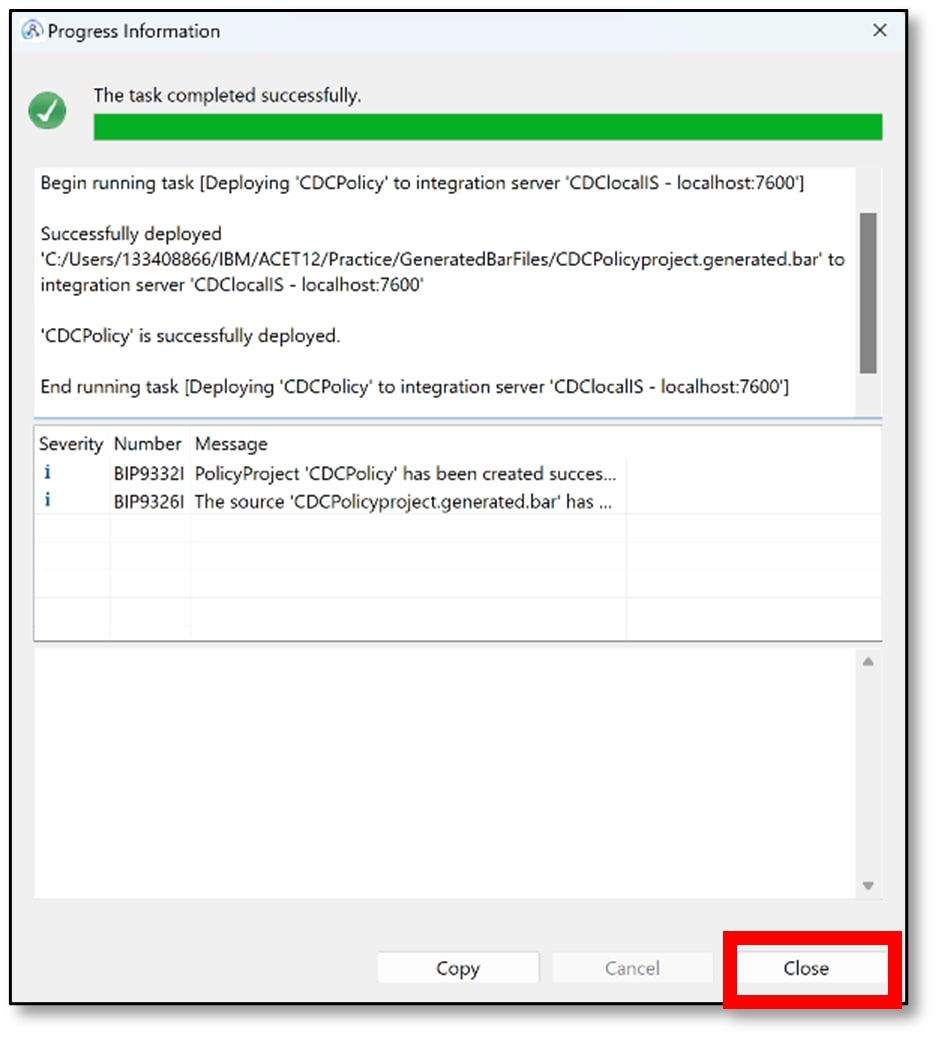
c) Drag the application that was created (Step 13c) down into the same integration server (I deployed CDC to CDClocalIS).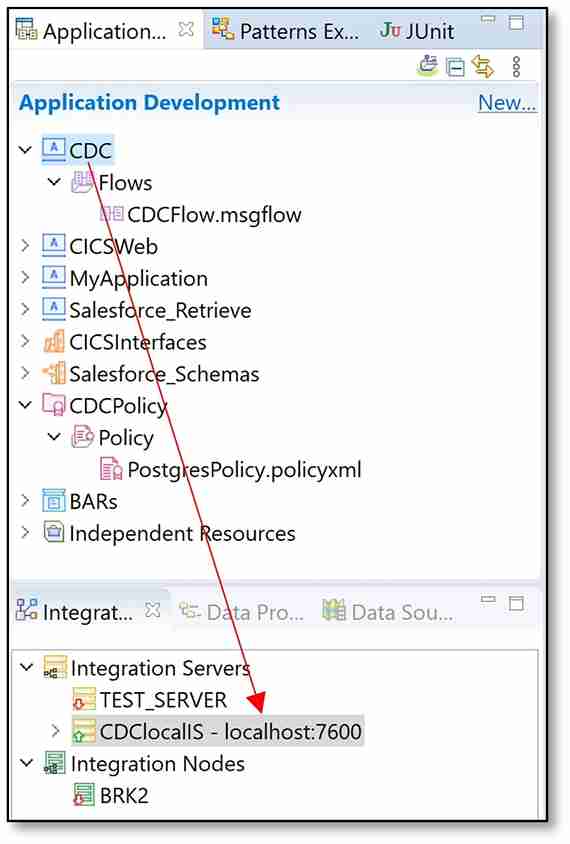
d) Another successful deployment dialog will be shown. Click ‘Close’.
15) Test the Message Flow
Now that the flow has been deployed, it can be tested by updating the database.
a) Start the flow exerciser by clicking on the red ‘Start’ button.
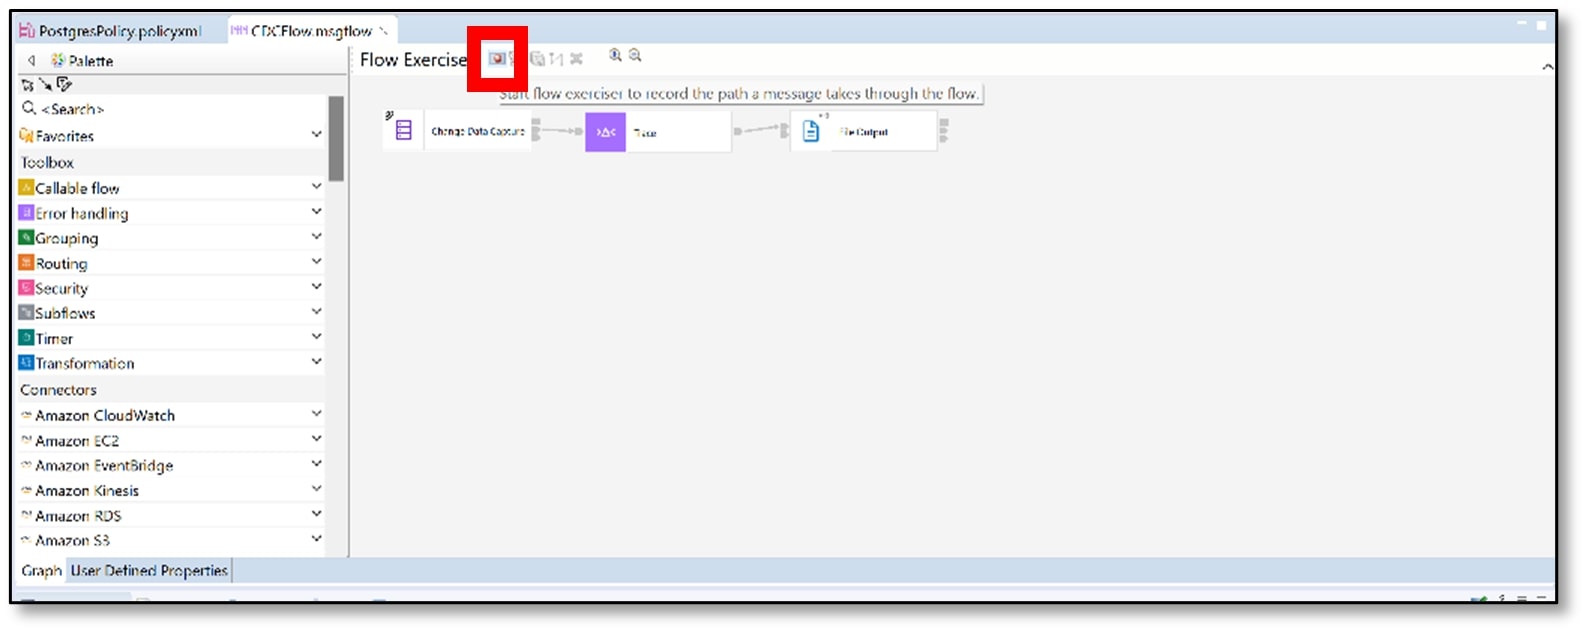
b) The flow exerciser will ask to re-deploy. Click ‘No’.

c) A ‘Ready to record’ message will pop-up. Click ‘Close’.
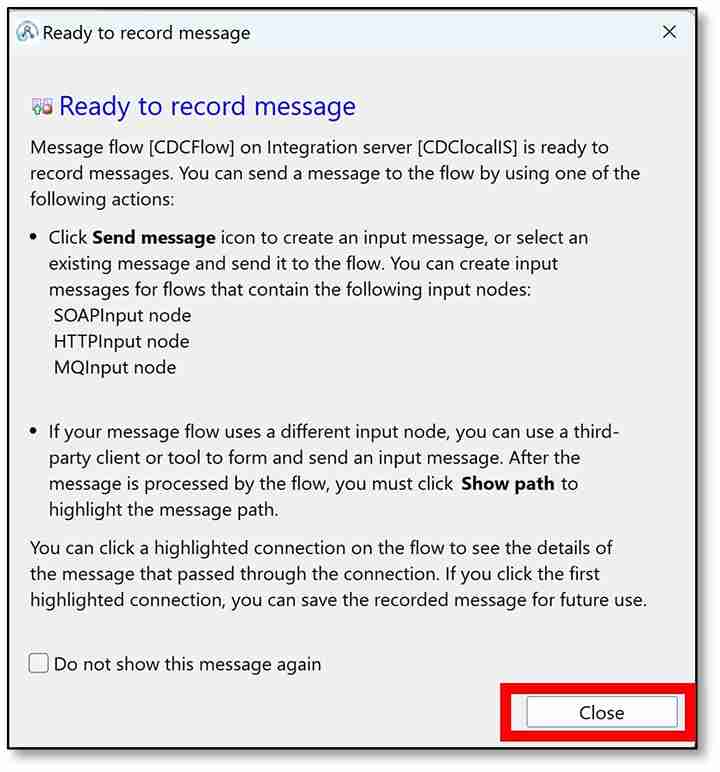
d) Now, the flow exerciser is recording, so changes to the database will be recorded and written to a text file. Open SQL Shell (psql) if it was closed previously and ensure you are connected to your database as the ‘postgres’ user (Step 3e).
e) A quick change that can be applied to the database is updating it. On psql, use the syntaxUPDATE TableName SET ColumnName1 = Value1 WHERE ColumnName2 = Value2;
• The TableName is the name of the table created (Step 4b).
• The ColumnName1 is column you want to update
• The Value1 is the new value you want to set in ColumnName1
• The ColumnName2 is the primary key column
• The Value2 is the value used to identify which row will be updated (it is a value from the primary key column, ColumnName2)
(I used UPDATE student SET firstname = ‘testing’ WHERE id = 24;)

Note: More ways of making changes to the database (like the syntax and examples) can be found here.
f) After a change has been applied from psql, go back to the Toolkit. View the message path by clicking on the fourth icon along the ‘Flow Exerciser’ bar.

g) You should see a small envelope appear on the two lines connecting the three different nodes.

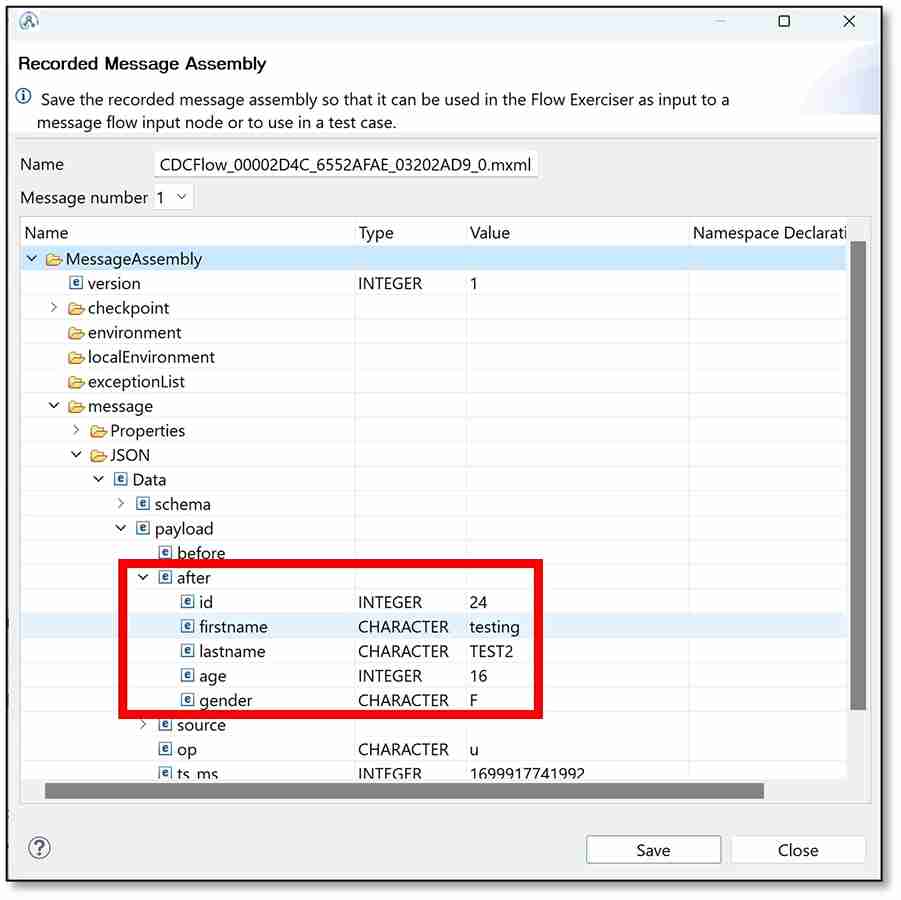
h) If you click on the first envelope (between the CDC and Trace node), then from the leftmost column, click on ‘Message Assembly’ → ‘Message’ → ‘JSON’ → ‘payload’ → ‘after,’ you should be able to see what the change to the database was. In my case, the value for the first name has changed to testing. You can then close this window.
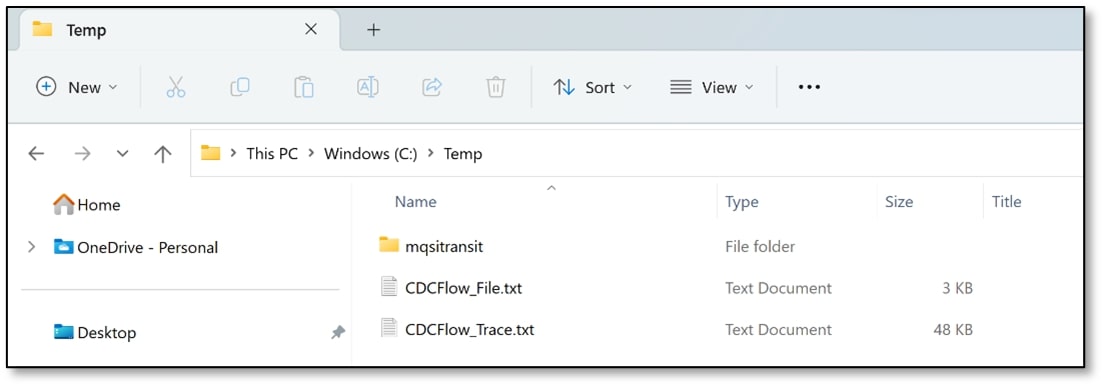
i) The changes were also written into a file. Go to the directory in File Explorer where the file is being written to (Step 13v) (mine is C:\Temp). In this folder, you should see the trace file, another file from the File Output node, and the ‘mqsitransit’ folder.
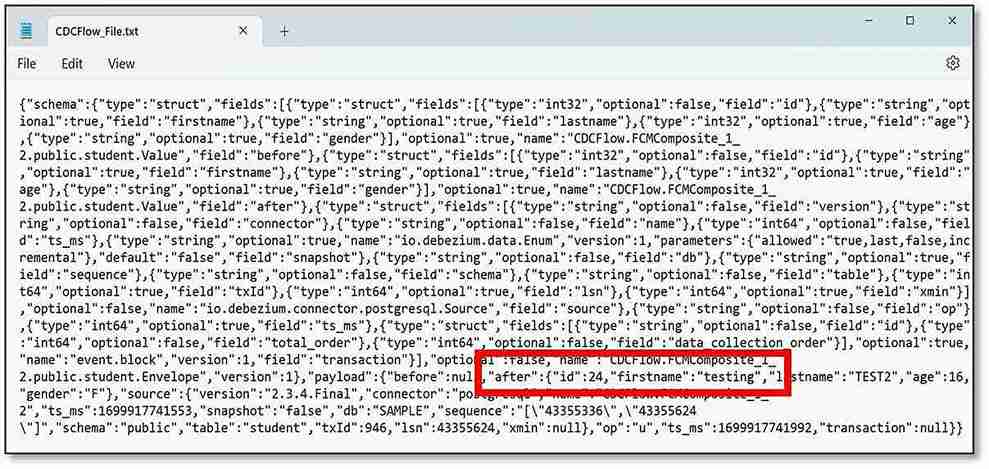
j) If you open the file from the File Output node (mine is called CDCFlow_File), you should again be able to see the change that occurred within the database.
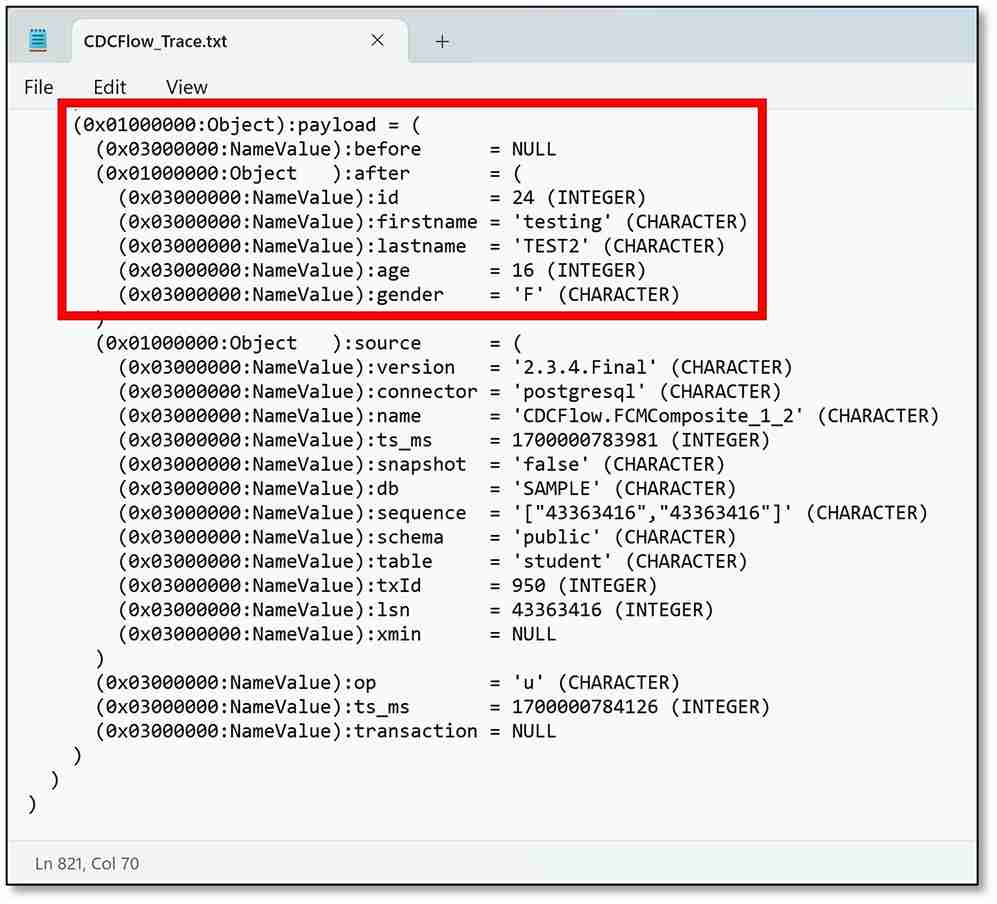
k) If you open the file from the Trace node (mine is called CDCFlow_Trace), you will see the timestamp at the very top of the text file followed by the contents of the message (the ${Body}).
If you scroll down to the very bottom of the file, you should be able to see the values in the database after the change has occurred.
l) Once you have finished, stop the flow exerciser by clicking on the blue square icon along the ‘Flow Exerciser’ bar. A warning sign will appear – click ‘Yes’.

m) Also, remember to stop your integration server by going on the App Connect Enterprise Console and pressing Ctrl+C (Step 11f).
Conclusion
After following this guide, you are now in a position to experiment and try different commands on psql which make changes to the database.
Published at DZone with permission of Sumuthu Amaradasa. See the original article here.
Opinions expressed by DZone contributors are their own.

Comments