How to Use the JSON Plugin in JMeter
Learn how to use the JSON plugin for JMeter's JSON to XML Convertersampler, JSON Path Assertion, JSON Format Post Processor, and JSON Path Extractor.
Join the DZone community and get the full member experience.
Join For FreeThis post is about the JSON plugin for Apache JMeter™, which adds on to the ability to work with JSON (JavaScript Object Notation) formatted data in JMeter. The JSON plugin expands the default functionality of JMeter with one sampler, one assertion, and two post processors: the JSON to XML Convertersampler, the JSON Path Assertion, the JSON Format Post Processor and the JSON Path Extractor. Let's try all of them in action.
If you need help installing JMeter plugins, please follow this link to learn more. Once you have the JMeter plugins manager, install "JSON Plugins".
JSON formatted data is often used in AJAX (Asynchronous JavaScript And XML) requests. AJAX requests are used to send and retrieve data from a server asynchronously. We need to find such a request and replicate it with JMeter for demo purposes. I found a good example on the DemoBlaze webstore:
- Open the Landing page.
- Choose the "Monitors" category -> This action makes an AJAX request to the server which sends and receives data in the JSON format.
.png)
Great! Choosing the category is a proper example of an AJAX request. Now it is time to create a demo script.
Creating a JMeter Script With AJAX
Add a Thread Group to the Test plan.
Test plan -> Add -> Thread (Users) -> Thread Group
Add an HTTP Request that asks for items from the category "Monitors."
Thread Group -> Add -> Sampler -> HTTP Request.png)
Fill in the following values:
- Name: Monitors
- Protocol: https
- Server name or IP: api.demoblaze.com
- Method: POST
- Path: bycat
- Body Data: {cat: “monitor”}
This sampler will make a POST request to the DemoBlaze server and should get a list of the monitors in the response.
Add an HTTP Header Manager to define the content type of the request.
Monitors -> Add -> Config Element -> HTTP Header Manager.png)
Add a row with the following values: Content-Type: application/json
These element and values are necessary for sending the JSON data correctly.
Add a View Results Tree listener to see the results of the tests.
Thread Group -> Add -> Listener -> View Results Tree
Run the script.
.png)
We see that this request received JSON data in the response. We can see that the response contains an array of items and some other data.
Cool! We see data, but the format of the data isn't very convenient to read. Is there a way to address this and make it more readable? Sure.
Adding JSON Plugin Elements to the JMeter Script
Add a JSON Format Post Processo r element to change the format of the JSON response.
Monitors -> Add -> Post Processors -> jp@gc - JSON Format Post Processor.png)
No need to change anything in this element. It will work as it is.
Run the script again!
.png)
The request works fine, just as in the previous test, but with one difference. The response data is in a more readable format.
The next step is to verify the response data. Let's verify the number of items returned. As we can see in the screenshot above there are 2 items.
Add a JSON Path Assertion element to verify the content of the response.
Monitors -> Add -> Assertions -> jp@gc - JSON Path Assertion.png)
Fill in the following values:
- JSON Path: $..Count
- Validate against expected value: Yes
- Match as regular expression: No
- Expected Value: [2]
This assertion will check:
- Is the response in JSON format?
- Does the response contain the path '$..Count'?
- This path will return an array. Does the returned array have [2] elements?
Start the test again.
.png)
The "Monitors" request passed. This means that the response is in the JSON format, the wanted path is present and the actual value coincides with the expected value.
Good. Our next step is to test the JSON to XML Converter post processor. First of all, we need to save the JSON response to a JMeter variable.
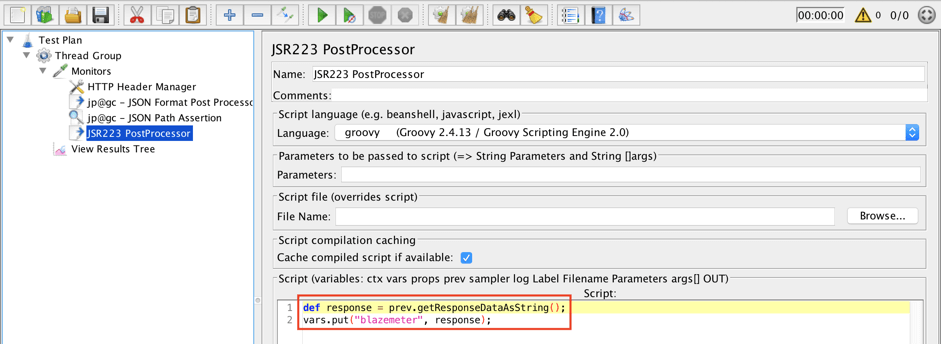
Add a JSR223 PostProcessor element to the "monitors" request.
Monitors -> Add -> Post Processors -> JSR223 PostProcessor
Type the following script:
def response = prev.getResponseDataAsString();
vars.put("blazemeter", response);
The JMeter variable 'blazemeter' will contain the response data of the request.
Add a JSON to XML Converter
Thread Group -> Add -> Sampler -> jp@gc - JSON to XML Converter
Set the following value to the JSON input: ${blazemeter}
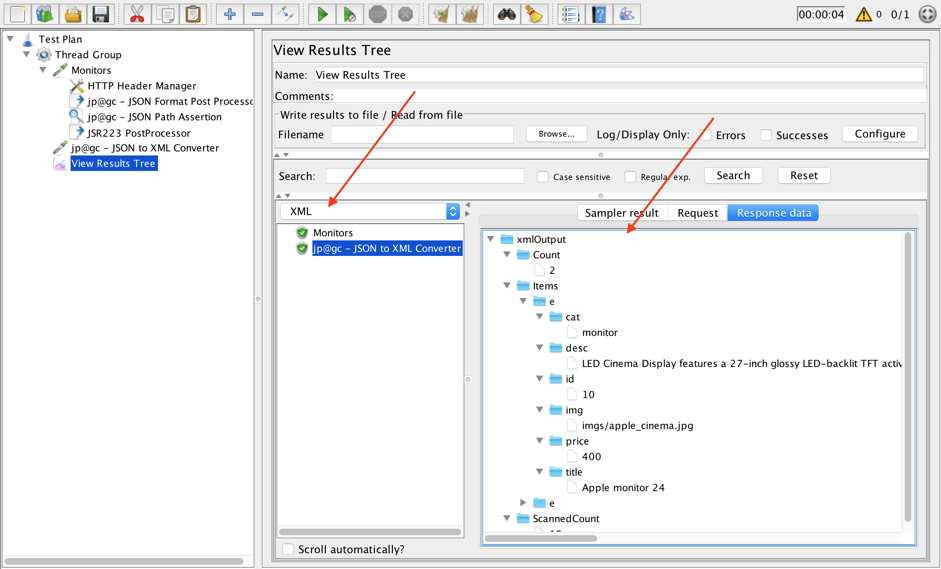
This sampler is supposed to return the JSON data converted to XML. Let's see if it really works.
Run the script one more time.

The JSON data was converted to XML! We can browse through the data using the XML option in the View Result Tree listener. It looks like the converter works just fine.
Now let's try the JSON Path Extractor post processor.
Add a JSON Path Extractor to the request.
Monitors -> Add -> Post Processors -> jp@gc - JSON Path Extractor
Fill in the following values:
- Destination Variable Name: monitor_titles
- JSONPath Expression: $..title
- Default Value: ERROR
This element will extract data from the response and save it to the 'monitor_titles' variable.
Another way to use this element is by extracting values from a JMeter variable. Add a JSON Path Extractor.
Thread Group -> Add -> Post Processors -> jp@gc - JSON Path Extractor
Fill in the following values:
- JMeter Variable: blazemeter
- Destination Variable Name: monitor_ids
- JSONPath Expression: $..id
- Default Value: ERROR
This element will extract ids from the 'blazemeter' variable and save them to the 'monitor_ids' variable.
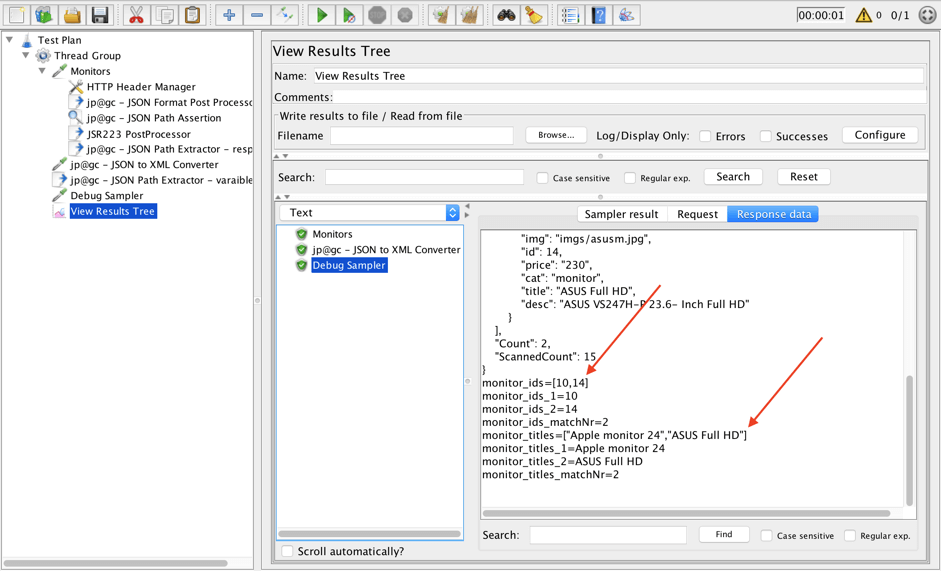
Now we have two JMeter variables ( 'monitor_titles' and 'monitor_ids'), which should contain the specified information from our JSON data. Let's use a Debug Sampler to see what gets saved to them.
Add a Debug Sampler to check JMeter variables.
Thread Group -> Add -> Sampler -> Debug Sampler
No need to change anything in the settings.
So! Start the script again one final time.

Both variables contain arrays with the correct information about monitors. Looks great! This is just an example of how to use the JSON Path Extractor. Please, follow this link and read about advanced usage scenarios for the JSON Path Extractor Plugin.
Great. We took a look at the JSON plugin and all elements that the plugin provides. Feel free to use any of these elements in your load scripts. JSON formatting gains popularity each year, so I hope this blog post will be useful now and in the future!
Running Your JMeter Tests in BlazeMeter
After creating your JMeter script, you can massively scale it by running it in BlazeMeter. BlazeMeter also enables you to share reports with team members and managers, so you can collaborate on your testing.
Published at DZone with permission of George Maksimenko, DZone MVB. See the original article here.
Opinions expressed by DZone contributors are their own.

Comments