How to Set Up a Continuous Delivery Environment
Jenkins' Pipeline Plugin offers a simple way to configure all steps in the same place. You can do almost everything inside your pipeline without any additional plugins.
Join the DZone community and get the full member experience.
Join For FreeWith the increasing popularity of microservices, more and more is being said about Continuous Delivery. There are many interesting books and articles about that subject. There are also many tools and solutions that can help set up a Continuous Delivery environment.
The main purpose of this article is to show a practical side of that aspect and present you how to use the most popular tools to create such an environment in your company.
Here are some definitions you might need to know.
Jenkins
Jenkins is the most popular open-source automation server, with many plugins and a large community. A few months ago, Jenkins introduced the Pipeline Plugin to help manage and describe the deployment process. The plugin is intensively developed and its popularity continues to grow.
GitLab
GitLab is a web-based Git repository manager. In addition to standard capabilities such as permissions management, viewing the source code, or viewing change history, it has many interesting features for code review and Continuous Delivery. Particularly interesting for us is the ability to perform code reviews using merge requests and protected branches.
Artifactory
Artifactory is an open-source Maven repository manager. In comparison with its competitors, such as Nexus, it has a more user-friendly web interface. The disadvantage is, for example, that NPM and docker repositories are available only in the paid version.
Ansible
Ansible is an open-source automation engine that automates cloud provisioning, configuration management, and application deployment. Nodes are managed by a controlling machine over SSH, and it uses an agentless architecture. It uses a YAML language to describe automated jobs, which are organized as Ansible playbooks.
SonarQube
SonarQube is an open-source platform for continuous code quality. It has a promotion pipeline feature that, using webhooks, can be easily integrated as a promotion step in the Continuous Delivery pipeline.
Here’s picture showing a proposed Continuous Delivery environment architecture. The heart of this architecture is Jenkins, which integrates with all other tools by its plugins.
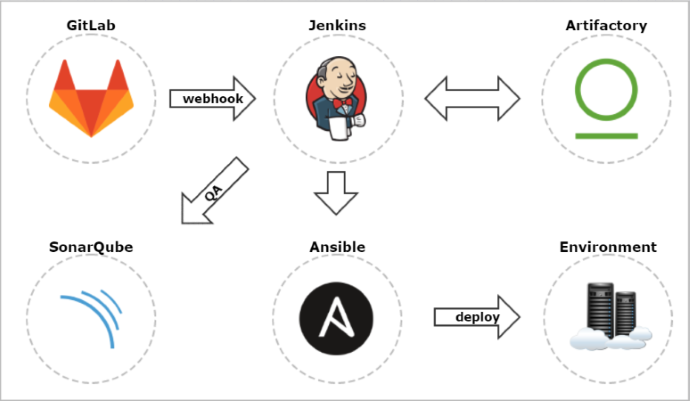
Git Push Propagation
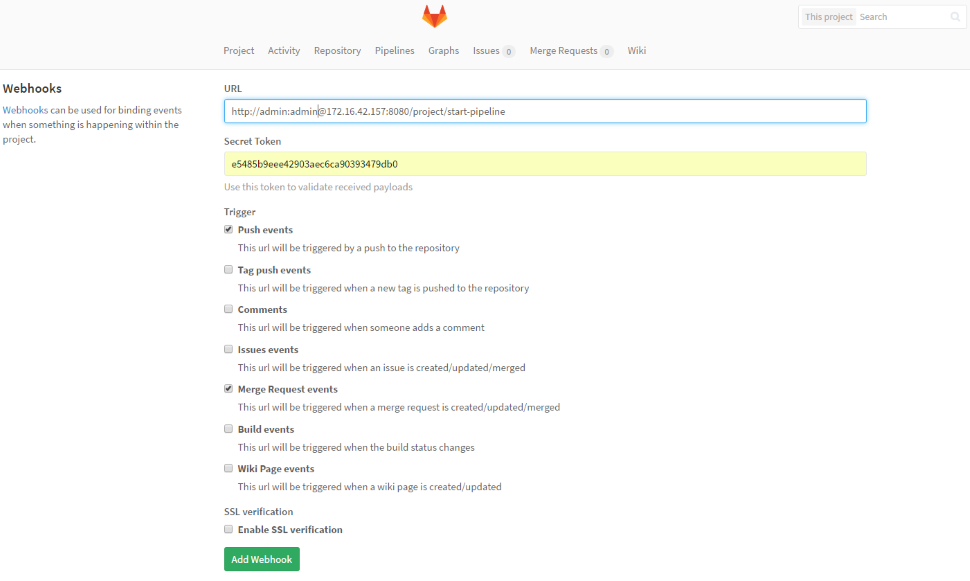
The changes pushed to the Git repository managed by GitLab are automatically propagated to Jenkins using webhook. We should enable push and merge request triggers. For our sample, SSL verification will be disabled. In the URL field, we have to put the Jenkins pipeline address with authentication credentials (user and password) and the secret token. This secret token in GitLab is the Jenkins API token, which is visible on its management console in user profile section under the Configuretab. One additional thing about GitLab and Jenkins refers to the situation when both are running on the same host. They both use by default port 8080, so you will have to change the Jenkins management port or GitLab's external_url property in /etc/gitlab/gitlab.rb.
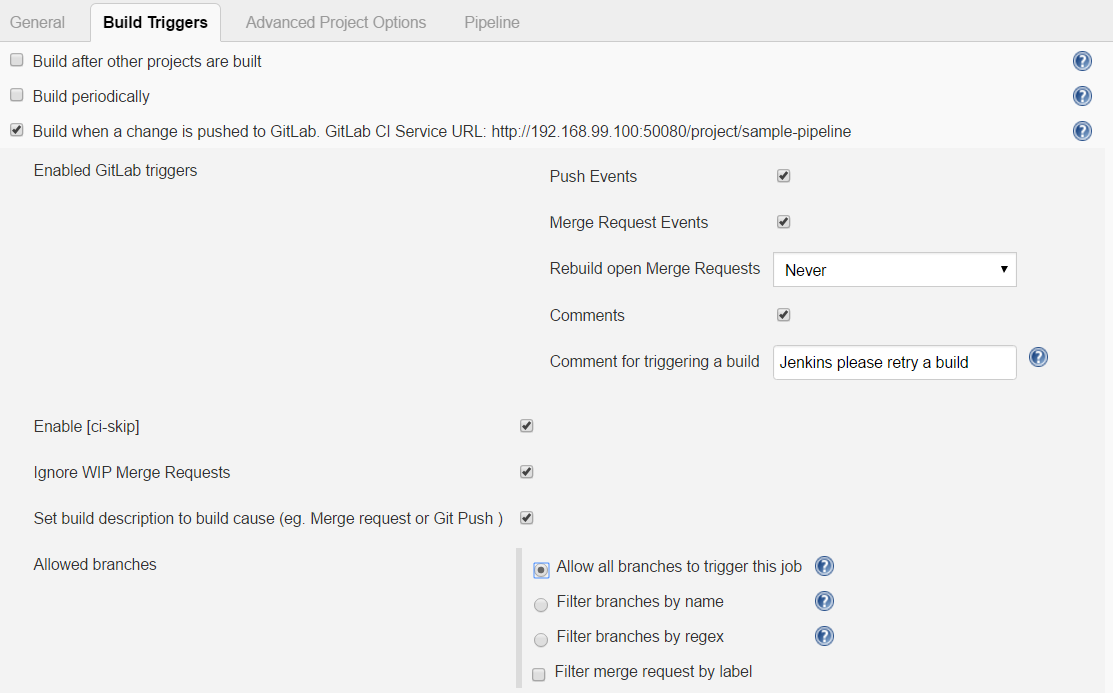
Here’s Jenkins pipeline configuration in the Build triggers section. We have to enable the option Build when a change is pushed to GitLab. The GitLab CI Service URL is the address we have already set up in our GitLab webhook configuration. There are push and merge requests enabled from all branches. We can also add additional restrictions for branch filtering by name or by regex. To support such kind of trigger in Jenkins, you need to have the GitLab plugin installed.
Code Review
There are two events that can trigger a Jenkins build:
- Push: Change in the source code is pushed to the Git repository.
- Merge Request: Change in the source code is pushed to one branch and then a committer creates a merge request to the build branch from the GitLab management console.
If you would like to use the first option, you have to disable build branch protection to enable a direct push to that branch. If you would like to use the second option, branch protection needs to be activated. Merge request is a GitLab feature used for code review. You can create merge requests and mention team members to review, comment, or safely merge your changes. If there are any merge conflicts, you can easily resolve them in UI.

Merge requests on GitLab console are very intuitive. Under section the Merge request, select source and target branch and confirm action.

Jenkins Configuration
I've written a lot about GitLab and Jenkins integration. Now, you know how to configure it. You now only have to decide if you would prefer a push or merge request in your Continuous Delivery configuration. Let’s move on. We have to install some other plugins in Jenkins in order to integrate it with Artifactory, SonarQube, and Ansible.
Here’s the full list of Jenkins plugins I used for the Continuous Delivery process setup inside my organization:
Here’s the Jenkins pipeline configuration for a sample Maven project.
node {

 try {

  withEnv(["PATH+MAVEN=${tool 'Maven3'}bin"]) {

   stage('Checkout') {
    def branch = env.gitlabBranch
    if (branch == null)
     branch = 'master'
    env.branch = branch
    git url: 'http://172.16.42.157/minkowp/start.git', credentialsId: '5693747c-2f45-4557-ada2-a1da9bbfe0af', branch: branch
   }

   stage('Test') {
    def pom = readMavenPom file: 'pom.xml'
    print "Build: " + pom.version
    env.POM_VERSION = pom.version
    sh 'mvn clean test -Dmaven.test.failure.ignore=true'
    junit '**/target/surefire-reports/TEST-*.xml'
    currentBuild.description = "v${pom.version} (${env.branch})"
   }

   stage('QA') {
    withSonarQubeEnv('sonar') {
     sh 'mvn org.sonarsource.scanner.maven:sonar-maven-plugin:3.2:sonar'
    }
   }

   stage('Build') {
    def server = Artifactory.server "server1"
    def buildInfo = Artifactory.newBuildInfo()
    def rtMaven = Artifactory.newMavenBuild()
    rtMaven.tool = 'Maven3'
    rtMaven.deployer releaseRepo: 'libs-release-local', snapshotRepo: 'libs-snapshot-local', server: server
    rtMaven.resolver releaseRepo: 'remote-repos', snapshotRepo: 'remote-repos', server: server
    rtMaven.run pom: 'pom.xml', goals: 'clean install -Dmaven.test.skip=true', buildInfo: buildInfo
    publishBuildInfo server: server, buildInfo: buildInfo
   }

   stage('Deploy') {
    dir('ansible') {
     ansiblePlaybook playbook: 'preprod.yml'
    }
    mail from: 'ci@example.com', to: 'piotr.minkowski@gmail.com', subject: "Nowa wersja aplikacji start", body: "Wdrożono nowa wersję start '${env.POM_VERSION}' na środowisku preprodukcyjnym"
   }

  }

 } catch (e) {
  currentBuild.result = "FAILED"
  mail from: 'ci@example.com', to: 'piotr.minkowski@gmail.com', mimeType: 'text/html', subject: "Błąd podczas budowania projektu start ${env.POM_VERSION}", body: "Build failed: <a href='${env.BUILD_URL}'>${env.JOB_NAME} [${env.BUILD_NUMBER}]</a>"
  throw e
 }

}
There are five stages in my pipeline:
- Checkout: Source code checkout from the Git branch. The branch name is sent as a parameter by GitLab webhook. We can access it using
env. - Test: Running JUnit tests and creating test reports visible in Jenkins and modifying job descriptions to match the version and branch name.
- QA: Running source code scanning using SonarQube scanner.
- Build: Building packages with artifacts resolved from Artifactory and publishing new application release and build information to Artifactory.
- Deploy: Deploying application packages and configurations on a remote server using Ansible. We send an email saying whether or not it was successful.
Deploy
Ansible uses SSH keys to authenticate on the remote host, so you have to put your SSH key to the authorized_keys file into the remote host before running Ansible commands on it. The main idea of that is to create a playbook with a set of Ansible commands. Playbooks are Ansible’s configuration, deployment, and orchestration language. They can describe a policy you want your remote systems to enforce or a set of steps in a general IT process. Here is catalog structure with ansible configuration for application deployment:
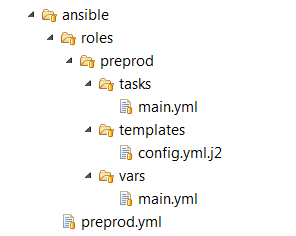
Here’s our Ansible playbook file. It defines a remote host, username for SSH connection, and role name. This file is used inside the Jenkins pipeline on the Ansible playbook step.
---
- hosts: preprod
  remote_user: default

  roles:
    - preprod
Here’s our main.yml file where we define a set of ansible commands on the remote server. In the first step, copy the configuration file to the remote server, then d0 the same for the application's main JAR file and all other dependencies. Then, run the application in a new process. Finally, wait for the server to go up on default service port 8761. In this sample, I've shown only a few of many Ansible features.
---
- block:
  - name: Copy configuration file
    template: src=config.yml.j2 dest=/home/minkowp/config.yml

  - name: Copy jar file
    copy: src=../target/discovery.jar dest=/home/minkowp/discovery.jar

  - name: Copy all dependencies
    copy: src=../target/dependency/ dest=/home/minkowp/

  - name: Run jar file
    shell: nohup java -jar /home/minkowp/discovery.jar &

  - name: Waiting for server
    wait_for:
      port: 8761
Monitoring
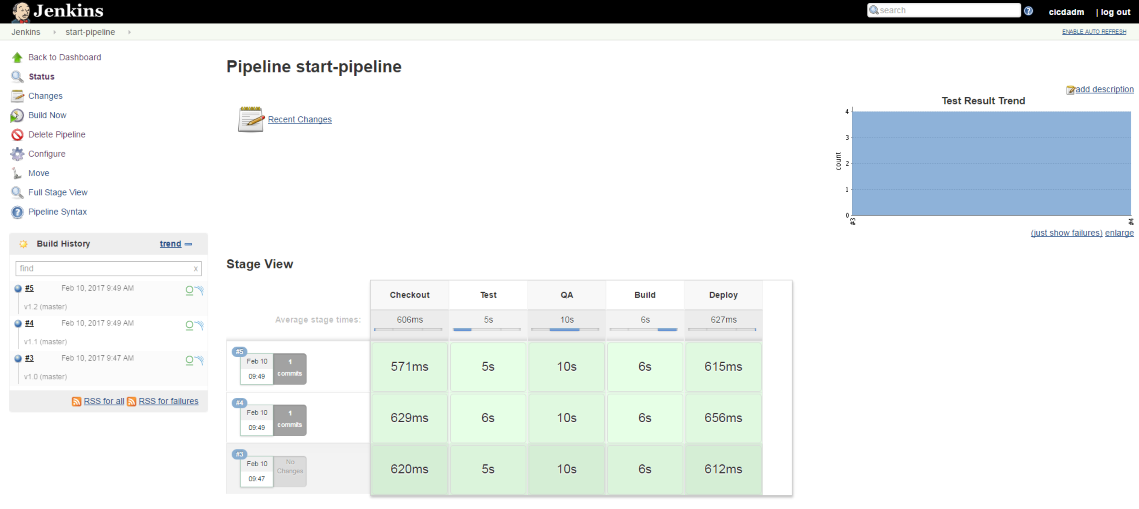
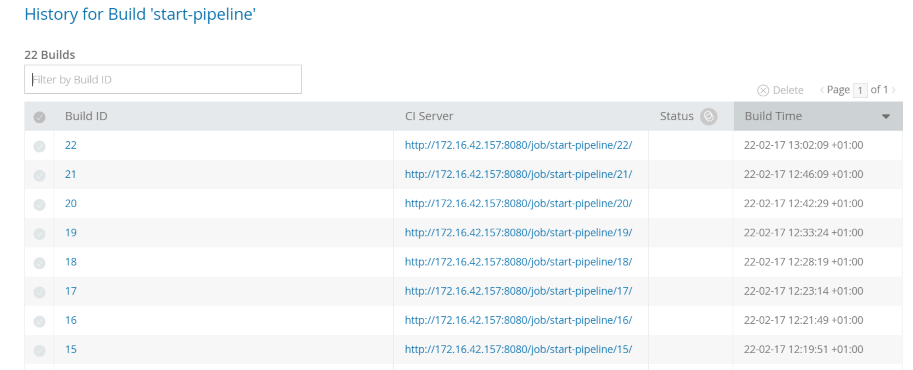
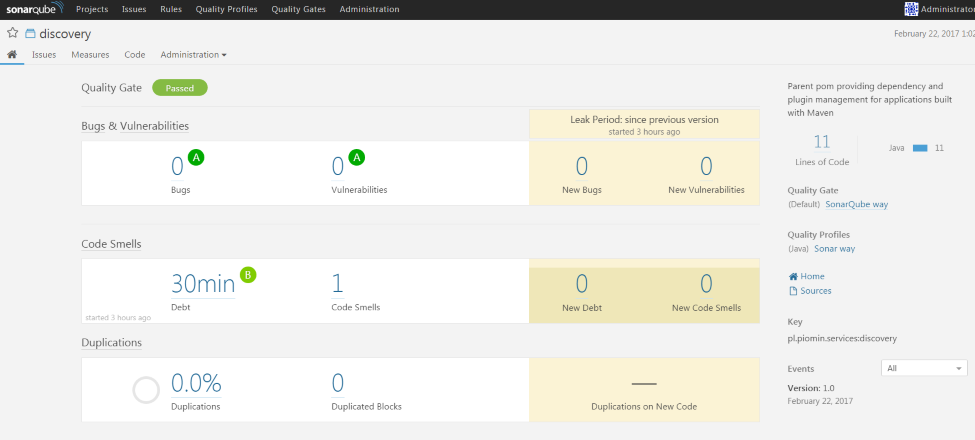
You can check out build results on the Jenkins console. There is also fine pipeline visualization with stage execution time. Each build history record has a link to Artifactory build information and SonarQube scanner report.
Here's the Artifactory build info history:
Here's the screen for the project from the SonarQube web console:
Conclusion
I hope that this sample will be useful for you if you are considering a Continuous Delivery environment in your organization. I put emphasis on the full automation of the process using the most popular tools on market. The Jenkins Pipeline Plugin (whose popularity in the last year is still growing) offers a convenient way to configure all steps in the same place. It uses Groovy language for configuration, so you can do almost everything inside your pipeline without any additional plugins.
Opinions expressed by DZone contributors are their own.

Comments