How to Remove all Unused Imports in a Java File — Eclipse Shortcut
Want to learn more about using shortcuts in Eclipse? Check out this post where we look at the Eclipse shortcut for removing all unused imports in a Java file.
Join the DZone community and get the full member experience.
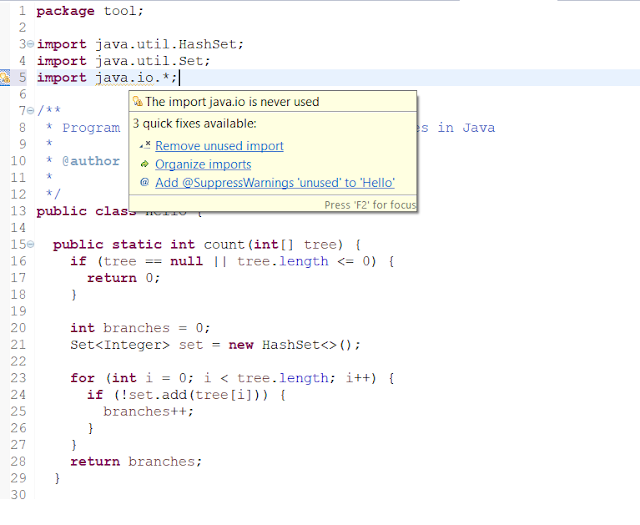
Join For FreeEclipse IDE gives the warning "The import XXX is never used" whenever it detects an unused import in a Java source file and shows a yellow underline. Though the unused import in a Java file does not create any harm, it's unnecessary to increase the length and size of a Java source file, and if you have too many unused imports in your Java source file, those yellow underlines and Eclipse warnings affect the readability of your code. In my last post on Eclipse, we looked at some Java debugging tips on Eclipse. In this post, we will see an Eclipse shortcut to remove all unused imports in Eclipse. There are many options to tackle this problem, e.g. you can collapse the import section of code in Eclipse or you can altogether remove all unused imports from Java file, and we'll see them in this short tutorial.
If you are completely new to Eclipse IDE, then I suggest you to first go through a comprehensive course, like The Eclipse Guided Tour: Part 1 and 2 from Pluralsight, which will teach you everything you need to know about Eclipse from the Java development point of view.
Anyway, let's see how to remove all unused imports from a Java file in Eclipse IDE.
How to Remove all Unused Imports From a Java File in Eclipse
The yellow underline on above pic denotes all unused imports in a Java Source file
Here are a couple of ways to remove all unused imports from the Java Eclipse IDE :
1) Go to the line of unused import, press Ctrl + 1, which is an Eclipse shortcut of a quick fix. This will show a drop-down menu to fix this error and one of them will be "remove unused imports." It will remove that import statement from Java file.
2) The above option is not very efficient if you want to remove multiple unused imports in single click because it removes them one by one. It's better to use the "Organize Imports" feature of Eclipse IDE to remove multiple or all unused imports statement. For using this from Menu, Select Source--> Organize Imports. This will remove all unused imports from that Java file.
3) Third and my preferred option to remove all unused import statement from Java file is Ctrl + Shift + O, which is a shortcut of organized import in Eclipse, and you can say Eclipse shortcut to remove all unused import statement from the Java file.
This will also work with the previous option and remove all unused import lines from the source file.

Do you want a bonus Eclipse tip? If yes, then here you go: you can save all keystrokes required to remove all unused imports from Java source file by using Eclipse save actions, which are actions Eclipse automatically performs when you save Java file ADVERTISEMENT.
Just check the option of organized imports in saving action under Window--> Preferences-> Java--> Editor--> Save Actions. This saves a lot of time while working in Eclipse and is one of the reasons I love Eclipse IDE for Java programming.
You can also configure formatting and a few other actions, which will be taken by Eclipse automatically whenever you save your file.
One more advantage of using Organize import or the shortcut Ctrl + Shift +O is that it imports all packages that are required by code. So, it not only saves time while removing the import statement but it also helps to import required packages in Java.
It means that if you copy and paste code and see lots of red lines, this is an error due to the non-imported packages. To fix this, use this Eclipse shortcut or save your source file if you have configured Eclipse save action to organize import.
That's all on Eclipse shortcuts for removing all unused import statements from a Java source file in Eclipse IDE. It's always good to learn more about the IDE on which you are working, e.g. Netbeans or Eclipse, to improve productivity.
Further Learning
Beginners Eclipse Java IDE Training Course
Eclipse Debugging Techniques and Tricks
The Eclipse Guided Tour: Part 1 and 2
Other Java Eclipse articles you may like to explore:
- 30 Useful Eclipse Shortcuts for Java Developers (list)
- How to remote debug Java application in Eclipse? (tutorial)
- 10 Eclipse Debugging Tips Java Developer Should Know? (see here)
- How to Attach Source Code for the JAR File in Eclipse? (guide)
- Eclipse Shortcut to Print System.out.println Statements? (shortcut)
- How to increase console buffer size in Eclipse? (steps)
- How to use spaces instead of tabs in Eclipse? (guide)
- How to create an executable JAR file from Eclipse? (example)
- 3 Books to Learn Eclipse IDE for Java developers (list)
- How to Increase Heap Size of Java Program running in Eclipse? (guide)
Since Eclipse is one of the popular Java IDE and many Java programmer, who like to do things fast loves to learn new shortcuts. If you also like to learn new shortcuts, then I suggest you check Top 30 Eclipse keyboard shortcut for Java programmer. This is one of the many Eclipse shortcuts!
Thanks for reading this article!. If you like this post, then please share it with your friends and colleagues. If you have any questions or feedback, then please drop a comment below.
Published at DZone with permission of Javin Paul, DZone MVB. See the original article here.
Opinions expressed by DZone contributors are their own.

Comments