How to Migrate From JUnit 4 to JUnit 5 Step by Step
In this tutorial, we take a look at how you can create and migrate a basic Spring Boot application from JUnit 4 to the refreshed JUnit 5.
Join the DZone community and get the full member experience.
Join For FreeIntroduction
The majority of the organizations are facing hurdles in digital transformations due to technical debt. Unit tests are one of them. One of the unit testing frameworks is JUnit. The industry was mostly using version 4 of JUnit to write unit tests. JUnit 5 has been in the market for quite some time, but the migration of JUnit 5 has not picked up steam. This is due to the lack of a clear migration path for developers.
In this exercise you will learn end-to-end migration from JUnit 4 to JUnit 5. You will first start with a basic Spring Boot project using JUnit 4. The project will be a simple calculator application with dependency classes to see how mocking frameworks like Mockito work along with JUnit. You will write a unit test for this calculator application. You will then introduce JUnit 5 in the JUnit 4 project. You will exclude JUnit 4 dependencies. Finally, you will migrate the JUnit 4 test class to JUnit 5. Please note that JUnit 5 is not backward compatible with JUnit 4, but the JUnit team created the JUnit Vintage Project to support JUnit 4 test cases on top of JUnit 5.
JUnit5 provides many new features that will help taking unit testing to next level in form of parameterized test, dynamic test and assertion aggregation to name a few.
If you just want to check out the project without going through steps you can download it from here.
Setup JUnit 4 Project with Test
Add JUnit Dependency
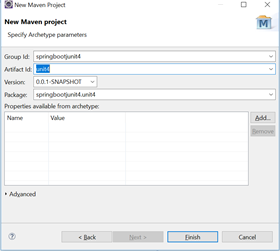
Open the Eclipse editor and create a simple Maven project name as JUnit 4. Please refer to the below image on how to achieve the same. You need to click on "New" under the "File" menu, select "Maven Project" and select a simple archetype. You can think of archetypes as a template under the Maven ecosystem.


Check Version and Spring Boot
Once the project is created, go to the Explorer view in Eclipse and open the pom.xml file of this newly created project. Now add dependencies to POM for spring-boot-starter-web and spring-boot-started-test. You can refer to below snippet for copy and paste as is.
Note that this project is with version 2.0.3 of Spring Boot, with JUnit 4 for unit testing.
Note that this project is with version 2.0.3 of spring boot, it was having JUnit 4 for unit testing. Your pom will look like below
<project xmlns="http://maven.apache.org/POM/4.0.0" xmlns:xsi="http://www.w3.org/2001/XMLSchema-instance"
xsi:schemaLocation="http://maven.apache.org/POM/4.0.0 http://maven.apache.org/xsd/maven-4.0.0.xsd">
<modelVersion>4.0.0</modelVersion>
<groupId>springbootJUnit4</groupId>
<artifactId>unit4</artifactId>
<version>0.0.1-SNAPSHOT</version>
<packaging>jar</packaging>
<name>JUnit-4-applcation</name>
<url>http://maven.apache.org</url>
<!-- https://mvnrepository.com/artifact/org.springframework.boot/spring-boot-starter-parent -->
<parent>
<groupId>org.springframework.boot</groupId>
<artifactId>spring-boot-starter-parent</artifactId>
<version>2.0.3.RELEASE</version>
</parent>
<properties>
<project.build.sourceEncoding>UTF-8</project.build.sourceEncoding>
</properties>
<dependencies>
<dependency>
<groupId>JUnit</groupId>
<artifactId>JUnit</artifactId>
<scope>test</scope>
</dependency>
<!-- https://mvnrepository.com/artifact/org.springframework.boot/spring-boot-starter-web -->
<dependency>
<groupId>org.springframework.boot</groupId>
<artifactId>spring-boot-starter-web</artifactId>
</dependency>
<dependency>
<groupId>org.springframework.boot</groupId>
<artifactId>spring-boot-starter-test</artifactId>
</dependency>
</dependencies>
</project>
Parent POM
The Spring Boot project works on the concept of parent POM inheritance. Parent POM contains version dependencies entry for helper projects like JUnit. This snippet will help you understand why 2.0.3 used JUnit 4.
The right side in the image is the latest version of spring-boot-test. The JUnit 4 dependency is still part of newer spring-boot-test project because of backward compatibility. It essentially means if there are existing JUnit 4 test cases available in the same project, JUnit’s will not break. In the next few steps, we will see how we will exclude JUnit 4 fully and move to JUnit 5 fully.

Add Functional Code
You need to add a now functional code to the project. Create simple Java classes with names as Calculator, Multiplier, Adder, and Subtractor. Once you add these classes you need to enrich them with functional code. In order to move faster, you can copy and paste the code from the below snippet in corresponding classes or refer to the Github link provided at the top.
Here you are creating a main class and delegating classes. This is necessary to learn the concept of mocking which is essential in any commercial project because most of the projects are designed with separation of concerns in mind. This exercise uses Spring as an IOC container. The Java classes created are injected as bean and autowired.
xxxxxxxxxx
package springbootJUnit4.unit4;
import org.springframework.stereotype.Component;
public class Adder {
public Integer add(Integer a, Integer b) {
// TODO Auto-generated method stub
return a + b;
}
}
package springbootjunit4.unit4;
import org.springframework.stereotype.Component;
public class Subtractor {
public Integer subtract(Integer a, Integer b) {
return a - b;
}
}
xxxxxxxxxx
package springbootjunit4.unit4;
import org.springframework.stereotype.Component;
public class Multiplier {
public Integer multiply(Integer a, Integer b) {
return a*b;
}
}
xxxxxxxxxx
package springbootjunit4.unit4;
import org.springframework.beans.factory.annotation.Autowired;
import org.springframework.stereotype.Component;
public class Calculator {
Adder adder;
Subtractor subtractor;
Multiplier multiplier;
public Integer subtract(Integer a, Integer b) {
if( a < b) {
throw new IllegalArgumentException("first argument cannot be less than second");
}
return subtractor.subtract(a, b);
}
public Integer multiplier(Integer a, Integer b) {
if(a == 0 || b == 0) {
throw new IllegalArgumentException("Input cannot be zero");
}
return multiplier(a, b);
}
public Integer add(Integer a, Integer b) {
if(a <0 || b < 0) {
throw new IllegalArgumentException("Invalid input positive integers only");
}
return adder.add(a, b);
}
}
Add Test Code
You need to create test class called CalculatorTest. To keep it simple, you just copy and paste the code snippet in the created test class. In this class you are using SpringBootTest annotation @RunWith(SpringJUnit4ClassRunner.class) annotation. The Runwith annotation is JUnit 4 specific annotation. This annotation provides the test run engine.
Your annotated dependency classes like Adder and Subtractor in class with the MockedBean annotation. This annotation will create mocked instances of the dependency classes and inject it in the execution path during JUnit run. This is the least invasive way of injecting dependency; otherwise, you either have to create a setter and getter in the Calculator class or create an constructor accepting these dependencies. These two approaches will not add any value, but will increase boiler plate code. This strategy of MockedBean will keep code as close to production as possible and still support unit tests.
In this snippet, SpringJUnit4ClassRunner is used to run the test. This will allow us to autowire Spring dependencies in the test class and instantiate the application context for this during test execution. There are many runners available for JUnit one of them is SpringJUnit4ClassRunner .
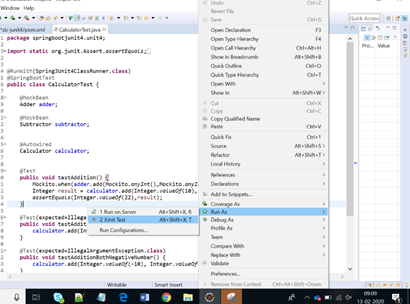
Run the test case in Eclipse with run as the JUnit test option by right-clicking on class. It will run with SpringJUnit4ClassRunner.
xxxxxxxxxx
package springbootjunit4.unit4;
import static org.junit.Assert.assertEquals;
import org.junit.Test;
import org.junit.runner.RunWith;
import org.mockito.Mockito;
import org.springframework.beans.factory.annotation.Autowired;
import org.springframework.boot.test.context.SpringBootTest;
import org.springframework.boot.test.mock.mockito.MockBean;
import org.springframework.test.context.junit4.SpringJUnit4ClassRunner;
(SpringJUnit4ClassRunner.class)
public class CalculatorTest {
Adder adder;
Subtractor subtractor;
Calculator calculator;
public void testAddition() {
Mockito.when(adder.add(Mockito.anyInt(),Mockito.anyInt())).thenReturn(22);
Integer result = calculator.add(Integer.valueOf(10), Integer.valueOf(12));
assertEquals(Integer.valueOf(22),result);
}
(expected=IllegalArgumentException.class)
public void testAdditionOneNegativeNumber() {
calculator.add(Integer.valueOf(-10), Integer.valueOf(12));
}
(expected=IllegalArgumentException.class)
public void testAdditionBothNegativeNumber() {
calculator.add(Integer.valueOf(-10), Integer.valueOf(-12));
}
public void testSubstraction() {
Mockito.when(subtractor.subtract(Mockito.anyInt(),Mockito.anyInt())).thenReturn(1);
Integer result = calculator.subtract(Integer.valueOf(11), Integer.valueOf(10));
assertEquals(Integer.valueOf(1),result);
}
}

Migrate JUnit 4 to JUnit 5
Create JUnit 5 Project
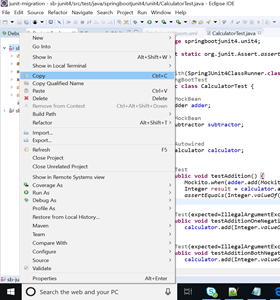
In this step you are going to create a new JUnit 5 project. You go to the context menu by right clicking in Project Explorer view of the Unit 4 project. Please refer to the below snippet to gain more clarity and give it new name sb-junit5.

Add JUnit 5 Dependency
As discussed above, the JUnit Vintage engine was responsible for running JUnit 4 tests. In this step, you will exclude that dependency. In order to achieve this you open pom.xml of sb-junit5 project and change spring boot version to latest 2.2.3.RELEASE and exclude the JUnit-vintage-engine dependency from spring boot started test dependency to use JUnit 5 and Mockito. In order to do it faster, you can copy the pom from the snippet directly. This image shows the difference view for pom.xml before and after changes.

Your final pom file will look like this:
xxxxxxxxxx
<project xmlns="http://maven.apache.org/POM/4.0.0" xmlns:xsi="http://www.w3.org/2001/XMLSchema-instance"
xsi:schemaLocation="http://maven.apache.org/POM/4.0.0 https://maven.apache.org/xsd/maven-4.0.0.xsd">
<modelVersion>4.0.0</modelVersion>
<parent>
<groupId>org.springframework.boot</groupId>
<artifactId>spring-boot-starter-parent</artifactId>
<version>2.2.3.RELEASE</version>
<relativePath/> <!-- lookup parent from repository -->
</parent>
<groupId>com.example</groupId>
<artifactId>demo</artifactId>
<version>1.0-SNAPSHOT</version>
<name>demo</name>
<description>Demo project for Spring Boot</description>
<properties>
<java.version>1.8</java.version>
</properties>
<dependencies>
<dependency>
<groupId>org.springframework.boot</groupId>
<artifactId>spring-boot-starter-web</artifactId>
</dependency>
<dependency>
<groupId>org.springframework.boot</groupId>
<artifactId>spring-boot-starter-test</artifactId>
<scope>test</scope>
<exclusions>
<exclusion>
<groupId>org.junit.vintage</groupId>
<artifactId>junit-vintage-engine</artifactId>
</exclusion>
</exclusions>
</dependency>
</dependencies>
<build>
<plugins>
<plugin>
<groupId>org.springframework.boot</groupId>
<artifactId>spring-boot-maven-plugin</artifactId>
</plugin>
<!--plugin>
<groupId>org.apache.maven.plugins</groupId>
<artifactId>maven-deploy-plugin</artifactId>
<version>${maven-deploy-plugin.version}</version>
</plugin-->
</plugins>
</build>
<distributionManagement>
<snapshotRepository>
<id>nexusdeploymentrepo</id>
<url>http://localhost:9081/repository/maven-snapshots/</url>
</snapshotRepository>
<repository>
<id>nexusdeploymentrepo</id>
<url>http://localhost:9081/repository/maven-releases/</url>
</repository>
</distributionManagement>
</project>
JUnit 5 has introduced junit-vintage-engine to support JUnit 4 test cases. You have to exclude this dependency of vintage engine so that only available engine is of JUnit 5.
Modify Test Code
Open CalculatorTest from the copied project and paste the snippet provided below. There are certain things worth noting here. The import statement for JUnit 5 and JUnit 4 is different as the supporting classes have different packages. The JUnit Runner class changed to SpringExtension. You have to use ExtendWith annotation instead of RunWith as per JUnit 5.
JUnit 5 has gotten rid of RunWith annotation in this version as it has introduced this concept of ExtendWith; this concept is applicable for all other areas in JUnit 5 where one can extend existing functionality coming out of the box, thus giving user leverage to build something on top of existing stuff without reinventing the wheel. For example, it provides you a mechanism to combine annotations from the package to give new meaning, like you want to run certain tests for sanity vs. full suite. You can create a annotation to filter those test cases combining existing @Test annotaion like @SanityTest. There is a change in test method having exception in annotation to assertion like below, it is using new method and lambda expression. We added new annotation DisplayName from JUnit 5 to be more descriptive about methods what they are doing like below.
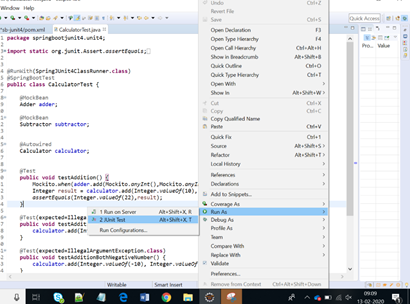
There is no change to Mockito API though the new version of Mockito has been added by parent pom of spring boot thus supporting Junit5 with Mockito out of the box. Try running the test class as JUnit test.
We added a new annotation DisplayName from JUnit 5 to be more descriptive about methods what they are doing like below
@DisplayName (" Test addition failure for one of the arguments are negative")
xxxxxxxxxx
package springbootJUnit4.unit4;
import static org.JUnit.jupiter.api.Assertions.assertEquals;
import static org.JUnit.jupiter.api.Assertions.assertThrows;
import org.JUnit.jupiter.api.DisplayName;
import org.JUnit.jupiter.api.Test;
import org.JUnit.jupiter.api.extension.ExtendWith;
import org.mockito.Mockito;
import org.springframework.beans.factory.annotation.Autowired;
import org.springframework.boot.test.context.SpringBootTest;
import org.springframework.boot.test.mock.mockito.MockBean;
import org.springframework.test.context.JUnit.jupiter.SpringExtension;
(SpringExtension.class)
public class CalculatorTest {
Adder adder;
Subtractor subtractor;
Calculator calculator;
(" Test positive integer Addition")
public void testAddition() {
Mockito.when(adder.add(Mockito.anyInt(),Mockito.anyInt())).thenReturn(22);
Integer result = calculator.add(Integer.valueOf(10), Integer.valueOf(12));
assertEquals(Integer.valueOf(22),result);
}
()
(" Test addition failure for one of the arguments are negative")
public void testAdditionOneNegativeNumber() {
assertThrows(IllegalArgumentException.class,
() -> calculator.add(Integer.valueOf(-10), Integer.valueOf(12)));
}
()
(" Test addition failure when both the arguments are negative")
public void testAdditionBothNegativeNumber() {
assertThrows(IllegalArgumentException.class,
() -> calculator.add(Integer.valueOf(-10), Integer.valueOf(-12)));
}
(" Test positive case for substraction")
public void testSubstraction() {
Mockito.when(subtractor.subtract(Mockito.anyInt(),Mockito.anyInt())).thenReturn(1);
Integer result = calculator.subtract(Integer.valueOf(11), Integer.valueOf(10));
assertEquals(Integer.valueOf(1),result);
}
}

There is no change to the Mockito API, though new version of Mockito has been added by parent pom of spring boot thus supporting Junit5 with Mockito out of the box without you doing much. Try running the test class as JUnit test. With this you have your first set of tests migrated successfully to Junit5 using Mockito.
Conclusion
In this exercise, you have learned how to move to a new JUnit 5 version from a JUnit 4 project. You learned how backward compatibility is ensured with JUnit 4 in JUnit 5. You learned about what packages needs to be imported with new JUnit 5. You learned about a new way of testing exceptions and usage of display name in JUnit 5. You got a brief about what to exclude from Pom in order to completely shut off JUnit 4. There may be cases in your project where you are not inheriting from parent pom of spring boot in those cases these dependencies need to be managed manually. In the next exercise we will learn the usage of advance features of JUnit 5.
Further Reading
Opinions expressed by DZone contributors are their own.

Comments