How to Integrate Google Maps in React Native
Join the DZone community and get the full member experience.
Join For FreeYou might have seen Google Maps in almost all the apps these days. Some mobile apps are displaying their outlet locations, tracking users (like Uber), showing nearby places, etc. So, it shows the importance of maps support in mobile apps. Today, we are going to integrate Google Maps in a React Native app step-by-step, using the popular React Native Maps package.
As a developer or a company, it is very important to manage an app’s codebase. So, these days, in mobile app development, there are platforms like React Native you can apps for both iOS and Android. I’m not going to dig in deep into React and React Native-related topics in the article. Instead, we will focus more Google Maps integration on both iOS and Android.
There are two ways to integrate Google Maps into a React Native mobile app:
- create-react-native-app cli
- react-native-cli
There are a few differences between these two that I would like to be clear about.
react-native-cli is developer friendly and gives the flexibility to use native components. But with this, you have to configure every small bit in the application. Apart from this, if you want to test your application, then you have to use the real device or you have to use simulators for both iOS and Android. You might generate a lot of bugs while installing various rpm packages and configuring them.
create-react-native-app, you can expo SDK built-in modules. This is a hassle-free environment for developing apps faster. You don’t need any device (not even simulators) to run and test the apps. You only need to develop the code and test using the expo app built for Android and iOS. You just need the QR Code generated by your application when you run using npm start.
It is very easy to integrate such modules in native code bases like Java or Swift. I would say one thing after reading the whole tutorial you can easily integrate Google Maps with React Native as well. You’ll also learn how to build a brand new React Native app from scratch. So, without further ado let’s get started.
Prerequisites
We’re assuming that you have at least basic or intermediate knowledge of JavaScript, React, and React Native. Let’s begin with create-react-native-app.
What are the things you need to integrate React Native Maps?
- Text Editor or IDE (We are using Visual Studio Code).
- Node JS (As always needed to install packages & other stuff).
- create-react-native-app (A CLI command line tool to install React Native on to your system.)
- Expo (More About Expo).
Let’s install the React Native on our system. Open up your command line in VS Code using Ctrl + ~ in Windows or go to the terminal on the menu and click on Add a new terminal.
Run the command: npm install -g create-react-native-app
- npm: (Node Package Manager, which manage all your package from installing to deleting).
- install: Install is used to give a command to NPM to install a package. You can also use -I instead of this.
- -g: It denotes or says NPM to install create-react-native-app globally in the system. This means it will available after this command to all of your systems and you can create a react native app in any directory.
- create-react-native-app: A tool which is made by react native developers to make starting a new mobile app in React Native hassle-free. It generates all the bolierplate code needed to get started right away with your app development process.
So, let’s move on to the next step.
It’s now time to dive into the meat of the project. We are going to build an app which integrates google maps. What would be the name of our app? Let’s name it as “location-finder”.
Create the Location-Finder App
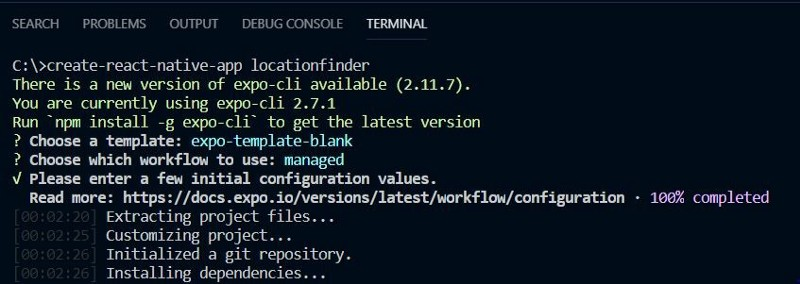
Run this command in your Terminal: create-react-native-app locationfinder.
You will see a lot of dependencies being isntalled, and it will take some time to install on your system as shown in the picture.
-
cd locationfinder(to get inside the app folder) - npm start
You can test using with the Expo app by scanning the QR Code generated by the command. Otherwise, you can use the simulator for iOS and the emulator for Android. To use them press “i” for iOS, and press “a” for Android. You can use any third-party emulator like Gennymotion.
This is a Map implementation project. The dependencies for this project while we are making this project are:
- “expo”: “³².0.0”,
- “react”: “16.5.0”,
- “react-native”: “³².0.0”
- “react-native-maps”: “0.22.0”
By default, Expo uses react-native-maps by Airbnb. Currently, Expo SDK is using version 0.22.0. Because this is built-in with create-react-native-app and expo.
You can see a similar folder structure in the VS Code as shown below:
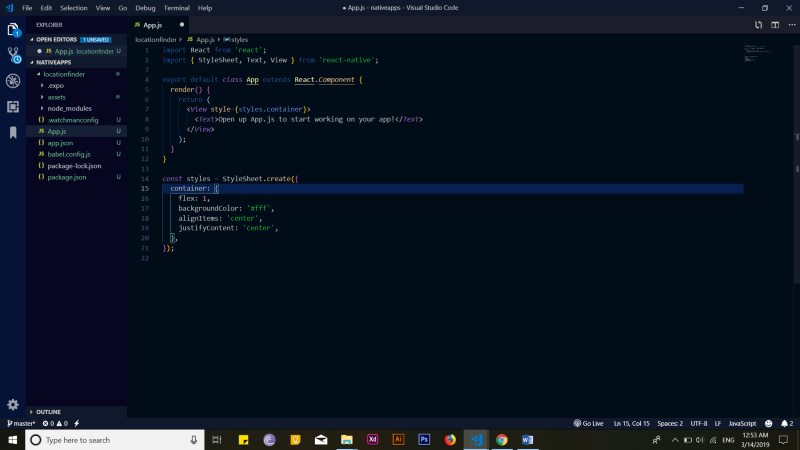
As I said earlier, we are going to use Expo SDK and react-native-maps is one of the built-in features to integrate Google Maps in Expo SDK. You do not need to install and configure react-native-maps for Android and iOS separately, but you need to in react-native-cli.
Integrating React Native Maps in Your React Native App
Now that you’ve installed all the required dependencies, you can import MapView in your React Native app. You need to make the following changes into the app.js file:
xxxxxxxxxx
import React, { Component } from 'react';
import { Platform, StyleSheet, Text, View } from 'react-native';
import MapView, { PROVIDER_GOOGLE } from 'react-native-maps';
export default
class App extends React.Component {
render() {
return (
<MapView
style={{ flex: 1 }}
provider={PROVIDER_GOOGLE}
showsUserLocation
initialRegion={{
latitude: 37.78825,
longitude: -122.4324,
latitudeDelta: 0.0922,
longitudeDelta: 0.0421}}
></div>
);
}
}
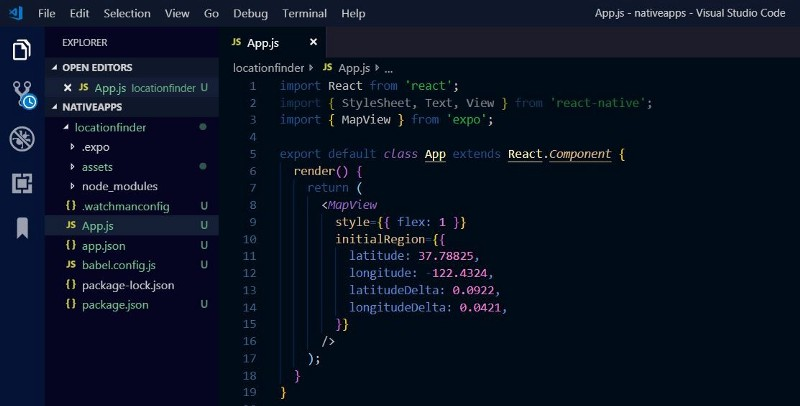
Great milestone! Now Google Maps is integrated into your mobile application. There are several methods that you can use to make it more intuitive. Features that you can add in your map, like you can ask the user for giving access to their current location. You can track user location as well. You can also add markers and labels on places as you see in Google Maps. You can also customize that map as much as you want.
Latitude and longitude are used to tell the position of the object. latitudeDelta and longitudeDelta are used to provide the zoom options in the map.
I have tried it on Android, and it works fine. You can try on an iPhone device and let me know in the comments section. Feel free to post a screenshot of your app to show off.
(Alternatively) Create a Rect Native app with react-native-cli
Step 1: Installing react-native-cli and creating App
Let’s start making the same app from scratch using react-native-cli. You need to follow the same way to install react-native-cli. In the terminal, run: npm install -g react-native-cli
It takes a little bit of time. After that, run another command to create the app: react-native init locationfinder
This will also take some time while installing. After installation, get into the folder using > cd locationfinder. You can run this app only on Android or iOS simulator using these commands for iOS, react-native run-ios and for android react-native run-android.
Step 2: Install react-native-maps package
react-native-maps created by Airbnb. It is open source and anybody can use it for accessing Google Maps. To install it in the app: locationfinder/npm install –save react-native-maps
After the installation is complete. You need to link this package with your current app so that you can use methods of the package in your application.
So, let’s configure map files for Android and iOS both.
Configure React-Native-Maps for Android
We are describing the steps in details, but I would suggest you check the official documentation as well. You just need to make little changes in some the files, but the rest of them are handled by react-native-cli automatically.
You have to get inside the android folder. There, you have to change in AndroidManifest.xml file. In this file, you have to configure the Google Maps API key. You can find this file inside android/app/src/main/AndroidManifest.xml.
xxxxxxxxxx
<application>
<meta-data
android:name=”com.google.android.geo.API_KEY”
android:value=”Your Google maps API Key Here”/>
</application>
Ensure that the meta-data of the app is under the application tag. Replace the android:value with the API key value.
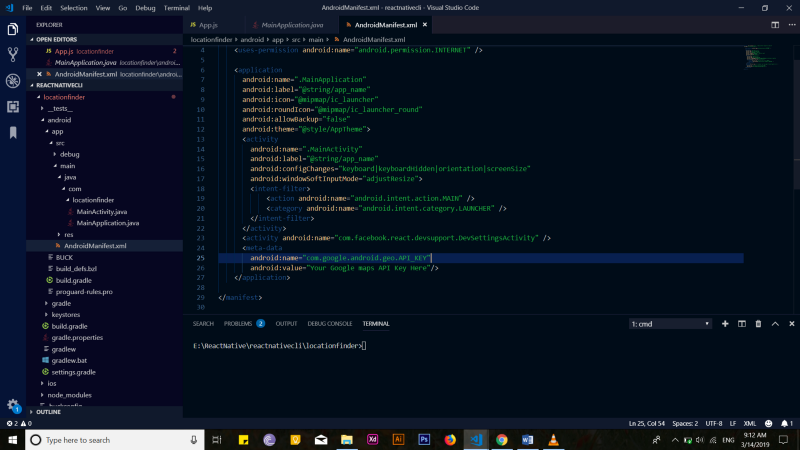
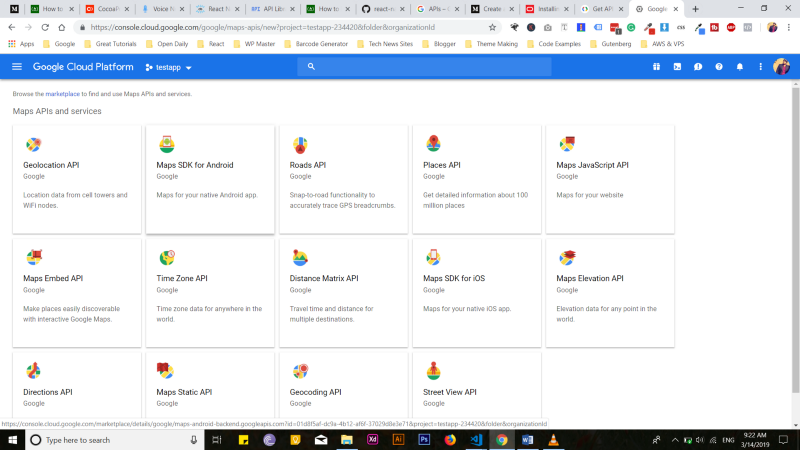
To find the Google API keys, you have to go to Google’s map SDK for Android, as shown in the picture. You can also see the instructions there. After that, go to Google’s cloud platform as shown in the picture:

import com.airbnb.android.react.maps.MapsPackage;
One more thing you need to change in this file. Add new MapsPackage() in function as shown below
xxxxxxxxxx
protected List<ReactPackage> getPackages() {
return Arrays.<ReactPackage>asList(
new MainReactPackage(),
new MapsPackage()
);
}
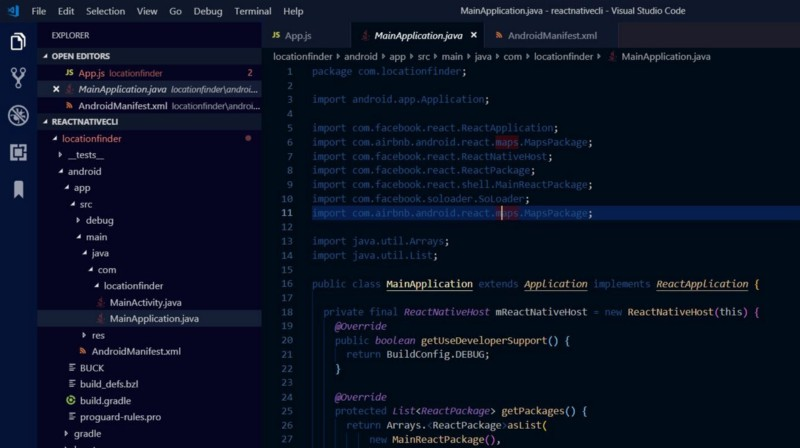
Finally, everything is done for Android. Now you have to rebuild the app. To do this, use the command, react-native run-android.
Configure React Native Maps for iOS
We need to add a Podfile in iOS to implement Cocoapods. To setup the PodFile, you need to go inside the iOS folder, create a file named Podfile and paste the code provided below. There are a few things that you need to change in this PodFile.
First of all, uncomment # platform: ios, ‘9.0’ by removing it. Next, you need to change target ‘_YOUR_PROJECT_TARGET_’ do to your app name like — target ‘locationfinder’ do. Then, after that, uncomment all the react-native-maps dependencies.
Once all of these changes are done, save the file. Then, go to command line and get inside the ios folder using cd ios. In this folder, you have to run one more command, pod install. This will install all the necessary files needed.
xxxxxxxxxx
# Uncomment the next line to define a global platform for your project
# platform :ios, '9.0'
target '_YOUR_PROJECT_TARGET_' do
rn_path = '../node_modules/react-native'
rn_maps_path = '../node_modules/react-native-maps'
# See http://facebook.github.io/react-native/docs/integration-with-existing-apps.html#configuring-cocoapods-dependencies
pod 'yoga', path: "#{rn_path}/ReactCommon/yoga/yoga.podspec"
pod 'React', path: rn_path, subspecs: [
'Core',
'CxxBridge',
'DevSupport',
'RCTActionSheet',
'RCTAnimation',
'RCTGeolocation',
'RCTImage',
'RCTLinkingIOS',
'RCTNetwork',
'RCTSettings',
'RCTText',
'RCTVibration',
'RCTWebSocket',
]
# React Native third party dependencies podspecs
pod 'DoubleConversion', :podspec => "#{rn_path}/third-party-podspecs/DoubleConversion.podspec"
pod 'glog', :podspec => "#{rn_path}/third-party-podspecs/glog.podspec"
# If you are using React Native <0.54, you will get the following error:
# "The name of the given podspec `GLog` doesn't match the expected one `glog`"
# Use the following line instead:
#pod 'GLog', :podspec => "#{rn_path}/third-party-podspecs/GLog.podspec"
pod 'Folly', :podspec => "#{rn_path}/third-party-podspecs/Folly.podspec"
# react-native-maps dependencies
pod 'react-native-maps', path: rn_maps_path
# pod 'react-native-google-maps', path: rn_maps_path # Uncomment this line if you want to support GoogleMaps on iOS
# pod 'GoogleMaps' # Uncomment this line if you want to support GoogleMaps on iOS
# pod 'Google-Maps-iOS-Utils' # Uncomment this line if you want to support GoogleMaps on iOS
end
post_install do |installer|
installer.pods_project.targets.each do |target|
if target.name == 'react-native-google-maps'
target.build_configurations.each do |config|
config.build_settings['CLANG_ENABLE_MODULES'] = 'No'
end
end
if target.name == "React"
target.remove_from_project
end
end
end
Now, we have to enable the Google Maps for iOS. To do it we have to integrate our API key inside AppDelegate.m file.

Now, we are ready to implement the maps in iOS. So, let’s do it. Just paste the code below and rebuild your app.
xxxxxxxxxx
import React, {Component} from 'react';
import {Platform, StyleSheet, Text, View} from 'react-native';
import MapView, { PROVIDER_GOOGLE } from 'react-native-maps';
export default class App extends React.Component {
render() {
return (
<MapView
style={{ flex: 1 }}
provider={PROVIDER_GOOGLE}
showsUserLocation
initialRegion={{
latitude: 37.78825,
longitude: -122.4324,
latitudeDelta: 0.0922,
longitudeDelta: 0.0421,
}}
></div>
);
}
}
Final Words
In this React Native tutorial, we learned how to add React Native Maps to a mobile app. I have tried to explain almost all the details on how to implement Google Maps in react native apps. I hope you like the article and it helps with your app development. If you get stuck somewhere, please comment below and don’t hesitate to share this article. It might help someone else.
Published at DZone with permission of krissanawatt kaewsanmunag. See the original article here.
Opinions expressed by DZone contributors are their own.

Comments