How to Install and Use Chatra
A developer takes a look at a platform that can be used to give your application chat functionalities, using either plugins or some API calls.
Join the DZone community and get the full member experience.
Join For FreeStill provide phone support? Have you ever thought about the live chat effectiveness for your website? While the majority of people avoid phone conversations and lack time to read emails, live chat can be a perfect option for providing the effective support and building relationships with your visitors. You can forget about all that "Could you spell your email phonetically?'' and give quick replies to the burning requests. Live chat saves you time, provides a much broader picture of your visitors, increases customers' loyalty, and even reduces stress caused by the phone calls.
What Is Chatra?
Chatra is a user-friendly messenger tool for websites that helps you assist the website visitors promptly and build sustainable relationships with them. Chatra gives you a chance to effectively fight the cart abandonment and avoid costly delays that are common for email support and are so critical in the competitive business environment. And their mobile apps allow you to help the visitors even when you are out of the office.
How to Add it to Your Website
To add Chatra to your website, you should sign up on their website in the upper-right corner, verify your Chatra account via the link sent to your email address, and set your password in the Chatra dashboard.
Adding the Code Manually
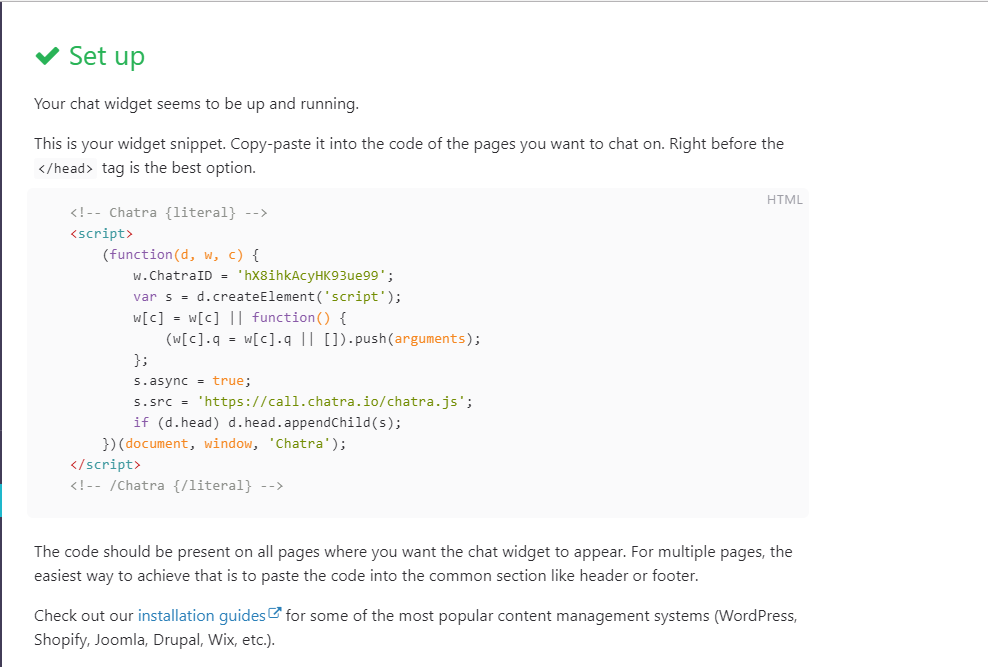
You can copy the widget code from the Set up and customize tab in the dashboard and paste it into the code of your website, preferably before the closing </head> tag.

Chatra is integrated with the majority of CMS platforms such as Shopify, Wordpress, Joomla, Drupal, Wix, etc. You can check out all the guides for the most popular systems here.
Plugin for WordPress
Chatra has its own plugin for WordPress so that you can easily add it to your website. Please follow the steps below if your website is WordPress-based:
- First, log into your WordPress admin panel and go to Plugins → Add new.
- Enter "chatra" into Search plugins field.
- Install and activate plugin.
- Go to Settings → Chatra chat.
- Log in into app.chatra.io in another browser tab and copy the widget code from the setup and customize section in the Chatra dashboard.
- Go back to the WordPress console, paste the code, and press Save changes.
- Done! Chatra should appear on your website.
It might happen that you don't see the widget after all the steps above are taken. If so, please check if you have any caching plugins installed. The widget should appear after you clear the cache of your website.
Shopify App
As you may know, Shopify is an extremely popular CMS for the online shops worldwide. Chatra offers a ready-to-use integration with this platform, so you can add Chatra to your online-store in one click. You can go to the Chatra app page on Shopify and press the green "Get" button there. Voila! Chatra is on your website. You can use the same Chatra account to connect an additional Shopify store. To do this, simply log into the store's admin dashboard and repeat the first step.
Other Platforms
Chatra is integrated with the majority of popular CMS platforms such as Bigcommerce, CS-Cart, Drupal, Ecwid, Joomla, Magento, Opencart, Tilda, and Wix. If you can't find the guide for your platform on Chatra website, check if you have an option to add custom HTML codes to your website or contact Chatra support for the correct guide.
Using the API
After the installation is completed, most of the settings (like widget texts, button colors, and position, etc.) can be changed from the dashboard on app.chatra.io, and the changes will be applied to the widget on your website in real-time. But Chatra also offers an API for the developers, with basic features available even on the free plan. Let's have a closer look at some of their features.
Changing the Colors
The Chatra dashboard allows you to change the colors only of the chat button, and you can pick only one of the colors from their palette.
With the API code below you can set your own colors not only for the chat button but for the message bubbles as well.
window.ChatraSetup = {
    colors: {
        buttonText: '#f5f5f5', // chat button text/icon color
        buttonBg: '#5ece1a', // chat button background color
        clientBubbleBg: '#e7ffd1', // visitor’s message bubble color
        agentBubbleBg: '#deffff' // agent’s message bubble color
    }
}
Add this code before the main widget code (or into the theme.liquid file, if you are using Shopify), and it will overwrite the settings from the Chatra dashboard. It's also convenient if you have several websites with different color palettes.
Changing the Size
If you think that the chat button or window is too big or too small for your website, change their size with this code:
window.ChatraSetup = {
    chatWidth: 400,
    chatHeight: 550,
    buttonSize: 75
}
This code also goes before the main widget code.
Setting the Language
Chatra is currently available in 7 languages: English, German, French, Spanish, Russian, Portuguese, and Dutch. If several languages are selected in the settings, Chatra detects the visitor's browser language and shows them the corresponding version.
Using the API, however, allows you to set the language on your side, so the browser language will be ignored. It allows you to have the chat window always in English on the English version of your website, in German on the German version, etc. To set the language, use this code:
window.ChatraSetup = {
    language: 'fr'
};
'fr' in the code above stands for French. Other possible language variables: 'en', 'de', 'es', 'nl', 'pt', and 'ru'. Chatra also allows you to translate the widget texts into other languages that are currently not supported (for example, from English into Japanese). Check their documentation for translating the widget here.
Note that window.ChatraSetup can only be used once on the page, so if you use different API options, make sure to combine all the options into a single object.
Connecting Chatra to Your Custom Button
If you want to make the chat window open with a click on your custom button, use this code:
<!-- Custom button anywhere on the page -->
<button onclick="Chatra('openChat', true)">Open chat window</button>
Basically, it's ready-to-use code that you can place anywhere on the page. If you already have a designed button, add the "Chatra('openChat', true)" setting to it. This way you can have an additional chat button on your page that can be placed in the header, footer, on the cart page, or wherever it might be useful.
If you only want to use your own button and to hide the default one, use this CSS code:
#chatra:not(.chatra--expanded) {
    visibility: hidden !important;
    opacity: 0 !important;
    pointer-events: none;
}
Add it into your CSS file or wrap it into the <style> tags and add it before the main widget code.
Advanced Options
All the examples listed above, as well as other options listed in the JavaScript API section in their documentation, are available in the free plan. The advanced API options are available only on the paid plan and during the trial period and require some individual coding on your side. You can:
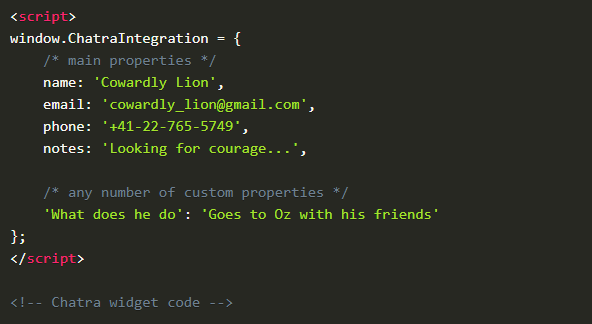
- Pass custom information into Chatra dashboard.
![Custom Data sent to Chatra via JavaScript API]()
- Bind the conversation history to the user’s account. By default, Chatra connects the conversation history to browser cookies, but, with this option, your visitors will have the same conversation history on all devices they are using to access your website.
- Use webhooks to get data from Chatra. This can be used for integration with third-party tools (for example, CRMs) and allows you to get the conversation history and visitor information from Chatra.
- Use a REST API to send data into Chatra. For example, you can send automatic order status updates to your registered customers. And combining REST APIs with webhooks allows you to get messages and reply to them in third-party apps, while the conversation history gets updated in Chatra in real-time.
Conclusion
Chatra is a powerful and highly configurable way to connect with your customer and for customers to provide feedback and ask for help. It's simple to set up and if you're not happy with something, as you have seen, you can probably change it with a few lines of code.
Published at DZone with permission of Joseph Zimmerman, DZone MVB. See the original article here.
Opinions expressed by DZone contributors are their own.


Comments