How to Implement Data-Driven Testing in your JMeter Test
One of the many advantages of DDT is that the tester mustn't create a separate test for each piece of input data. Here's how it works.
Join the DZone community and get the full member experience.
Join For FreeData-driven testing (DDT) is an approach, or, in other words, an architecture, for creating automated tests. The essence of this approach is that the input data for the test and the results that should be obtained with this input data are stored separately from the test itself. One example of storing input data and results is an Excel spreadsheet file. The results that are written to the Excel file are our expected result from the successful passing of the test.
One of the advantages of DDT is that the tester does not have to create a separate test for each piece of input data. The test is created in one instance, and the input data and the expected result for comparison with the actual result is taken from the file.
In order to create a test using DDT, imagine that we have an API that accepts the LOGIN and the PASSWORD of the user as incoming values.
For the API, the following requirements exist:
The user login must contain only English characters. Otherwise, return the following error message in the API response: "The user login was entered incorrectly."
Before creating a test in Apache JMeter™, you need to download the following JAR files:
These downloaded jar files should be added to the folder ... .. \ apache-jmeter-3.3 \ lib. Be sure to add them only when JMeter is closed.
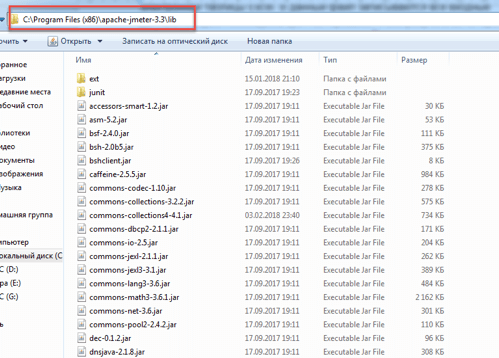
After adding the JAR files, you need to do the following.
Create an Excel File
Create an Excel file as shown in the image below.

In this file, each row, starting with the second row, is our test case. Fill in the following fields:
- Description of the test case: To be filled in manually.
- Login: The values for the "login" parameter, with which the request to the API will be formed.
- Password: The values for the "password" parameter, with which the request to the API will be generated.
- Request: In this column, JMeter will write a request to the API.
- Actual result: In this column, JMeter will write a response from the API.
- Expected result: The result we expect from the API. To be filled in manually.
- Status: In this column, JMeter will record the status of passing or not passing of the test case.
Based on the Excel file above, we will perform seven test cases. For each test case, we expect the following response from the API: "{" message ":" User login is not entered correctly "}" because the logins do not contain only English characters, as per our requirement.
The created Excel file can be saved in any directory.
Add a Thread Group
Right-click > Add > Threads (Users) > Thread Group.
Add User-Defined Variables
Thread Group > right-click > Add > Config Element > User-Defined Variables.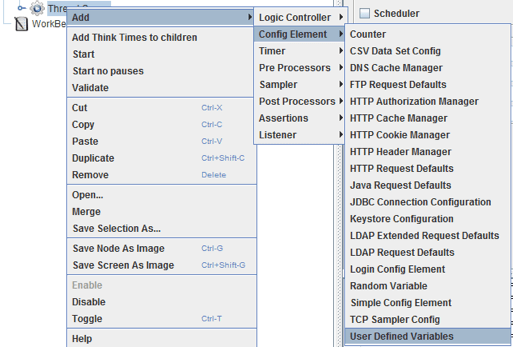
In the User-Defined Variables, create a variable named pathToFile with the value C:\\Users\\CC\\Desktop\\ddt1.xlsx. The value of this variable is the path to the Excel file that we created above.

Add a JSR223 Sampler
The purpose of this step is to create a Workbook object based on your excel file.
Thread Group > right-click > Add > Sampler > JSR223 Sampler.
JSR223 Sampler > Language Java (BeanShell 2.0b5/BeanShell Engine 1.0). This can also be done in Groovy.
In the JSR223 Sampler, add the following code example.
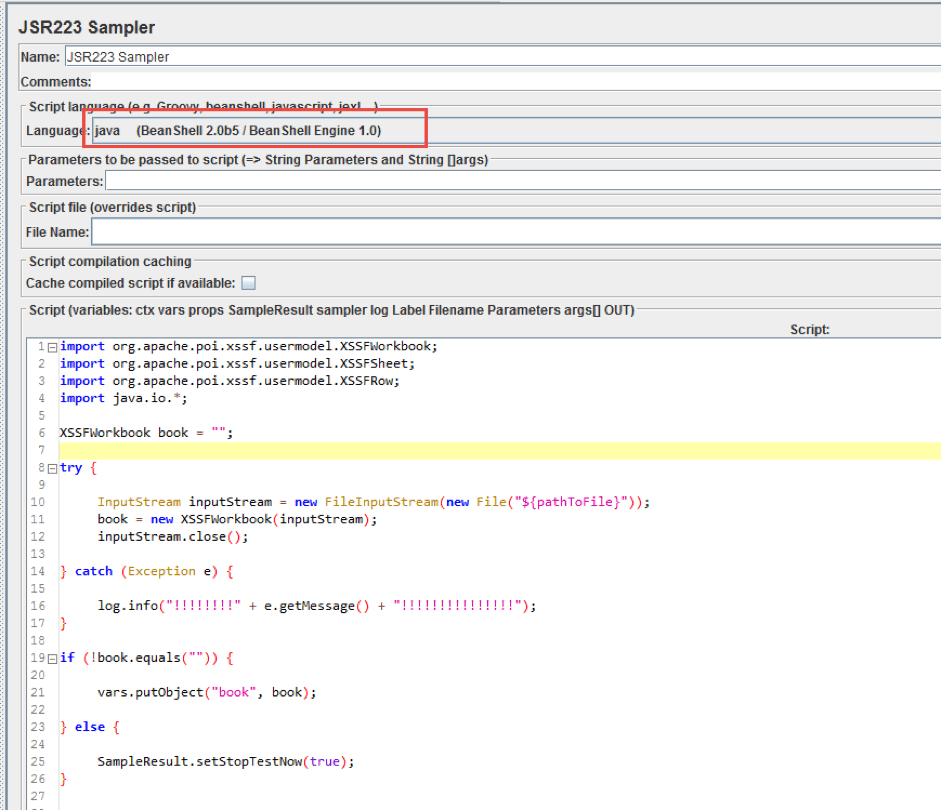
This code does the following:
import org.apache.poi.xssf.usermodel.XSSFWorkbook;
import org.apache.poi.xssf.usermodel.XSSFSheet;
import org.apache.poi.xssf.usermodel.XSSFRow;
import java.io.*;
This is the import of classes that are necessary for writing code. The class data is imported from the Jar files we added to JMeter.
XSSFWorkbook book = "";: Create a reference variable book with data type XSSFWorkbook. This variable will refer to an object that contains all the rows from the Excel file. Initially, we create a variable that does not refer to any object. In other words, it does not contain a single row from the Excel file.
try {

InputStream inputStream = new FileInputStream(new File("${pathToFile}"));
book = new XSSFWorkbook(inputStream);
inputStream.close();} catch (Exception e) { log.info("!!!!!!!!" + e.getMessage() + "!!!!!!!!!!!!!!!");
}
try {} catch{}: A block that is designed to handle exceptions. An exception is an unforeseen situation that might occur during the execution of the code. In our case, an unforeseen situation can arise if the Excel file that we created is deleted without our knowledge. The code in which the exception may occur is placed inside the try block. The code that handles the exception and notifies the user of this situation is placed inside the catch block.
InputStream inputStream = new FileInputStream(new File("${pathToFile}")):new File("${pathToFile}"): Provides access to our Excel file on the specified path. In our case, the path to the file is the variable "${pathToFile}", which we created in the user-defined variables.
InputStream inputStream = new FileInputStream(): Reads all the rows from an Excel file.
book = new XSSFWorkbook(inputStream);: Creates an XSSFWorkbook object that will contain all the rows from the Excel file.
inputStream.close();: Stop reading rows from the file.
log.info("!!!!!!!!" + e.getMessage() + "!!!!!!!!!!!!!!!"); -
log.info (): A method that prints messages to the JMeter console.
e.getMessage (): A method that receives an exception message.
If the Excel file does not exist for some reason by the specified directory, an exception will be thrown. e.getMessage () will receive an exception message, and log.info () will display the following message in the JMeter console:
"!!!!!!!! C:\Users\CC\Desktop\ddt1.xlsx (Can not find the specified file ) !!!!!!!!!!!!!!! "

if (!book.equals("")) {vars.putObject("book", book);

} else {SampleResult.setStopTestNow(true);
}!book.equals(""): Checks that the book variable does not reference an empty object (in other words, it checks that the rows from the Excel file have been saved to the XSSFWorkbook object). In our case, an empty object can be created if an exception occurs, and as a result rows from the Excel file will not be received.
If the rows from the Excel file are not received, then the code SampleResult.setStopTestNow (true) will execute (stop the test execution).
Add a While Controller
The While Controller will be used to send requests to the API as many times as the number of rows of the incoming data our Excel file contains. In our case, this is seven times.
Thread Group > right-click > Add > Logic Controller > While Controller.
In the While Controller, add the following code.

This code is used to stop the While Controller.
Add a Counter
While Controller > Add > Config Element > Counter.
Set the following parameters:
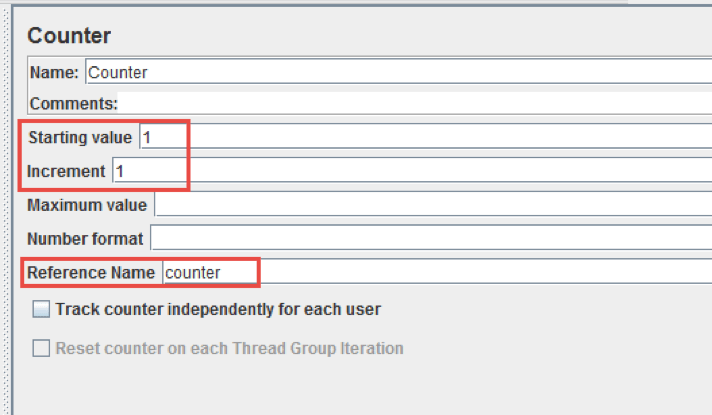
- Start = "1" is the initial value that is assigned to the variable "counter" before sending the first request to the API.
- Increment = "1" is the value that is added to the value of the variable "counter" before sending the second request to the API.
- Reference Name = "counter" is the name of the variable.
Add a JSR223 Sampler
In this step, we get the string from the object, from the rows of the cell values, and store these values in variables.
While Controller > Right Click > Add > Sampler > JSR223 Sampler.
In the JSR223 Sampler, add the following code example.
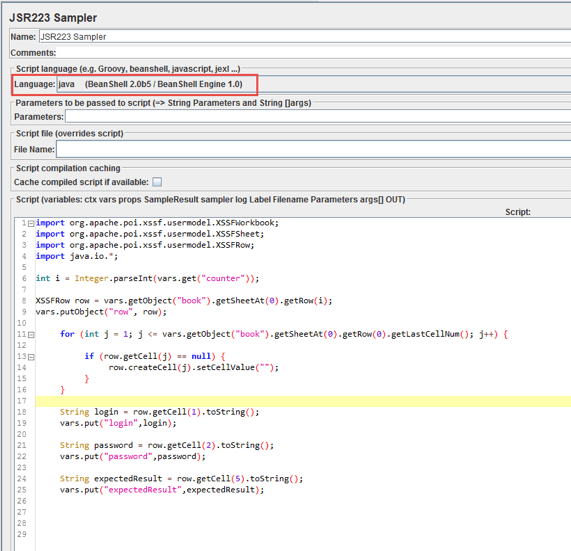
This code does the following:
int i = Integer.parseInt(vars.get("counter"));: Getting the value of the variable "counter".
XSSFRow row = vars.getObject("book").getSheetAt(0).getRow(i): Getting the first row that contains the values of the parameters Login and Password.
vars.putObject ("row", row);All the cells in the Excel file that do not contain a value (in our case, the cells for the Request, Actual Result, and Status) columns do not actually exist after writing to the book object. If we try to get the value of such a cell to write data to it, we will get an error and our test will fail. To prevent this from happening, before JMeter writes data to the cells for the Request, Actual Result, and Status columns, we create cells and set a blank value in them.
Getting each cell in a row:
for (int j = 1; j <= vars.getObject("book").getSheetAt(0).getRow(0).getLastCellNum(); j++) {

    if (row.getCell(j) == null) {
        row.createCell(j).setCellValue("");
    }
}

for (int j = 1; j <= vars.getObject("book").getSheetAt(0).getRow(0).getLastCellNum(); j++)
If the cell does not exist, we create a cell and set it to an empty value:
if (row.getCell(j) == null) {
    row.createCell(j).setCellValue("");
} -
String login = row.getCell(1).toString();: Getting the value of the first cell in the row and assigning the value of the variable login. In our case, for the first request to the API, the value of the variable "login" = 1 vars.put("login",login);.
String password = row.getCell(2).toString();: Getting the value of the second cell in the row and assigning the value of the variable password. In our case, for the first request to the API, the value of the variable "password" = 1A2V3X vars.put("password",password);.
String expectedResult = row.getCell(5).toString();: Getting the value of the fifth cell in the row and assigning the value of the "expectedResult" variable.
vars.put("expectedResult",expectedResult);Add a Dummy Sampler
The purpose of this step is to simulate the tested service.
While Controller > Add > Sampler > jp@gc - Dummy Sampler
In the Dummy Sampler, add the following data:
Example code: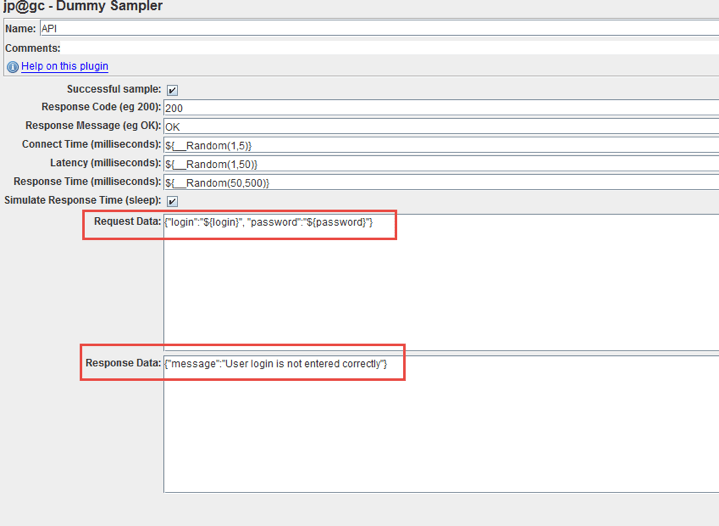
Learn more about how to use the Dummy Sampler from the post How to Retrieve Database Data for API Testing With JMeter.
Add a BeanShell Assertion
This part compares the actual and expected response from the API and records the Request, Response, and Status in the workbook object.
Dummy Sampler > right-click > Add > Assertions > BeanShell assertion.
In the BeanShell Assertion, add the following example code:
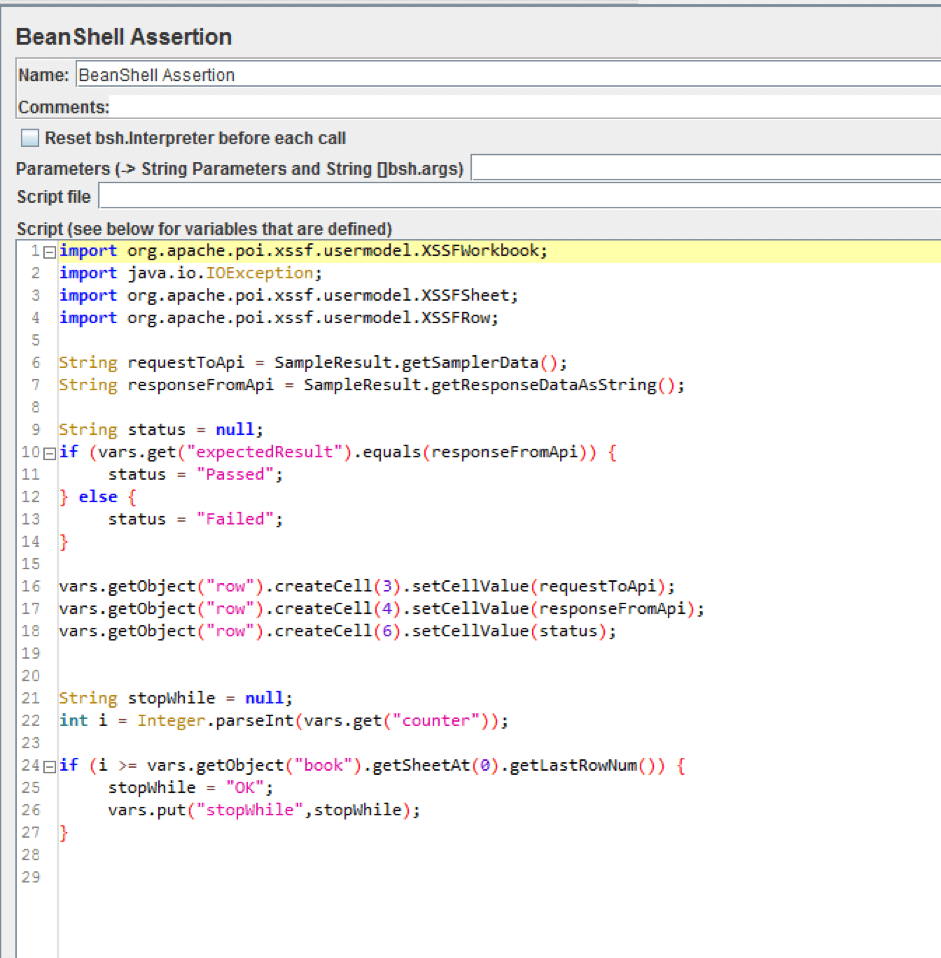
This code does the following:
String requestToApi = SampleResult.getSamplerData();: Getting the API request (from the Dummy Sampler in this case) and assigning the value of the variable.
String responseFromApi = SampleResult.getResponseDataAsString();: Getting a response from the API and assigning a value to a variable.
String status = null;: Create a variable that contains the result of passing the test. Initially assign the value "null".
if (vars.get("expectedResult").equals(responseFromApi)) {
    status = "Passed";
} else {
    status = "Failed";
}
If the expected result from the API and the actual result is equivalent, then the status = "Passed" is set; otherwise, the status = "Failed".
vars.getObject("row").createCell(3).setCellValue(requestToApi);: Writing of the request to the API in the cell of the Request column from the Excel file.
vars.getObject("row").createCell(4).setCellValue(responseFromApi);: Writing of the response from the API to the cell of the Actual Result column from the Excel file.
vars.getObject("row").createCell(6).setCellValue(status);: Writing of the status of passing the test in the cell of the Status column.
String stopWhile = null;
int i = Integer.parseInt(vars.get("counter"));

if (i >= vars.getObject("book").getSheetAt(0).getLastRowNum()) {
stopWhile = "OK";
vars.put("stopWhile",stopWhile);
}
This code stops the While Controller when all rows with incoming data to the API terminate.
Add a JSR223 Sampler
This phase copies the results to the actual excel file.
Thread Group > right-click > Add > Sampler > JSR223 Sampler.
In the JSR223 Sampler, add the following code example.
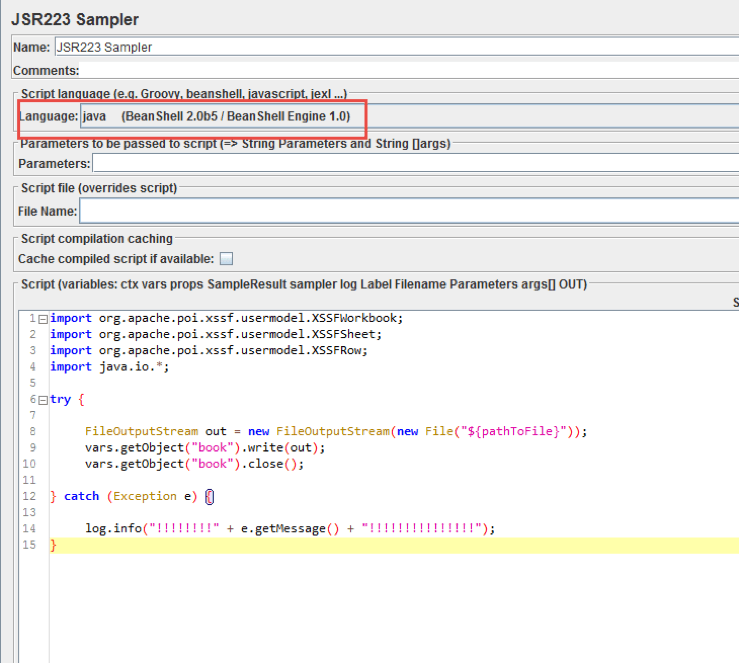
This code does the following.
Since all our results for each API request were written to the "book" object created by us and not to the actual Excel file, after the last request to the API was sent, all results are written to an Excel file.
FileOutputStream out = new FileOutputStream(new File("${pathToFile}"));: Opens the Excel file we created to write test results.
vars.getObject("book").write(out);: Writes test results to a file.
vars.getObject("book").close();: Closes an Excel file.
After all the test case results are written to an Excel file, our file will look like the one shown below:

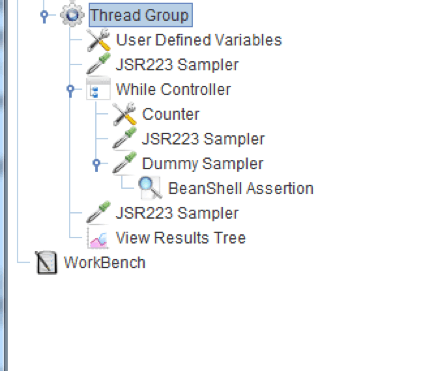
The overall structure of the test is shown in the image below.
Published at DZone with permission of Sergey Horban, DZone MVB. See the original article here.
Opinions expressed by DZone contributors are their own.

Comments