How to Enable Column Hiding in Ignite UI for Angular Grid
Learn how to make a snazzy column that users can click to open and close using Angular Grid.
Join the DZone community and get the full member experience.
Join For FreeIgnite UI for Angular Grid is the fastest Angular Grid out there. It does not only run fast, it is also very easy to use igxGrid in your application. Ignite UI for the Angular Grid component class is named igxGrid and, on the template, it can be used as <igx-grid></igx-grid>.
In this blog post, let's learn how Column Hiding can be enabled in IgniteUI for Angular Grid.

Step 1: Add Ignite UI for Angular into Our Angular Project
There are three ways to add an igx-grid to an Angular project:
- If starting a new project, use the Ignite UI CLI to scaffold the project. You can use command line options to add the igx-grid, including dependency installation.
- In an existing project, you can use the Ignite UI for Angular Toolbox Extension to add an igx-grid in the project. Learn how in this blog post.
- You can use npm to install Ignite UI for Angular dependencies in your project. You can learn about that in detail here: Step-by-Step with Images to Add Ignite UI for Angular in an Existing Angular Project
Step 2: Add igx-grid to an Angular Project
To work with igxGrid, you need to add:
igxGridModuleBrowserAnimationModule
import { BrowserAnimationsModule } from '@angular/platform-browser/animations';
import { IgxGridModule } from 'igniteui-angular';
After importing, pass these two modules to the imports array module. Next, to bind with igxGrid, let's create a local data source in the component.
getData() {
    return [
        { model: 'BMW', color: 'Black', price: '20000' },
        { model: 'Audi', color: 'Blue', price: '10000' },
        { model: 'Merc', color: 'Red', price: '25000' },
        { model: 'Toyta', color: 'Green', price: '18000' },
        { model: 'GM', color: 'Blye', price: '10000' },
    ];
}
If you want to learn how to work with REST-based API and igxGrid, follow four simple steps to working with Ignite UI for Angular Grid and REST Services.
In the ngOnInit life cycle hook of the component, read data from getData() function as shown in the code listed below. We will set the data source for igxGrid to localData using property binding on the template.
ngOnInit() {
    this.localData = this.getData();
}
Add igxGrid on the template as shown in the code listing below. We are explicitly configuring columns such that, we can work with column hiding feature.
<igx-grid #grid1 id="grid1" [data]="localData" [autoGenerate]="false">
    <igx-column field="model" header="Maker"></igx-column>
    <igx-column field="color" header="Color"></igx-column>
    <igx-column field="price" header="Price"></igx-column>
</igx-grid>
In the above igxGrid:
- The columns are configured manually.
- The data source is set using the
[data]property and binding it tolocalData. - Since the columns are configured manually,
autoGenerateis set to false.
At this point, you will get an igxGrid in your Angular application as shown in the image below:

Step 3: Enable Column Hiding
When using Ignite UI for Angular Grid, place the column hiding the UI in the grid’s toolbar. You can use the grid’s toolbar dropdown to show or hide columns. So, the first step you need to do is set showToolbar in the igx-grid element to true.
<igx-grid .... [showToolbar]="true" toolbarTitle="Cars" ...>

</igx-grid>
After setting showToolbar to true, you need to set columnHiding to true.
<igx-grid .... [columnHiding]="true" ...>

</igx-grid>
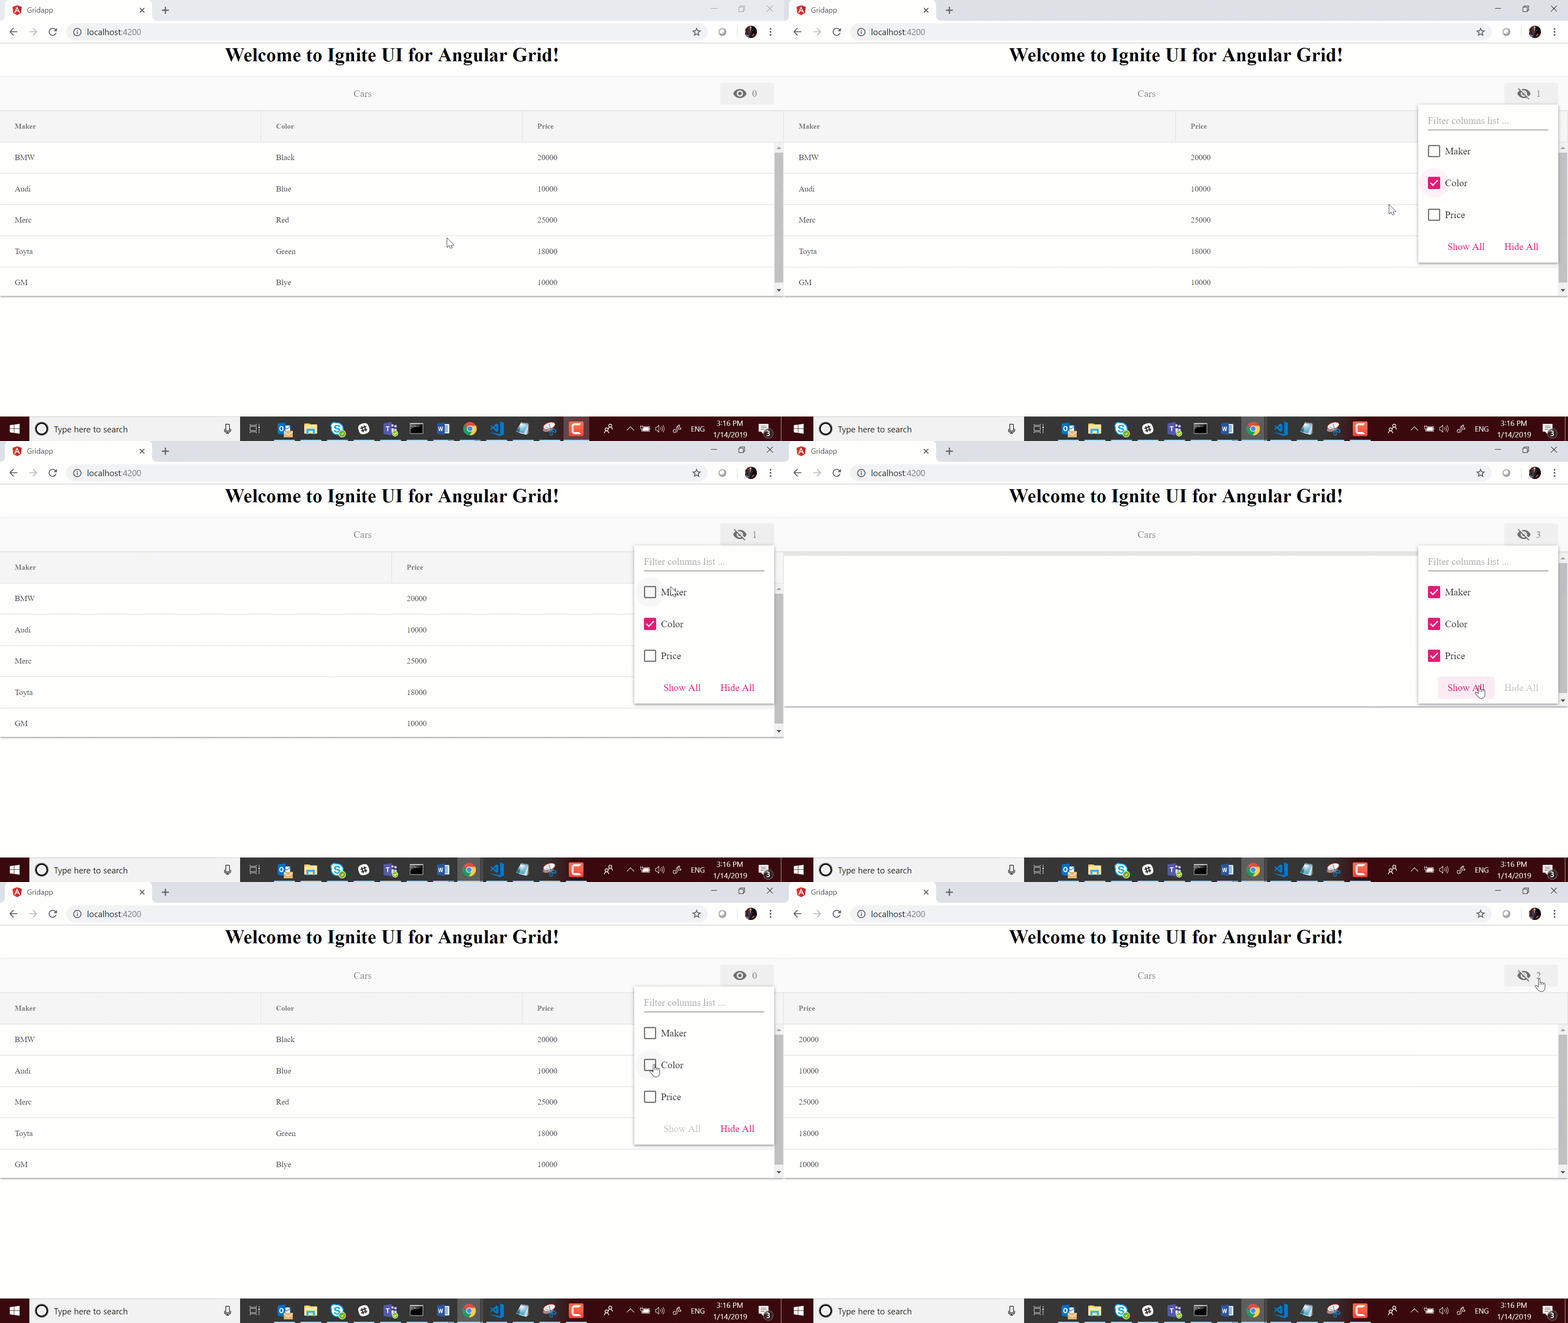
By setting a combination of showToolbar and columnHiding, you can work with column hiding in igxGrid. Putting everything together, with column hiding and manual column configuration igx-grid will look like as shown in the code listing below:
<igx-grid #grid1 id="grid1" [data]="localData" [autoGenerate]="false"
            [showToolbar]="true" toolbarTitle="Cars" [columnHiding]="true">
      <igx-column field="model" header="Maker"></igx-column>
      <igx-column field="color" header="Color"></igx-column>
      <igx-column field="price" header="Price"></igx-column>
  </igx-grid>
At this point, you will find igxGrid rendered as shown in the image below:

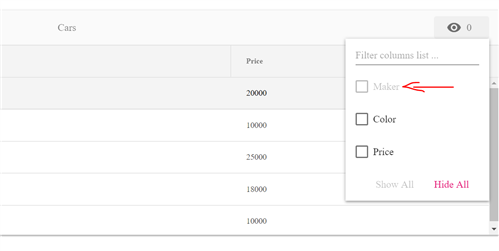
You can also disable a column from hiding by setting the [disabledHiding] property to true. So you can disable the hiding of a column's module as shown in the code listing below:
<igx-grid #grid1 id="grid1" [data]="localData" [autoGenerate]="false"
          [showToolbar]="true" toolbarTitle="Cars" [columnHiding]="true">
    <igx-column field="model" [disableHiding]="true" header="Maker"></igx-column>
    <igx-column field="color" header="Color"></igx-column>
    <igx-column field="price" header="Price"></igx-column>
</igx-grid>
At this point on running application, you will find igxGrid rendered with model column disabled for hiding shown in the image below:

Besides hiding columns, there aremany features to use with IgniteUI for Angular Grid, which make it the best grid for enterprise applications. Check out all features here.
Now you have seen that hiding columns is as simple as setting property binding. I hope you find this post useful.
Published at DZone with permission of Dhananjay Kumar, DZone MVB. See the original article here.
Opinions expressed by DZone contributors are their own.

Comments