How to Completely Uninstall Xcode From Mac
Xcode can take a toll on your storage and performance, especially if you’re running out of available space. Follow this guide to remove all Xcode files from your Mac.
Join the DZone community and get the full member experience.
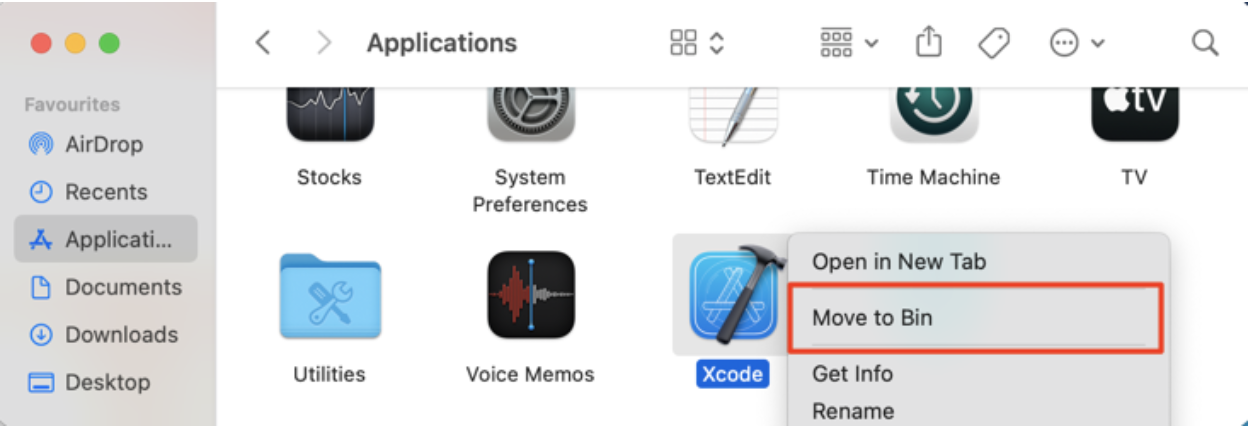
Join For FreeFirst launch Finder and click Applications on the right sidebar. Right-click on the Xcode icon and select Move to Bin on the context menu. That will immediately uninstall Xcode from your Mac.
Before you proceed to uninstall Xcode, we recommend that you find where the app's files and components are located on your Mac. That’ll give you an idea of where to look when you need to delete Xcode’s leftover files after uninstalling the app.
You can use the mdfind command in Terminal to locate all the files associated with the Xcode app. Here’s how to get it done.
1. Go to Finder > Applications > Utilities and double-click Terminal.
2. Type or paste the command below into the Terminal console and press Return on your keyboard.
mdfind -name "xcode"

3. Take note of the directories and file paths in the results.
You can run the command again after uninstalling Xcode to find any leftover file. Mind you, you shouldn't delete all directories displayed in the results. Files and folders commonly associated with Xcode are listed below:
-
/Applications/Xcode.app
-
~/Library/MobileDevice
-
~/Library/Developer
-
/System/Library/Receipts/com.apple.pkg.XcodeSystemResources.plist
-
/System/Library/Receipts/com.apple.pkg.XcodeExtensionSupport.plist
-
/System/Library/Receipts/com.apple.pkg.XcodeSystemResources.bom
-
/System/Library/Receipts/com.apple.pkg.XcodeExtensionSupport.bom
-
~/Library/Caches/com.apple.dt.Xcode
-
/Library/Preferences/com.apple.dt.Xcode.plist
-
~/Library/Preferences/com.apple.dt.Xcode.plist
This list is by no means definitive. You may find extra Xcode files in directories not listed above on your Mac. That’s why you should use the mdfind command to locate the files before uninstalling Xcode.
When you uninstall Xcode from your Mac, a bunch of these files will be deleted. However, some files may still be lurking behind. Follow the steps below to uninstall Xcode and completely remove all its associated data—leftover files and components.
Step 1: Delete the Xcode App
The first step to uninstalling Xcode from your Mac (and deleting its residual files) is to move the app itself to the macOS Bin. Launch Finder and click Applications on the right sidebar. Right-click on the Xcode icon and select Move to Bin on the context menu.

That will immediately uninstall Xcode from your Mac. Now, proceed to remove its residual files.
Step 2: Delete Xcode’s Residual Files
The files of newer Xcode versions are usually consolidated in the ~/Library/Developer/ folder. You may also find support files in the ~/Library/Caches/ folder. If your Mac doesn’t delete these files/folders after uninstalling Xcode, you should.
To do so, launch Terminal (go to Finder > Applications > Utilities > Terminal) and paste the following command.
sudo rm -rf ~/Library/Developer/

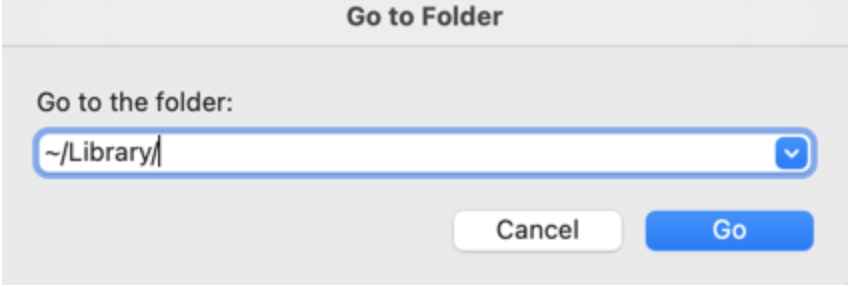
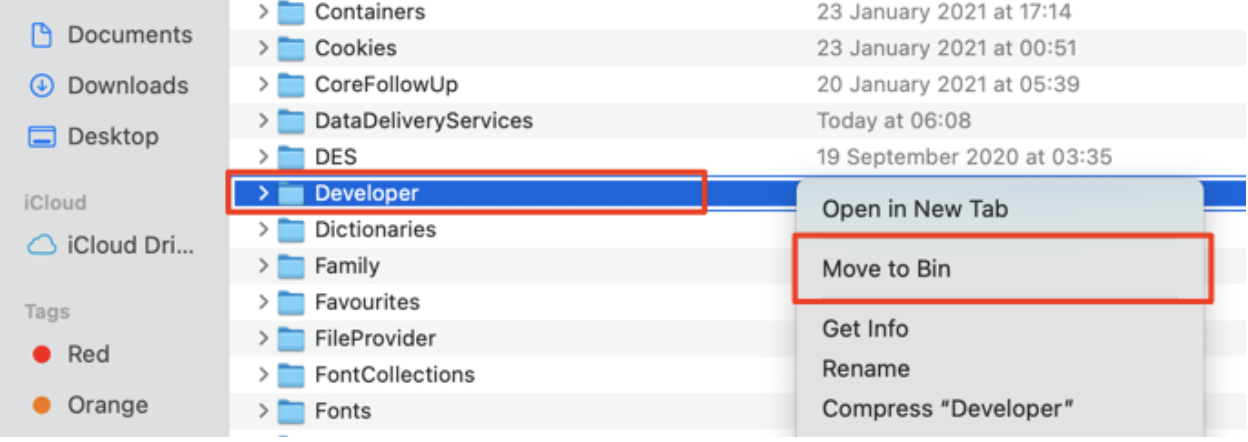
Enter your Mac’s password and press Return. This command will remove Xcode’s leftover files in the Developer folder. An alternative route is to launch the Go to Folder windows (Shift + Command + G), paste ~/Library/ into the dialog box, and click Go. 
Right-click the Developer folder and select Move to Bin.
Execute the next command to delete other support files in the Library cache folder.
sudo rm -rf ~/Library/Caches/com.apple.dt.Xcode Paste the command above and press Return. The folder will be deleted after entering your Mac’s password.
Proceed to empty your Mac’s Bin after uninstalling Xcode and deleting the residual files. You can also run the mdfind command in Terminal to confirm that the files have indeed been deleted.
If you find that some Xcode files are still resident on your Mac’s hard drive, you probably have an old version of the Xcode app. To delete the legacy files of legacy Xcode versions, launch Terminal and paste the command below into the console.
sudo /Developer/Library/uninstall-devtools --mode=all Press Return, enter your Mac’s password, and press Return again.
Files generated by Xcode and its components run into tens of gigabytes. This can take a toll on your Mac’s storage and performance, especially if you’re running out of available space. Follow the steps in this guide to completely remove all Xcode’s files from your Mac.
Why and When Should You Uninstall Xcode?
Sometimes, the best way to fix the issues and prevent Xcode from filling up your hard drive is to uninstall the app and reinstall it from scratch. So when some features of Xcode consistently malfunction time and time again, you might want to completely remove the app from your Mac.
Say, for example, XCode fails to compile your app or install some vital components/simulators. Uninstalling the app might be the next best thing if all troubleshooting solutions prove abortive.
You may also need to uninstall Xcode if you’re selling off your Mac or gifting it to someone who isn’t a developer.
Xcode is one of the best Integrated Development Environments (IDEs) for writing, testing, and deploying Apple apps. Creating applications for Mac and iOS devices is a lot easier with Xcode. Despite being a super app development tool with several benefits, Xcode has one huge downside: it’s a data hog.
The (latest version of the) app is about 11GB on the App Store. During usage, Xcode also creates a lot of temporary cache files that consume an insane amount of storage space. In the long run, these temp files may cause the app (and your Mac) to freeze or malfunction during usage.
Opinions expressed by DZone contributors are their own.

Comments