How to Change Certificates At Runtime Without Downtime
In this article, see how to change certificates during runtime without taking the application down
Join the DZone community and get the full member experience.
Join For FreeCertificates Are Always a Pain in the Production Environment!
Security is one the most important part of any application these days especially the fact that most of the applications are running on a public cloud provider puts the security part on a higher priority. One of the ways applications are used to keep communications secure is through the certificate. The certificate is one of the concepts that is not as easy as other parts of software development. First, you should understand how a certificate plays in the security part to figure out how to incorporate it into your application security. Moreover, you need to know how to generate/issue a new certificate for your application.
Unfortunately, certificate generation is not a one-time job and it has an expiration date. So, it means a new certificate should be replaced with the current certificate before the expiration date comes. In most cases, the certificate information is used in configurations of a deployed application on production. Therefore, you need to generate a new certificate and redeploy your application on production. This creates difficulties for software teams to see how they can handle this issue and justify the downtime in production if there is no rolling update mechanism. Lack of knowledge and documentation in projects often makes this operation highly error prune. Therefore, there is a high chance that even after a new certificate something fails on production unexpectedly because of misconfiguration. In this article, we are going to see how we can solve this issue without having downtime on production while using a single server and without any changes on the application level.
How to Update the Certificate on the Server With Zero Downtime
This example demonstrates a Java-based server with the widely used Spring-Boot, however, the configuration can also be applied to other servers.
Maven Dependencies
The following Maven dependencies will be used for the examples:
Client
xxxxxxxxxx
<dependency>
<groupId>io.github.hakky54</groupId>
<artifactId>sslcontext-kickstart</artifactId>
</dependency>
<dependency>
<groupId>org.slf4j</groupId>
<artifactId>slf4j-simple</artifactId>
</dependency>
<dependency>
<groupId>com.fasterxml.jackson.core</groupId>
<artifactId>jackson-databind</artifactId>
</dependency>
Server
xxxxxxxxxx
<dependency>
<groupId>org.springframework.boot</groupId>
<artifactId>spring-boot</artifactId>
</dependency>
<dependency>
<groupId>org.springframework.boot</groupId>
<artifactId>spring-boot-starter-web</artifactId>
<exclusions>
<exclusion>
<groupId>org.springframework.boot</groupId>
<artifactId>spring-boot-starter-tomcat</artifactId>
</exclusion>
</exclusions>
</dependency>
<dependency>
<groupId>org.springframework.boot</groupId>
<artifactId>spring-boot-starter-jetty</artifactId>
</dependency>
<dependency>
<groupId>io.github.hakky54</groupId>
<artifactId>sslcontext-kickstart-for-jetty</artifactId>
</dependency>
Spring Boot has an embedded Tomcat server that doesn't support the configuration which will be demonstrated within this example. The Tomcat server will be replaced by Jetty which has the ability to accept a custom SSL configuration object.
Server Configuration
In this tutorial, we will demonstrate updating the server certificates through an HTTP call. It is also possible to change the certificates when the keystores are getting updates on the file system with a file listener, see here for a reference implementation: FilesBasedSslUpdateService
Let's start with the REST implementation by adding a basic rest controller to access the server:
xxxxxxxxxx
public class HelloWorldController {
(value = "/api/hello", produces = MediaType.TEXT_PLAIN_VALUE)
public ResponseEntity<String> hello() {
return ResponseEntity.ok("Hello");
}
}
The server is currently accessible on port 8080 with HTTP protocol. To secure it we need to adjust the server configuration. This can be done by creating an instance of ConfigurableServletWebServerFactory. It needs an SslContextFactory and a custom port. In this case, 8443 will be used.
xxxxxxxxxx
public ConfigurableServletWebServerFactory webServerFactory(SslContextFactory.Server sslContextFactory) {
JettyServletWebServerFactory factory = new JettyServletWebServerFactory();
JettyServerCustomizer jettyServerCustomizer = server -> {
ServerConnector serverConnector = new ServerConnector(server, sslContextFactory);
serverConnector.setPort(8443);
server.setConnectors(new Connector[]{serverConnector});
};
factory.setServerCustomizers(Collections.singletonList(jettyServerCustomizer));
return factory;
}
SslContextFactory of Jetty will be constructed with the following snippet:
xxxxxxxxxx
public SSLFactory sslFactory() {
return SSLFactory.builder()
.withSwappableIdentityMaterial()
.withIdentityMaterial("/path/to/identity.jks", "secret".toCharArray())
.withSwappableTrustMaterial()
.withTrustMaterial("/path/to/truststore.jks", "secret".toCharArray())
.withNeedClientAuthentication()
.build();
}
public SslContextFactory.Server sslContextFactory(SSLFactory sslFactory) {
return JettySslUtils.forServer(sslFactory);
}
The SSLFactory will first use the identity.jks, which contains the server key pair, to create a KeyManager. It will also use the truststore.jks, which contains trusted certificates, to create a TrustManager. By default, it is not possible to update the server certificates at runtime without taking the server down and restarting it. However, this feature can be enabled by using the withSwappableIdentityMaterial and withSwappableTrustMaterial. These two options will wrap the actual KeyManager and TrustManager with a wrapper of the same type. This special wrapper class has the ability to swap the underlying KeyManager and TrustManager with a new one whenever needed. Most of the servers and also HTTP clients are using the base SSL configuration, such as SSLContext, SSLSocketFactory, SSLServerSocketFactory, and SSLEngine which will only hold the reference to the highest level of KeyManager and TrustManager, and therefore it is possible to hot-swap the internal one.
The next step is to make the KeyManager, TrustManager, and SSLSession available for an admin service that has the responsibility of taking new SSL material and swapping it with the existing SSL configuration.
xxxxxxxxxx
public X509ExtendedKeyManager keyManager(SSLFactory sslFactory) {
return sslFactory.getKeyManager().orElseThrow();
}
public X509ExtendedTrustManager trustManager(SSLFactory sslFactory) {
return sslFactory.getTrustManager().orElseThrow();
}
public SSLSessionContext serverSessionContext(SSLFactory sslFactory) {
return sslFactory.getSslContext().getServerSessionContext();
}
xxxxxxxxxx
public class SwappableSslService {
private final SSLSessionContext sslSessionContext;
private final X509ExtendedKeyManager swappableKeyManager;
private final X509ExtendedTrustManager swappableTrustManager;
public SwappableSslService(SSLSessionContext sslSessionContext,
X509ExtendedKeyManager swappableKeyManager,
X509ExtendedTrustManager swappableTrustManager) {
this.sslSessionContext = sslSessionContext;
this.swappableKeyManager = swappableKeyManager;
this.swappableTrustManager = swappableTrustManager;
}
public void updateSslMaterials(X509ExtendedKeyManager keyManager, X509ExtendedTrustManager trustManager) {
KeyManagerUtils.swapKeyManager(swappableKeyManager, keyManager);
TrustManagerUtils.swapTrustManager(swappableTrustManager, trustManager);
SSLSessionUtils.invalidateCaches(sslSessionContext);
}
}
The SwappableSslService will take a new KeyManager and a new TrustManager. It will inject it into the existing SSL configuration which we have created in the previous snippet and the old one will be overridden. By cleaning the SSL session all new requests will use the new certificates. The next step would be an entry point to get new certificates, this might be a file listener or just a rest controller. In this example, we will use a basic rest controller which accepts an SSLUpdateRequest. We hide this endpoint behind the admin path.
x
public class AdminController {
private final SwappableSslService sslService;
public AdminController(SwappableSslService sslService) {
this.sslService = sslService;
}
(value = "/admin/ssl", consumes = MediaType.APPLICATION_JSON_VALUE)
public void updateKeyManager( SSLUpdateRequest request) throws IOException {
try (InputStream keyStoreStream = new ByteArrayInputStream(request.getKeyStore());
InputStream trustStoreStream = new ByteArrayInputStream(request.getTrustStore())) {
KeyStore keyStore = KeyStoreUtils.loadKeyStore(keyStoreStream, request.getKeyStorePassword());
X509ExtendedKeyManager keyManager = KeyManagerUtils.createKeyManager(keyStore, request.getKeyStorePassword());
KeyStore trustStore = KeyStoreUtils.loadKeyStore(trustStoreStream, request.getTrustStorePassword());
X509ExtendedTrustManager trustManager = TrustManagerUtils.createTrustManager(trustStore);
sslService.updateSslMaterials(keyManager, trustManager);
}
}
}
xxxxxxxxxx
public class SSLUpdateRequest {
private byte[] keyStore;
private char[] keyStorePassword;
private byte[] trustStore;
private char[] trustStorePassword;
public SSLUpdateRequest() {}
public SSLUpdateRequest(byte[] keyStore,
char[] keyStorePassword,
byte[] trustStore,
char[] trustStorePassword) {
this.keyStore = keyStore;
this.keyStorePassword = keyStorePassword;
this.trustStore = trustStore;
this.trustStorePassword = trustStorePassword;
}
// Getters and Setters
}
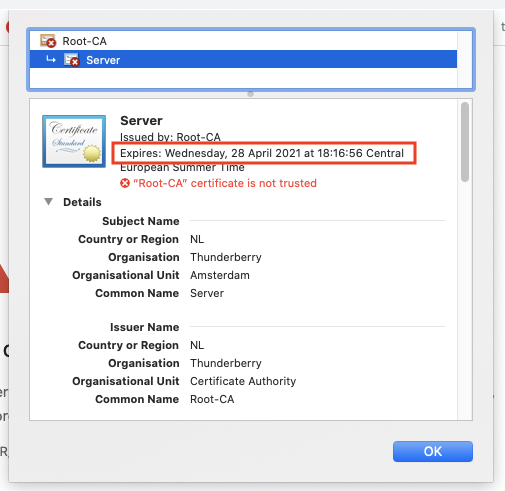
This basic admin controller has now the capability of receiving a new keyStore as a new server identity and a new trustStore as a byte array. It is able to translate these byte arrays into a KeyStore object and it will forward it to the SwappableSslService. The Server setup is done and when accessed through the browser at https://localhost:8443/api/hello we will get the server certificate as shown below. It will expire on the 28th of April 2021, so we need to update it!

Client Configuration
The client can be any type of application that is able to send an HTTP post request to the admin controller. It expects a JSON request which has the structure of the SSLUpdateRequest as shown earlier. In our case, we will use the default HTTP Client which is available from Java 11 onwards. The client also needs his own certificates to be able to communicate with the server as the server requires any client to authenticate based on their certificates. This is also called mutual authentication, a.k.a., two-way-ssl. If a client is not trusted by the server it cannot communicate with it. The admin SSL material will be loaded and it will be supplied to the HTTP Client. Next, the new server identity.jks and truststore will be loaded and it will be sent to the admin endpoint of the server.
xxxxxxxxxx
public class App {
private static final ObjectMapper objectMapper = new ObjectMapper();
public static void main(String[] args) throws IOException, InterruptedException {
char[] keyStorePassword = "secret".toCharArray();
SSLFactory sslFactory = SSLFactory.builder()
.withIdentityMaterial("keystores/admin/identity.jks", keyStorePassword)
.withTrustMaterial("keystores/admin/truststore.jks", keyStorePassword)
.build();
HttpClient httpClient = HttpClient.newBuilder()
.sslParameters(sslFactory.getSslParameters())
.sslContext(sslFactory.getSslContext())
.build();
byte[] identity = App.class.getClassLoader().getResourceAsStream("keystores/server/identity.jks").readAllBytes();
byte[] truststore = App.class.getClassLoader().getResourceAsStream("keystores/server/truststore.jks").readAllBytes();
SSLUpdateRequest sslUpdateRequest = new SSLUpdateRequest(identity, keyStorePassword, truststore, keyStorePassword);
String body = objectMapper.writeValueAsString(sslUpdateRequest);
HttpRequest request = HttpRequest.newBuilder().POST(HttpRequest.BodyPublishers.ofString(body))
.header("Content-Type", "application/json")
.uri(URI.create("https://localhost:8443/admin/ssl"))
.build();
HttpResponse<Void> response = httpClient.send(request, HttpResponse.BodyHandlers.discarding());
System.out.println(response.statusCode());
}
}
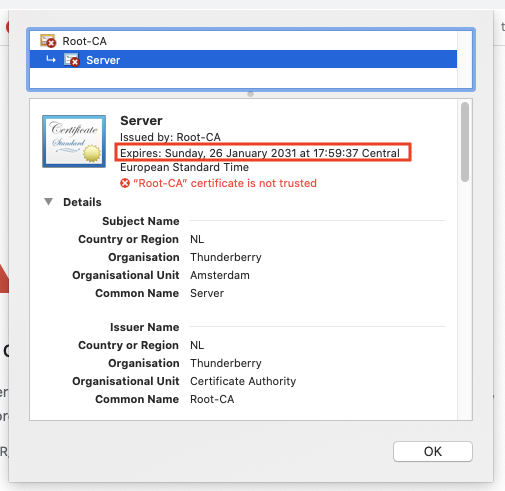
After running the client it will print a 200 as a status code which means, I did it and it looks like everything went smooth! When we refresh our browser page we will see that the server certificate has changed, it still has the signed Root-CA but the new certificate is valid for another 10 years. It will expire on the 26th of January 2031!

If you haven't watched the video which was in the beginning, there is a demo in the video in which you can see how this solution works.
Benefits of This Solution
This solution is helping to decouple the certificate implementation from the application layer and that can be controlled separately from the actual development pipeline. This means whenever any changes needed to be done on the part of the certificate, you only change that part without being waiting for a release to add that change. Most importantly with this solution, there will no downtime and end users would not notice the certificate replacement. This will be a huge achievement for applications where you do not have flexible slots for these kinds of changes.
Although this solution has been implemented with Java, you should be able to implement this concept in any programming language.
As usual, you'll find the sources over on GitHub. You can give it a try and we are looking forward to hearing your feedback!
Opinions expressed by DZone contributors are their own.

Comments