How to Build a Recommender System Using TensorFlow
Learn how to use TensorFlow and TensorFlow Recommenders (TFRS) to build a powerful and accurate recommendation system for your website or application.
Join the DZone community and get the full member experience.
Join For FreeWhat Is a Recommender System?
A recommender system is a software engine developed to suggest products and services for a given set of customers. While there are multiple ways in which these systems recommend products, the most common is by analyzing a customer's previous purchasing patterns by storing data related to previous purchases, positive and negative reviews, saves/adds to lists, views, and more.
So why do businesses such as Amazon and Netflix spend small fortunes building and improving these systems? Because recommender systems boost sales significantly. By acting as each customer’s personal sales team, recommender systems provide each user with a unique and personalized experience. These systems can help customers identify their favorite movies, books, shows, articles, and more without having to parse through the millions of choices.
TensorFlow and TensorFlow Recommender
Created by the well-known Tensor framework, the TensorFlow Recommender (or TFRS) is a library created specifically for building recommendation system models. In addition to being moderately easy to learn, the TensorFlow Recommender framework helps in the entire recommendation system-building process, from data collection and evaluation to deployment.
In our short tutorial, we will integrate the TensorFlow Recommender system into our recommendation system model. We’ll also explain the structure of our model, with a brief explanation of each step in the code.
The Goal of Our Recommender System
We will build a recommendation system that takes in a list of electronic products (provided by Amazon) along with a list of ratings of each item given by different users as the input data. The system will provide further suggestions for similar products with the highest ratings that each customer might be interested in buying.
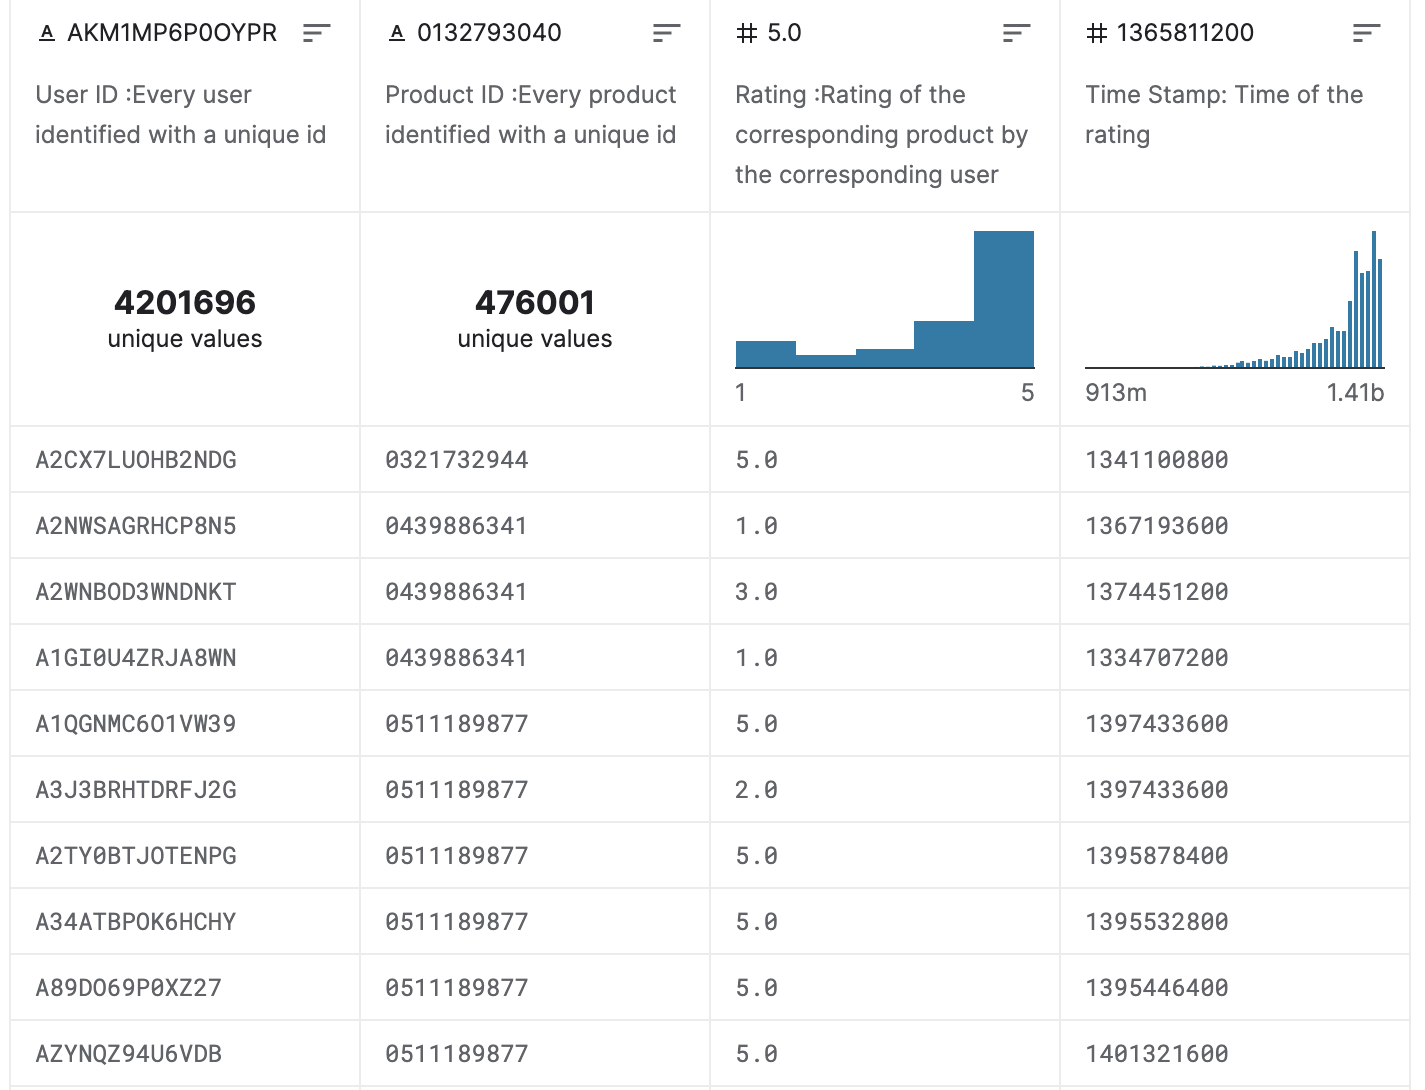
To find the data set used in our tutorial example, please check the following link: Amazon Product Review Data set. The data set contains four columns; the user ID, product ID, product rating, and the time stamp of each rating. Using the following values, we will build the required recommender system.

TensorFlow Recommenders Tutorial
Note that you can test your code on Kaggle or Google Colab.
Step 1: Importing the Required Libraries
<span>import numpy as np</span>

<span>import pandas as pd</span>

<span>from datetime import datetime,timedelta</span>
We will also import the plotting libraries. These are libraries that allow us to draw and plot figures, graphs, etc. These figures will mostly be used for explanation purposes and will have no effect on the final result of our model whatsoever.
<span>import matplotlib.pyplot as plt</span>

<span>from matplotlib.patches import Patch</span>

<span>from matplotlib.ticker import MaxNLocator</span>

<span>from learntools.time_series.utils import plot_periodogram, seasonal_plot</span>

<span>from learntools.time_series.style import *</span>

<span>import seaborn as sns</span>

<span>from IPython.display import Markdown, display</span>
<span>def printmd(string):</span>

<span>display(Markdown(string))<br><br></span><span>from pathlib import Path</span>

<span>comp_dir = Path('../input/amazon-product-reviews')</span>
Step 2: Importing the Amazon Reviews Data Set
In this step, we will import and read the electronic rating data set from Amazon.
<span>electronics_data=pd.read_csv(comp_dir / "ratings_Electronics (1).csv", dtype={'rating': 'int8'},</span>

<span>names=['userId', 'productId','rating','timestamp'], index_col=None, header=0)</span>

<span>#electronics_data.drop("timestamp",axis=1, inplace=True)</span>
Step 3: Printing the Data Set Info
In this part, we will print some information about the given dataset, such as the number of rows (ratings) available, the columns used (userID, productID, rating, and timestamp), the number of unique users, and finally the number of unique products.
<span>printmd("Number of Rating: {:,}".format(electronics_data.shape[0]) )</span>

<span>printmd("Columns: {}".format( np.array2string(electronics_data.columns.values)) )</span>

<span>printmd("Number of Users: {:,}".format(len(electronics_data.userId.unique()) ) )</span>

<span>printmd("Number of Products: {:,}".format(len(electronics_data.productId.unique()) ) )</span>

<span>electronics_data.describe()['rating'].reset_index()</span>
Output:
Number of Rating: 7,824,481
Columns: ['userId' 'productId' 'rating' 'timestamp']
Number of Users: 4,201,696
Number of Products: 476,001
Step 4: Checking for Missing Values
<span>printmd('**Number of missing values**:')</span>

<span>pd.DataFrame(electronics_data.isnull().sum().reset_index()).rename( columns={0:"Total missing","index":"Columns"})</span>
Luckily for us, the used data set contains no missing values. The reason that we check for missing values is to remove them. As in our case, missing values will negatively affect the accuracy of our final model.
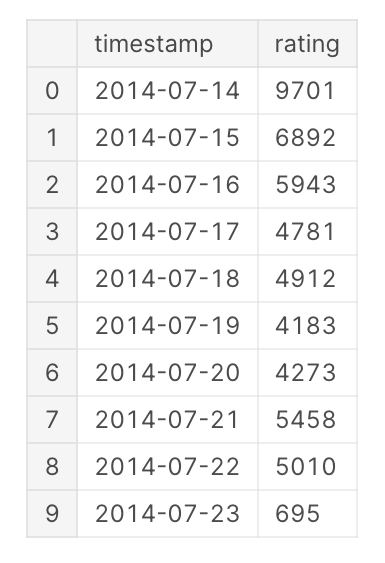
Step 5: Printing the Number of Ratings Per Day
<span>data_by_date = electronics_data.copy()</span>

<span>data_by_date.timestamp = pd.to_datetime(electronics_data.timestamp, unit="s")#.dt.date</span>

<span>data_by_date = data_by_date.sort_values(by="timestamp", ascending=False).reset_index(drop=True)</span>

<span>printmd("Number of Ratings each day:")</span>

<span>data_by_date.groupby("timestamp")["rating"].count().tail(10).reset_index()</span>

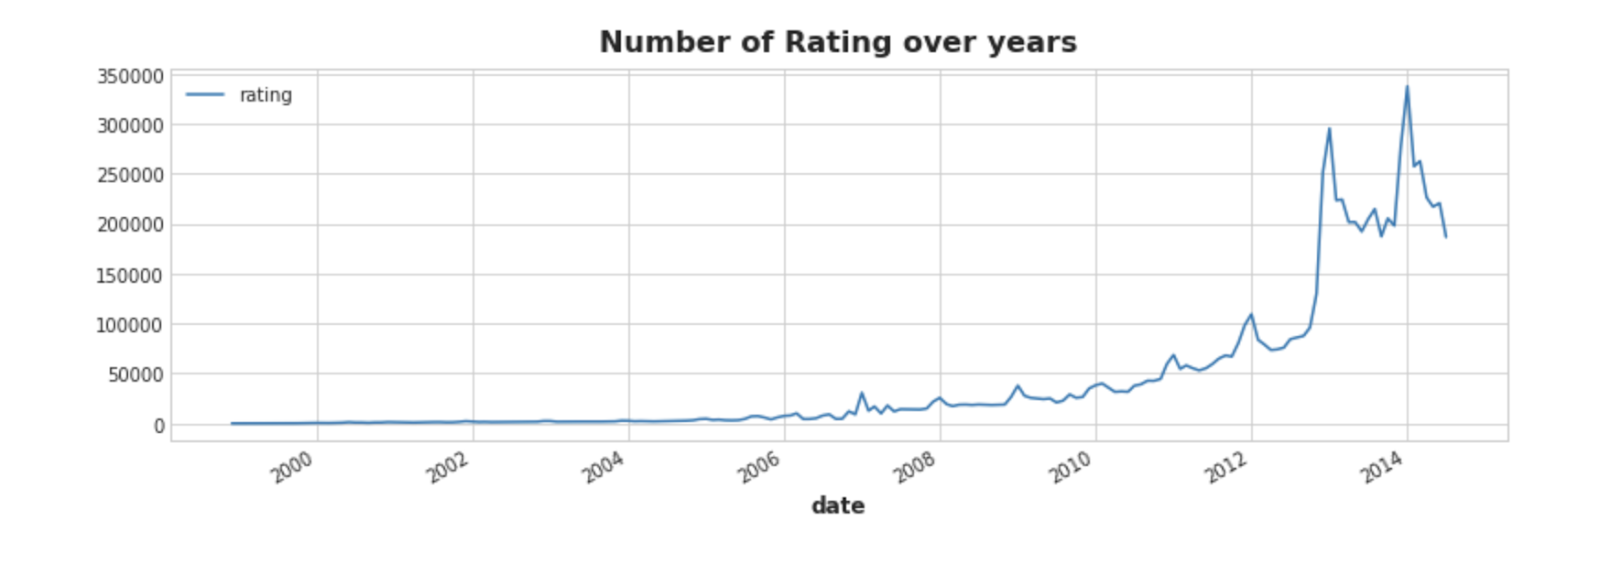
Step 6: Plotting the Number of Ratings Over the Years
<span>data_by_date["year"] = data_by_date.timestamp.dt.year</span>

<span>data_by_date["month"] = data_by_date.timestamp.dt.month</span>

<span>rating_by_year = data_by_date.groupby(["year","month"])["rating"].count().reset_index()</span>

<span>rating_by_year["date"] = pd.to_datetime(rating_by_year["year"].astype("str") +"-"+rating_by_year["month"].astype("str") +"-1")</span>

<span>rating_by_year.plot(x="date", y="rating")</span>

<span>plt.title("Number of Rating over years")</span>

<span>plt.show()</span>

Step 7: Sorting the Products by Number of Ratings
<span>#rating_by_product = electronics_data.groupby(by='productId')['Rating'].count().sort_values(ascending=False).reset_index()</span>

<span>rating_by_product = electronics_data.groupby("productId").agg({"userId":"count","rating":"mean"}).rename(columns={"userId":"Number of Ratings", "rating":"Average Rating"}).reset_index()</span>
We will then define the cutoff to be of value 50. Only products with a greater number of ratings than the cutoff will be counted. This means that products with less than the cutoff number of ratings will be negated from the sorting.
<span>cutoff = 50</span>

<span>top_rated = rating_by_product.loc[rating_by_product["Number of Ratings"]>cutoff].sort_values(by="Average Rating",ascending=False).reset_index(drop=True)</span>
Step 8: Installing TensorFlow Recommenders (TFSR)
To start with, we will update pip to the latest available version. If pip is not found, then it will be installed. After that, we will install the TensorFlow recommenders framework using pip.
<span>!/opt/conda/bin/python3.7 -m pip install --upgrade pip</span>

<span>!pip install -q tensorflow-recommenders</span>
Step 9: Import the TensorFlow and TensorFlow Recommenders Library
We will use the below two libraries in order to import the two neural network models used in this tutorial.
<span>import tensorflow as tf</span>

<span>import tensorflow_recommenders as tfrs</span>
Step 10: Importing Our Models
The RankingModel method takes as its one and only parameter the tf.keras.Model, which is the parent neural network model imported from the TensorFlow library. Moving on, we will then pass a value of 32 to the embedding_dimension, which is a hyperparameter of the embedding layer that specifies the size of the embedding vector.
Next, inside the RankingModel, we will perform word embedding on the product and user data sets. Because our model can’t understand textual data, we will need to transform the textual data into integer values that can be processed by it.
Word embedding is the process of transforming every single word inside a given dataset into an integer value. This value will represent the importance of the given word in the used neural network in order to reach the required objective.
At last, for the ratings, we will build 3 dense (fully connected) layers that will perform normal regression. The first layer contains 256 neurons, the second 64, and the last layer has only 1, meaning that our final value is either true/false (yes/no).
<span>class RankingModel(tf.keras.Model):</span>

<span>def init(self):</span>

<span>super().init()</span>

<span>embedding_dimension = 32</span>

<span>self.user_embeddings = tf.keras.Sequential([</span>

<span>tf.keras.layers.experimental.preprocessing.StringLookup(vocabulary=unique_userIds, mask_token=None),</span>

<span># add additional embedding to account for unknown tokens</span>

<span>tf.keras.layers.Embedding(len(unique_userIds)+1, embedding_dimension)</span>

<span>])</span>

<span>self.product_embeddings = tf.keras.Sequential([</span>

<span>tf.keras.layers.experimental.preprocessing.StringLookup(vocabulary=unique_productIds, mask_token=None),</span>

<span># add additional embedding to account for unknown tokens</span>

<span>tf.keras.layers.Embedding(len(unique_productIds)+1, embedding_dimension)</span>

<span>])</span>

<span># Set up a retrieval task and evaluation metrics over the</span>

<span># entire dataset of candidates.</span>

<span>self.ratings = tf.keras.Sequential([</span>

<span>tf.keras.layers.Dense(256, activation="relu"),</span>

<span>tf.keras.layers.Dense(64, activation="relu"),</span>

<span>tf.keras.layers.Dense(1)</span>

<span>])</span>

<span>def call(self, userId, productId):</span>

<span>user_embeddings = self.user_embeddings (userId)</span>

<span>product_embeddings = self.product_embeddings(productId)</span>

<span>return self.ratings(tf.concat([user_embeddings,product_embeddings], axis=1))</span>
The amazonModel which is the final model used, inherits the TFRS neural network model imported from the TFRS library. This amazonModel then initializes the ranking model built from the above step.
<span>class amazonModel(tfrs.models.Model):</span>

<span>def init(self):</span>

<span>super().init()</span>

<span>self.ranking_model: tf.keras.Model = RankingModel()</span>

<span>self.task: tf.keras.layers.Layer = tfrs.tasks.Ranking(</span>

<span>loss = tf.keras.losses.MeanSquaredError(),</span>

<span>metrics = [tf.keras.metrics.RootMeanSquaredError()])</span>

<span>def compute_loss(self, features, training=False):</span>

<span>rating_predictions = self.ranking_model(features["userId"], features["productId"])</span>

<span>return self.task(labels=features["rating"], predictions=rating_predictions)</span>
Step 11: Filtering Out the Dataset
In this step, we will remove any product with fewer than 50 ratings and any rating before the year 2012 from our data set. The reason for filtering out these values is that they will weaken the accuracy of the model. In the case of products with fewer than 50 ratings, there are not enough ratings for the model to correctly judge the product.
We will be filtering all ratings before the year 2012 because values are older and may have a negative effect on the model's accuracy. In addition, removing them will boost our model's running time and save memory space.
<span>cutoff_no_rat = 50 # Only count products which received more than or equal 50</span>

<span>cutoff_year = 2011 # Only count Rating after 2011</span>

<span>recent_data = data_by_date.loc[data_by_date["year"] > cutoff_year]</span>

<span>print("Number of Rating: {:,}".format(recent_data.shape[0]))</span>

<span>print("Number of Users: {:,}".format(len(recent_data.userId.unique())))</span>

<span>print("Number of Products: {:,}".format(len(recent_data.productId.unique())))</span>

<span>del data_by_date # Free up memory</span>

<span>recent_prod = recent_data.loc[recent_data.groupby("productId")["rating"].transform('count').ge(cutoff_no_rat)].reset_index(drop=True).drop(["timestamp","year","month"],axis=1)</span>

<span>del recent_data # Free up memory</span>
Output:
<span>Number of Rating: 5,566,858</span>

<span>Number of Users: 3,142,438</span>

<span>Number of Products: 382,245</span>
Step 12: Storing the Final Ratings for Our Model
We will save the new values of unique users, products, and ratings.
<span>userIds    = recent_prod.userId.unique()</span>

<span>productIds = recent_prod.productId.unique()</span>

<span>total_ratings= len(recent_prod.index)</span>
We will save the final ratings required in a value called ratings.
<span>ratings = tf.data.Dataset.from_tensor_slices( {"userId":tf.cast( recent_prod.userId.values  ,tf.string),</span>

<span>                                "productId":tf.cast( recent_prod.productId.values,tf.string),</span>

<span>                                "rating":tf.cast( recent_prod.rating.values  ,tf.int8,) } )</span>
Step 13: Shuffle the Rating Data Set
We will shuffle the rating values and restore them in a new value called shuffled.
<span>tf.random.set_seed(42)</span>

<span>shuffled = ratings.shuffle(100_000, seed=42, reshuffle_each_iteration=False)</span>
Step 14: Splitting the Data Set
We will split the final shuffled data set and store 80 percent of it in the training value and 20 percent in the testing value.
<span>train = shuffled.take( int(total_ratings*0.8) )</span>

<span>test = shuffled.skip(int(total_ratings*0.8)).take(int(total_ratings*0.2))</span>

<span>unique_productIds = productIds</span>

<span>unique_userIds    = userIds</span>
Step 15: Running Our Final Model
<span>model = amazonModel()</span>

<span>model.compile(optimizer=tf.keras.optimizers.Adagrad( learning_rate=0.1 ))</span>

<span>cached_train = train.shuffle(100_000).batch(8192).cache()</span>

<span>cached_test = test.batch(4096).cache()</span>

<span>model.fit(cached_train, epochs=10)</span>
Step 16: Evaluating the Model
In the evaluation part of the model, we will try to suggest five products to a user we chose at random. In the below example, we chose the user with ID 123.
<span>model.evaluate(cached_test, return_dict=True)</span>

<span>user_rand = userIds[123]</span>

<span>test_rating = {}</span>

<span>for m in test.take(5):</span>

<span>test_rating[m["productId"].numpy()]=RankingModel()(tf.convert_to_tensor([user_rand]),tf.convert_to_tensor([m["productId"]]))</span>

<span>print("Top 5 recommended products for User {}: ".format(user_rand))</span>

<span>for m in sorted(test_rating, key=test_rating.get, reverse=True):</span>

<span>print(m.decode())</span>
Output:
<span>Top 5 recommended products for User A32PYU1S3Y7QFY: </span>

<span>B002FFG6JC</span>

<span>B004ABO7QI</span>

<span>B006YW3DI4</span>

<span>B0012YJQWQ</span>

<span>B006ZBWV0K</span>
To check the original code for the example used in this tutorial, please check the following link: TensorFlow Recommenders: Amazon Review Dataset.
Final Notes on Building a Recommender System Using the TFRS Library
A recommender system is a tool that helps businesses such as Amazon and Netflix recommend products or services to customers based on their previous purchasing patterns and other data. These systems can greatly increase sales by providing a personalized experience for each user, helping them discover their favorite items without having to search through a vast selection.
TensorFlow, along with TensorFlow Recommender or the TFSR, makes it easy and simple to develop a recommender system. With our brief explanation of its structure and tutorial, hopefully you have a better grasp of how to tackle the development of your own recommender system.
Published at DZone with permission of Kevin Vu. See the original article here.
Opinions expressed by DZone contributors are their own.

Comments