Enhancing Stream Data Processing With Snow Pipe, Cortex AI, and Snow Park
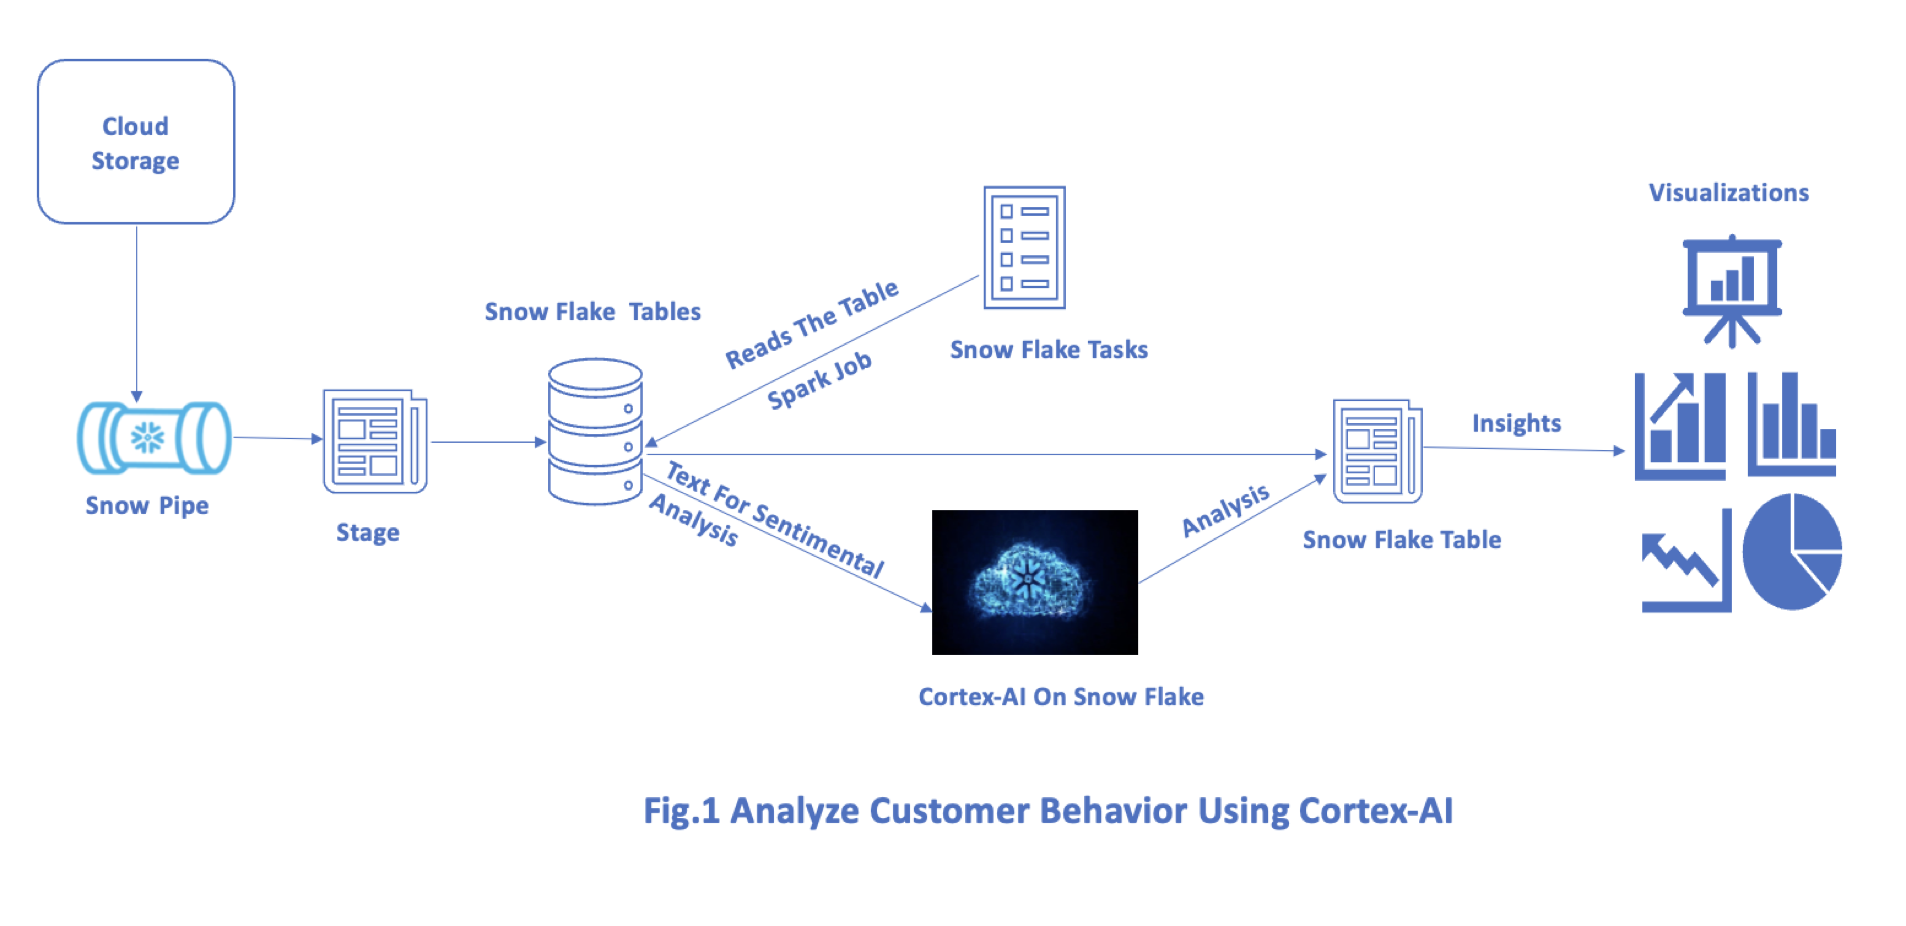
Customer sentiment analysis from reviews gathered from external source streams is ingested to Snowflake using Snow Pipe for further analysis using cortex AI API’s.
Join the DZone community and get the full member experience.
Join For FreeWhy Snowflake?
Snowflake is a cloud-based data platform that provides a fully managed service for handling data-driven engagements. It is scalable and is enabled on multiple cloud tenants of AWS, Azure, and GCP.
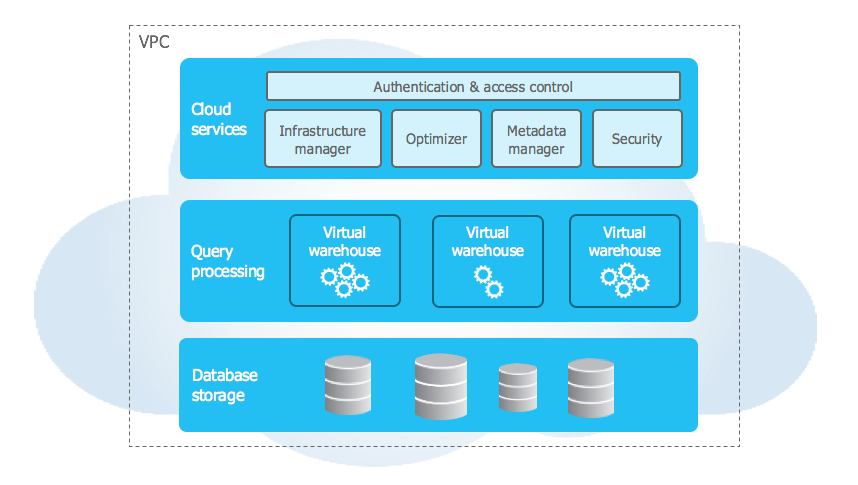
Snowflake has a unique architecture that separates the storage, compute, and service layers which enables scalable and elastic data processing. This architecture enables us to use resources of storage, compute, and services independently and pay as per the usage.

Snowflake supports MPP architecture which allows high concurrency with the capability of handling multiple workloads and accessing data simultaneously. It also provides secure data sharing across different organizations without creating replicas of the dataset. It offers query performance features of Auto query optimization, data indexing, and caching
It provides robust security features of data encryption for data at rest and in transit. Role-based access control (RBAC) with auditing capabilities to ensure that it is compliant.
Snowflake supports structured (RDBMS), Semi-structured data (JSON, XML), and unstructured data and is well integrated with various business intelligence, data integration, and analytical workflows.
What Is Streaming?
Streaming refers to the continuous transmission and delivery of data such as videos, audio, and data over a network from source to destination in a real-time manner.
Technologies that support streaming include Apache Kafka, Apache Flink, Apache Spark Streaming, and Snow Pipe of Snowflake.
What Is Snow Pipe?
Snow Pipe is a Snowflake service that automatically ingests data into the Snowflake warehouse from cloud storage such as Amazon S3, Azure Blob Storage, and Google Cloud Storage without requiring any manual intervention.
It seamlessly integrates files from cloud platforms of different types and varied sizes with an event-driven mechanism up on the file detection in the storage containers with configured SQS queues helps integrate the dataset with Snowflake warehouse on a real-time basis with an auto-scaling mechanism that handles a wide variety of payloads with minimal adjustments thereby reducing the cost associated with the load operations and reduce overheads.
What Is Cortex AI?
It is an AI platform that provides capabilities of natural language processing (NLP), predictive analytics, Segmenting, and a recommendation system that can be integrated with Snowflake AI via Snow Park to generate real-time insights using Snowflake native capabilities of scheduling & execution, which further reduces costs associated with data movement and integration by processing data and running AI models within the integrated platform.
What Is Snowpark?
Snowpark is an SDK(Software Development Kit) enabled on the Snowflake platform that allows developers to write custom code in their preferred languages of Scala, Python, and Java to perform data processing and transformation activities by leveraging Snowflake’s compute capabilities.
It provides libraries and APIs to interact programmatically with the Snowflake platform and provides effective insights by integrating with AI applications.

Steps Involved in Creating Snow-Pipe
1. Prepare Your AWS Setup
- Amazon S3 Bucket: Make sure that you have an Amazon S3 bucket set up where your data files will be placed.
- AWS IAM Role: Create an AWS IAM role that Snowflake can assume to access your S3 bucket. This role should have permission to read from the S3 bucket.
2. Set up Snowflake
- Integration: Set up an integration in Snowflake that defines your AWS S3 details (bucket name, AWS IAM role ARN, etc.).
CREATE STORAGE INTEGRATION my_storage_integration

TYPE = EXTERNAL_STAGE

STORAGE_PROVIDER = S3

ENABLED = TRUE

S3_BUCKET = 'my_bucket'

S3_PREFIX = 'snowpipe/kafka/';
3. Create a Stage
- External Stage: Create an external stage in Snowflake using the integration created in the previous step.
CREATE OR REPLACE STAGE kafka_stage

URL = 's3://my_bucket/snowpipe/kafka/'

STORAGE_INTEGRATION = my_storage_integration;
4. Create a Snowflake Table
- Target Table: Create a table in Snowflake where your data from S3 will be loaded.
CREATE OR REPLACE TABLE my_snowflake_table (

  column1 STRING,

  column2 STRING,

  column3 TIMESTAMP

);
5. Create a Kafka Integration
Snowflake uses Kafka integrations to connect to Kafka topics and consume messages. Here’s an example of how to create a Kafka integration:
CREATE INTEGRATION kafka_integration

TYPE = EXTERNAL_KAFKA

ENABLED = TRUE

KAFKA_BROKER_HOST = 'your.kafka.broker.com'

KAFKA_BROKER_PORT = 9092

KAFKA_TOPIC_LIST = 'topic1,topic2'

KAFKA_SECURITY_PROTOCOL = 'PLAINTEXT'

KAFKA_AUTO_OFFSET_RESET = 'earliest'

KAFKA_FETCH_MIN_BYTES = 1

KAFKA_POLL_TIMEOUT_MS = 200;
6. Create a Snowpipe
CREATE PIPE my_kafka_pipe

AUTO_INGEST = TRUE

INTEGRATION = kafka_integration

AS

COPY INTO my_snowflake_table

FROM (

  SELECT $1::STRING, $2::STRING, $3::TIMESTAMP  -- Adjust based on your Kafka message structure

  FROM @kafka_stage (FILE_FORMAT => 'json_format')

);
7. Grant Necessary Permissions
- Snowflake Objects: Grant necessary permissions to the Snowflake objects (integration, stage, table, and pipe) to the appropriate Snowflake roles or users.
GRANT USAGE ON INTEGRATION my_storage_integration TO ROLE my_role;

GRANT USAGE ON STAGE kafka_stage TO ROLE my_role;

GRANT SELECT, INSERT ON TABLE my_snowflake_table  TO ROLE my_role;

GRANT EXECUTE TASK ON PIPE my_kafka_pipe TO ROLE my_role;
8. Monitor and Manage Snowpipe
- Monitoring: Monitor the performance and status of your Snowpipe using Snowflake's UI or by querying the relevant metadata tables (
PIPE_HISTORY,PIPE_EXECUTION). - Manage: Modify or disable the Snowpipe as needed using
ALTER PIPEcommands.
Creating and Integrating Snow Pipe Using SQL
Snowflake SQL To Create a Snowpipe for Ingesting Kafka Data
CREATE PIPE snowpipe_kafka_pipe

AUTO_INGEST = TRUE

AWS_SNS_TOPIC = 'arn:aws:sns:us-west 2:123456789012:snowpipe_notifications'

AS COPY INTO my_kafka_table

FROM @my_external_stage

FILE_FORMAT = (TYPE = 'JSON');
Example Snowflake SQL for Running Sentiment Analysis Using Cortex AI
CREATE OR REPLACE PROCEDURE sentiment_analysis_proc()

  RETURNS VARIANT

  LANGUAGE JAVASCRIPT

  EXECUTE AS CALLER

AS

$$

  var result = [];

  var stmt = snowflake.createStatement({

    sqlText: "SELECT review_text FROM MY_KAFKA_TABLE"

  });

  var rs = stmt.execute();

  while (rs.next()) {

    var review_text = rs.getColumnValue(1);

    // Perform sentiment analysis using Cortex AI

    var sentiment = cortexAI.predictSentiment(review_text);

    result.push({

      review_text: review_text,

      sentiment: sentiment

    });

  }

  return result;

$$;


CALL sentiment_analysis_proc();
Code for Sentimental Analysis and Integrating Kafka Streams Using PySpark
from pyspark.sql import SparkSession

from pyspark.sql.functions import col, udf

from cortex_ai_client import CortexAIClient
Initialize Spark Session
spark = SparkSession.builder \

     .appName("KafkaSnowflakeCortexAIIntegration") \

    .getOrCreate()
Kafka Connection Details
kafka_brokers = "kafka_host:port"
Replace With Your Kafka Broker Details
kafka_topic = "customer_interactions"
- Replace with your Kafka Topic
Cortex AI Client Initialization
cortex_client = CortexAIClient(api_key='your_api_key')
- Initialize Cortex AI client with your API key
Function To Perform Sentiment Analysis Using Cortex AI
def analyze_sentiment(review_text):

    sentiment = cortex_client.predict_sentiment(review_text)

    return sentiment
Register UDF for Sentiment Analysis
analyze_sentiment_udf = udf(analyze_sentiment)
Read From Kafka Stream
kafka_stream_df = spark \

    .readStream \

    .format("kafka") \

     .option("kafka.bootstrap.servers", kafka_brokers) \

    .option("subscribe", kafka_topic) \

    .load()
Convert Kafka Messages to Strings
kafka_stream_df = kafka_stream_df.selectExpr("CAST(value AS STRING)")
Apply Sentiment Analysis Using Cortex AI
sentiment_analyzed_df = kafka_stream_df.withColumn("sentiment_score", analyze_sentiment_udf(col("value")))
Define Snowflake Connection Options
sfOptions = {

    "sfURL": "your_account.snowflakecomputing.com",

    "sfAccount": "your_account",

    "sfUser": "your_username",

    "sfPassword": "your_password",

    "sfDatabase": "your_database",

    "sfSchema": "your_schema",

    "sfWarehouse": "your_warehouse",

    "dbtable": "analyzed_customer_interactions",
Snowflake Table To Write Results
"streamName": "kafka_stream_results"
Snowflake Stream Name for Streaming Inserts
}
Write Analyzed Data to Snowflake
query = sentiment_analyzed_df \

    .writeStream \

    .format("snowflake") \

    .options(**sfOptions) \

     .option("checkpointLocation", "/tmp/checkpoint_location") \

    .start()
Await Termination (Or Run Indefinitely if Needed)
query.awaitTermination()
Stop Spark Session
spark.stop()
Schedule Python or PySpark Jobs in Snowflake
- Upload your script to Snowflake internal stage: Upload your Python or PySpark script to a Snowflake internal stage using the PUT command:
PUT file:///local/path/to/my_python_script.py @~/snowflake_scripts/my_python_script.py;
- Create a Snowflake task: Create a Snowflake task that will execute your Python or PySpark script. Tasks in Snowflake can execute SQL statements, so you can call a stored procedure that invokes an external script runner (like
PYTHON&PYSPARK SCRIPTS):
CREATE TASK my_python_task

WAREHOUSE = my_warehouse

SCHEDULE = 'USING CRON 0 * * * * UTC'

TIMESTAMP_INPUT_FORMAT = 'YYYY-MM-DD HH24:MI:SS'

AS

CALL execute_external_script('PYTHON_SCRIPT', '@~/snowflake_scripts/my_python_script.py');- Enable and manage your task: Once the task is created, use the ALTER TASK command to enable it:
ALTER TASK my_python_task RESUME;
You can also use ALTER TASK to disable, modify the schedule, or update the script executed by the task.
Conclusion
Leveraging Cortex AI with the Snowflake platform enhances robust synergies of advanced AI and power platform capabilities and helps organizations achieve transformative insights from their data without the complexities of traditional data movement and integration challenges.
Opinions expressed by DZone contributors are their own.

Comments