Effective Refactoring, Part 2: Formulating a Plan
This article outlines steps to follow to ensure your project starts on the right foot, even if your refactoring project is relatively small.
Join the DZone community and get the full member experience.
Join For FreeThis is the second part of a 4 part series on effective refactoring.
Part 2: Formulating a Plan
Part 3: The Imperative Role of Tests (coming soon)
Part 4: Rewriting the Code (coming soon)
The Planning Phase
If you fail to plan, you are planning to fail.
Benjamin Franklin (supposedly) said that. Once you’ve decided to refactor an application, your first instinct will be to start digging into the code and cleaning it up. However, without a plan, you are almost guaranteed catastrophe.

She didn't have a plan.
You don’t even want to touch the code until you have established what needs to be done, and what can be done within the available time and budget. The point of refactoring is to benefit the team and maximize the value of the code. If some portions of the code are a little messy but functional, there isn’t much point in refactoring them. We’ll discuss prioritization later, but at the very least you should identify the potential value up front.
The sections below outline some steps you should follow to ensure your project starts out on the right foot. Even if your refactoring project is relatively small, I still recommend that you use these techniques.
Pick a Project Management Tool
Regardless of the scope of refactoring, you’re going to need a tool to track your progress. I’m a big fan of Trello. Its Kanban style of project management lends itself well to projects like these, but use whatever tool you’re comfortable with. You’ll need a tool that allows you to order and group tasks with the ability to add comments and descriptions. The ability to add attachments and create labels/tags are also nice features but aren’t required.
For my project, I created a Trello board with the following list names for tracking tasks:
Backlog
Next Up
In Progress
Pull Request
Closed
I also created labels to indicate if a task involved a React component, a Redux element (i.e. actions, reducers, or selectors), or a configuration aspect of the application. If you’re a visual person like me, adding colored labels provides a way to quickly determine the nature of a task without reading the title or description. For example, I created a task to upgrade webpack from 1.0 to 3.0 and applied the Configuration label with a specific color to quickly identify it on the board. Now that you’ve got your project management system setup, it’s time to start breaking down the work into manageable chunks.
Find Logical Contexts
If the codebase is large, it can be daunting to determine how to proceed. Rather than try to think of the hundreds of tasks that need to be added to the project plan, it’s more effective to deconstruct the application down to modules or contexts. Contexts represent sections of code that may fall within a specific business entity or configuration aspect of the application. This process can be challenging, especially in a disorganized codebase. But even a rough breakdown will get you on the right track. Digging in and determining how you can split things up provides the added advantage of helping you become more familiar with the codebase.
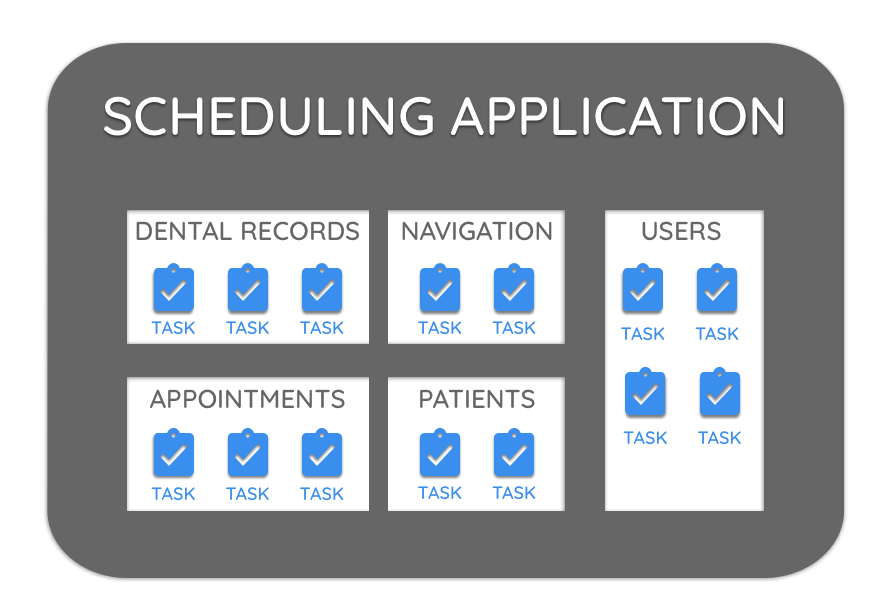
In many cases, you can extrapolate the contexts based on the nature of the application. For example, a scheduling app for a dentist’s office could be broken down into the following contexts:
Patients
Appointments
Navigation
Dental records
User management
The tricky part here is getting the granularity right. For the application I was working on, I determined the contexts based on the API calls and existing Redux reducers. I ended up with a user context, a super user context (for administrative actions), an app context (for UI state), and several others.
Note: Don’t get too hung up on finding the perfect contexts, the purpose of this step is to simplify the task creation process.

Create Tasks
You need to create tasks will well-defined scope. Think about scope in terms of pull requests. You don’t want to submit PRs with 5,000 lines of code changes, but submitting 5,000 PRs with 2 changes is just as ineffective.
As an example, one of the goals of my refactoring project was to transition from the Foundation framework to Semantic UI React and implement CSS Modules. I originally created a single task to represent this change until I realized the amount of work that it would entail.
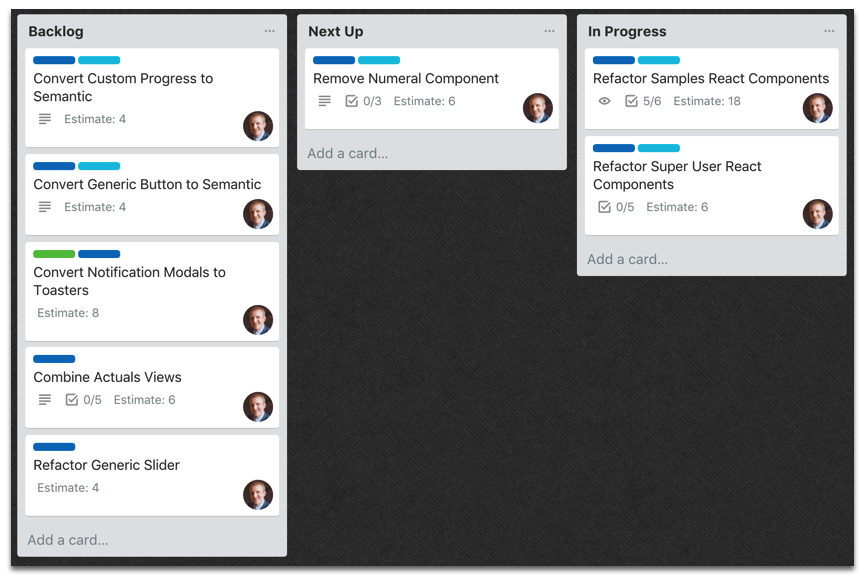
There were almost 100 React components that needed to be updated. However, I didn’t want to create 100 tasks in Trello to represent each individual component. In this situation, my defined contexts came in handy. First, I created tasks to refactor the Redux-connected container components within each context. Next, I looked through the shared /components directory and grouped them by category (form controls, charts, etc). Finally, I created separate tasks to refactor each group of shared components. Here’s a screenshot of my board with some examples:

Trello Project Board
You also need to consider the implications of your changes breaking the application. If you need to revert it back to an older version, do you really want to have to dig through a massive PR to figure out what caused the bug? I only made this mistake once, and it was incredibly frustrating. I ended up just scrapping most of my changes and trying again with smaller chunks.
Order Tasks (if You Want)
If you want to establish some criteria for prioritizing or ordering the tasks, that’s up to you. If you established a well-defined scope for each task, it shouldn’t matter which order you complete them. I tended to work on groups of tasks associated with certain functionality, like Redux elements or API management, but that wasn’t deliberately planned. I would recommend tackling some of the low-hanging fruit (low effort, high impact tasks) when you first get started to keep your motivation up.
Keep Your Plan Up to Date
Understand and accept that you won’t get the planning 100% correct when you first put it together. You may have made some assumptions about the code when you first formulated the plan that turned out to be wrong when you started digging into it. Adjust your course, but don’t let your plan go stale, make sure you update it and document the reasons for the change. If you end up performing a refactoring task on the fly that isn’t in the plan, add it to the plan and mark it complete. I know this sounds tedious, but it will pay off in the end.
Wrap Up
Planning the project doesn’t have to be daunting, but it does have to be done. The benefits of a rewritten codebase are often intangible and difficult to measure. Having a detailed plan provides an audit trail and an invaluable resource for other developers that may have to pick up where you left off. In part 3 of this series, I discuss the importance of testing and cover how to set up a robust testing framework.
Published at DZone with permission of Mike Rourke. See the original article here.
Opinions expressed by DZone contributors are their own.

Comments