Effective Java Application Testing With Cucumber and BDD
Increase your testing efficiency by utilizing Cucumber for Java application testing, fully integrated with Behavior-Driven Development (BDD).
Join the DZone community and get the full member experience.
Join For FreeIncrease your testing efficiency by utilizing Cucumber for Java application testing, fully integrated with Behavior-Driven Development (BDD). This guide provides comprehensive steps for project setup, scenario writing, step implementation, and reporting.
Introduction
Cucumber is a tool that supports Behavior-Driven Development (BDD). A good starting point in order to learn more about BDD and Cucumber, are the Cucumber guides. BDD itself was introduced by Dan North in 2006, you can read his blog introducing BDD. Cucumber, however, is a tool that supports BDD, this does not mean you are practicing BDD just by using Cucumber. The Cucumber myths is an interesting read in this regard.
In the remainder of this blog, you will learn more about the features of Cucumber when developing a Java application. Do know, that Cucumber is not limited to testing Java applications, a wide list of languages is supported.
The sources used in this blog can be found on GitHub.
Prerequisites
Prerequisites for this blog are:
- Basis Java knowledge, Java 21 is used;
- Basic Maven knowledge;
- Basic comprehension of BDD, see the resources in the introduction.
Project Setup
An initial project can be setup by means of the Maven cucumber-archetype. Change the groupId, artifactId and package to fit your preferences and execute the following command:
$ mvn archetype:generate                      \
   "-DarchetypeGroupId=io.cucumber"           \
   "-DarchetypeArtifactId=cucumber-archetype" \
   "-DarchetypeVersion=7.17.0"               \
   "-DgroupId=mycucumberplanet"               \
   "-DartifactId=mycucumberplanet"               \
   "-Dpackage=com.mydeveloperplanet.mycucumberplanet"  \
   "-Dversion=1.0.0-SNAPSHOT"                 \
   "-DinteractiveMode=false"
The necessary dependencies are downloaded and the project structure is created. The output ends with the following:
[INFO] ------------------------------------------------------------------------
[INFO] BUILD SUCCESS
[INFO] ------------------------------------------------------------------------
[INFO] Total time:  2.226 s
[INFO] Finished at: 2024-04-28T10:25:16+02:00
[INFO] ------------------------------------------------------------------------
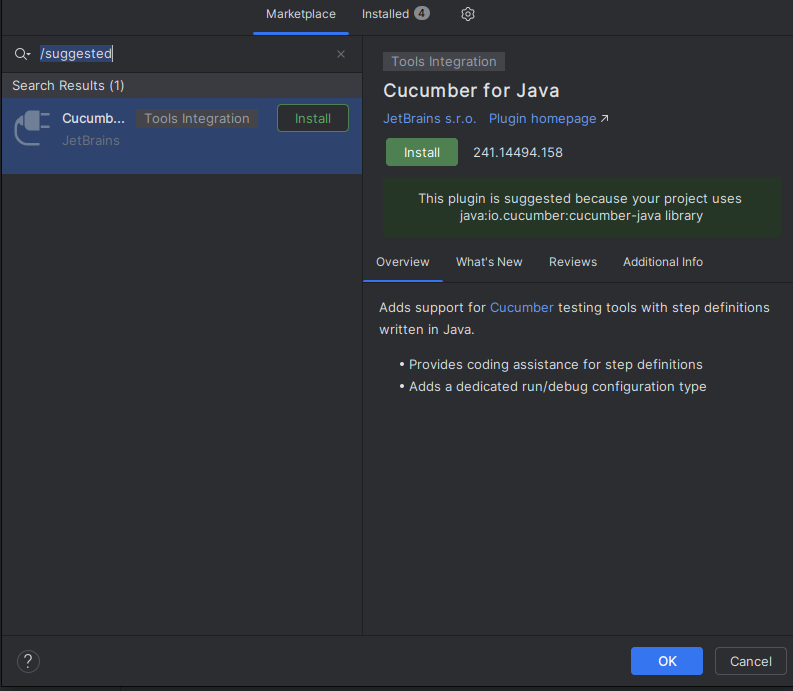
Open the project with your favorite IDE. If you are using IntelliJ, a message is shown in order to install a plugin.

Take a closer look at the pom:
- The
dependencyManagementsection contains BOMs (Bill of Materials) for Cucumber and JUnit; - Several dependencies are added for Cucumber and JUnit;
- The
buildsection contains the compiler plugin and the surefire plugin. The compiler is set to Java 1.8, change it into 21.
<dependencyManagement>
    <dependencies>
        <dependency>
            <groupId>io.cucumber</groupId>
            <artifactId>cucumber-bom</artifactId>
            <version>7.17.0</version>
            <type>pom</type>
            <scope>import</scope>
        </dependency>
        <dependency>
            <groupId>org.junit</groupId>
            <artifactId>junit-bom</artifactId>
            <version>5.10.2</version>
            <type>pom</type>
            <scope>import</scope>
        </dependency>
    </dependencies>
</dependencyManagement>

<dependencies>
    <dependency>
        <groupId>io.cucumber</groupId>
        <artifactId>cucumber-java</artifactId>
        <scope>test</scope>
    </dependency>

    <dependency>
        <groupId>io.cucumber</groupId>
        <artifactId>cucumber-junit-platform-engine</artifactId>
        <scope>test</scope>
    </dependency>

    <dependency>
        <groupId>org.junit.platform</groupId>
        <artifactId>junit-platform-suite</artifactId>
        <scope>test</scope>
    </dependency>

    <dependency>
        <groupId>org.junit.jupiter</groupId>
        <artifactId>junit-jupiter</artifactId>
        <scope>test</scope>
    </dependency>
</dependencies>

<build>
    <plugins>
        <plugin>
            <groupId>org.apache.maven.plugins</groupId>
            <artifactId>maven-compiler-plugin</artifactId>
            <version>3.13.0</version>
            <configuration>
                <encoding>UTF-8</encoding>
                <source>21</source>
                <target>21</target>
            </configuration>
        </plugin>
        <plugin>
            <groupId>org.apache.maven.plugins</groupId>
            <artifactId>maven-surefire-plugin</artifactId>
            <version>3.2.5</version>
        </plugin>
    </plugins>
</build>
In the test directory, you will see a RunCucumberTest, StepDefinitions and an example.feature file in the resources section.
The RunCucumberTest file is necessary to run the feature files and the corresponding steps. The feature files and steps will be discussed later on, do not worry too much about it now.
@Suite
@IncludeEngines("cucumber")
@SelectPackages("com.mydeveloperplanet.mycucumberplanet")
@ConfigurationParameter(key = PLUGIN_PROPERTY_NAME, value = "pretty")
public class RunCucumberTest {
}
Run the tests, the output should be successful.
$ mvn testWrite Scenario
When practicing BDD, you will need to write a scenario first. Taken from the Cucumber documentation:
When we do Behavior-Driven Development with Cucumber we use concrete examples to specify what we want the software to do. Scenarios are written before production code. They start their life as an executable specification. As the production code emerges, scenarios take on a role as living documentation and automated tests.
The application you need to build for this blog is a quite basic one:
- You need to be able to add an employee;
- You need to retrieve the complete list of employees;
- You need to be able to remove all employees.
A feature file follows the Given-When-Then (GWT) notation. A feature file consists of:
- A feature name. It is advised to maintain the same name as the file name;
- A feature description;
- One or more scenarios containing steps in the GWT notation. A scenario illustrates how the application should behave.
Feature: Employee Actions
  Actions to be made for an employee

  Scenario: Add employee
    Given an empty employee list
    When an employee is added
    Then the employee is added to the employee list
Run the tests and you will notice now that the feature file is executed. The tests fail of course, but an example code is provided in order to create the step definitions.
[INFO] -------------------------------------------------------
[INFO]  T E S T S
[INFO] -------------------------------------------------------
[INFO] Running com.mydeveloperplanet.mycucumberplanet.RunCucumberTest

Scenario: Add employee                            # com/mydeveloperplanet/mycucumberplanet/employee_actions.feature:4
  Given an empty employee list
  When an employee is added
  Then the employee is added to the employee list
[ERROR] Tests run: 1, Failures: 0, Errors: 1, Skipped: 0, Time elapsed: 0.104 s <<< FAILURE! -- in com.mydeveloperplanet.mycucumberplanet.RunCucumberTest
[ERROR] Add an employee.Add employee -- Time elapsed: 0.048 s <<< ERROR!
io.cucumber.junit.platform.engine.UndefinedStepException:
The step 'an empty employee list' and 2 other step(s) are undefined.
You can implement these steps using the snippet(s) below:

@Given("an empty employee list")
public void an_empty_employee_list() {
    // Write code here that turns the phrase above into concrete actions
    throw new io.cucumber.java.PendingException();
}
@When("an employee is added")
public void an_employee_is_added() {
    // Write code here that turns the phrase above into concrete actions
    throw new io.cucumber.java.PendingException();
}
@Then("the employee is added to the employee list")
public void the_employee_is_added_to_the_employee_list() {
    // Write code here that turns the phrase above into concrete actions
    throw new io.cucumber.java.PendingException();
}

        at io.cucumber.core.runtime.TestCaseResultObserver.assertTestCasePassed(TestCaseResultObserver.java:69)
        at io.cucumber.junit.platform.engine.TestCaseResultObserver.assertTestCasePassed(TestCaseResultObserver.java:22)
        at io.cucumber.junit.platform.engine.CucumberEngineExecutionContext.lambda$runTestCase$4(CucumberEngineExecutionContext.java:114)
        at io.cucumber.core.runtime.CucumberExecutionContext.lambda$runTestCase$5(CucumberExecutionContext.java:136)
        at io.cucumber.core.runtime.RethrowingThrowableCollector.executeAndThrow(RethrowingThrowableCollector.java:23)
        at io.cucumber.core.runtime.CucumberExecutionContext.runTestCase(CucumberExecutionContext.java:136)
        at io.cucumber.junit.platform.engine.CucumberEngineExecutionContext.runTestCase(CucumberEngineExecutionContext.java:109)
        at io.cucumber.junit.platform.engine.NodeDescriptor$PickleDescriptor.execute(NodeDescriptor.java:168)
        at io.cucumber.junit.platform.engine.NodeDescriptor$PickleDescriptor.execute(NodeDescriptor.java:90)
        at java.base/java.util.ArrayList.forEach(ArrayList.java:1596)
        at java.base/java.util.ArrayList.forEach(ArrayList.java:1596)

[INFO]
[INFO] Results:
[INFO]
[ERROR] Errors:
[ERROR]   The step 'an empty employee list' and 2 other step(s) are undefined.
You can implement these steps using the snippet(s) below:

@Given("an empty employee list")
public void an_empty_employee_list() {
    // Write code here that turns the phrase above into concrete actions
    throw new io.cucumber.java.PendingException();
}
@When("an employee is added")
public void an_employee_is_added() {
    // Write code here that turns the phrase above into concrete actions
    throw new io.cucumber.java.PendingException();
}
@Then("the employee is added to the employee list")
public void the_employee_is_added_to_the_employee_list() {
    // Write code here that turns the phrase above into concrete actions
    throw new io.cucumber.java.PendingException();
}

[INFO]
[ERROR] Tests run: 1, Failures: 0, Errors: 1, Skipped: 0
Add Step Definitions
Add the example code from the output above into the StepDefinitions file. Run the tests again. Of course, they fail, but this time a PendingException is thrown indicating that the steps need to be implemented.
[INFO] -------------------------------------------------------
[INFO]  T E S T S
[INFO] -------------------------------------------------------
[INFO] Running com.mydeveloperplanet.mycucumberplanet.RunCucumberTest

Scenario: Add employee                            # com/mydeveloperplanet/mycucumberplanet/employee_actions.feature:4
  Given an empty employee list                    # com.mydeveloperplanet.mycucumberplanet.StepDefinitions.an_empty_employee_list()
      io.cucumber.java.PendingException: TODO: implement me
        at com.mydeveloperplanet.mycucumberplanet.StepDefinitions.an_empty_employee_list(StepDefinitions.java:12)
        at ✽.an empty employee list(classpath:com/mydeveloperplanet/mycucumberplanet/employee_actions.feature:5)

  When an employee is added                       # com.mydeveloperplanet.mycucumberplanet.StepDefinitions.an_employee_is_added()
  Then the employee is added to the employee list # com.mydeveloperplanet.mycucumberplanet.StepDefinitions.the_employee_is_added_to_the_employee_list()
[ERROR] Tests run: 1, Failures: 0, Errors: 1, Skipped: 0, Time elapsed: 0.085 s <<< FAILURE! -- in com.mydeveloperplanet.mycucumberplanet.RunCucumberTest
[ERROR] Add an employee.Add employee -- Time elapsed: 0.032 s <<< ERROR!
io.cucumber.java.PendingException: TODO: implement me
        at com.mydeveloperplanet.mycucumberplanet.StepDefinitions.an_empty_employee_list(StepDefinitions.java:12)
        at ✽.an empty employee list(classpath:com/mydeveloperplanet/mycucumberplanet/employee_actions.feature:5)

[INFO]
[INFO] Results:
[INFO]
[ERROR] Errors:
[ERROR]   TODO: implement me
[INFO]
[ERROR] Tests run: 1, Failures: 0, Errors: 1, Skipped: 0
Implement Application
The first scenario is defined, let’s implement the application. Create a basic EmployeeService which adds the needed functionality. An employee can be added to an employee list which is just a map of employees. The list of employees can be retrieved and the list can be cleared.
public class EmployeeService {

    private final HashMap<Long, Employee> employees = new HashMap<>();
    private Long index = 0L;

    public void addEmployee(String firstName, String lastName) {
        Employee employee = new Employee(firstName, lastName);
        employees.put(index, employee);
        index++;
    }

    public Collection<Employee> getEmployees() {
        return employees.values();
    }

    public void removeEmployees() {
        employees.clear();
    }
}
The employee is a basic record.
public record Employee(String firstName, String lastName) {
}
Implement Step Definitions
Now that the service exists, you can implement the step definitions. It is rather straightforward, you create the service and invoke the methods for the Given-When implementations. Verifying the result is done by Assertions, just as you would do for your unit tests.
public class StepDefinitions {

    private final EmployeeService service = new EmployeeService();

    @Given("an empty employee list")
    public void an_empty_employee_list() {
        service.removeEmployees();
    }
    @When("an employee is added")
    public void an_employee_is_added() {
        service.addEmployee("John", "Doe");
    }
    @Then("the employee is added to the employee list")
    public void the_employee_is_added_to_the_employee_list() {
        assertEquals(1, service.getEmployees().size());
    }

}
Run the tests, which are successful now.
[INFO] -------------------------------------------------------
[INFO]  T E S T S
[INFO] -------------------------------------------------------
[INFO] Running com.mydeveloperplanet.mycucumberplanet.RunCucumberTest

Scenario: Add employee                            # com/mydeveloperplanet/mycucumberplanet/employee_actions.feature:4
  Given an empty employee list                    # com.mydeveloperplanet.mycucumberplanet.StepDefinitions.an_empty_employee_list()
  When an employee is added                       # com.mydeveloperplanet.mycucumberplanet.StepDefinitions.an_employee_is_added()
  Then the employee is added to the employee list # com.mydeveloperplanet.mycucumberplanet.StepDefinitions.the_employee_is_added_to_the_employee_list()
[INFO] Tests run: 1, Failures: 0, Errors: 0, Skipped: 0, Time elapsed: 0.081 s -- in com.mydeveloperplanet.mycucumberplanet.RunCucumberTest
[INFO]
[INFO] Results:
[INFO]
[INFO] Tests run: 1, Failures: 0, Errors: 0, Skipped: 0
Extra Scenario
Add a second scenario that tests the removal of employees. Add the scenario to the feature file.
Scenario: Remove employees
    Given a filled employee list
    When the employees list is removed
    Then the employee list is empty
Implement the step definitions.
@Given("a filled employee list")
public void a_filled_employee_list() {
    service.addEmployee("John", "Doe");
    service.addEmployee("Miles", "Davis");
    assertEquals(2, service.getEmployees().size());
}
@When("the employees list is removed")
public void the_employees_list_is_removed() {
    service.removeEmployees();
}
@Then("the employee list is empty")
public void the_employee_list_is_empty() {
    assertEquals(0, service.getEmployees().size());
}
Tags
In order to run a subset of scenarios, you can add tags to features and scenarios.
@regression
Feature: Employee Actions
  Actions to be made for an employee

  @TC_01
  Scenario: Add employee
    Given an empty employee list
    When an employee is added
    Then the employee is added to the employee list

  @TC_02
  Scenario: Remove employees
    Given a filled employee list
    When the employees list is removed
    Then the employee list is empty
Run only the test annotated with TC_01 by using a filter.
$ mvn clean test -Dcucumber.filter.tags="@TC_01"
...
[INFO] -------------------------------------------------------
[INFO]  T E S T S
[INFO] -------------------------------------------------------
[INFO] Running com.mydeveloperplanet.mycucumberplanet.RunCucumberTest
[WARNING] Tests run: 2, Failures: 0, Errors: 0, Skipped: 1, Time elapsed: 0.233 s -- in com.mydeveloperplanet.mycucumberplanet.RunCucumberTest
[INFO]
[INFO] Results:
[INFO]
[WARNING] Tests run: 2, Failures: 0, Errors: 0, Skipped: 1
Reporting
When executing tests, it is often required that appropriate reporting is available. Up till now, only console output has been shown.
Generate an HTML report by adding the following configuration parameter to the RunCucumberTest.
@Suite
@IncludeEngines("cucumber")
@SelectPackages("com.mydeveloperplanet.mycucumberplanet")
@ConfigurationParameter(key = PLUGIN_PROPERTY_NAME, value = "pretty")
@ConfigurationParameter(key = PLUGIN_PROPERTY_NAME, value = "html:target/cucumber-reports.html")
public class RunCucumberTest {
}
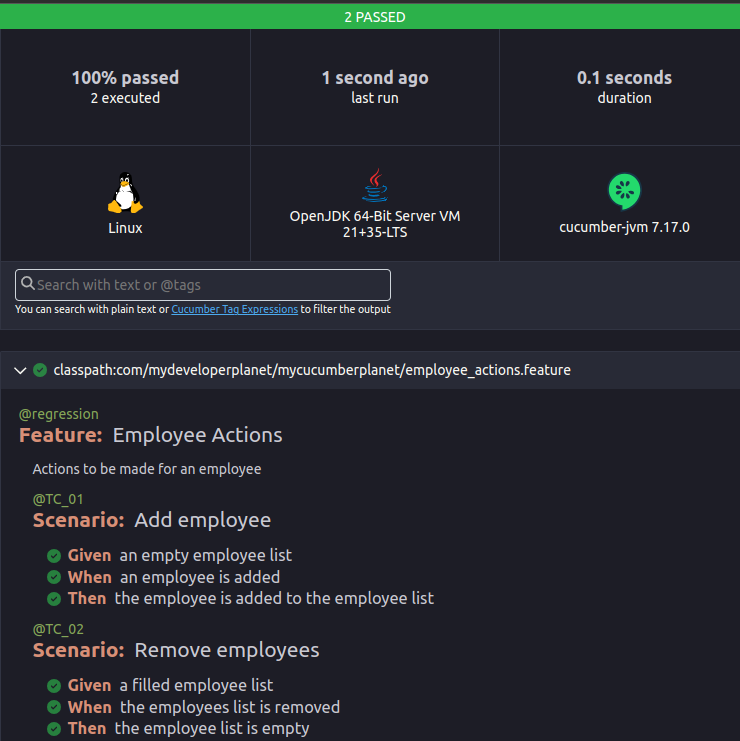
After running the test, a rather basic HTML report is available in the specified path.

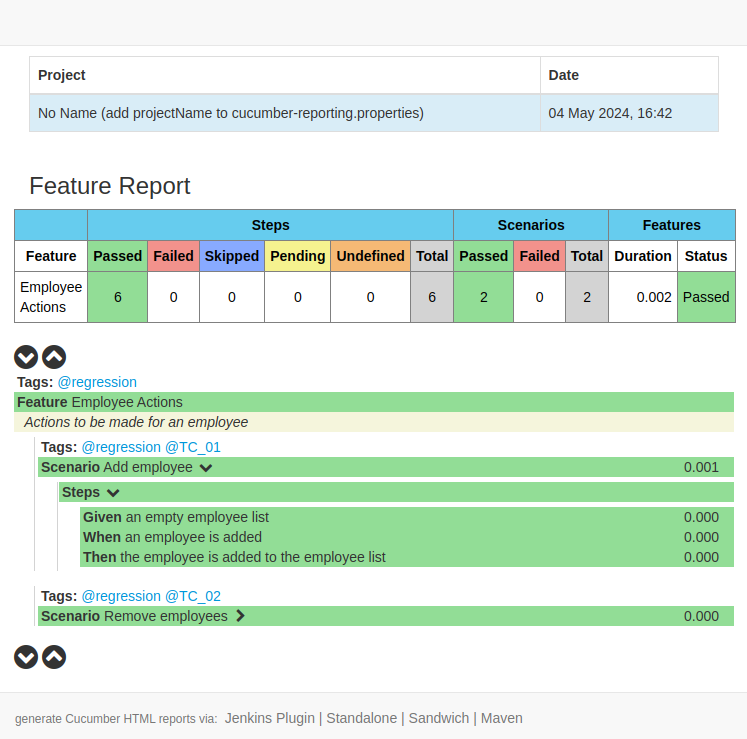
Several third-party reporting plugins are available. The cucumber-reporting-plugin offers a more elaborate report. Add the dependency to the pom.
<dependency>
    <groupId>me.jvt.cucumber</groupId>
    <artifactId>reporting-plugin</artifactId>
    <version>5.3.0</version>
</dependency>
Enable the report in RunCucumberTest.
@Suite
@IncludeEngines("cucumber")
@SelectPackages("com.mydeveloperplanet.mycucumberplanet")
@ConfigurationParameter(key = PLUGIN_PROPERTY_NAME, value = "pretty")
@ConfigurationParameter(key = PLUGIN_PROPERTY_NAME, value = "html:target/cucumber-reports.html")
@ConfigurationParameter(key = PLUGIN_PROPERTY_NAME, value = "me.jvt.cucumber.report.PrettyReports:target/cucumber")
public class RunCucumberTest {
}
Run the tests and in the target/cucumber directory the report is generated. Open the file starting with report-feature.

Conclusion
Cucumber has great support for BDD. It is quite easy to use and in this blog, you only scratched the surface of its capabilities. An advantage is that you can make use of JUnit and Assertions and the steps can be implemented by means of Java. No need to learn a new language when your application is also built in Java.
Published at DZone with permission of Gunter Rotsaert, DZone MVB. See the original article here.
Opinions expressed by DZone contributors are their own.

Comments