Divide and Conquer: High Scalability With MongoDB Sharding
MongoDB handles horizontal scaling via sharding. Take a look at the different sharding methods you can use and how to make them work.
Join the DZone community and get the full member experience.
Join For Free
Scalability is a characteristic of a system that describes its capability to perform under an increased workload. A system that scales well will be able to maintain and increase its level of performance under larger operational demands.
MongoDB supports horizontal scaling through Sharding , distributing data across several machines and facilitating high throughput operations with large sets of data.
An advantage of horizontal scalability is that it can provide system administrators with the ability to increase capacity on the fly, being only limited by how many machines can be connected successfully.
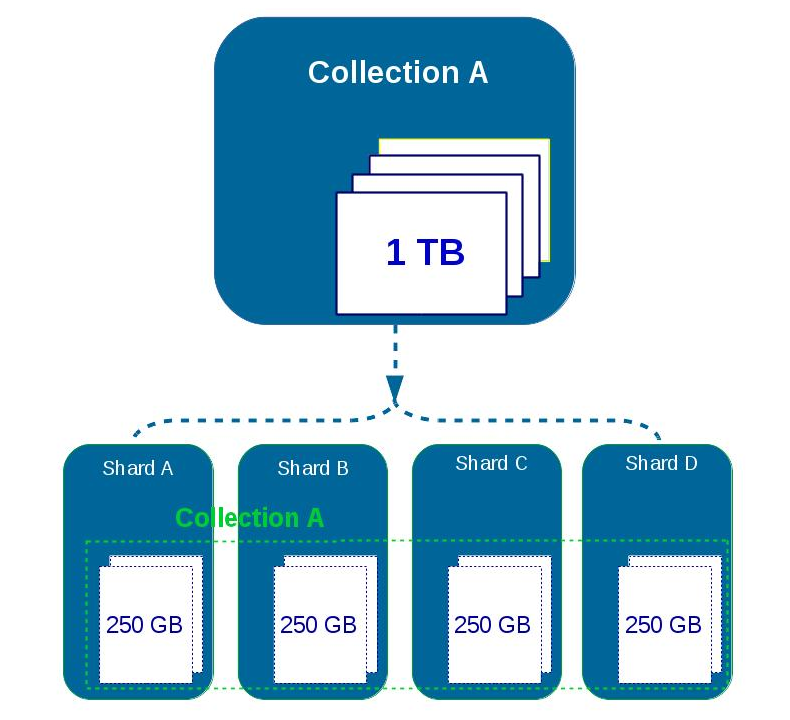
Sharding allows you to add additional instances to increase capacity when required.

In the image above, each shard runs on a different server.
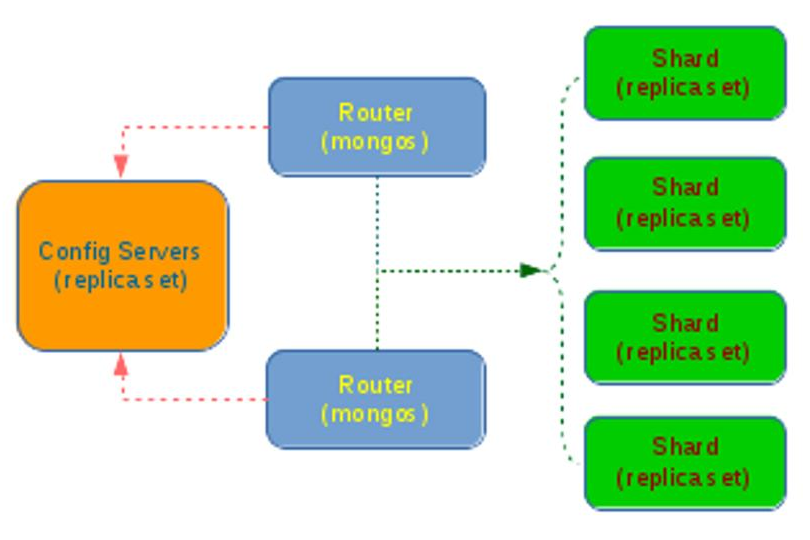
A typical configuration of modules used when sharding in MongoDB looks like in the image below:

As we can see, sharding is implemented through three different components:
The configuration server, which must be deployed as a replica set in order to ensure redundancy and high availability.
The query routers (mongos), which are the instances you have to connect in order to retrieve data. Query Routers are hiding the configuration details from the client application while getting the configuration from Config Servers and read/write data from/to shards. The client application does not work directly with the shards.
Shard instances are the ones persisting the data. Each shard handling only a part of the data, the one that belongs to a certain subset of shard keys. A single shard is usually composed of a Replica Set when deployed in production.
Note: This article will not explain what a Replica Set is. If you want to find out more about Replica Sets, please check the official MongoDB manual, here.
Sharding in MongoDB happens at the collection level and, as a result, the collection data will be distributed across the servers in the cluster.
Step #1: Initialize the Config Servers
The first step is to initialize the Config Servers, as they must be available before any router or shard instances are running. To do this:
Create a data directory where the Config Servers will keep their data.
Start the configuration server with a command similar to this one:
mongod --configsvr --dbpath /config-server --port 27019 After this, the Config Server will start listening for connections from the routers.
If you have a Config Server Replica Set, repeat the previous step for each of them.
Config Servers can be started with a Replica Set, in which case, after all the Config Servers are running, connect to one of them by running mongo in a console.
The Mongo Shell will start, and now the rs.initialize() method must be run in order to initialize the Config Servers Replica Set.
Step #2: Initialize and Configure Query Router Instances
A Query Router is started up with a service called mongos, and the command looks like the following:
mongos --configdb configserver1.myhost.com:27019In this case, configserver1.myhost.com is the Config Server initialized during Step #1.
If there are more Query Routers to initialize, then each one of them must be started using a command like the one above. In case a Config Server Replica Set has been initialized, each of the mongos must be started using all three Config Servers.
Step #3: Add Shards to the Cluster
Note: In a production configuration Replica Set Shards must be added to the Cluster , in which case a replica set with at least the members must be used.
To add a shard to the cluster:
Start a shard with the following command if the shard is not part of a Replica Set:
mongod --shardsvrWhen the shard will be part of a Replica Set, use this instead:
mongod --shardsvr --replSet <replSetname>If the shard is part of a Replica Set, use rs.initialize() to initialize the Replica Set.
Connect to one of the Query Routers and add a shard:
mongo --host router1.myhost.com --port 27017
sh.addShard( "shard1.myhost.com:27017" )Note: If you are configuring a production cluster with replication sets, you have to specify the replication set name and a replication set member to configure each set as a distinct shard.
sh.addShard( "replica_set_name/shard1.myhost.com:27017" )Step #4: Enable Sharding for a Database
MongoDB organizes information into databases, and inside each database, data is split into collections. A collection is similar to a table from a relational database.
Connect to a query router
mongo --host router1.example.com --port 27017 Switch to the desired database with: use my_database
Enable sharding on my_database
sh.enableSharding("my_database")Step #5: Enable Sharding for a Collection
At this point, we have to decide on a sharding strategy. Sharding is using a Shard key to split data between shards.
Shard Keys
Shard keys are used to distribute the documents from a collection on multiple servers. The fields used as Shard keys must be part of every document of that collection, and they must also be immutable. There are a few rules:
The shard key must be chosen when sharding a collection. The shard key cannot be changed after sharding.
A sharded collection can have only one shard key.
To shard a non-empty collection, that collection must have an index that starts with the shard key.
The way the shard key has been chosen can impact the performance of the database.
The data of a shard key must be evenly distributed in order to avoid sending all the data to only one shard.In cases where it is unsure about how things will be distributed, or there is no appropriate field, a "hashed" shard key can be created based on an existing field.
use my_database
db.my_collection.ensureIndex( { _id : "hashed" } )

sh.shardCollection("my_database.my_collection", { "_id": "hashed" } )
More about how to choose a sharding key is here.
Chunks
A contiguous range of shard key values within a particular shard is called a chunk. Chunk ranges are inclusive of the lower boundary and exclusive of the upper boundary. MongoDB splits chunks when they grow beyond the configured chunk size, which by default is 64 megabytes. MongoDB migrates chunks when a shard contains too many chunks of a collection relative to other shards. See Data Partitioning with Chunks and Sharded Cluster Balancer for more details how to administer shards and chunks.
Step #6: Verification
Insert some data into your collection through a Mongo Shell opened on one of the Query Routers.
To get information about a specific shard type:
> sh.status()

--- Sharding Status ---
sharding version: { "_id" : 1, "version" : 3 }
shards:
      {  "_id" : "shard0000",  "host" : "shard1.myhost.com:27017" }
      {  "_id" : "shard0001",  "host" : "shard2.myhost.com:27017" }
databases:
      {  "_id" : "admin",  "partitioned" : false,  "primary" : "config" }
      {  "_id" : "contacts",  "partitioned" : true,  "primary" : "shard0000" }
          foo.contacts
              shard key: { "postalCode" : 1 }
              chunks:
                  shard0001    2
                  shard0002    3
                  shard0000    2
              { "postalCode" : "M2H 1A1" } -->> { "postalCode" : "M3K 9Z9" } on : shard0001 { "t" : 2, "i" : 0 }
              { "postalCode" : "M3L 1A1" } -->> { "postalCode" : "M4J 9Z9" } on : shard0002 { "t" : 3, "i" : 4 }
              { "postalCode" : "M4K 1A1" } -->> { "postalCode" : "M4W 9Z9" } on : shard0002 { "t" : 4, "i" : 2 }
              { "postalCode" : "M4X 1A1" } -->> { "postalCode" : "M5E 9Z9" } on : shard0002 { "t" : 4, "i" : 3 }
              { "postalCode" : "M5G 1A1" } -->> { "postalCode" : "M5W 9Z9" } on : shard0001 { "t" : 4, "i" : 0 }
              { "postalCode" : "M5X 1A1" } -->> { "postalCode" : "M6S 9Z9" } on : shard0000 { "t" : 4, "i" : 1 }
              { "postalCode" : "M7A 1A1" } -->> { "postalCode" : "M9W 9Z9" } on : shard0000 { "t" : 3, "i" : 3 }
      {  "_id" : "test",  "partitioned" : false,  "primary" : "shard0000" }
That's all for now! To find out more about sharding, please go to the official manual page.
Opinions expressed by DZone contributors are their own.

Comments