DevOps Tools for Continuous Delivery: Workloads Distribution and Jenkins Installation
Join the DZone community and get the full member experience.
Join For Free

the vast majority of software development companies have to place a great emphasis on the process of continuous integration and rapid delivery of new versions of their product. obviously, when supplying enterprise-level projects, such processes need to be automated as much as possible. and this is when the cloud devops tools come in handy.
thus, in today’s article we’d like to pay a special attention to the devops tools that automate the continuous integration and delivery within the jelastic paas that can be installed on any bare metal or cloud infrastructure as virtual private cloud or hybrid cloud.
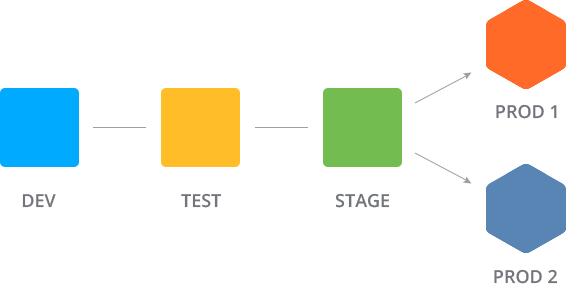
this is a pretty complex example of enterprise application life cycle with continuous integration and seamless migration throughout devops pipeline from development to several productions (you can use simplified process if you have less complex project ).
the instruction below will be useful for jelastic cluster administrators such as systems integrators, hosting service providers, enterprises, and isv customers, who can easily implement it at their jelastic cloud installations. nevertheless, this guide contains plenty of features and continuous integration tips described, which can be interesting for different developers.

so, let’s get started with the first part of the instruction!
setting up dedicated user groups
first of all, you need to allocate separate hardware sets for all your project teams (one per each development phase, i.e. development > testing > production ) and adjust the access permissions to make them completely isolated and not influenced by others. the multi-regions for a hybrid cloud option, that became available within the recently released jelastic 3.3 version , is optimally suited for this task.
- to start with, create three hardware node groups (within one region) and name them after the corresponding stages for more convenience (e.g. dev , test , production ).

- the next step is to prepare three user groups and attach them to the corresponding hardware – in our case the dev group has access to the dev hardware node group only, qa – to the test one, and ops should work specifically with the production set.

in such a way, users from the appropriate groups can use the specified sets of hardware only, but at the same time – they have a possibility to transfer their environments throughout the whole platform, between different teams’ accounts.
jenkins continuous integration server configuration
now we need the integration tool, that will control and perform all of the required operations automatically, i.e. build the cloud devops pipeline. our choice fell on jenkins as one of the most popular solutions used for this goal – it can be easily installed from our marketplace either at the corresponding site page or directly via the dashboard .

as a result, you’ll get the pure jenkins installed, which should be properly adjusted before you start organizing your application life cycle. thus, select the open in browser button and proceed with the following configurations steps:
- while at the home page, click on the manage jenkins option at the left-hand menu and select the manage plugins link within the appeared list.

- after you’ve been redirected to the plugin manager, switch to the available tab, find the following plugins using the search filter field above and tick them for installation:
- git plugin – is required for building our project’s source (stored at the github repository)
- envfile plugin – is used for storing system environment variables (its necessity is driven by security restrictions, implemented at jelastic, which forbid the direct exporting of environment variables from the tomcat server)

click install without restart when ready.
during the installation process, tick the restart jenkins when installation is complete and no jobs are running option to automatically restart jenkins for enabling the chosen plugins.
- then, you also need to install maven, which will be used for building the project. for that, navigate to the manage jenkins > configure system menu, scroll down to the maven section and click add maven.

- within the expanded section, type the desired name for your maven installation (e.g. maven ) and save the changes using the same-named button at the bottom of the page.

in such a way, this tool will be also automatically installed when required (i.e. during the first app build).
now your jenkins server is well-staffed for the further work.
add deployment process scripts to the jenkins container
the next step is to upload the scripts that you are going to use for automating different organizational actions, required to be applied to your application at the intermediate development life cycle phases (like deploying, placing it to the appropriate hardware according to the stage, running auto-test, etc).
the easiest way to do this is to access your jenkins container via the jelastic ssh-gateway.
in the case you haven’t performed similar operations before, you need to:
- generate an ssh keypair
- add your public ssh key to the dashboard
- access your account via ssh protocol
- once inside, create a new folder for your project (we’ll use demo ) and move in there:
mkdir /opt/tomcat/demo
cd /opt/tomcat/demo

this location can be used for storing your scripts, variables, logs etc.
- here, you can upload the required scripts using the command of the following type:
curl -fssl {link_to_script} -o {file_name}
we also provide the set of script examples, which can be used as templates for your own ones:
- install.sh – gets a user session and creates a new environment via the jelastic api according to the specified manifest file. it also defines, that the name of this environment will be equal to its creation date and time (as a unique name is required for every script execution, but you won’t be able to set it manually as this operation would be run automatically). however, you can set your own dynamic name pattern to be used here
- transfer.sh – changes the environment ownership based on the jelastic environment transferring feature
- migrate.sh – physically moves an environment to another hardware set (hardnode group)
note: that before the appliance, each of the script templates, presented above, have to be additionally adjusted to make them work properly within a particular jelastic installation. thus, the list of parameters below should be obligatory substituted according to your platform’s settings:
- /path/to/scripts/ – the full path to your scripts folder (created in the previous step)
- {cloud_domain} – your jelastic platform domain name
- {jca_dashboard_appid} – your dashboard id, that could be seen within the platform.dashboard_appid parameter at the jca > about section
- {jca_appstore_appid} – appstore id, listed within the same section (at the platform.appstore_appid parameter)
- {url_to_manifest} – link to the manifest file created according to our documentation (you may also use this one as an example – it sets up two tomcat application servers with the nginx load-balancer in front of them)

note: above you can see one more runtest.sh script uploaded – it simulates the testing activities for demonstration purposes, thus we don’t provide its code in this tutorial. if required, create your own one according the specifics of your application and upload it alongside the rest of the scripts.
- in addition, you need to create a separate file for storing the variable with environment name (as it needs to be dynamically changed each time a new environment is created):
echo env_name= > /opt/tomcat/demo/variables

these are the main steps of preparation to achieve automatic continuous integration and delivery of your web application with a help of jenkins within jelastic cloud platform. in the second part of these blog series, we’ll configure the set of jobs at the jenkins server, which represents the core of our automation. each of them will be devoted for a particular operation, required to be run at the corresponding application life cycle phase:
create environment > build and deploy > dev tests > migrate to qa > qa tests > migrate to production
stay tuned to see the next steps. if you still don’t have jelastic installation, contact us to get access to our free demo for cloud platform evaluation or just start with trial registration at one of our hosting partners .
Published at DZone with permission of Tetiana Markova, DZone MVB. See the original article here.
Opinions expressed by DZone contributors are their own.

Comments