Developing a Web Application Using Angular (Part 2)
In Part 2 of our code-along series with Angular, we will take a look at developing the architecture for our web application.
Join the DZone community and get the full member experience.
Join For FreeIn the previous article, we explored the basic User Interface (UI) design for our web application and laid the foundation for our project by using the Angular Command Line Interface (CLI) to generate a skeleton project for us. In this article, we will develop an architecture for our web application and begin to implement the classes required to bring our web application from the abstract to the concrete.
Table Of Contents
- Part 1: Designing User Interface
- Part 2: Developing Application Architecture & Implementing Resource Layer
- Part 3: Implementing Service Layer
- Part 4: Implementing Component Layer
- Part 5: Testing Completed Application
Developing an Architecture
Much like the general architecture that we developed for the backend web service in Creating a REST Web Service with Java and Spring (Part 1), many web applications follow the same basic architecture. Starting from the components closest to the user, we have a UI that is the most direct interconnection with the end-user of the system. Between the UI and the web service we are interfacing with, we have a service layer that abstracts the interaction with the web service, encapsulating the Hypertext Transfer Protocol (HTTP) actions (such as GET, POST, etc.). Lastly, we have resources, which are produced by the web service and displayed by the UI layer.
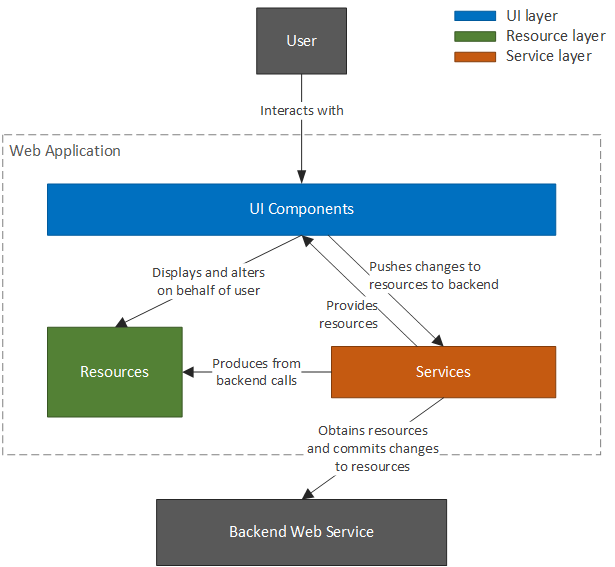
While there is a tendency to display any layered architecture in a strictly hierarchical manner (with one layer directly above the other), it is more beneficial to look at our architecture in terms of the interactions between the UI layer, service layer, and resources, as illustrated in the following diagram:

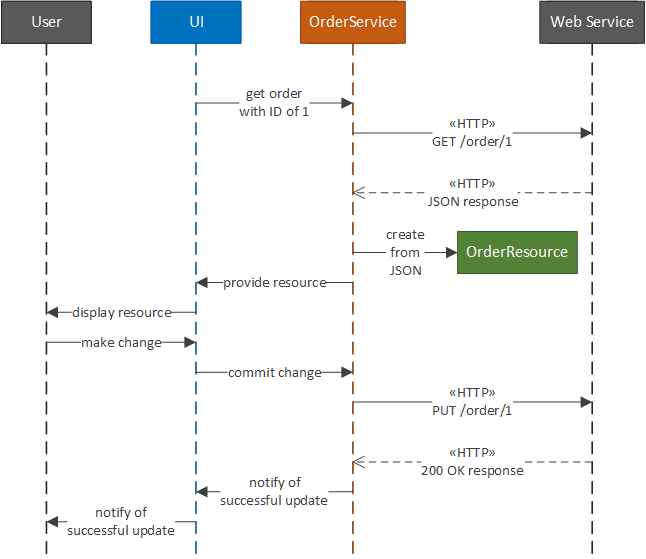
In this architecture, the most depended upon layer is the resource layer, which is responsible for representing the resources retrieved from the web service; the service layer is responsible for making HTTP calls to the backend web service and obtaining resources; the UI layer then displays these resources to the user and allows the user to change the state of the resources. Once the changes are finished, the UI layer instructs the service layer to commit these changes to the backend, which in turn causes the service layer to make HTTP calls to the backend. This process can be seen in the sequence diagram below, which depicts the steps for editing an order with an ID of 1. Note that the OrderService and OrderResource are classes that act as the service and resource, respectively, for an order.

As illustrated above, the actions of the user drive the UI layer to, in turn, instruct the service layer to interact with the backend web service. The service layer then creates new resources or uses existing ones passed by the UI layer to represent the orders received or sent to the web service. During the entirety of this process, the service layer is the only layer that is responsible for creating resources. Additionally, the UI layer does not directly interact with the web service but instead interacts with the service layer using order resources.
This decoupling allows our layers to change without causing a domino effect of changes to other layers. For example, if the web service changed (for example, the URL to contact the web service changes), only the service layer must change (more particularly, only the service that interacts with the affected resources must change). The UI layer components remain stable in spite of the change to the web service.
With our architecture solidified, we can now move on to implementing our web application. We will start by implementing the resource layer since it has no dependencies on the other layers and is depended on by both. Next, we will implement the service layer since it is depended on by the UI layer, and lastly, we will implement the UI layer, since it is not depended on by any other layer, but depends on the two other layers.
Implementing the Resource Layer
The first step to implementing our resource layer is to enumerate the resources that we will have in the system. Since we are interfacing with a simple web service, we only have one resource: Order. Based on the design of our web service, we expect the resource to be sent to us by the web service to resemble the following (in Javascript Object Notation, JSON):
{
    "id": 1,
    "description": "Some sample order",
    "costInCents": 250,
    "complete": false
    "_links": {
        "self": {
            "href": "http://localhost:8080/order/1"
        },
        "udpate": {
            "href": "http://localhost:8080/order/1"
        },
        "delete": {
            "href": "http://localhost:8080/order/1"
        }
    }
}
This means that we have to ensure that our Order resource can be deserialized from the above JSON and be usable by our UI layer. To do this, we create the following set of classes:
export class Link {
    public href: string;
}

class OrderLinks {
    self: Link;
    update: Link;
    delete: Link;
}

export class Order {

    id: number;
    description: string;
    private costInCents: number;
    isComplete: boolean;
    links: OrderLinks;

    public constructor() {}

    public static fromJson(json: any): Order {
        const order = new Order();
        order.deserialize(json);
        return order;
    }

    public deserialize(json: any) {
        this.id = json.id;
        this.description = json.description;
        this.costInCents = json.costInCents;
        this.isComplete = json.complete;
        this.links = json._links;
    }

    public serialize(): any {
        return {
            'id': this.id,
            'description': this.description,
            'costInCents': this.costInCents,
            'complete': this.isComplete
        };
    }

    set cost(cost: number) {
        this.costInCents = cost * 100.0;
    }

    public toggleComplete() {
        this.isComplete = !this.isComplete;
    }

    get isIncomplete(): boolean {
        return !this.isComplete;
    }

    get cost(): number {

        if (this.costInCents === 0) {
            return 0.0;
        }
        else {
            return this.costInCents / 100.0;
        }
    }

    get costString(): string {
        return `\$${this.cost.toFixed(2)}`;
    }
}
Starting from the top, we create a Link class to abstract the Hypermedia as the Engine of Application State (HATEOAS). Next, we create another abstraction, OrderLinks, that contains the assortment of Links that is expected from the web service. Lastly, we create the Order class that abstracts the JSON order resources we receive from the web service.
It is important to note that the Order class contains a deserialize and a serialize method, which allows for an Order object to be created from a raw JSON order resource and for an existing Order object to be serialized into a raw JSON order resource. There are two main reasons while we manually perform serialization and deserialization, in spite of Typescript's ability to automatically perform these operations:
- We can vary the names of the internal fields of our
Orderclass. The default serialization technique used by Typescript uses the names of the fields, which restricts us to naming our fields to the exact names used in the expected JSON. For example, we would be required to name the field that stores the HATEOAS links_linksbecause that name is used by the backend. This would couple the internal structure of our resource class with the structure used by the backend. - In order for the methods of our class to be callable, we need to manually instantiate an object of that type. For example, we could use the default deserialization logic as such,
const order = someRawJson as Order, but if we tried to callorder.toggleComplete()(or any other method), we would obtain an error stating that the functiontoggleCompletecannot be found for the given type. This is because the underlying type of order is notOrder: We have simply treated (through casting) some raw JavaScript object with no type as if it were anOrder, but when we tried to call a method on that object, an error was thrown because the implementation type of the object was not anOrder(and therefore did not have the desired method), even though the declared type wasOrder.
This second issue is very difficult to surmount without manually creating the desired object (using the new operator). For more information on this known issue, see this StackOverflow post. Therefore, we will manually perform the serialization and deserialization of our Order objects. In a larger system with many more resources, this may be untenable. In that case, further exploration of Typescript's deserialization and serialization techniques would be in order.
The next decision that must be addressed is the privatization of the costInCents field. The web service we are interfacing with stores the cost value in cents so that it does not have to manipulate decimal places (which can easily cause pennies to be lost). Although the backend web service maintains its cost value in such a manner, there are multiple benefits for our Order resource to deal with the cost in decimal.
Foremost among these is displaying the cost in a human-readable manner. For example, it would be a mistake to display the cost in cents to the user, rather than displaying it in dollars, such as $4.56. Secondly, the UI will likely be changing the value in terms of a decimal. For example, the input field that allows our Order resource to be edited will likely include a decimal so that the user can input the value as 4.56 rather than 456. Therefore, we will use the encapsulation provided by Typescript classes to maintain the internal state of our cost in cents, while allowing outside components to alter or read the cost in terms of decimal dollars.
Since this conversion logic (between cents and decimal dollars) can be difficult to get correct, it is a good idea to include automated unit tests to exercise this functionality. Although automated unit tests are often associated with backend development in Java, Ruby, Python, or another typically non-frontend programming language, the Angular project we generated includes native support for automated unit tests in Jasmine. The unit test specification for our Order class is listed below:
class OrderFactory {

    public static createWithPrice(costInCents: number): Order {
        return Order.fromJson({
            id: 1,
            description: 'Test',
            costInCents: costInCents,
            complete: false
        })
    }
}

describe('Order', () => {

    it('Cost amount is correct', () => {
        const order = OrderFactory.createWithPrice(381);
        expect(order.cost).toEqual(3.81);
    });

    it('Zero cost is correct', () => {
        const order = OrderFactory.createWithPrice(0);
        expect(order.cost).toEqual(0.0);
    });

    it('Cost string is correct', () => {
        const order = OrderFactory.createWithPrice(381);
        expect(order.costString).toEqual("$3.81");
    });

    it('Cost string with only cents is correct', () => {
        const order = OrderFactory.createWithPrice(71);
        expect(order.costString).toEqual("$0.71");
    });

    it('Zero cost string is correct', () => {
        const order = OrderFactory.createWithPrice(0);
        expect(order.costString).toEqual("$0.00");
    });
});
Prior to setting up our test suite and individual test cases, we create an OrderFactory, which will help in the creation of the Order objects we want. For example, since we are testing the cost value of our Order resource, we create a factory method, createWithPrice, for creating Order objects with a specific price. Next, we establish our test suite using the describe method (provided by Jasmine); within this test suite declaration, we add individual test cases using the it method. In each of the test cases, we simply create an Order resource with the desired cost in cents and then make an assertion about the output of a method using the expect method.
Note that it is a common convention in Angular applications to place the unit test files within the same directory that contain the files that are under test, adding spec to the name of the file. For example, if our Order resource is contained in src/app/order.resource.ts, we place the Jasmine unit tests in src/app/order.resource.spec.ts.
Although we have only used the basic functionality of Jasmine, there are many other powerful mechanisms included that make Jasmine very similar to a standard unit testing framework, such as JUnit, in terms of its functionality. For more information on creating Jasmine tests, see the Jasmine Introduction page. To run our unit tests, simply execute the following command:
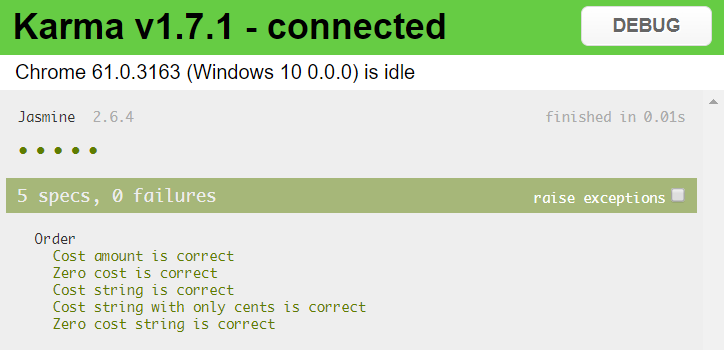
npm testOnce the tests are compiled and executed, a browser window will open. The contents of the new window should resemble the following, indicating that all tests have passed:

In the next article, we will continue implementing our web service, starting with the service layer and ultimately culminating with the completion of the UI layer and the usage of our web application to interface with our order management web service.
Opinions expressed by DZone contributors are their own.

Comments