Develop and Debug C++ for ARM Linux Boards on Windows With Eclipse
Learn more about developing and debugging ARM Linux Boards on Windows.
Join the DZone community and get the full member experience.
Join For Free
You can have a complete development environment on a Windows PC to create and debug C++ programs for Raspberry Pi, BeagleBone, and other Linux devices.
All activities happen within Eclipse: build the executable, deploy it to your ARM device, and remotely debug it. In this post, we look at how to do all three, so without further ado, let's get started!

What Experience Do You Get
- Code can be written in Eclipse
- Compilation and linking for the ARM Linux target happen when building the project.
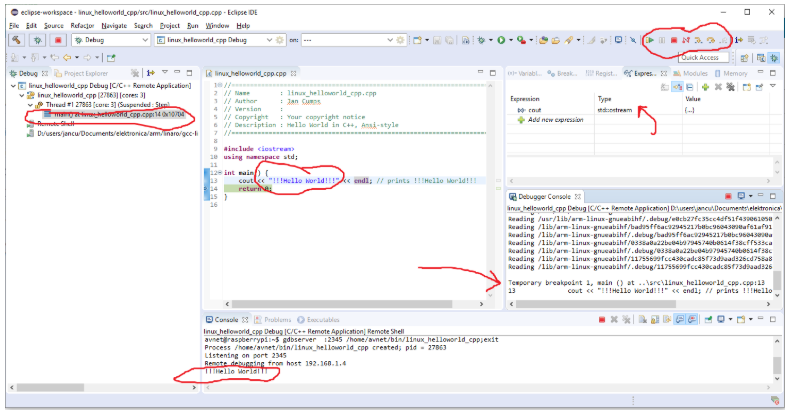
- When a debug session is started, the executable is deployed to the Linux device and the remote debugger is automatically started. Source code is loaded in the editor and the execution halts at
main(). - You can step over and into the code, show assembly, watch variables and expressions, and set breakpoints.
- You see the standard output generated by your executable in Eclipse.
- When debugging is finished, the remote debug server on the ARM device closes.
System Preparation
Software Requirement on the ARM Linux Device
- A working SSH connection
- gdbserver installed
Software Requirement on the Windows PC:
- Eclipse IDE (the version for C/C++ Developers)
- Arm cross-compile toolchain.
There are no specific hardware requirements. Deploy and debug happen over the network.
Prepare the Windows PC
Download and install the arm-linux cross-compile toolchain. The package is available as a compressed archive. You can extract it to a location of choice.
Check your board documentation for the right one. I selected gcc-linaro-5.3-2016.02-i686-mingw32_arm-linux-gnueabihf to work with BeagleBone, Raspberry Pi and Hartung Mica
When you unpack it, take care that you start the unzip utility (I use 7-Zip) with administrator rights. That's needed to get the correct symbolic links created during the extract.
If you use 7-zip, you can do this by looking for the 7-Zip File Manager entry in Windows' start menu, right-click on it, and then select Execute as Administrator. Then, you navigate to the archive and extract it. This will give you a working cross-compilation toolset.
Then download and install the latest Eclipse. This also comes as an archive. Unpack that one (admin rights are not needed), also to a location of choice.
The setup on Windows is now complete.
Prepare the ARM Linux Board
Log on to Linux and check if the debug server is installed:
gdbserver --version
If not, install it:
apt-get install gdbserver
Create a working directory where Eclipse can deploy and run your developments. I prefer to have it in my home folder. You are free to choose the name for that directory. I called it ~/bin.
The setup on your ARM Linux device is now complete.
Develop a Program
Open Eclipse by double-clicking eclipse.exe in the folder where you installed it.
Accept or change the suggested Working Folder location. Your projects will be stored there.
File -> New -> Project
Search for C++ Project and select it.
Project Name: helloworld
Use default location
Project type: Hello World C++ Project
Toolchain: Cross GCC
Next -> Next-> Next
Cross-compiler path: Browse the bin subdirectory of the location where you unpacked the toolchain
Cross compiler prefix: arm-linux-gnueabihf-
The prefix is the fixed begin of the filename for most programs in the toolchain's bin directory (e.g.: arm-linux-gnueabihf-gcc.exe)
Finish
If asked to 'Open Perspective,' do that (normally, this is only asked the first time you create this type of project).
You may get two errors in the 'Problems' view. We don't need those.
Right Click on the Errors label -> Select All
Right Click on the Errors label Again -> Delete
Right-click on the project name -> Properties -> C/C++ Build -> Builder Settings
Builder type: Internal builder
Apply and Close
Right-click on the project name -> Build Project
Your console should show output similar to this:
16:56:52 **** Incremental Build of configuration Debug for project helloworld ****
Info: Internal Builder is used for build
arm-linux-gnueabihf-g++ -O0 -g3 -Wall -c -fmessage-length=0 -o "src\\helloworld.o" "..\\src\\helloworld.cpp"
arm-linux-gnueabihf-g++ -o helloworld "src\\helloworld.o"
16:56:53 Build Finished. 0 errors, 0 warnings. (took 808ms)
Deploy and Debug the Program
Run -> Debug Configurations
Right-click on C/C++ Remote Application -> New configuration
name: helloworld Debug
Main tab
Project -> Browse -> helloworld
Connection -> New -> SSH -> OK
Connection Name: how you name your Linux board, e.g. raspberrypi
Host: network address or IP of the Linux device
User: your Linux account
Password-based authentication -> Password
Finish
Remote Absolute File Path for C/C++ Applications -> Browse
This opens your home folder on the Linux device.
Select the development folder you created and confirm (the one I called
binin the preparation steps). If the application name is not shown in the entry field, add/helloworld
Debugger tab -> Debugger Options -> Main
GDB debugger: Browse the
binsubdirectory of the location where you unpacked the toolchain, then select the program that ends with gdb.exe (in my case: arm-linux-gnueabihf-gdb.exe)
Apply -> Debug
You are now debugging your application. It runs on the Linux device but you control it from your Windows machine. Enjoy!
Opinions expressed by DZone contributors are their own.

Comments