Designing APIs With Apicurio Studio
In this post, we take a look at an open source tool that provides a visual, click-driven approach to API design and development.
Join the DZone community and get the full member experience.
Join For FreeWorkflows that center around a machine-readable definition in OpenAPI format are state of the art when dealing with APIs. Various tools are available to assist in all steps of the API lifecycle, starting from the design phase. As a first simple design tool, we recently introduced Swagger Editor on this blog. The Editor is a great tool to help you write OpenAPI definitions by providing immediate validation and preview. What, however, if you don't actually want to write OpenAPI, and prefer a more visual, click-driven approach to your API Design? Well, today we'll have a look at another tool: Apicurio Studio.
Apicurio Studio is an open source API designer. Development is primarily driven by Red Hat, however, the project is freely available under an Apache license and accepting contributions on GitHub. You can go to the Apicurio website and download the application to run locally or on a server you own, or you can simply click Try Live to go for the hosted version.
Unlike Swagger Editor, which runs completely on your local browser, requires no registration, and asks you to save your definition locally, Apicurio follows a very different approach. In this approach, you need to create an account for a Studio instance. This account contains a list of all the OpenAPI definitions that you're working on. However, it doesn't actually store the content. Instead, every API is connected to a repository on GitHub, GitLab, or Bitbucket. It's not possible to use Apicurio Studio without linking to such a repository.
As of now, you can use Apicurio Studio to design and validate OpenAPI definitions. Due to the fact that your definitions are stored in code repositories, you can easily work collaboratively. Both Swagger/OpenAPI 2.0 and the newer OpenAPI 3.0.0 format are fully supported (read my article for a list of differences between both formats). You can always switch between an editable interactive visualization and a JSON/YAML definition view. Unfortunately, you cannot actually send requests to a mock or live version of your API, which is possible in other tools, but support is on the roadmap and Apicurio, which still carries a beta tag, is under heavy development.
As mentioned above, you need a source code repository to store your API definition in. Otherwise, Apicurio Studio won't even allow access to the designer. My recommendation is to create the repository on Bitbucket, because, unlike GitHub, you can also create some private repositories for free on their service.
Go to Bitbucket and create an account or sign in to your existing account. Apicurio requires repositories to be associated with a team and not your personal account, so if you don't have a team yet click on the + button, choose Team, and give your team a name and ID.
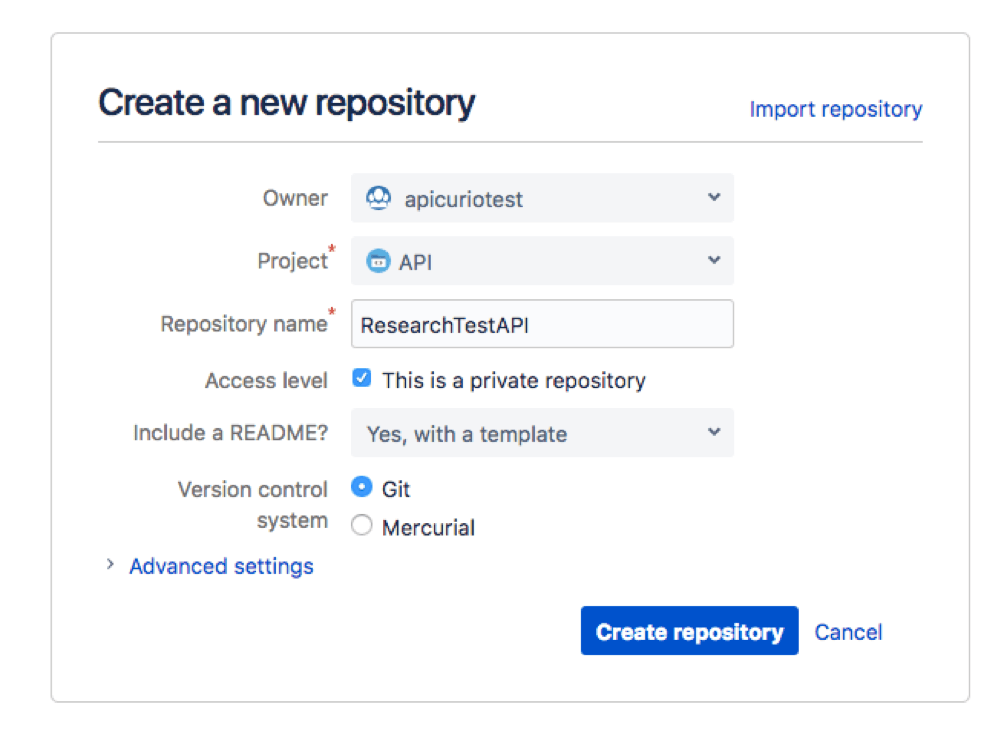
Now, click + again and choose Repository this time. Assign a team, enter a project name or select an existing project for that team, give a repository name, initialize it with a README, and click Create repository.
When opening Apicurio Studio for the first time, you'll be sent to an authorization page. Click Register to create a new account with your email address. Single-sign-in with a Google account is also provided. To access the account you have registered, enter your email and password and hit Login.
Once you are logged in there are three sections of the web application:
- Dashboard: Shows some general information about the Apicurio project and the APIs you've worked with recently.
- APIs: Shows the complete list of all APIs associated with your account and allows you to create a new API or link to an existing API.
- Settings: Allows you to view your user profile and manage your repository provider accounts.
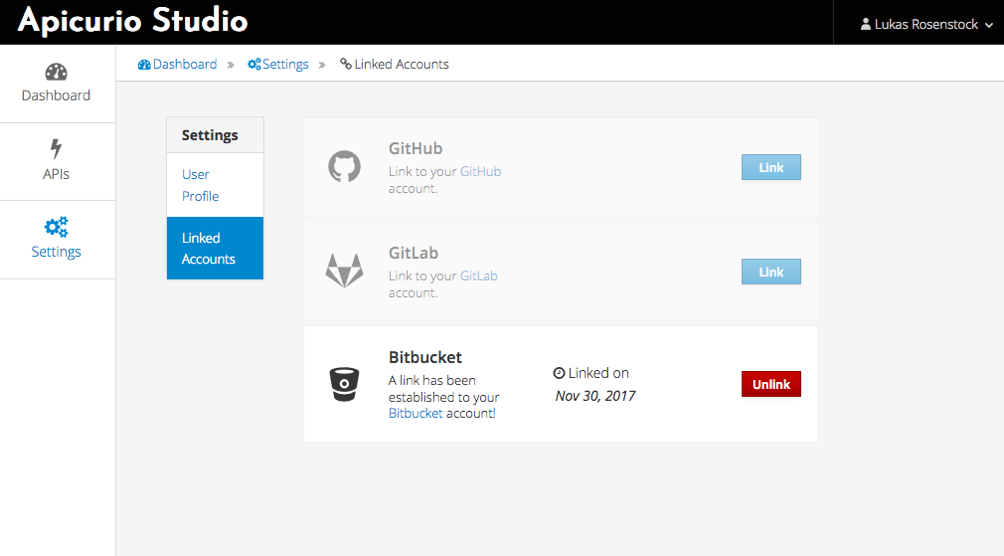
Go to Settings, Linked Accounts, and click the Link button next to Bitbucket. You will be redirected to Bitbucket and asked to provide access to your account. Once granted, you'll be sent back to Apicurio.
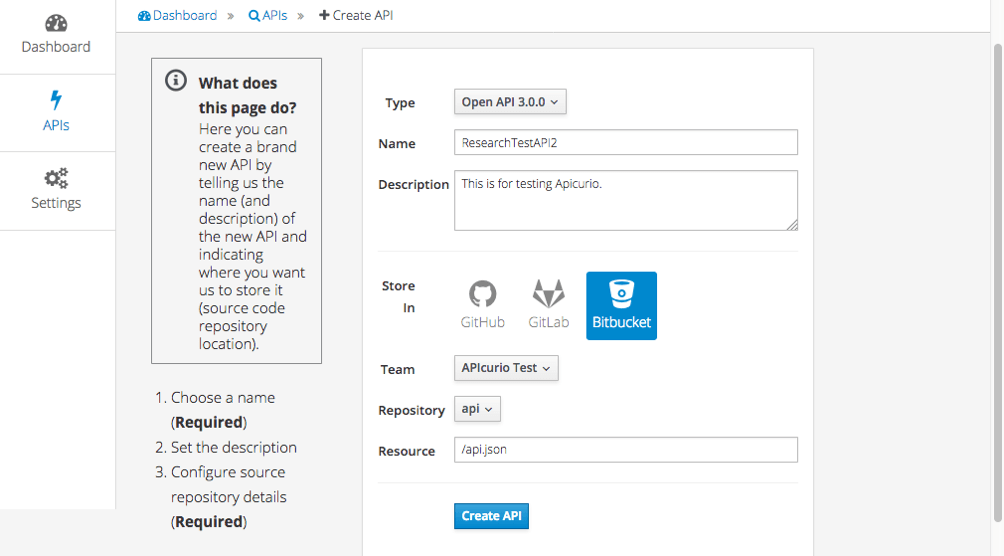
Now, go to APIs, Create New API. Choose the version of the format and enter a name and description for your API. Click the Bitbucket button and select the team and repository you previously created. In the Resource field, you have to enter the path to the API definition. As we have created a brand new repository this file does not exist yet. We can choose anything and Apicurio will create that file for us, so let's use something simple such as /api.json to keep the file in the root of the repository. Hit Create API and you're ready to go.
If you've followed the tutorial so far you've ended up on the landing page for your API, which shows some basic information about the API and collaborators. The important part is the Design API button which will launch the actual API designer.
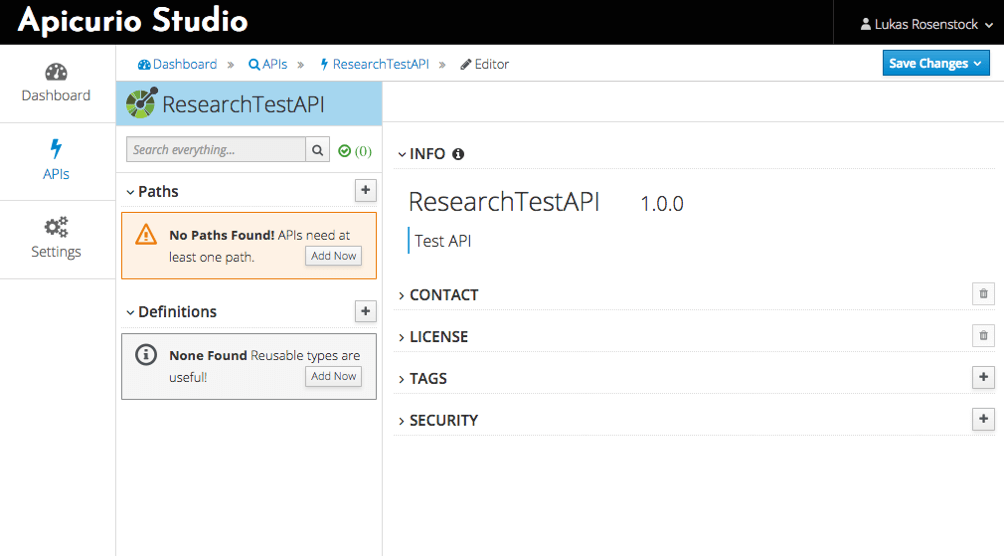
The API designer features a split view. The left column contains collapsible lists of paths and definitions, while the right column shows the basic metadata of the API. If you move the pointer with your mouse or trackpad over this page you'll notice some elements appear. Sometimes a little icon i will appear, which provides you with helpful explanations on what a specific section is for. You should take your time to read those explanations, especially if it's your first time doing API design or working with the Studio.
For other elements, a pen icon appears, which means you can edit this element. When clicking the pen icon, the formerly static text is converted into an editable text field into which you can type. Changes are confirmed with the checkmark and discarded with an x. This is how editing works throughout the API designer. Don't forget the checkmark, if you just click outside the text field your changes are lost!
As an example to help you get started, we'll build a hypothetical contact manager API. This API could allow a person to manage their contacts, so we need typical CRUD operations like listing all contacts and accessing individual contacts, as well as adding, updating, and deleting. We'll build this API using common best practices for the design of REST APIs in terms of using good URL paths and proper HTTP verbs for each operation. Let's start with our domain, though, and define a data schema for contacts. To keep this simple, we can assume our contacts only have a numeric ID, a name, and an email address. Feel free to extend this later with more fields, such as phone numbers.
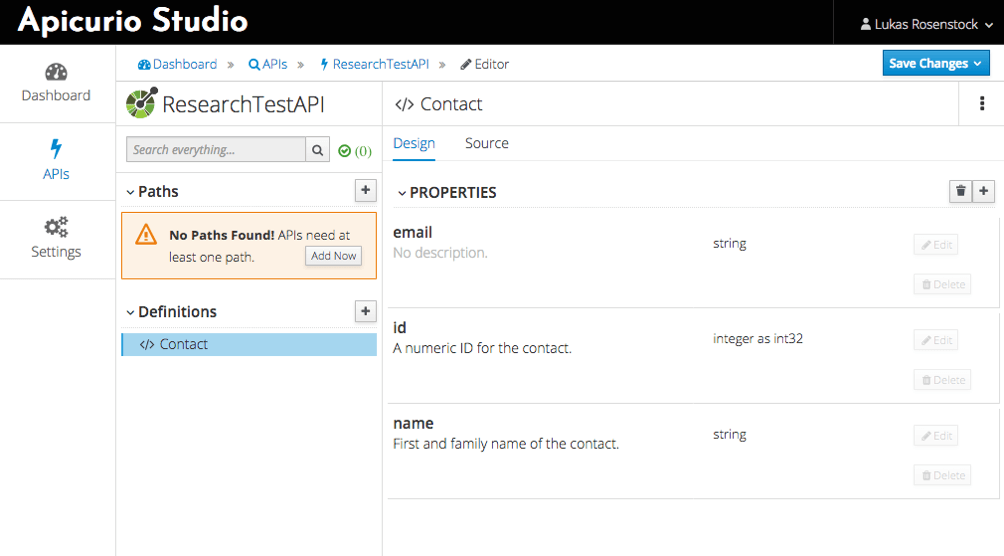
Click the + button next to Definitions and enter the Name "Contact." A nice feature of Apicurio Studio is that you can infer the definition from an existing JSON object, which is great when you want to create a Swagger/OpenAPI file for an API which already exists, or if you like to copy and paste examples like this one:
{
 "id" : 1,
 "name" : "John Doe",
 "email" : "john@doe.email"
}
After clicking Add, your new definition appears. The right pane of the window has now changed to show the properties of the definition. You can add, edit, and delete the properties using the buttons provided. Editing allows you to set some more specific attributes from JSON Schema, for example, change the data type or indicate whether a property is required or not. Also, note the tabs that say Design and Source, you can use them to toggle between the more visual list of properties and the source code in YAML or JSON. This is a great feature if you want to learn the Swagger or OpenAPI formats, especially because you can inspect smaller segments, such as a single schema definition, instead of getting lost in a huge definition file.
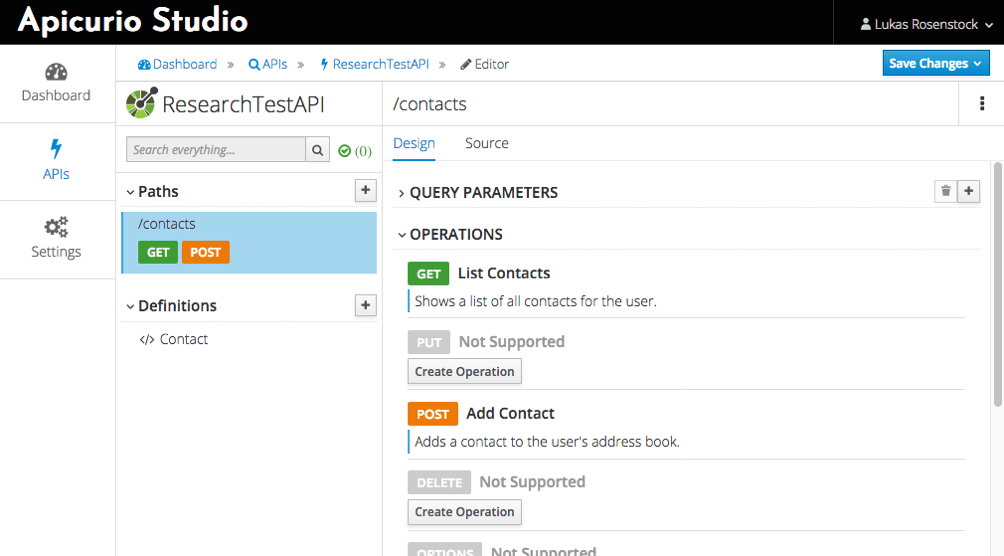
Now it's time to add our paths. Click the + button next to Paths. Our first path is /contacts, a collection resource which will be used to retrieve the list of contacts and to add new contacts. After confirming with Add, the right side lists all the HTTP verbs, so we can simply choose the ones we need. Click on Create Operation below GET and POST. Provide a summary and/or description if you like.
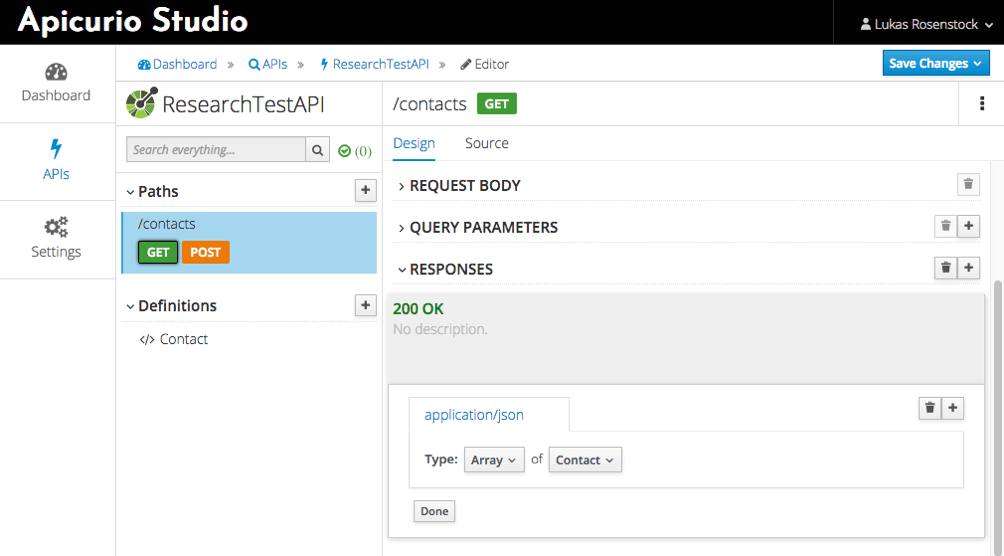
Next, we need to specify request and response formats. This functionality is a bit hidden in the Studio and is exposed when you click on the colorful HTTP verbs in the operation or path lists. Click on GET first. For this verb, no request body or query parameters are necessary, but a response is always required in any operation defined in OpenAPI. Click Add Response, choose 200 and confirm. Click Edit next to the response to define the response. The editor will ask you to specify a media type, so follow the required steps; application/json is already suggested as a sensible default for the first media type you add. In OpenAPI, you can define the schema for a response either as a separate object definition but also in line with the operation. It makes sense to centrally define object schemas that are used in multiple API operations for easy reusability, which we did for Contact. It's also possible to create nested schemas that reuse existing object definitions as part of a new definition, and that is exactly what we're doing here: set the data type of the response to the type Array and choose our own schema Contact as the type for the array's items.
In a similar way, we can update the POST operation's details. Click on POST. This time we do need a request body. Set it to Required, create the media type application/json just like before and choose Contact as the type of request. For the response, we can choose a 201 type and don't need to specify a body.
It would be a good time now to review what Apicurio Studio has generated for us under the hood, so switch to the Source tab. You'll see a YAML definition for the method and can switch to JSON, too. Unfortunately, at least for now, there's no preview of the whole OpenAPI file, but you can view it in your repository.
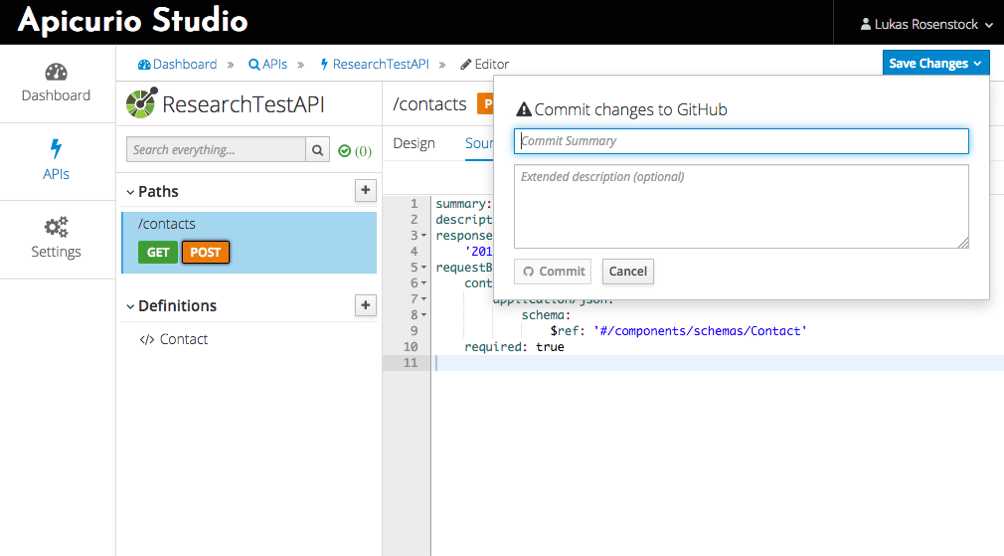
Let's commit your work now so nothing gets lost accidentally: click Save Changes, enter a note for your repository's log, and Commit. What happens next is the same process as when you run git commands on your system to commit and push source code to a Git repository.
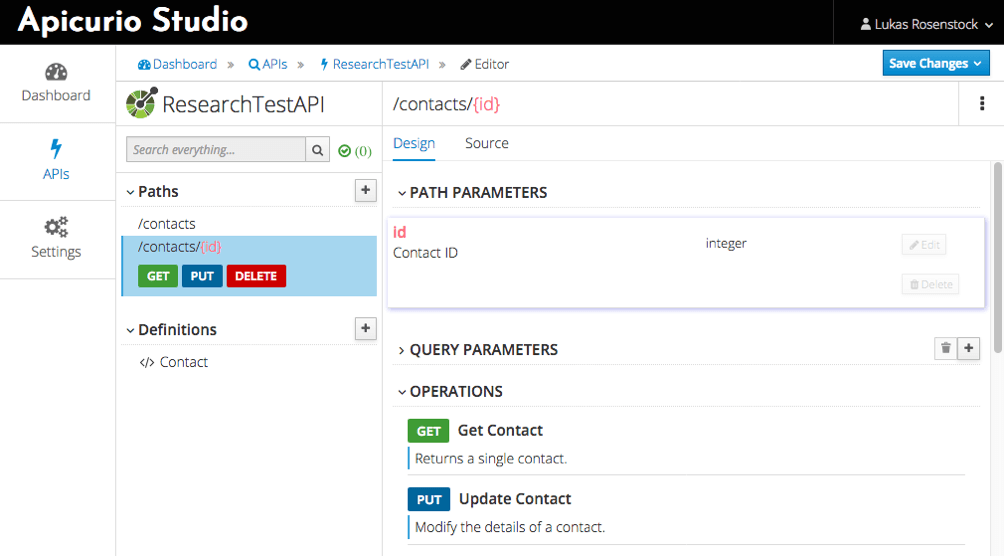
We need a second path for individual items. Click + next to Paths and enter the path as /contacts/{id}. Noticed the curly braces around id? They indicate a placeholder for a parameter that consumers of your API need to specify. If you save this path, the placeholder is highlighted in red and a new section called Path Parameters appears in the Design pane. You still need to confirm the parameter and edit it to specify a type. Then, add a GET, PUT, and DELETE operation, which is required for this path. By now, you should be able to finish up the complete definition by yourself without further handholding. Just go ahead and add the responses to these operations. Don't forget to save at the end! Then, you can open your repository on Bitbucket and view the complete OpenAPI definition you just created as a JSON file. Congratulations!
Apicurio Studio is a great approach to visual API design. You can find out what you can do with OpenAPI by inspecting all the buttons and option menus and you don't have to write any YAML or JSON code at all, however, you're always able to look at this code whenever you want to. By delegating all collaboration functionality to repository providers, the tool is compatible with collaborative workflows. OpenAPI definitions can live in their own repository or along with the code of your application and all sorts of automation and integrations can be built on top of that. The setup with registration for Apicurio as well as linking the repository is a bit cumbersome at first and might be an initial hurdle, compared to Swagger Editor, which is ready for input immediately after loading the site. The Studio also still has some bugs and lack of features, such as a sandbox client, but as it is under active development it's just a matter of time until this is resolved. In any case, the open source nature of the tool, as well as the fact that it's built on OpenAPI as a standard, ensures that you are not locked in.
Published at DZone with permission of Lukas Rosenstock, DZone MVB. See the original article here.
Opinions expressed by DZone contributors are their own.

Comments