Deploying To Azure From Azure DevOps Without Secrets
Optimize Azure deployment using Workload Identity Federation for automated, secure, seamless CI/CD in DevOps without secret credentials.
Join the DZone community and get the full member experience.
Join For FreeIf you are deploying your application to Azure from Azure Pipelines, you might want to leverage the ability to do so without using secrets, thanks to Workload identity federation. In this article, I will demonstrate how to automate the configuration of your Azure DevOps project, with everything pre-configured to securely deploy applications to Azure.
Why Should You Use Workload Identity Federation for Your Deployment Pipelines?
I already wrote about the problem of secret credentials, but let me remind you two reasons why I think you should always avoid using secrets in your deployment pipelines:
- It's more secure if you don't need a secret to authenticate to Azure.
- It's more practical if you don't need to handle secret rotation when secrets expire.
This is true, whatever the CI/CD platform you are using.
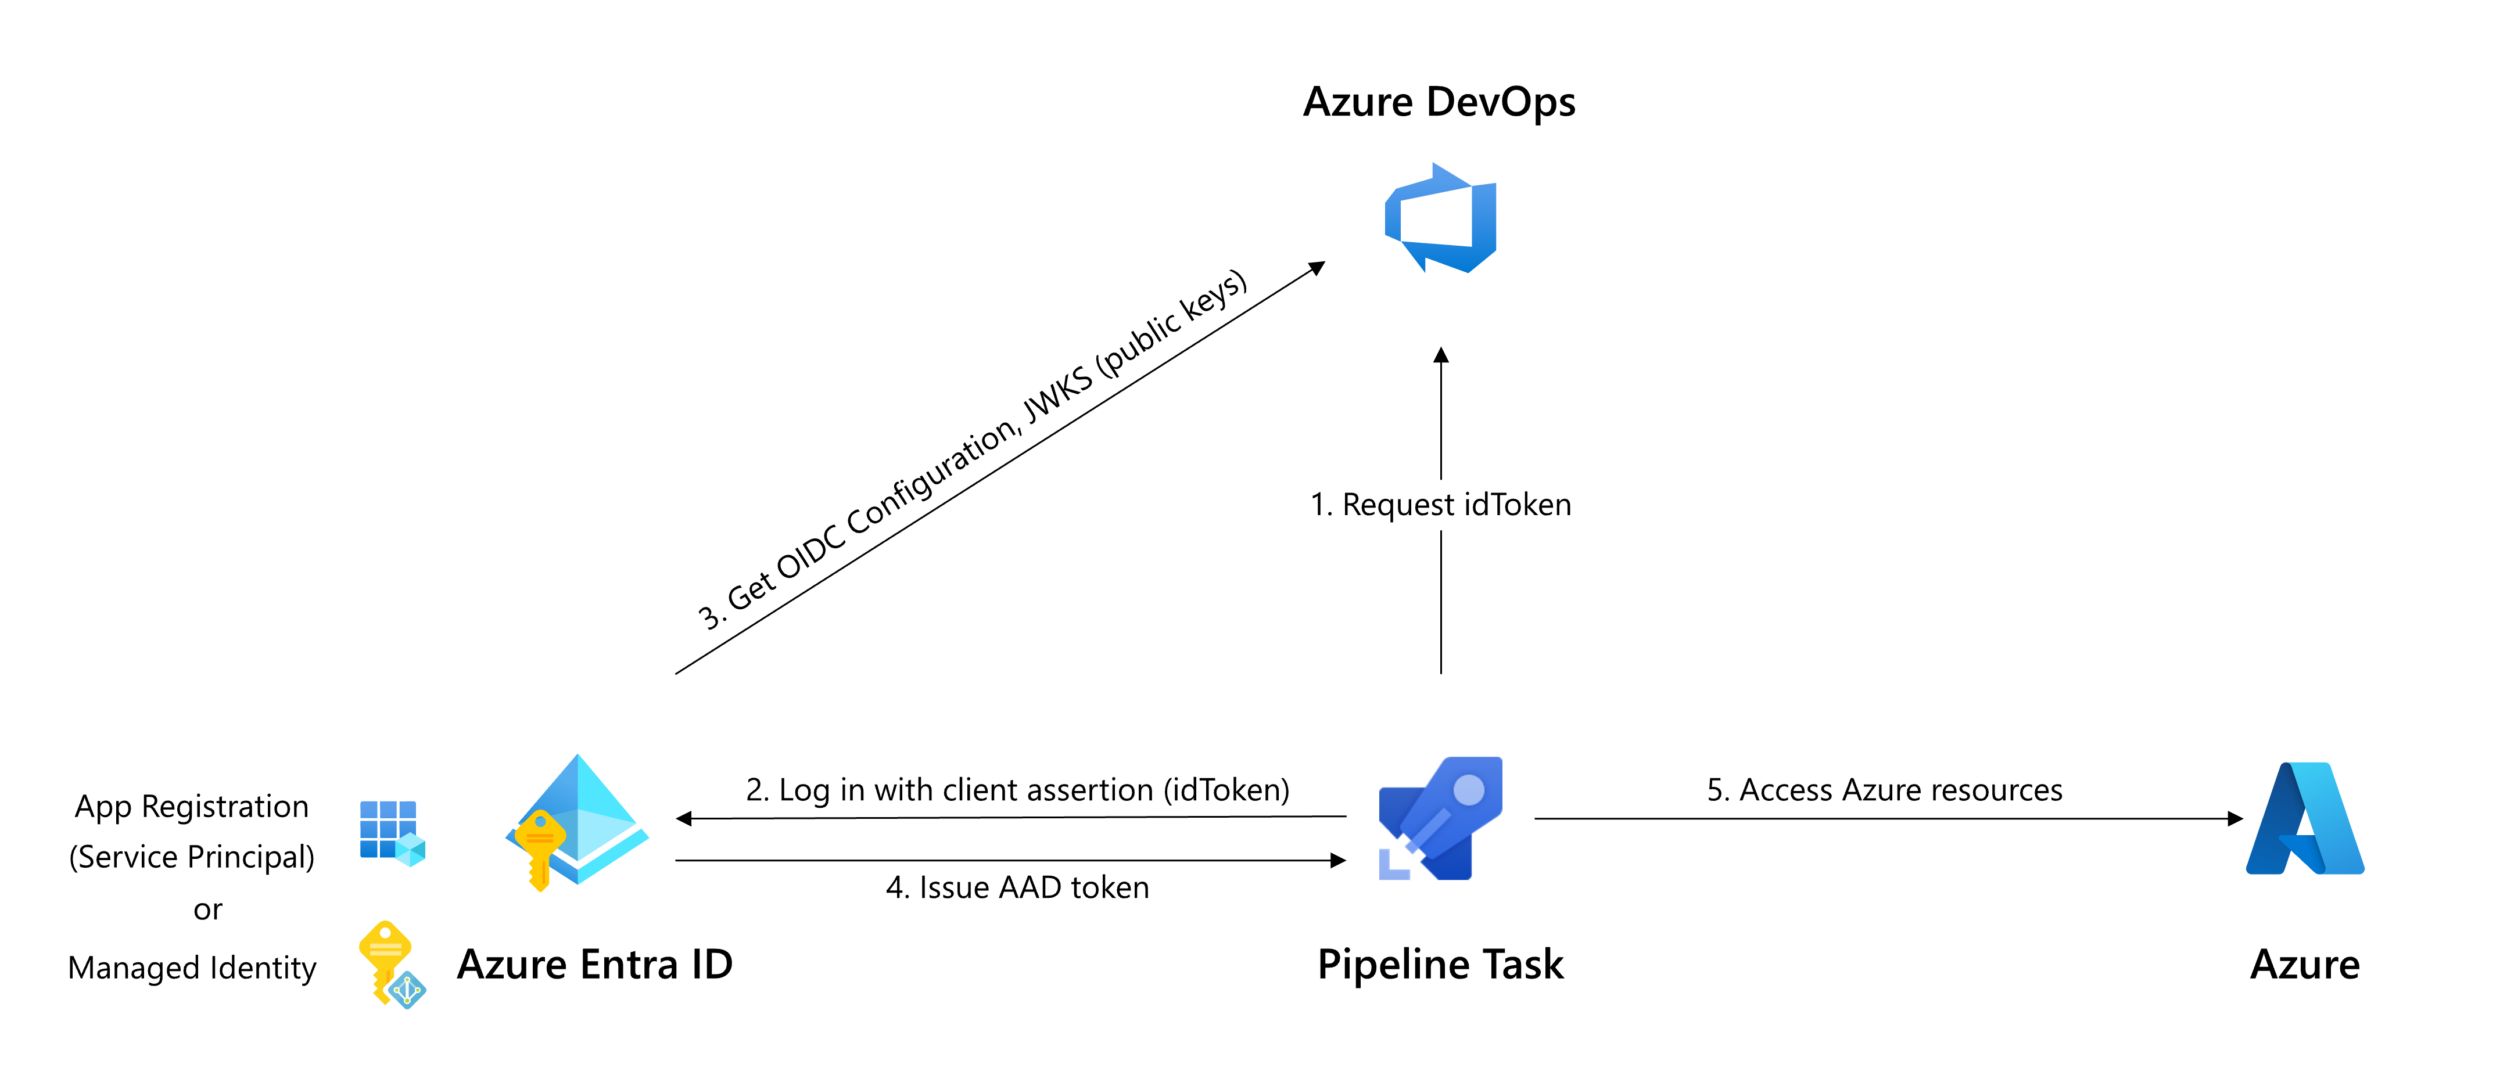
Workload identity federation leverages OpenID Connect to solve these problems and avoid using secrets in your pipelines to authenticate to Azure.

Microsoft has announced the public preview of the Workload identity federation for Azure Pipelines on the 11th of September, 2023.
How Can You Use Workload Identity Federation to Deploy to Azure From Azure Pipelines?
Azure Pipelines tasks use service connections to authenticate with external services. Specifically, for Azure, it is necessary to create an Azure Resource Manager service connection.
You can create an Azure Resource Manager service connection that uses workload identity federation by configuring it in your Azure DevOps organization portal (check the documentation here).
Or ... you can automate that using Infrastructure as Code.
Yet, who wants to manually configure things from a wizard when everything can be automated in versioned code? So, let's go the IaC way.
All kidding aside, I genuinely believe that there are many advantages to provisioning your Azure DevOps projects and their associated resources (Repos, Service Connections, policies, pipelines, ...) using Infrastructure as Code. It takes time to properly configure Azure DevOps projects, and if they are often organized similarly, it's more efficient to automate their configuration rather than doing it manually.

I will use Pulumi and its Azure DevOps provider to provision the necessary resources. The infrastructure as code will be written in C#, but you could easily convert the C# code to any language that Pulumi supports (like TypeScript; I am a big fan of using TypeScript to write infrastructure code).
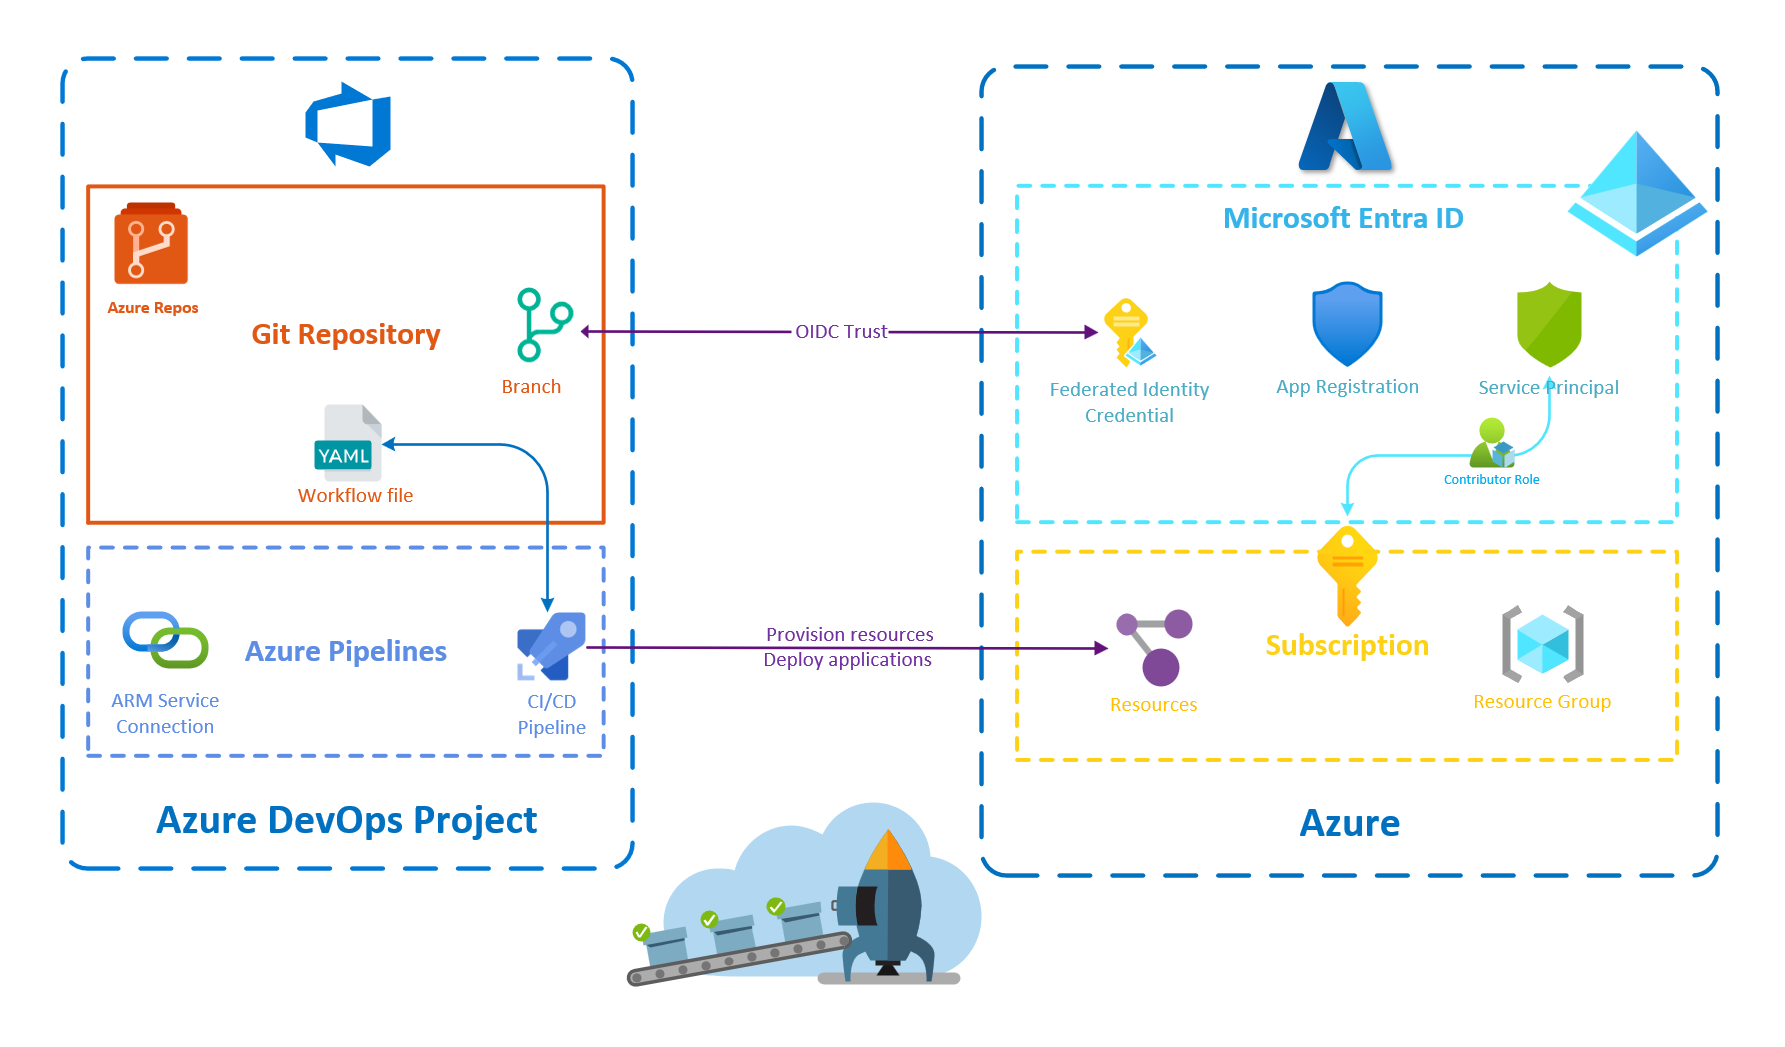
Here is the complete solution to implement:

Automate the Configuration of Workload Identity Federation in Azure DevOps
Create the Pulumi .NET Project
Let's start by scaffolding a new Pulumi project using .NET:
pulumi new csharp -n AzureDevOpsWorkloadIdentity -s dev -d "A program to set up an Azure-Ready Azure DevOps repository"This command creates a new pulumi project and stack from the csharp template:
- The name of the project, "AzureDevOpsWorkloadIdentity," is specified using the
-noption. - The description of the project, "A program to set up an Azure-Ready Azure DevOps repository," is specified using the
-doption. - The stack of the project "dev" is specified using the
-soption.
This project will need three different providers:
- The Azure Native provider
- The Azure Active Directory provider (provider for Microsoft Entra ID)
- The Azure DevOps provider
So we can add the following Nuget packages to our project:
Create the Azure DevOps Project
First, we must select the Azure DevOps organization where we wish to create a project and set its URL in our Pulumi configuration.
pulumi config set azuredevops:orgServiceUrl XXXXXXXXXXXXXX --secretSecond, we need to supply the necessary Azure DevOps credentials. For that, we can create a personal access token and add it to our Pulumi configuration.
pulumi config set azuredevops:personalAccessToken YYYYYYYYYYYYYY --secretI followed the documentation, but to be honest, I don't think it's necessary to include the --secret option for the organization URL as it's not really a sensitive value that needs to be encrypted. However, it's mandatory to include it for the access token so that we can safely commit the configuration files without creating security risks.
Third, we can create the DevOps project:
var project = new Project("AzureReadyADOProject", new()
{
	Description = "New project with everything correctly configured to provision Azure resources or deploy applications to Azure",    Features = new()    {        ["boards"] = "disabled",        ["repositories"] = "enabled",        ["pipelines"] = "enabled",        ["testplans"] = "disabled",        ["artifacts"] = "disabled"    },
});
I intentionally disabled Azure Boards, Azure Test Plans, and Azure Artifacts, as we only need Azure Repos and Azure Pipelines for this demo. Still, you can enable what you need for your projects.
By default, when we create an Azure DevOps project, a Git repository is created for us with the same name as the project. This repository can be retrieved using the following code:
var repository = GetGitRepository.Invoke(new()
{
	ProjectId = project.Id,
	Name = project.Name
});
We can also choose to create a new Git repository like this:
var repository = new Git("AzureReadyADORepository", new()
{
	ProjectId = project.Id,
	Initialization = new GitInitializationArgs()
    {
    	InitType = "Clean",
        SourceType = "Git",
        SourceUrl = "https://repo.com",
        ServiceConnectionId = ""
	},
	DefaultBranch = "refs/heads/main"
});
We should not have to set the SourceType, SourceUrl, and ServiceConnectionId properties as we are initializing a clean Git repository, not importing one. Still, it's a workaround because of this issue on the provider.
Configure the ARM Service Connection in Azure DevOps
In the Azure DevOps provider, the Azure Resource Manager service connection is called a ServiceEndpointAzureRM. We can create such a resource like this:
var serviceConnection = new ServiceEndpointAzureRM("AzureServiceConnection", new()
{
  ProjectId = project.Id,
  ServiceEndpointName = "azure-with-oidc",
  ServiceEndpointAuthenticationScheme = "WorkloadIdentityFederation",
  AzurermSpnTenantid = tenantId,
  AzurermSubscriptionId = subscriptionId,
  AzurermSubscriptionName = subscriptionName,
  Credentials = new ServiceEndpointAzureRMCredentialsArgs()
  {
    Serviceprincipalid = servicePrincipal.ApplicationId,
  }
});
Do not worry about the service principal; we will see in the next section how to create it. The tenant and the subscription identifiers can be retrieved from the current configuration of the Azure Native provider (using the GetClientConfig.Invoke function):
var azureConfig = GetClientConfig.Invoke();
var tenantId = azureConfig.Apply(c => c.tenantId);
var subscriptionId = azureConfig.Apply(c => c.SubscriptionId);
For the subscription name, it's more complicated as we don't have it, and no easy way to retrieve it. To be frank, I think having to provide the subscription name while we already provide the subscription identifier is completely useless, but that's how the Azure DevOps provider works.
The Azure Classic provider offers a function to get a subscription by its identifier, but it's not available in the Azure Native provider. I don't want to add the Azure Classic provider to my project solely for this purpose. However, it's not a big deal as it allows us to experience one of the advantages of using Pulumi: when something is not available, you can just implement it or use any library that can help you, such as the Azure SDK in this case.
var subscriptionName = subscriptionId.Apply(s =>
{    var armClient = new ArmClient(new DefaultAzureCredential());    var subscription = armClient.GetSubscriptionResource(new ResourceIdentifier($"/subscriptions/{s}")).Get();    return subscription.Value.Data.DisplayName;
});
Set Up the Necessary Microsoft Entra ID Resources
We need to set up the following resources in Microsoft Entra ID:
- An Application that represents the Azure DevOps service connection identity.
- A Service Principal (related to the application above) that has the contributor role on the Azure subscription.
- Credentials for the CI/CD pipeline to authenticate to Azure on behalf of this Microsoft Entra ID application.
Let's take care of the first two points:
var azureConfig = GetClientConfig.Invoke();
var aadApplication = new Application("ADOAzureReadyApp", new()
{    DisplayName = "ADO Azure Ready App"
});
var servicePrincipal  = new ServicePrincipal("AzureReadyServicePrincipal", new()
{    ApplicationId = aadApplication.ApplicationId,
});

var subscriptionId = azureConfig.Apply(c => c.SubscriptionId);
new RoleAssignment("contributor", new()
{    PrincipalId= servicePrincipal.Id,    PrincipalType= PrincipalType.ServicePrincipal,    RoleDefinitionId = AzureBuiltInRoles.Contributor,    Scope = Output.Format($"/subscriptions/{subscriptionId}")
});
It's worth mentioning that using an Application and its associated Service Principal is not the only way to proceed, we could have created instead a User Assigned Identity.
Now that everything is created, we can create the Federated identity credentials:
new ApplicationFederatedIdentityCredential("ADOAzureReadyAppFederatedIdentityCredential", new() {    ApplicationObjectId = aadApplication.ObjectId,    DisplayName = "AzureReadyDeploys",    Description = "Deployments for azure-ready-repository",    Audiences = new(){"api://AzureADTokenExchange" },    Issuer = serviceConnection.WorkloadIdentityFederationIssuer,    Subject = Output.Format($"sc://{organisationName}/{project.Name}/{serviceConnection.ServiceEndpointName}")
});
You can observe that the federation subject adheres to a particular format (sc://<org>/<project>/<service connection name>), which identifies the service connection authorized for authentication with Azure.
Create the Deployment Pipeline
We have completed the configuration of an ARM Service Connection that employs Workload Identity Federation for authentication with Azure. While we could stop at this point, it would be nice to automate the creation of a pipeline that utilizes this service connection and seize the opportunity to ensure everything works properly.
For this purpose, I have written a very simple YAML pipeline that runs the AzureCLI task to show information about the Azure subscription associated with the previously created service connection.
trigger:
  - main

pool:
  vmImage: ubuntu-latest

steps:
  - task: AzureCLI@2
    inputs:
      azureSubscription: 'azure-with-oidc'
      scriptType: 'pscore'
      scriptLocation: 'inlineScript'
      inlineScript: 'az account show --query id -o tsv'
We can add this file in the Git repository:
var pipelineFile = new GitRepositoryFile("AzurePipeline", new()
{
    File = "azure-pipelines.yaml",
    RepositoryId = repository.Apply(r => r.Id),
    CommitMessage = "Add preconfigured pipeline file",
    Content = File.ReadAllText("azure-pipelines.yml"),
    Branch = "refs/heads/main"
});
Now, we have to create the pipeline itself:
var pipeline = new BuildDefinition("deployToAzure", new()
{
    ProjectId = project.Id,
    Repository = new BuildDefinitionRepositoryArgs()
    {
        RepoId = repository.Apply(r => r.Id),
        BranchName = "refs/heads/main",
        YmlPath = pipelineFile.File,
        RepoType = "TfsGit"
    }
});
To complete the automation process, we can authorize the pipeline to utilize the service connection, eliminating the need for manual intervention through the portal:
new PipelineAuthorization("azureOidcPipelineAuthorization", new()
{
  ProjectId = project.Id,
  Type = "endpoint",
  PipelineId = pipeline.Id.Apply(int.Parse),
  ResourceId = serviceConnection.Id
});
The last thing we can do is create a stack output to expose the URL of the created pipeline:
return new Dictionary<string, object?>
{
	["pipelineUrl"] = Output.Format($"{organizationUrl}{project.Name}/_build?definitionId={pipeline.Id}")
};
Now, we can execute the pulumi up command to provision all these resources and then open the pipeline page in our browser to test the pipeline.
On Windows, you can use the start $(pulumi stack output pipelineUrl) command to directly open the browser on the pipeline page. If you are using Nushell, the command will be pulumi stack output pipelineUrl | start $in
Everything is working as expected.
To Conclude
In this article, we demonstrated how to automate the configuration of an Azure DevOps project using Workload Identity Federation for secure deployments to Azure. We covered the provisioning of the Microsoft Entra ID and Azure DevOps resources necessary to make this work. It's very similar to what can be done for GitHub but with the specificities of Azure DevOps.
It was an opportunity for me to work with the Azure DevOps provider. Even if it does the job, I must admit I was somewhat disappointed with the developer experience, which I found to be not very intuitive, with poorly named resources and an overreliance on strings as parameters. I assume that the Azure DevOps APIs are primarily responsible for this, as they are what the provider calls upon.
One thing I find interesting with Azure DevOps is that YAML pipelines do not need to be updated to take advantage of workload identity federation as long as the Azure Pipelines tasks you are using support it and your ARM service connection has been converted to workload identity federation.
Anyway, regardless of the CI/CD platform you are using, I believe that employing Workload Identity Federation to deploy code to Azure from pipelines is the right approach.
Published at DZone with permission of Alexandre Nedelec. See the original article here.
Opinions expressed by DZone contributors are their own.

Comments