Deploy to WildFly and Docker From IntelliJ Using Management API
When you are new to both Docker and IntelliJ how do you deploy your Java EE applications? Steve Favez shows you how.
Join the DZone community and get the full member experience.
Join For FreeAs a new Docker and IntelliJ user, I was looking for some tips on how to deploy an application from my IDE to a running wildfly docker container. Searching the web returned me some tech tips, but only based on Eclipse/JBoss tools.
So, I decided to share a quick summary of how to deploy a Java EE 7 application to WildFly and Docker from Intellij(2016), using the WildFly management API.
This JBoss tools tutorial (Part 1 and Part 2 ) was really helpful .
Customizing the jboss/wildfly image
This tutorial is based on the official jboss/wildfly docker image.
In order to access wildfy management API remotely (that’s the case with Docker), you’ll need to customize jboss/wildfly image to expose management port outside of the container. So, let’s create a new Dockerfile.
FROM jboss/wildfly:latest
USER jboss  RUN /opt/jboss/wildfly/bin/add-user.sh admin Jboss@admin01 --silent
CMD ["/opt/jboss/wildfly/bin/standalone.sh", "-b", "0.0.0.0", "-bmanagement", "0.0.0.0", "--debug"]
As you can see, we’re extending jboss/wildfly image (latest version – so, wildfly 10 now), sudo to user « jboss » (the one used to execute wildfly process in the dock), add a new management user using « add-user.sh » in silent mode (user is admin, with password Jboss@admin01) and change the default command exposing management port to the outside world and starting in debug mode.
Building Your New jboss/wildfly image
Right now, you need to build your new Docker image, using docker build. You can have named it as you want. For this tutorial, let’s name it «jboss/wildfly-dev»
This can be done using the following command in the directory containing your new Dockerfile (don’t forget the «.» in the end):
docker build /wildfly-dev .Running Your New jboss/wildfly-dev Image
After a successful build, you’re now ready to run your new image, by executing the following command:
docker run -it -p 8080:8080 -p 9990:9990 -p 8787:8787 jboss/wildfly-devThis will run in interactive mode your new container, exposing port 8080 for your application, 9990 for the management api and 8787 for remote debugging.
Type the following URL in your favorite browser to ensure your wildfly is properly started: http://192.168.99.100:8080
You can also check that your «admin» user exists by typing: http://192.168.99.100:9990
ATTENTION: please, check your docker IP address using the following command if you’re using docker-machine:
docker-machine envCreate a Sample Web Project in IntelliJ
In order to test hot swap, let’s create a simple restful web service (yes, yet another «hello world» restful project in your life).
You can find the pom.xml and the two java classes on github. The restful service implementation is trivial – it’s just an http GET logging and returning a hello world message:
package org.docker.demo;
import org.slf4j.Logger;
import org.slf4j.LoggerFactory;
import javax.ws.rs.GET;
import javax.ws.rs.Path;
import javax.ws.rs.Produces;
/**   * Created by Steve Favez on 14.04.2016.
* Yet another Hello world restfull service implementation. Just a "GET" returning a plain hello world message.   *
*/
@Path("/sayhello")  public class YahwRs {
  private final static Logger LOGGER = LoggerFactory.getLogger(YahwRs.class) ;

  // The Java method will process HTTP GET requests
  @GET  // The Java method will produce content identified by the MIME Media type "text/plain"
  @Produces("text/plain")
  public String sayHelloWorldPlease() {
    final String yahwMessage = "Hello world from a restful service deployed in wildfy, in docker and eventually, in  virtualbox" ;
    LOGGER.info( yahwMessage );
    return yahwMessage ;
  }
}
In your IDE, please run a maven package, in order to generate the corresponding web archive.
Configure a Remote Wildfly Server in IntelliJ
Now, you need to create a new « Run » configuration in your project.
Go to menu « Run -> Edit configurations… ».
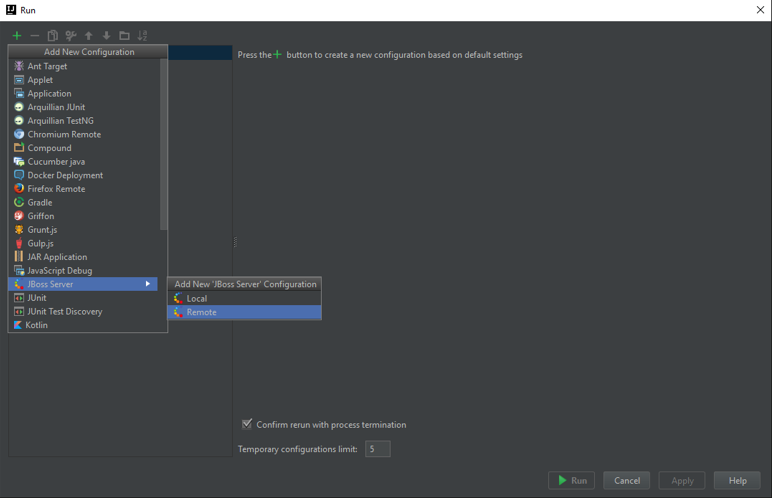
Click the « + » button to create a new one and choose « Jboss Server -> Remote »
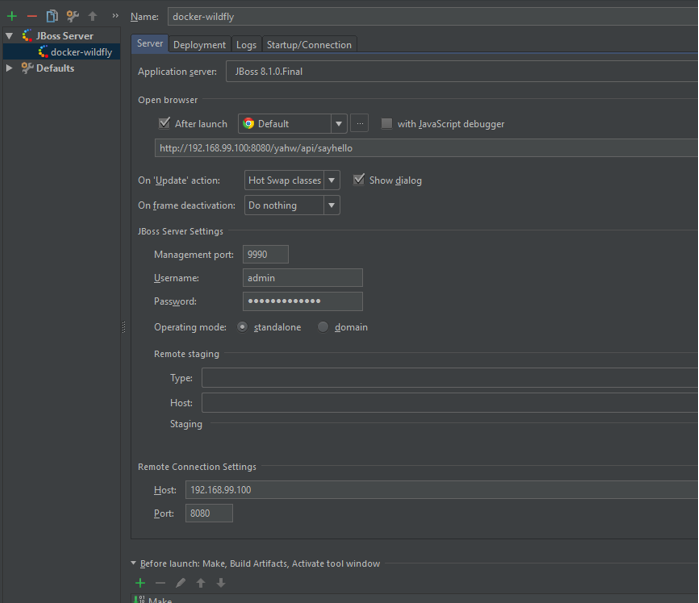
First Tab ( Server )
Choose a name (in our case, « docker-wildfly »)
If not already configured, choose a corresponding local wildfly installation (same version than the one in your docker image)
In Jboss server settings, set the management port to 9990, Username to « admin » and password to « Jboss@admin01»
And, in remote Connecting Host, enter the IP of your docker container (see docker-machine env)
Second Tab (Deployment)
Click on the «+» to add an «Artifact», and choose «yahw.war»
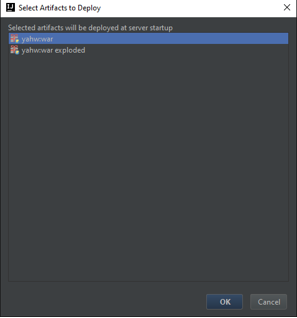
On the right, change «Deployment method» to «Native»

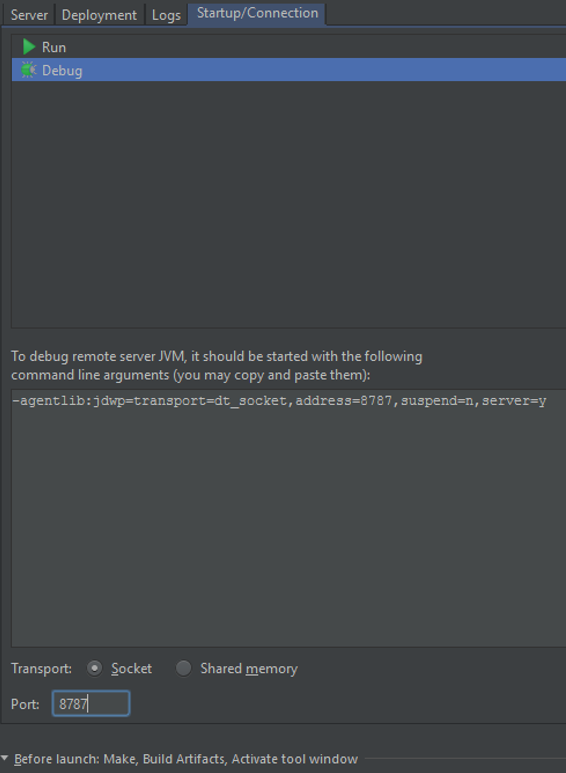
Last Tab (Startup/Connection)
Click on « debug » and change the default debug port to 8787.
Debug your project
Here we’re. Now we can deploy our project on our docker/wildfly instance.
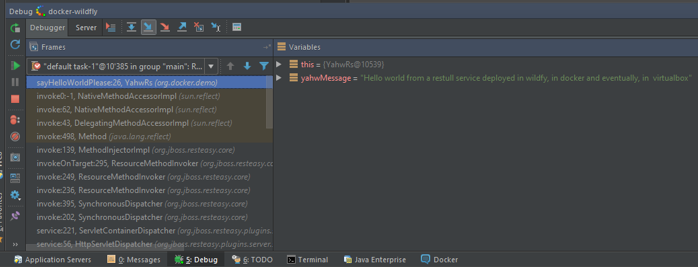
Let’s start by adding a debug breakpoint in our web service (on logging for example), and then choose your new « docker-wildfly » run configuration and click on the « debug » button.

After a short time, you’ll see a successful deployment, your browser will open a new tab and, if the URL is correct, Intellij will stop on the breakpoint in your web service.
Perform Hot Swap
Now, let’s perform some Hot Swap.
For example, change the hello world message in your restful web service.
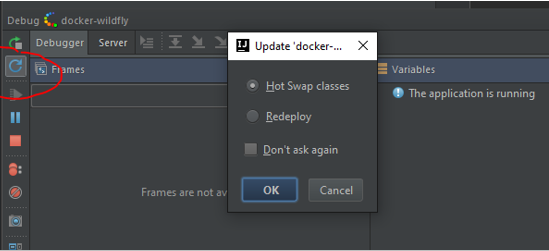
Hot Swap will allow you to push your new implementation to the running server without having to perform a new deployment.
So, click on the «update», it will ask you the action to take, choose hot swap, and, here you’re.
Conclusion
As you can see, it’s really easy to use a Wildfly Docker container to develop your JEE 7 application with IntellliJ. Using Docker is really useful when your team has to switch frequently of project, requiring heavy WildFly configuration (datasources, jms and so on). Using Docker, a developer can be ready to work on a project really quickly, sharing not only the source code, but also the JEE infrastructure with the team.
Links
Source code can be found on github : https://github.com/stevefavez/docker-labs
Opinions expressed by DZone contributors are their own.

Comments