Dependency Injection and Ways to Inject It Using .NET Core API
In this article, readers will use a tutorial to learn about dependency injections and how to inject them using .NET Core API, including code and visuals.
Join the DZone community and get the full member experience.
Join For FreeIn this article, we are going to discuss dependency injection and its usage and benefits. We will also discuss different ways to implement dependency injection.
Prerequisites
- Basic understanding of the C# programming language.
- Understanding of Object-Oriented programming.
- Basic understanding of .NET Core.
Purpose of the Dependency Injection Design Pattern
In simple words, dependency means the object depends on another object to do some work. Using dependency injection, we can write loosely coupled classes and, because of that, our current functionality of one class does not directly depend on another class because we can easily maintain, change, and unit test code properly. It also takes care of the open-closed principle. Using abstraction and interface, we can make some future changes easily without modifying existing functionality.
Dependency Injection
Dependency injection is used to inject the object of the class into another class, it also uses Inversion of Control to create an object outside the class and uses that object in different ways, like using service container, which .NET Core provides.
Now, we are looking at the problem we will face without using a dependency injection.
Suppose we have a class car, and that depends on the BMW class:
public class Car
{
    private BMW _bmw;
    public Car()
    {
        _bmw = new BMW();
    }
}
public class BMW
{
    public BMW()
    {
    }
}
Here, in this example class, Car depends on the BMW class, and because they are tightly coupled, we need to create an object of the BMW class each time.
In the future, suppose we want to add some parameters to the BMW class constructor, like the model name, as shown in the below example:
public class Car
{
    private BMW _bmw;
    public Car()
    {
        _bmw = new BMW("BMW X1");
    }
}
public class BMW
{
    public BMW(string ModelName)
    {
    }
}
So, in this case, we need to add the Model Name parameter into the Car class, and again, we need to change the constructor and pass the parameter. This is not a good practice in software development, and because of that, there is a hard dependency created. Lastly, when our application is large, it’s hard to maintain.
These are the challenges we face while implementing functionality without dependency injection.
Uses of Dependency Injection in .NET Core
.NET Core provides a mechanism like an IOC container that will respond to take care of the following things:
- The registration of services with the type and class in a container, which enables us to inject the services as per our need.
- The IOC container also resolves the dependencies of classes of the required class.
- It also manages the lifetime of the object.
Registering Lifetime of Services in a Startup Class
Scope
- It will create a single instance per scope.
- It will create instances of every request.
Singleton
- It will create only a single instance per request and be used throughout the application.
- It also shared that same instance throughout the application.
Transient
- It will make a new instance each time and not share the instance with other applications.
- It is used for small and lightweight applications.
Now, we are going to create a .NET Core product application using the dependency injection one by one:
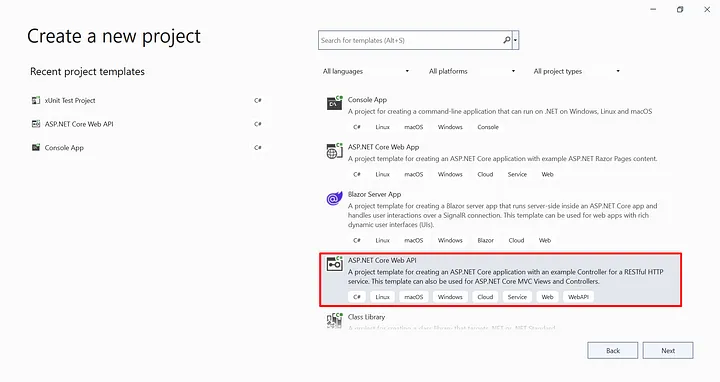
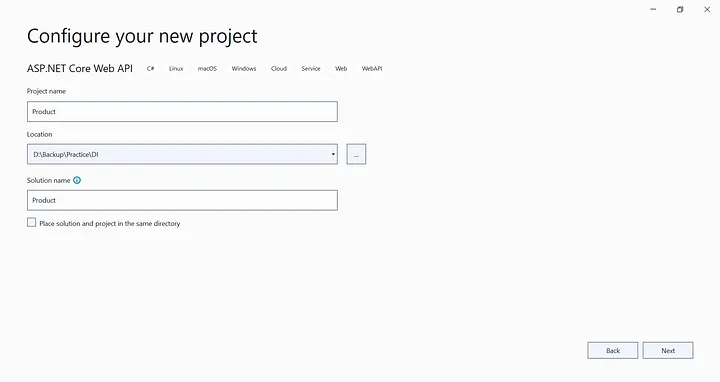
Next, configure the project:
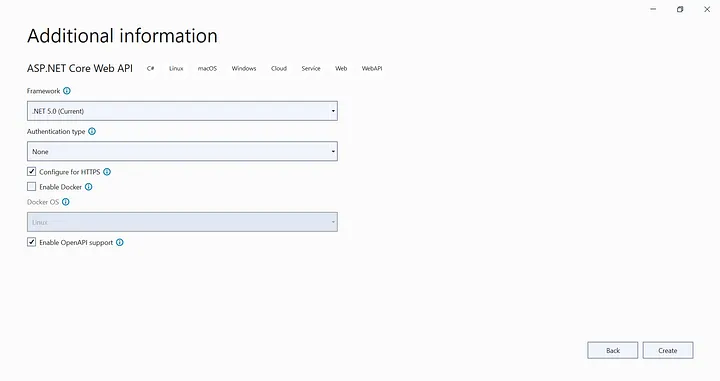
Provide additional information like .NET Version and other configuration:
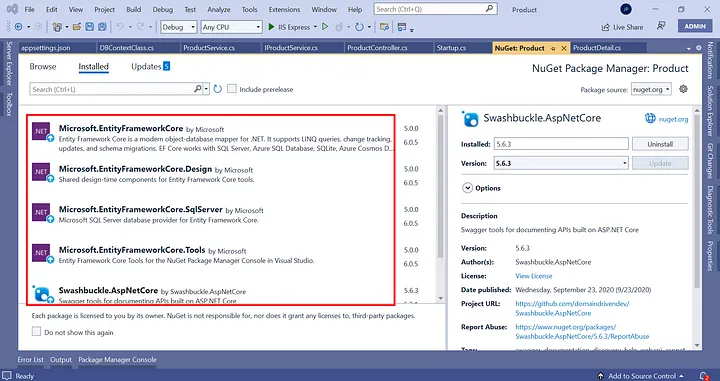
Then, install the following NuGet packages, which we need for Swagger, SQL Server, Migration, and Database Update:
Microsoft.EntityFrameworkCoreMicrosoft.EntityFrameworkCore.DesignMicrosoft.EntityFrameworkCore.SqlServerMicrosoft.EntityFrameworkCore.ToolsSwashbuckle.AspNetCore
Add the database connection string of the SQL server in the appsetting.json file:
using System.ComponentModel.DataAnnotations;
namespace Product.Model
{
    public class ProductDetail
    {
        [Key]
        public int Id { get; set; }
        public string Name { get; set; }
        public int Cost { get; set; }
        public int NoOfStock { get; set; }
    }
}
Later on, create the DBContextClass for the database-related operation of the entity framework:
using Microsoft.EntityFrameworkCore;
using Product.Model;
namespace Product.Data
{
    public class DBContextClass : DbContext
    {
        public DBContextClass(DbContextOptions<DBContextClass> options) : base(options)
        {
        }
        public DbSet<ProductDetail> Products { get; set; }
    }
}
Add the database connection string of the SQL server in the appsetting.json file:
{
  "Logging": {
    "LogLevel": {
      "Default": "Information",
      "Microsoft": "Warning",
      "Microsoft.Hosting.Lifetime": "Information"
    }
  },
  "AllowedHosts": "*",
  "ConnectionStrings": {
    "DefaultConnection": "Data Source=ServerName;Initial Catalog=ProductData;User Id=Test;Password=database@123;"
  }
}
Create the ProductService and the IProductService classes inside the “Service Folder” for data manipulation using the dependency injection:
using Product.Model;
using System.Collections.Generic;
namespace Product.Service
{
    public interface IProductService
    {
        ProductDetail AddProduct(ProductDetail employee);
        List<ProductDetail> GetProducts();
        void UpdateProduct(ProductDetail employee);
        void DeleteProduct(int Id);
        ProductDetail GetProduct(int Id);
    }
}
Now, create the ProductService class:
using Product.Data;
using Product.Model;
using System.Collections.Generic;
using System.Linq;
namespace Product.Service
{
    public class ProductService : IProductService
    {
        private readonly DBContextClass _context;
public ProductService(DBContextClass context)
        {
            _context = context;
        }
        public ProductDetail AddProduct(ProductDetail product)
        {
            _context.Products.Add(product);
            _context.SaveChanges();
            return product;
        }
public void DeleteProduct(int Id)
        {
            var product = _context.Products.FirstOrDefault(x => x.Id == Id);
            if (product != null)
            {
                _context.Remove(product);
                _context.SaveChanges();
            }
        }
public ProductDetail GetProduct(int Id)
        {
            return _context.Products.FirstOrDefault(x => x.Id == Id);
        }
public List<ProductDetail> GetProducts()
        {
            return _context.Products.OrderBy(a => a.Name).ToList();
        }
public void UpdateProduct(ProductDetail product)
        {
            _context.Products.Update(product);
            _context.SaveChanges();
        }
    }
}
After this, create a product controller, and inside that, you can see that we inject the product service into the constructor easily without being tightly coupled. It helps extend the functionality of the product without modifying the existing functionality:
using Microsoft.AspNetCore.Mvc;
using Product.Model;
using Product.Service;
using System.Collections.Generic;
namespace Product.Controllers
{
    [Route("api/[controller]")]
    [ApiController]
    public class ProductController : ControllerBase
    {
        private readonly IProductService productService;
        public ProductController(IProductService _productService)
        {
            productService = _productService;
        }
        [HttpGet]
        [Route("api/Product/GetProducts")]
        public IEnumerable<ProductDetail> GetProducts()
        {
            return productService.GetProducts();
        }
        [HttpPost]
        [Route("api/Product/AddProduct")]
        public IActionResult AddProduct(ProductDetail product)
        {
            productService.AddProduct(product);
            return Ok();
        }
        [HttpPut]
        [Route("api/Product/UpdateProduct")]
        public IActionResult UpdateProduct(ProductDetail product)
        {
            productService.UpdateProduct(product);
            return Ok();
        }
        [HttpDelete]
        [Route("api/Product/DeleteProduct")]
        public IActionResult DeleteProduct(int id)
        {
            var existingProduct = productService.GetProduct(id);
            if (existingProduct != null)
            {
                productService.DeleteProduct(existingProduct.Id);
                return Ok();
            }
            return NotFound($"Product Not Found with ID : {existingProduct.Id}");
        }
        [HttpGet]
        [Route("GetProduct")]
        public ProductDetail GetProduct(int id)
        {
            return productService.GetProduct(id);
        }
    }
}
Finally, register the service inside the “Configure Services” method, add the DB provider, and configure the database connection string, which we put in the app settings:
using Microsoft.AspNetCore.Builder;
using Microsoft.AspNetCore.Hosting;
using Microsoft.EntityFrameworkCore;
using Microsoft.Extensions.Configuration;
using Microsoft.Extensions.DependencyInjection;
using Microsoft.Extensions.Hosting;
using Microsoft.OpenApi.Models;
using Product.Data;
using Product.Service;
namespace Product
{
    public class Startup
    {
        public Startup(IConfiguration configuration)
        {
            Configuration = configuration;
        }
        public IConfiguration Configuration { get; }
        // This method gets called by the runtime. Use this method to add services to the container.
        public void ConfigureServices(IServiceCollection services)
        {
            services.AddControllers();
            //DBContext Configuration
            services.AddDbContext<DBContextClass>(options =>
           options.UseSqlServer(Configuration.GetConnectionString("DefaultConnection")));
            //Register the ProductService for DI purpose
            services.AddScoped<IProductService, ProductService>();
            //enable swagger
            services.AddSwaggerGen(c =>
            {
                c.SwaggerDoc("v1", new OpenApiInfo { Title = "Product", Version = "v1" });
            });
        }
        // This method gets called by the runtime. Use this method to configure the HTTP request pipeline.
        public void Configure(IApplicationBuilder app, IWebHostEnvironment env)
        {
            if (env.IsDevelopment())
            {
                app.UseDeveloperExceptionPage();
                app.UseSwagger();
                app.UseSwaggerUI(c => c.SwaggerEndpoint("/swagger/v1/swagger.json", "Product v1"));
            }
            app.UseHttpsRedirection();
            app.UseRouting();
            app.UseAuthorization();
            app.UseEndpoints(endpoints =>
            {
                endpoints.MapControllers();
            });
        }
    }
}
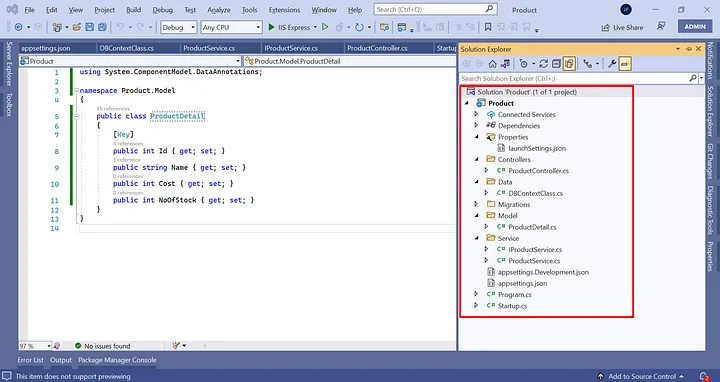
Our project structure looks like the image below:
Finally, we are going to create a database and migrations using the entity framework. For that, open the “Package Manager Console” in the “Visual Studio” and enter the following commands for the migration one by one:
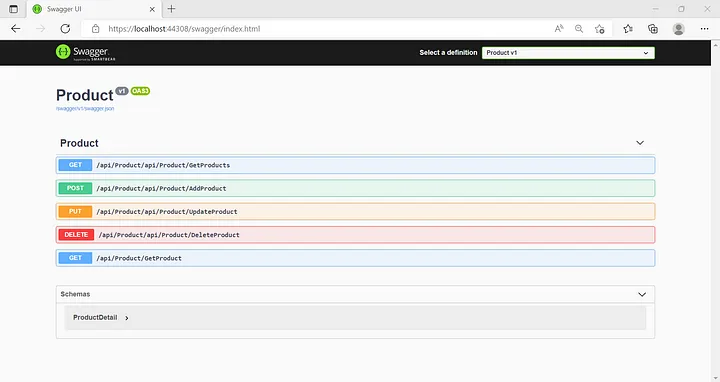
Add-Migration "FirstMigration"database-updateNow, run the product application, open the Swagger dashboard, and use the endpoints:
Methods To Inject the DI Without the Controller Constructor
Method 1
[HttpGet]
[Route("api/Product/GetProducts")]
public IEnumerable<ProductDetail> GetProducts()
{
    //method 1
    var services = this.HttpContext.RequestServices;
    var productService = (IProductService)services.GetService(typeof(IProductService));
    return productService.GetProducts();
}
Method 2
[HttpPost]
[Route("api/Product/AddProduct")]
public IActionResult AddProduct(ProductDetail product)
{
    //Method 2
    var productService =
   (IProductService)this.HttpContext.RequestServices.GetService(typeof(IProductService));
    productService.AddProduct(product);
    return Ok();
}
Method 3
//Method 3
public IActionResult UpdateProduct([FromServices] IProductService productService,
ProductDetail product)
{
    productService.UpdateProduct(product);
    return Ok();
}
Conclusion
In this article, you learned how to inject dependency injections using .NET Core API. I hope you understand. Feel free to comment below and share.
Happy Coding!
Published at DZone with permission of Jaydeep Patil. See the original article here.
Opinions expressed by DZone contributors are their own.

Comments