Insert Volley Using Android Studio
Get started with Volley with Android Studio.
Join the DZone community and get the full member experience.
Join For Free
In this article, we will learn how to perform CRUD in Volley using Android Studio.
Step 1:
Create a new application.
File > New Project > Project Name :Volley > Select SDK > Empty Activity > Finish.
Step 2:
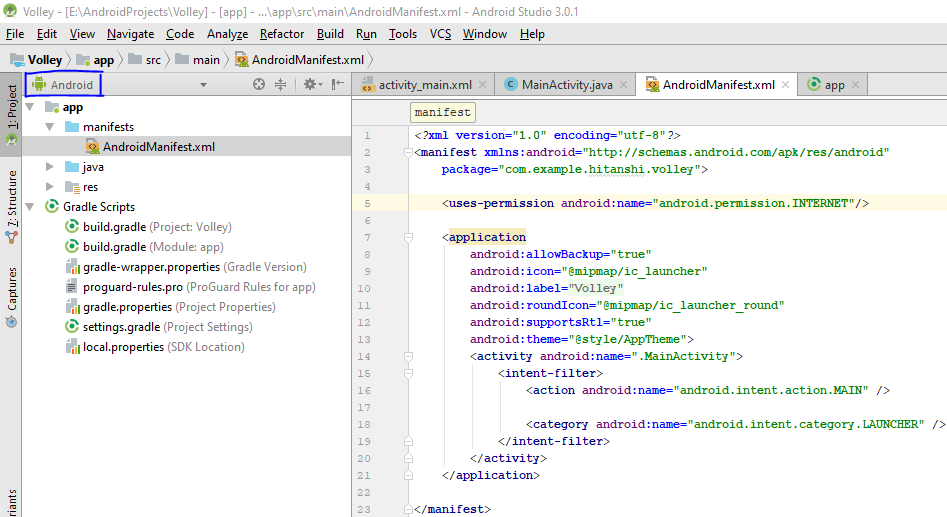
Open AndroidMinfest.xml. (Make sure Android is selected.)

In AndroidMainfest.xml add the following code.
<uses-permission android:name="android.permission.INTERNET"/>Step 3:
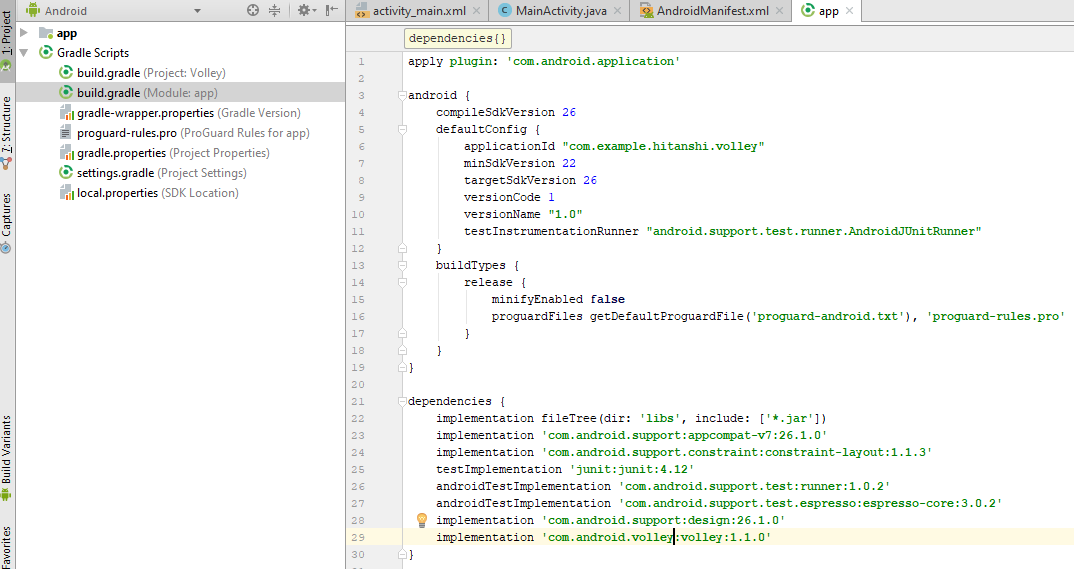
Open Gradle scripts >build.gradle(Module: app).

Add the following two lines in dependencies.
 implementation 'com.android.support:design:26.1.0'
 implementation 'com.android.volley:volley:1.1.0'
Support:design version must match to the compileSdkVersion and targetSdkVersion.
Step 4:
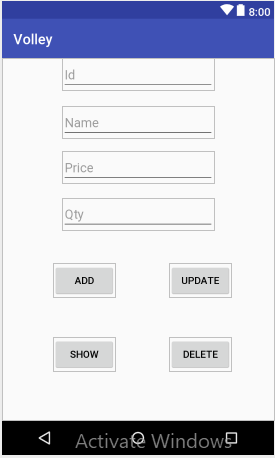
Create a design for CRUD.

Open activity_main.xml.
<?xml version="1.0" encoding="utf-8"?>
<RelativeLayout xmlns:android="http://schemas.android.com/apk/res/android"
    xmlns:app="http://schemas.android.com/apk/res-auto"
    xmlns:tools="http://schemas.android.com/tools"
    android:layout_width="match_parent"
    android:layout_height="match_parent"
    tools:context="com.example.hitanshi.volley.MainActivity">

    <Button
        android:id="@+id/btnAdd"
        android:layout_width="wrap_content"
        android:layout_height="wrap_content"
        android:layout_alignParentBottom="true"
        android:layout_alignParentStart="true"
        android:layout_marginBottom="174dp"
        android:layout_marginStart="72dp"
        android:text="Add" />

    <Button
        android:id="@+id/btnUpdate"
        android:layout_width="wrap_content"
        android:layout_height="wrap_content"
        android:layout_alignParentEnd="true"
        android:layout_alignTop="@+id/btnAdd"
        android:layout_marginEnd="60dp"
        android:text="Update" />

    <Button
        android:id="@+id/btnShow"
        android:layout_width="wrap_content"
        android:layout_height="wrap_content"
        android:layout_alignStart="@+id/btnAdd"
        android:layout_below="@+id/btnUpdate"
        android:layout_marginTop="56dp"
        android:text="Show" />

    <Button
        android:id="@+id/btnDelete"
        android:layout_width="wrap_content"
        android:layout_height="wrap_content"
        android:layout_alignEnd="@+id/btnUpdate"
        android:layout_alignTop="@+id/btnShow"
        android:text="Delete" />

    <EditText
        android:id="@+id/TxtId"
        android:layout_width="wrap_content"
        android:layout_height="wrap_content"
        android:layout_alignParentTop="true"
        android:layout_centerHorizontal="true"
        android:ems="10"
        android:inputType="textPersonName"
        android:hint="Id" />

    <EditText
        android:id="@+id/TxtName"
        android:layout_width="wrap_content"
        android:layout_height="wrap_content"
        android:layout_alignStart="@+id/TxtId"
        android:layout_below="@+id/TxtId"
        android:layout_marginTop="22dp"
        android:ems="10"
        android:inputType="textPersonName"
        android:hint="Name" />

    <EditText
        android:id="@+id/TxtPrice"
        android:layout_width="wrap_content"
        android:layout_height="wrap_content"
        android:layout_alignStart="@+id/TxtName"
        android:layout_below="@+id/TxtName"
        android:layout_marginTop="18dp"
        android:ems="10"
        android:inputType="textPersonName"
        android:hint="Price" />

    <EditText
        android:id="@+id/TxtQty"
        android:layout_width="wrap_content"
        android:layout_height="wrap_content"
        android:layout_alignStart="@+id/TxtPrice"
        android:layout_below="@+id/TxtPrice"
        android:layout_marginTop="20dp"
        android:ems="10"
        android:inputType="textPersonName"
        android:hint="Qty" />
</RelativeLayout>
Step 5:
Open MainActivity.java.
public class MainActivity extends AppCompatActivity {

    String server_url_insert="http://192.168.43.196/Volley/insert.php";
    EditText id,name,price,qty;
    Button AddData,UpdateData,ShowData,DeleteData;

    @Override
    protected void onCreate(Bundle savedInstanceState) {
        super.onCreate(savedInstanceState);
        setContentView(R.layout.activity_main);

        id=findViewById(R.id.TxtId);
        name=findViewById(R.id.TxtName);
        price=findViewById(R.id.TxtPrice);
        qty=findViewById(R.id.TxtQty);

        ShowData=findViewById(R.id.btnShow);
        AddData=findViewById(R.id.btnAdd);
        UpdateData=findViewById(R.id.btnUpdate);
        DeleteData=findViewById(R.id.btnDelete);

        AddData.setOnClickListener(new View.OnClickListener() {
            @Override
            public void onClick(View view) {
                    Add();
            }
        });
    }
}
we have connected a component to view by their ID and we have call method Add() on add button click. We need to create one PHP file to handle some logical.
Locate where you have downloaded xampp in your computer > xampp > htdocs > (Create Folder) Volley> Create Php file insert.php.
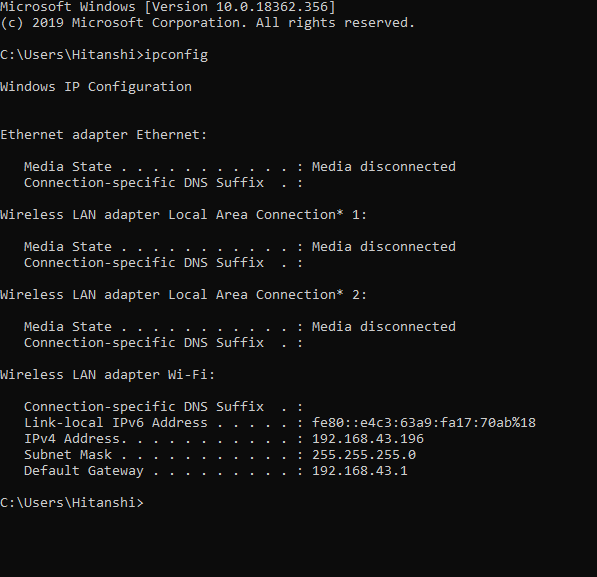
In volley, we access API (PHP file) through the internet so we will need Ipv4 address of localhost. To find out Ipv4 address go to the command prompt:
Enter ipconfig
You will see list of data from that select IPv4 of Wireless LAN adapter Wi-Fi:

To check whether your Ipv4 address is connected to xampp or not go to your browser and enter the IPv4 address. If the xampp dashboard opens, everything is working perfectly.
Now, in code change 192.168.43.196 to your IPv4 address.
Step 6:
private void Add() throws UnsupportedEncodingException {
        String name1= URLEncoder.encode(name.getText().toString(),"UTF8");
        Integer price1=Integer.parseInt(URLEncoder.encode(price.getText().toString(),"UTF8"));
        Integer qty1=Integer.parseInt(URLEncoder.encode(qty.getText().toString(),"UTF8"));

        String url=server_url_insert+ "?pro_name="+name1+"&pro_price="+price1+"&pro_qty="+qty1+"";
        Log.e("URL",url);
    }
In the above method, data of the textbox is stored in encoded form. We will send this encoded data to the PHP file.
Step 7:
Let's create a table in a database.

Step 8:
Open the PHP file. (xampp>htdocs>Volley(Folder name)>insert.php).
<?php
    $response=array();
    $connect=mysqli_connect("localhost","root","1234","volleycrud");

    if(isset($_REQUEST['pro_name']) && isset($_REQUEST['pro_price']) && isset($_REQUEST['pro_qty']) )
    {
        $name=$_REQUEST['pro_name'];
        $price=$_REQUEST['pro_price'];
        $qty=$_REQUEST['pro_qty'];

        $sql=mysqli_query($connect,"insert into Product(name,price,qty) values ('$name','$price','$qty')");
        if($sql)
        {
            $response['success']=1;
            $response['message']="success";
        }
        else
        {
            $response['success']=0;
            $response['message']="Error";

        }
        echo json_encode($response);
    }
?>
First, we have created a connection with a database. After that, we have checked whether textboxes are empty or not. If not, then we have stored them in local variables and write a query. If a query will be successful, we have set a message. At last, we have encoded data in JSON format.
Step 9:
Now again, move to MainActivity.java>Add method.
 private void Add() throws UnsupportedEncodingException {
        String name1= URLEncoder.encode(name.getText().toString(),"UTF8");
        Integer price1=Integer.parseInt(URLEncoder.encode(price.getText().toString(),"UTF8"));
        Integer qty1=Integer.parseInt(URLEncoder.encode(qty.getText().toString(),"UTF8"));

        String url=server_url_insert+ "?pro_name="+name1+"&pro_price="+price1+"&pro_qty="+qty1+"";
        Log.e("URL",url);

        StringRequest stringRequest= new StringRequest(Request.Method.GET, url, new Response.Listener<String>() {
            @Override
            public void onResponse(String response) {
                try {
                    JSONObject jsonObject=new JSONObject(response);
                    Toast.makeText(MainActivity.this,jsonObject.getString("message"),Toast.LENGTH_LONG).show();
                } catch (JSONException e) {
                    e.printStackTrace();
                    Toast.makeText(MainActivity.this,"e"+e.toString(),Toast.LENGTH_LONG).show();
                }

            }
        },
                new Response.ErrorListener() {
                    @Override
                    public void onErrorResponse(VolleyError error) {
                        Toast.makeText(MainActivity.this,"err"+error.toString(),Toast.LENGTH_LONG).show();

                    }
                }
        );
    RequestQueue requestQueue=Volley.newRequestQueue(MainActivity.this);
    requestQueue.add(stringRequest);
    name.setText(" ");
    price.setText(" ");
    qty.setText(" ");

    }
Here we have created a StringRequest object, which will get a response from a specified URL. We have displayed the message using Toast notification. In the end, we have added our stringreques to RequestQueue.
I hope the concept is clear to you. If you have any doubt feel free to ask in the comment section.
Further Reading
Opinions expressed by DZone contributors are their own.

Comments