Creating Procedural Normal Maps for SceneKit
How to create images maps in SceneKit on iOS.
Join the DZone community and get the full member experience.
Join For FreeNormal and bump mapping are techniques used in 3D graphics to fake additional surface detail on an object without adding any additional polygons. Whilst bump mapping uses simple greyscale images (where light areas appear raised) normal mapping, used by SceneKit, requires RGB images where the red, green and blue channels define the displacement along the x, y and z axes respectively.
Core Image includes tools that are ideal candidates to create bump maps: gradients, stripes, noise and my own Voronoi noise are examples. However, they need an additional step to convert them to normal maps for use in SceneKit. Interestingly, Model I/O includes a class that will do this, but we can take a more direct route with a custom Core Image kernel.
The demonstration project for this blog post is SceneKitProceduralNormalMapping.
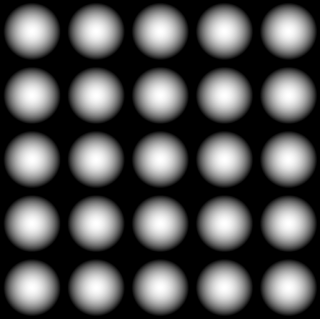
Creating a Source Bump Map
The source bump map is created using a CIGaussianGradient filter which is chained to a CIAffineTile:
let radialFilter = CIFilter(name: "CIGaussianGradient", withInputParameters: [
  kCIInputCenterKey: CIVector(x: 50, y: 50),
  kCIInputRadiusKey : 45,
  "inputColor0": CIColor(red: 1, green: 1, blue: 1),
  "inputColor1": CIColor(red: 0, green: 0, blue: 0)
])

let ciCirclesImage = radialFilter?
  .outputImage?
  .imageByCroppingToRect(CGRect(x:0, y: 0, width: 100, height: 100))
  .imageByApplyingFilter("CIAffineTile", withInputParameters: nil)
  .imageByCroppingToRect(CGRect(x:0, y: 0, width: 500, height: 500))
Creating a Normal Map Filter
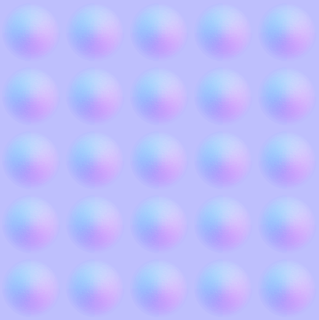
The kernel to convert the bump map to a normal map is fairly simple: for each pixel, the kernel compares the luminance of the pixels to its immediate left and right and, for the red output pixel, returns the difference of those two values added to one and divided by two. The same is done for the pixels immediately above and below for the green channel The blue and alpha channels of the output pixel are both set to 1.0:
float lumaAtOffset(sampler source, vec2 origin, vec2 offset) {
  vec3 pixel = sample(source, samplerTransform(source, origin + offset)).rgb;
  float luma = dot(pixel, vec3(0.2126, 0.7152, 0.0722));
  return luma;
}

kernel vec4 normalMap(sampler image) {
  vec2 d = destCoord()
  float northLuma = lumaAtOffset(image, d, vec2(0.0, -1.0));
  float southLuma = lumaAtOffset(image, d, vec2(0.0, 1.0));
  float westLuma = lumaAtOffset(image, d, vec2(-1.0, 0.0));
  float eastLuma = lumaAtOffset(image, d, vec2(1.0, 0.0));
  float horizontalSlope = ((westLuma - eastLuma) + 1.0) * 0.5;
  float verticalSlope = ((northLuma - southLuma) + 1.0) * 0.5;
  return vec4(horizontalSlope, verticalSlope, 1.0, 1.0);
}
Wrapping this up in a Core Image filter and bumping up the contrast returns a normal map:
Implementing the Normal Map
A SceneKit material's normal content can be populated with a CGImage instance, so we can update the code above to chain the tiled radial gradients to the new filter and, should we want to, a further color controls filter to tweak the contrast:
let ciCirclesImage = radialFilter?
  .outputImage?
  .imageByCroppingToRect(CGRect(x:0, y: 0, width: 100, height: 100))
  .imageByApplyingFilter("CIAffineTile", withInputParameters: nil)
  .imageByCroppingToRect(CGRect(x:0, y: 0, width: 500, height: 500))
  .imageByApplyingFilter("NormalMap", withInputParameters: nil)
  .imageByApplyingFilter("CIColorControls", withInputParameters: ["inputContrast": 2.5])

let context = CIContext()
let cgNormalMap = context.createCGImage(
ciCirclesImage!,
fromRect: ciCirclesImage!.extent
)
Then, simply define a material with the normal map:
let material = SCNMaterial()
material.normal.contents = cgNormalMap
Core Image for Swift
All the code to accompany this post os available from my GitHub repository. However, if you'd like to learn more about how to wrap the Core Image Kernel Language code in a Core Image filter or explore the awesome power of custom kernels, may I recommend my book, Core Image for Swift.
Core Image for Swift is available from both Apple's iBooks Store or, as a PDF, from Gumroad. IMHO, the iBooks version is better, especially as it contains video assets which the PDF version doesn't.
Published at DZone with permission of Simon Gladman, DZone MVB. See the original article here.
Opinions expressed by DZone contributors are their own.


Comments