Creating a Docker Overlay Network
If you'd like to learn more about using Docker Swarm, check out this tutorial showing you how to create an overlay network with a single master node.
Join the DZone community and get the full member experience.
Join For FreeSummary
When we get started using Docker, the typical configuration is to create a standalone application on our desktop.
For the most part, it's usually not practical to run all your applications on a single machine and when it's not, you'll need an approach for distributing the applications across many machines. This is where a Docker Swarm comes in.
Docker Swarm provides capabilities for clustering, scalability, discovery, and security, to name a few. In this article, we'll create a basic Swarm configuration and perform some experiments to illustrate discovery and connectivity.
In this demo, we'll create a Swarm overlay cluster that will consist of a Swarm manager and a worker. For convenience, it will be running in AWS.
Architecture
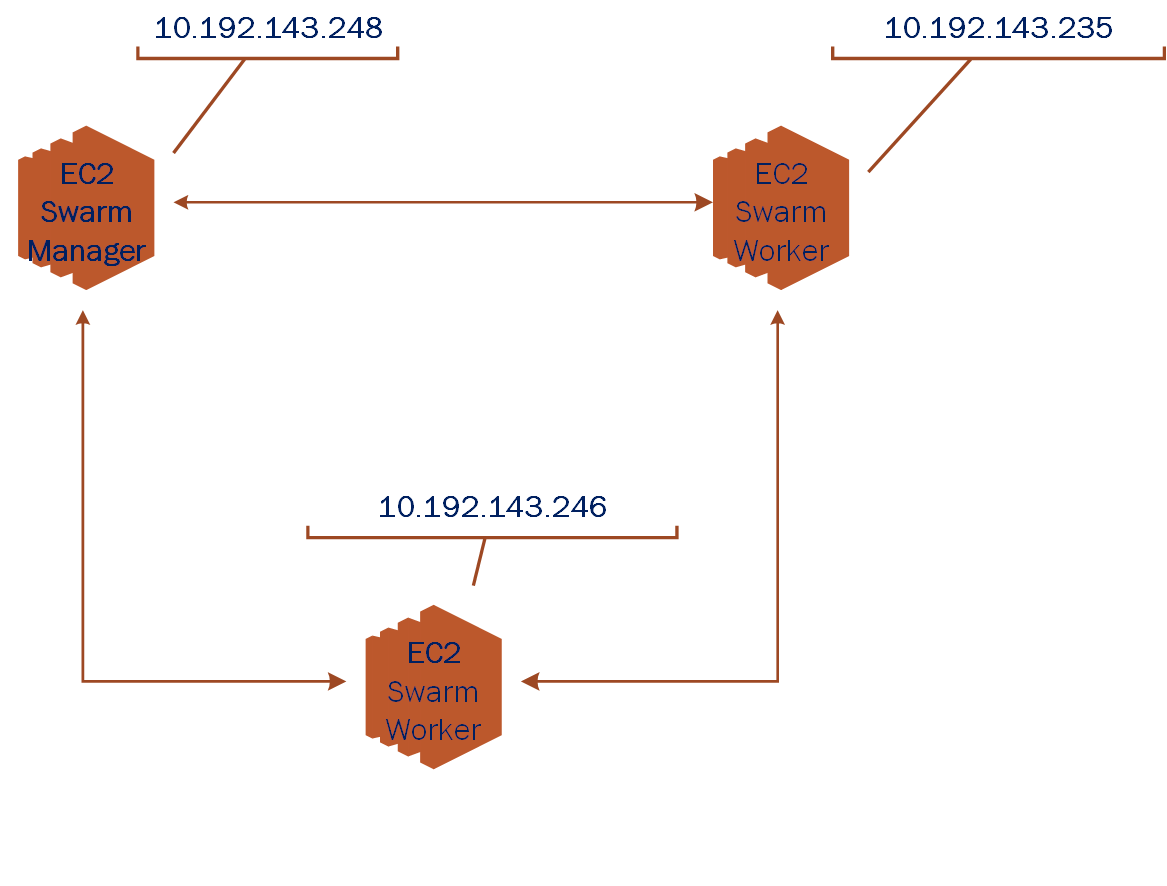
Our target Architecture will consist of a couple of Docker containers running inside AWS AMI images on different EC2 hosts. The purpose of these examples is to demonstrate the concepts of how a Docker swarm can be used to discover services running on different host machines and communicate with one another.

In our hypothetical network above, we depict the interconnections of a Docker swarm manager and a couple of swarm workers. In the examples which follow we'll use a single manager and a single worker to keep complexity and costs low. Keep in mind that your real configurations will likely consist of many swarm workers.
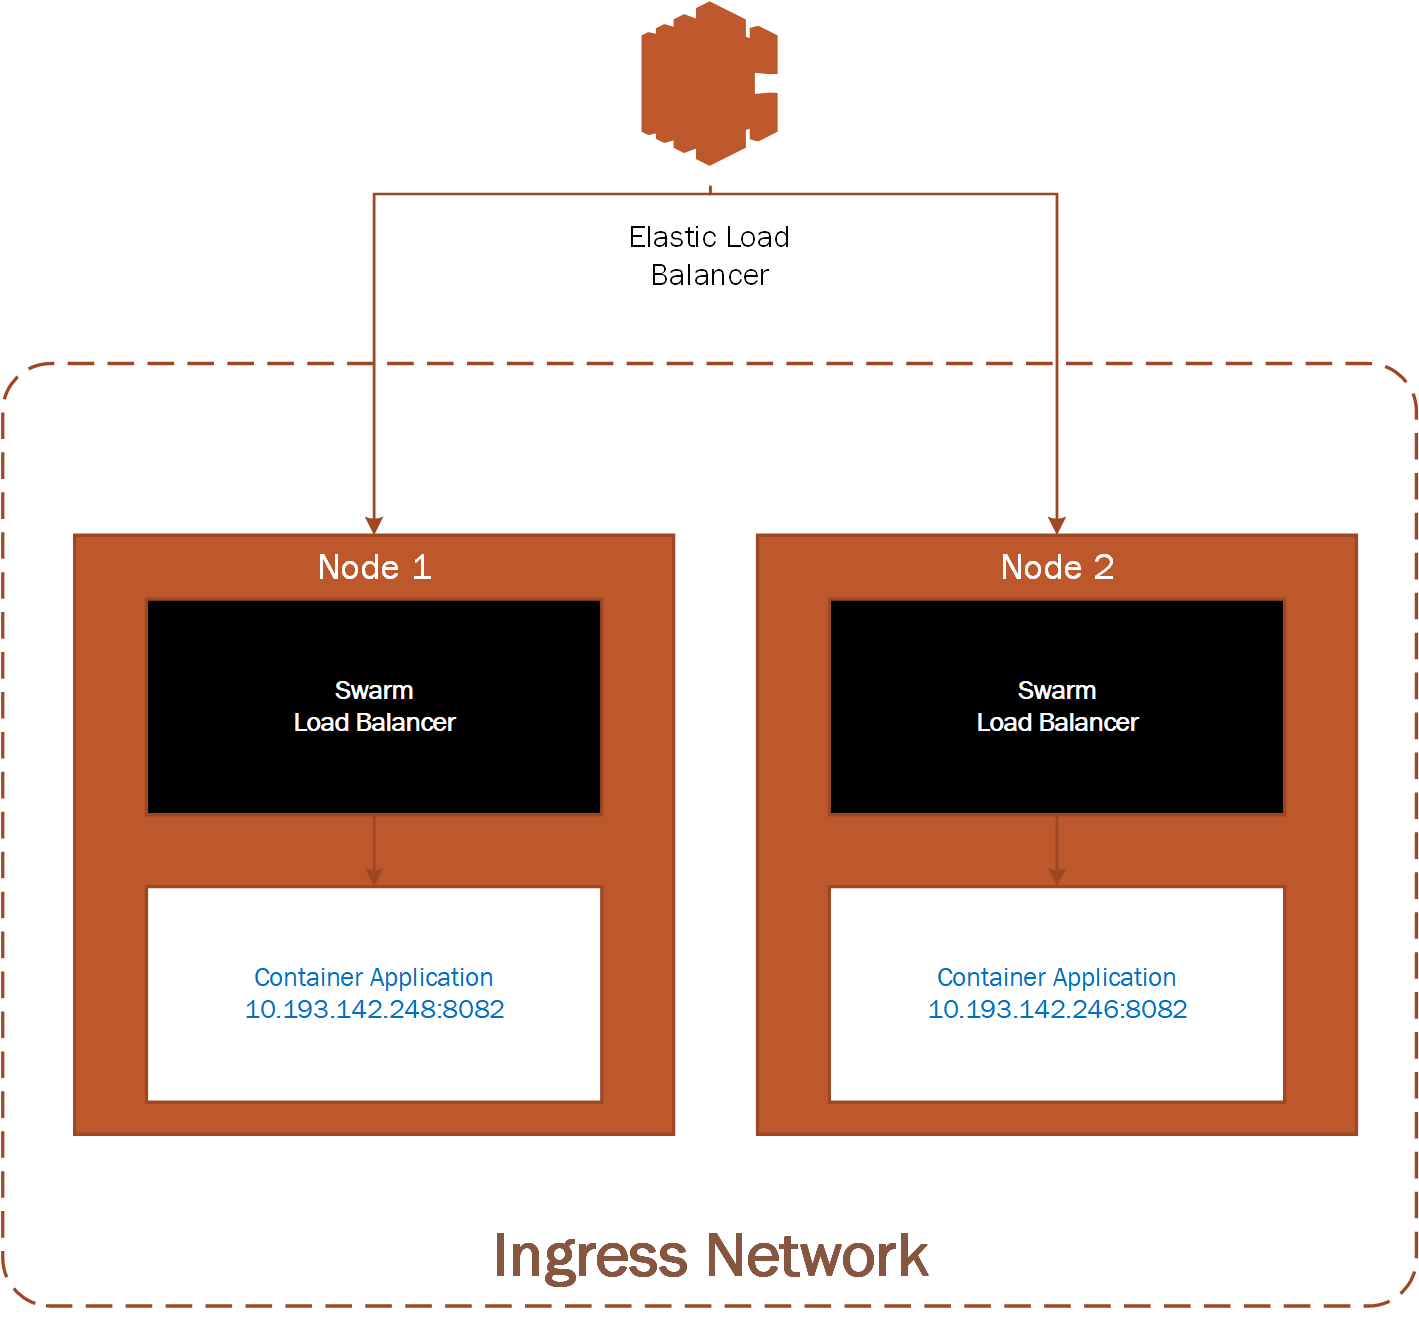
Here's an example of what a potential Use Case may look like. An AWS load balancer configured to distribute load to a Docker swarm running on 2 or more EC2 instances.

We'll show in the examples below how you can create a Docker swarm overlay network that will allow DNS discovery of members and allow members to communicate with one another.
Prerequisites
We assume you're somewhat familiar with Docker and have some familiarity setting up EC2 instances in AWS.
If you're not confident with AWS or would like a little refresher, please review the following articles:
Some AWS services will incur charges, so be sure to stop and/or terminate any services you aren't using. Additionally, consider setting up billing alerts to warn you of charges exceeding a threshold that may cause you concern.
Configuration
Begin by creating two (2) EC2 instances (free tier should be fine), and install Docker on each EC2 instance. Refer to the Docker Supported platforms section for Docker installation guidance and instructions for your instance.
Here are the AWS ports to open to support Docker Swarm and our port connection test:
Open ports in AWS Mule SG
| Type | Protocol |
Port Range |
Source | Description |
Custom TCP Rule |
TCP |
2377 |
10.193.142.0/24 |
Docker swarm management |
Custom TCP Rule |
TCP |
7946 |
10.193.142.0/24 |
Container network discovery |
Custom UDP Rule |
UDP |
4789 |
10.193.142.0/24 |
Container ingress network |
Custom TCP Rule |
TCP |
8083 | 10.193.142.0/24 |
Demo port for machine to machine communications |
For our examples, we'll use the following IP addresses to represent Node 1 and Node2:
- Node 1: 10.193.142.248
- Node 2: 10.193.142.246
Before getting started, let's take a look at the existing Docker networks.
Docker Networks
docker network lsThe output of the network list should look at least like the listing below if you’ve never added a network or initialized a swarm on this Docker daemon. Other networks may be shown as well.
Results of Docker Network Listing:
NETWORK ID |
NAME | DRIVER |
SCOPE |
fa977e47b9f3 |
bridge |
bridge |
local |
705fc078c278 |
host |
host |
local |
bd4caf6c1751 |
none |
null | local |
From Node 1, let's begin by initializing the swarm.
Create the Swarm Master Node
docker swarm init --advertise-addr=10.193.142.248
You should get a response that looks like the one below. We'll use the token provided to join our other node to the swarm.
Results of swarm init
Swarm initialized: current node (v9c2un5lqf7iapnv96uobag00) is now a manager.

To add a worker to this swarm, run the following command:

docker swarm join --token SWMTKN-1-5bbh9ksinfmajdqnsuef7y5ypbwj5d9jazt47urenz3ksuw9lk-227dtheygwbxt8dau8ul791a7 10.193.142.248:2377

To add a manager to this swarm, run 'docker swarm join-token manager' and follow the instructions.
It takes a minute or two for the Root CA Certificate to synchronize through the swarm, so if you get an error, give it a few minutes and try again.
If you happen to misplace the token, you can use the join-tokenargument to list tokens for manager and workers. For example, on Node 1, run the following:
Manager Token for Node 1
docker swarm join-token managerNext, let's join the swarm from Node 2.
Node 2 Joins Swarm
docker swarm join --token SWMTKN-1-5bbh9ksinfmajdqnsuef7y5ypbwj5d9jazt47urenz3ksuw9lk-227dtheygwbxt8dau8ul791a7 10.193.142.248:2377
This node joined a swarm as a worker.
From Node 1, the swarm master, we can now look at the connected nodes
On Master, List All Nodes
docker node lsResults of Listing Nodes
| ID | HOSTNAME | STATUS | AVALIABILITY | ENGINE VERSION |
2quenyegseco1w0e5n1qe58r3 |
ip-10-193-142-248 |
Ready |
Active |
Active 18.03.1-ce |
wrjk02g909c6fnuxlepmksuz4 |
ip-10-193-142-246 |
Ready |
Active |
Active 18.03.1-ce |
Also, notice that an Ingress network has been created, this provides an entry point for our swarm network.
Results of Docker Network Listing
NETWORK ID |
NAME | DRIVER |
SCOPE |
fa977e47b9f3 |
bridge |
bridge |
local |
705fc078c278 |
host |
host |
local |
bd4caf6c1751 |
none |
null | local |
qrppfipdu098 |
ingress |
overlay |
swarm |
Let's go ahead and create our Overlay network for standalone containers.
Overlay Network Creation on Node 1
docker network create --driver=overlay --attachable my-overlay-net

docker network ls
Results of Docker Network Listing
NETWORK ID |
NAME | DRIVER |
SCOPE |
fa977e47b9f3 |
bridge |
bridge |
local |
705fc078c278 |
host |
host |
local |
bd4caf6c1751 |
none |
null | local |
qrppfipdu098 |
ingress |
overlay |
swarm |
vn12jyorp1ey |
my-overlay-net |
overlay |
swarm |
Note the addition of our new overlay network to the swarm. Now we join the overlay network from Node 1.
Run Our Container, Join the Overlay Net
docker run -it --name alpine1 --network my-overlay-net alpineJoin the overlay network from Node 2, we'll open port _8083_ to test connectivity into our running container.
Run Our Container, Join the Overlay Net
docker run -it --name alpine2 -p 8083:8083 --network my-overlay-net alpineVerify Our Overlay Network Connectivity
With our containers running we can test that we can discover our hosts using DNS configured by the swarm. From Node 2, let's ping the Nod 1 container.
Node 2 Pings Node 1, Listens on Port 8083
ip addr # show our ip address
ping -c 2 alpine1

# create listener on 8083
nc -l -p 8083
From Node 1LetsPing the Node 2 Container and Connect toIt'sOpen Listener on Port8083
Node 1 Pings Node 2, Connect to Node 2 Listener on Port 8083
ip addr # show our ip address
ping -c 2 alpine2

# connect to alpine2 listener on 8083
nc alpine2 8083
Hello Alpine2
^C
There you have it, you created a tcp connection from Node 1 to Node 2 and sent a message. Similarly, your services can connect with and exchange data when running in the Docker overlay cluster.
With these fundamental building blocks in place, you're ready to apply these principles to real-world designs.
Cleanup
With our testing complete we can tear down the swarm configuration.
Remove Node 2 Swarm
docker container stop alpine2
docker container rm alpine2

docker swarm leave
Remove Node 1 Swarm
docker container stop alpine1
docker container rm alpine1

docker swarm leave --force
This concludes our brief examples with creating Docker Overlay Networks. With these fundamental building blocks in place, you now have the essential pieces necessary for building larger, more complex Docker container interactions.
Be sure to remove any AWS assets you may have used in these examples so you don't incur any ongoing costs.
I hope you enjoyed reading this article as much as I have enjoyed writing it, I'm looking forward to your feedback!
Opinions expressed by DZone contributors are their own.


Comments