Controlling IoT Cameras With libptp
Learn more about controlling IoT cameras with libptp.
Join the DZone community and get the full member experience.
Join For Free
When capturing light and image data, it's common to connect a small computer or MCU to a camera to process the data and then send a portion of the data to the cloud. I've been working with an online community of developers for a few years to build camera projects using a Raspberry Pi running Raspian or an NVIDIA Jetson running L4T, which is derived from Ubuntu 18.04.
Before I explain how to adapt your project to control a camera with a USB cable, let's check out some 360-camera projects built by my friends in the community. FOX SEWER ROVER by Hugues Perret uses a combination of Wi-Fi data transfer and USB camera control. The robot has a Raspberry Pi onboard.

In the example below, industrial drone manufacturer VTRUS has a RICOH THETA 360 degree camera mounted on an autonomous flying robot.

Other projects have a stationary camera powered by USB from a Raspberry Pi and use PoE to power the Pi. For example, the VirtualForest project below by Professor Koen Hufkens of Harvard University has been operating for years in the remote Harvard Forest as part of a National Science Foundation project.

Advantages of USB Connection
The advantages of connecting a camera with a USB cable instead of Wi-Fi or Bluetooth are:
The USB cable can supply power to the camera indefinitely while it is sending commands
A USB-C connection offers a fast transfer of large images and videos that is more stable than 5Ghz or 2.4Ghz Wi-Fi
You can put a camera to sleep and wake it up through the USB cable
The primary uses of this architecture are:
Land-based drone with wheels
Flying drone
Long-term surveillance including multi-month timelapse
PTP and MTP Transfer Protocols
To control a camera using a USB cable, most people are using Picture Transfer Protocol (PTP) or the extension Media Transfer Protocol (MTP). In addition to transferring pictures and videos, both of these protocols can be used to take pictures and videos.
Using libptp on Linux-Based Boards
On Linux, which is the most common operating system for the Raspberry Pi and NVIDIA Jetson, the most common library to use is libptp. To be honest, this library is old and needs to be compiled from the source to be useful. It's not a plug-and-play solution, but it does work.
Modifying Packet Length
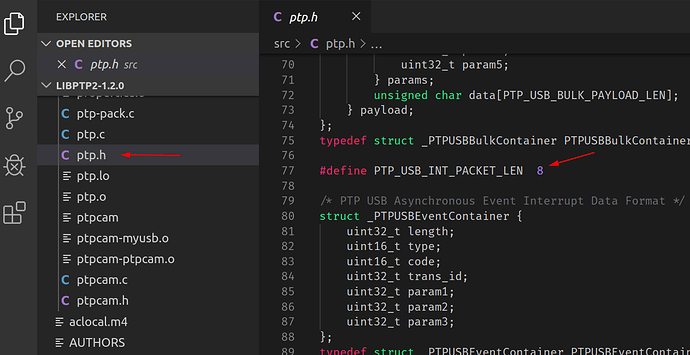
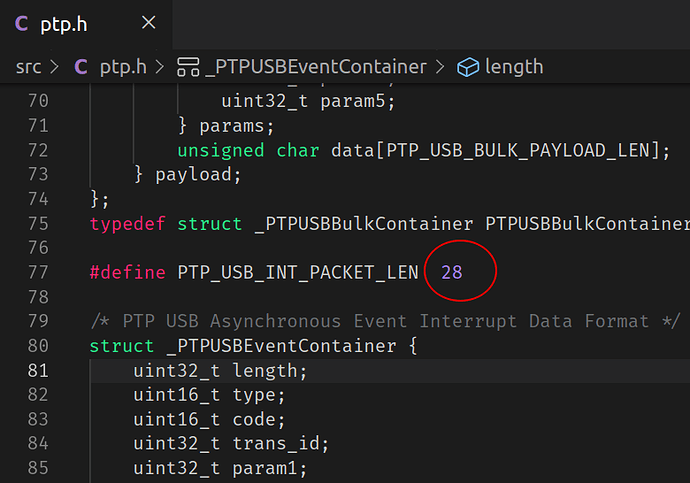
Download the source and modify ptp.h line 77. Set PTP_USB_INT_PACKET to 28.


ptplib Build Walkthrough
I'm using Raspbian Jessie on a Raspberry Pi. Place both libptp2-1.2.0 and libusb-1.0.21 on your RPi in a development directory.
pi@raspberrypi:~/Development$ ls -l
total 992
-rw-r--r-- 1 pi pi 404105 Oct  4 04:11 libptp2-1.2.0.tar.gz
-rw-r--r-- 1 pi pi 607417 Oct  4 04:14 libusb-1.0.21.tar.bz2
pi@raspberrypi:~/Development$

pi@raspberrypi:~/Development$ tar xvf libusb-1.0.21.tar.bz2
libusb-1.0.21/
libusb-1.0.21/aclocal.m4

pi@raspberrypi:~/Development$ cd libusb-1.0.21/
pi@raspberrypi:~/Development/libusb-1.0.21$ ls
aclocal.m4  config.guess  COPYING   install-sh        Makefile.am  PORTING
android     config.h.in   depcomp   libusb            Makefile.in  README
AUTHORS     config.sub    doc       libusb-1.0.pc.in  missing      tests
ChangeLog   configure     examples  ltmain.sh         msvc         TODO
compile     configure.ac  INSTALL   m4                NEWS         Xcode
pi@raspberrypi:~/Development/libusb-1.0.21$
In order to build ptplib, you must first install libusb. The default libusb installed with Raspbian Jessie will not work.
Install libudev-dev and Make libusb
$ sudo apt-get install libudev-dev
Reading package lists... Done
Building dependency tree
Run configure, then make:
$ make
make  all-recursive
make[1]: Entering directory '/home/pi/Development/libusb-1.0.21'
Making all in libusb
make[2]: Entering directory '/home/pi/Development/libusb-1.0.21/libusb'
  CC       libusb_1_0_la-core.lo
  CC       libusb_1_0_la-descriptor.lo
....
make[2]: Leaving directory '/home/pi/Development/libusb-1.0.21/libusb'
Making all in doc
make[2]: Entering directory '/home/pi/Development/libusb-1.0.21/doc'
make[2]: Nothing to be done for 'all'.
make[2]: Leaving directory '/home/pi/Development/libusb-1.0.21/doc'
make[2]: Entering directory '/home/pi/Development/libusb-1.0.21'
make[2]: Leaving directory '/home/pi/Development/libusb-1.0.21'
make[1]: Leaving directory '/home/pi/Development/libusb-1.0.21'
pi@raspberrypi:~/Development/libusb-1.0.21$
Make install.
Add /usr/local/lib to linker path:
$ export LDFLAGS='-L/usr/local/lib/'Install libptp
At this point, you can now extract libptp2, configure, make, and sudo make install.
Using ptpcam
ptpcam is included with libptp. It is a command-line program that you can use inside of bash scripts. Although bash is the most popular scripting language in our camera development community, I personally prefer to use Python as I find the syntax easier to read.
To get started, let's review some basic commands from the shell. I'm first going to export my LD_LIBRARY_PATH environmental variable. I'll then run ptpcam -i to get information on the camera.
root@raspberrypi:/home/pi/Development# export LD_LIBRARY_PATH=$LD_LIBRARY_PATH:/usr/local/lib
root@raspberrypi:/home/pi/Development# ptpcam -i

Camera information
==================
Model: RICOH THETA V
  manufacturer: Ricoh Company, Ltd.
  serial number: '00101082'
  device version: 1.00.2
  extension ID: 0x00000006
  extension description: (null)
  extension version: 0x006e


root@raspberrypi:/home/pi/Development# ptpcam -c

Initiating captue...
Object added 0x400d0004
List Files
root@raspberrypi:/home/pi/Development# ptpcam -L

Listing files...
Camera: RICOH THETA V
Handler:           Size:        Captured:       name:
0x0000002d:      1970120        2017-09-28 12:58        R0010025.JPG
0x0000002e:      2402374        2017-09-28 12:58        R0010026.JPG
0x0000002f:      2136165        2017-09-28 12:58        R0010027.JPG
0x00000030:      2810985        2017-09-28 12:59        R0010028.JPG
0x00000031:     97458043        2017-09-28 21:08        R0010029.MP4
0x00000032:      1064880        2017-10-02 15:31        R0010030.JPG
0x00000033:    722622498        2017-10-02 15:53        R0010031.MP4
0x00000034:    131377941        2017-10-02 15:57        R0010032.MP4
0x00000035:      1040761        2017-10-02 16:02        R0010033.JPG
0x00000039:      1295975        2017-10-03 22:00        R0010034.JPG

root@raspberrypi:/home/pi/Development#
Check on Camera Battery Level
# ptpcam --show-property=0x5001

Camera: RICOH THETA V
'Battery Level' is set to: 70
root@raspberrypi:/home/pi/Development#
At this stage, you're wondering where I got "0x5001" from.
You can get a list of operations with ptpcam -o:

You can see the parameters with ptpcam -p:

You can also look at the API documentation for your specific camera or refer to the Media Transfer Protocol specification. In my case, the camera vendor has a web page with the hex code and commands.
The documentation is pretty simple, but it gets the job done. It's likely that your camera uses the same codes as the codes are a standard for all cameras that comply with the MTP specification. Most of the commands on the vendor site are the same as the commands that are stored in ptpcam.

Change From Still Image to Video
# ptpcam --set-property=0x5013 --val=0x8002

Camera: RICOH THETA V
'Still Capture Mode' is set to: [Normal]
Changing property value to 0x8002 [(null)] succeeded.
root@raspberrypi:/home/pi/Development#
Next Steps
You should be able to get the rest of the commands by using ptpcam help or by consulting the PTP specification. For most people, the difficulty is in installing libptp, not actually using ptpcam or accessing the PTP API.
Using Arduino
It's possible to use Arduino to control some Canon EOS and Powershot cameras as well as Nikon DSLRs and P&S cameras. If you have one of these cameras, check out Oleg Mazurov's PTP_2.0 for Arduino. Unfortunately, this library will not work with the RICOH THETA, and it looks difficult to get it to work with my camera.
Additionally, I want to do more image and video processing on the computer than the Arduino is capable of, and so something like the NVIDIA Jetson is a better platform for me.
Your platform and library will depend on your project requirements.
Additional Tips
As it's likely the person using this technique is building a robot, I'll share a few more lessons I learned from the community.
In the picture below, the 360 camera is wrapped with a 360 LED light strip to provide global illumination. The light strip looks like three yellow stripes.


You will need to stabilize the camera in a flying drone with a gimbal.

If you're live-streaming a 360 video feed from a drone into a VR headset, you'll need to do some research on techniques to reduce latency and use a specialized radio transmitter on the drone.

If you're processing images and video on the Linux computer, the most common libraries are OpenCV and TensorFlow.
Summary
Getting your application to control a camera through a USB cable can be surprisingly tricky for many camera models. The great news is that once the application is running, the commands are easy to use and the connection is stable.
If you figure out the configuration once, you can use it on all your robots and surveillance projects. Although the libptp library on Linux is old and honestly takes a bit of work to configure properly, it's seeing a new surge of popularity due to its increased use in flying and rolling robots that process and then transmit or trigger data to a cloud-based system.
Opinions expressed by DZone contributors are their own.

Comments