Coding and Testing Linux Applications on Windows Using WSL and VS Code
In this article, read about the experience of using Windows Subsystem for Linux along with Visual Studio Code for some basic coding and testing in C++ and Java.
Join the DZone community and get the full member experience.
Join For FreeIn this article, I will share my experience of using Windows Subsystem for Linux along with Visual Studio Code for some basic coding and testing in C++ and Java. While I will be using some of the examples from the Refinitiv Real-time SDKs, the notes below should be applicable to general C++ and Java development.
I will start with:
- an overview of some key relevant WSL + VS Code features I discovered.
- the detailed steps I carried out in order to be able to edit, compile and run C++ & Java examples inside the WSL environment.
Knowledge Prerequisite: working knowledge of Windows, developer tools such as make, JVMs and a basic understanding of Linux console usage
A Windows Diehard!
I have been a Windows developer for most of my career. I started with MS-DOS-based development before quickly moving onto Windows development. I may have interacted with SQL Server or Oracle systems over the years, but these would have always been via a Windows-based interface/utility.
When I joined my current employer back in 2004, I discovered that our real-time streaming APIs came in both Windows and Linux versions, and most of our clients’ real-time data applications were deployed on Linux. This made sense: this allowed for improved performance and stability compared to Windows (certainly back then).
So, I had to adapt and start familiarizing myself with Linux. But for someone who had spent most of their working life with Windows and MS-DOS, this did not come easy. I seriously struggled: the joys of Vi, the considerable difference between cmd.exe and the various Linux shells, etc. When possible, I always did my coding or tried recreating a customer issue on Windows. If all worked well on Windows, then I would migrate it to Linux or try and recreate the issue on Linux as required. I had to rely on tools like WinSCP and PuTTY to transfer files and access our Linux test machines.
It is not like I did not want to learn Linux, just the infrequent usage and lack of time meant I never made any reasonable progress.
Things got a bit easier with virtualization products such as VMWare and VirtualBox, allowing me to use a GUI interface with Linux and only resort to a Linux shell when absolutely necessary. However, there was always the issue of reduced performance and the headache of maintaining the VM, configuring the network settings, etc. and VMs that mysteriously stopped working.
Some of you may ask: "What about Docker?" We have published some Docker Container Images for our Real-Time SDKs (see links below) which I find useful for basic testing. However, I personally did not find that Docker offered me the same flexibility and integration suited to my workflow.
Windows Subsystem for Linux
You can imagine my hopefulness when I first started hearing the great promises Microsoft was making around their new Windows Subsystem for Linux.
My first experiments around WSL simply involved copying across the Linux versions of our SDKs and trying to build and run them. Any coding/editing was still done on Windows and copying the files/changes back and forth between Windows to Linux as required.
Initially, I was typing long-winded command lines like the one below before I discovered the WSL File Explorer integration.
cp /mnt/c/Refinitiv/RTSDK-2.0.2.L1.win.rrg/Cpp-C/Ema/Examples/Training/Consumer/100_Series/100_MP_Streaming/Consumer.cpp .
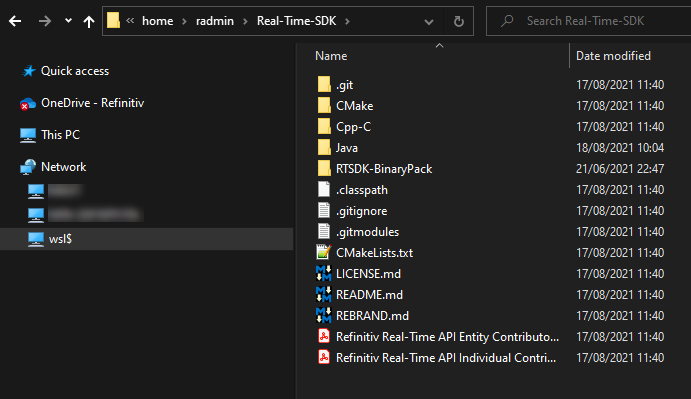
The integration works really well, allowing you to access the WSL directory structure from Windows File Explorer by navigating to Network->wsl$. If you cannot see the wsl$ share, then just type in wsl$ into the address bar and then selecting the required WSL installation (you will note below that I got carried away and installed four WSL versions):

You can then navigate the Linux directory structure using Windows File Explorer. Below I have navigated to my Linux home directory and into the RT-SDK directory:
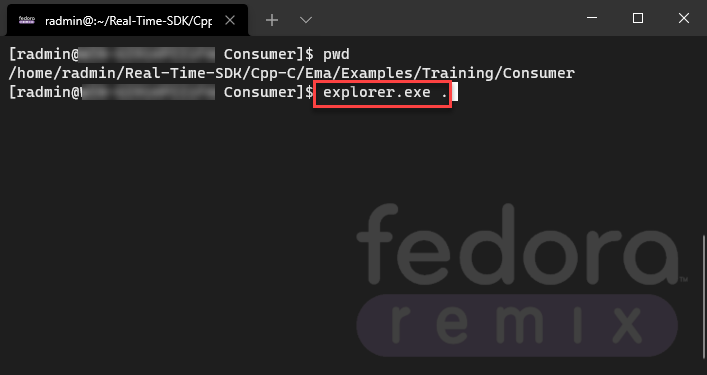
Alternatively, from a WSL terminal, you can invoke File Explorer by typing in explorer.exe . where the dot specifies the current Linux directory:
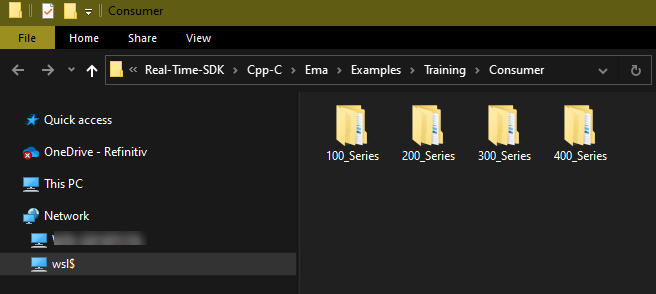
This brings up file explorer in the same directory as the WSL terminal:
Visual Studio Code WSL Integration
While I used full-blown Visual C++ for my Windows RT-SDK C++ coding, around the same time as I was exploring WSL, I had also started using Visual Studio Code for editing and running Python scripts . It starts up quicker and Microsoft is continuously improving the Python integration with VS Code.
At some point, VS Code alerted me to the existence of a WSL extension — Remote — WSL — which "allows VS Code on Windows to build Linux applications that run on WSL". After installing and checking out the extension, I initially felt the phrase "build Linux applications" was a bit of an exaggeration . Nonetheless, the ability to directly edit source code in my WSL file system directly from a Windows IDE definitely scored points with me (no more manual having to navigate the $wsl , which to me seems slower than using VS Code + WSL extension).
It is worth noting here that the Remote — WSL extension is actually part of the VS Code Remote Development extension pack , which includes SSH support and Docker integration.
Visual Studio 2019 and 2022 Improved WSL Integration
If you are a C++ developer and have a full Visual Studio license, then it gets even more interesting:
- Visual Studio 2019 version 16.1 added native support for using C++ with WSL
- Visual Studio 2022 introduces an improved WSL 2 toolset for C++ development which allows you to build and debug C++ code on WSL
I did briefly try out the steps in the VS2019 blog post, but it did not work for me as described . I will no doubt try again at a later date.
We have now covered the background, so let’s move on and look at what I did in order to set up my C++ and Java dev environment on WSL.
Setting up a Basic C++ Linux Dev Environment on WSL
As you may have guessed, my primary objective was to be able to run build and run Linux versions of our APIs/SDKs such as the Refinitiv Real-Time SDK.
As the RT-SDK is qualified/tested with RHEL and other related distros such as Centos, Oracle Linux , I installed the Fedora Remix for WSL, which is available from both the Microsoft Store and GitHub. I also briefly tested with Pengwin Enterprise WSL (upgraded to Oracle Linux) and that seemed to work fine, too.
Enabling WSL and Installing a Linux Distro
As there are plenty of online resources on how to install WSL on Windows, I will refer you to the Microsoft one that I used : Install WSL on Windows 10 | Microsoft Docs. At Step 6 of these instructions, you can install Fedora Remix from the Microsoft Store or GitHub , or another Redhat-based distro such as Pengwin Enterprise or Centos (I have not tested with Centos or others).
Setting up Our Basic Linux Dev Environment
Once I had completed my Fedora Remix WSL installation and set my root password, I had to carry out the following steps to install the basic development tools such as Git, CMake, compiler, etc. (If you use a different distro, the installation requirements may vary based on what is already packaged with that distro.)
Note that I will be installing the Refintiv Real-Time SDK in my Linux home directory (rather than the commonly used opt directory) , as the opt directory needs sudo permissions and I don’t want to keep having to sudo or su root each time I want to change some source code, etc.
Open up a WSL terminal and perform the following steps to:
- install Git
- install my C++ related tools
- clone the RT-SDK repository from GitHub
- install CMake
- get an XML library used by RT-SDK
# install git
sudo yum install git
# install openssl and development package
sudo yum install openssl
sudo yum install openssl-devel# some development tools
sudo yum group install "Development Tools"# some distros include gcc-c++ in dev tools - so you may not need this step - but I did
sudo yum install gcc-c++# download clone the Refinitiv RT-SDK into my home directory (~)
cd~
git clone --recursive https://github.com/refinitiv/Real-Time-SDK.git# download and unpack cmake into the opt directory
cd /opt
sudo wget https://cmake.org/files/v3.21/cmake-3.21.0-linux-x86_64.tar.gz
sudo tar -xvf cmake-3.21.0-linux-x86_64.tar.gz# download XML Library
sudo wget http://xmlsoft.org/sources/libxml2-2.9.9.tar.gzBuild Our RT-SDK Makefiles
We can now use the previously downloaded CMake to create our Linux Makefiles for the RT-SDK (CMake v3.14 or higher) , which I will do in a sub-directory of my home directory.
# change to home directory
cd ~
# create a directory for our makefiles
mkdir rtbuild
cd rtbuild# create a subdirectory for external XML library
mkdir -p external/dlcache
cp /opt/libxml2-2.9.9.tar.gz external/dlcache# add cmake to PATH
export PATH=/opt/cmake-3.21.0-linux-x86_64/bin:$PATH#build the makefiles - see documentation for list of parameters
cmake ../Real-Time-SDK -DBUILD_UNIT_TESTS=OFFBuild an Example and Run It
Once we have our makefiles, we can then build one of the examples and run it.
# build Consumer example 100
make Cons100
# LD_LIBRARY_PATH = directories where executables search for shared libraries
export LD_LIBRARY_PATH=~/rtbuild/install/lib64# change to executables directory and run example 100
cd ~/Real-Time-SDK/Cpp-C/Ema/Executables/LIN5_64_GCC1121/Optimized/
./Cons100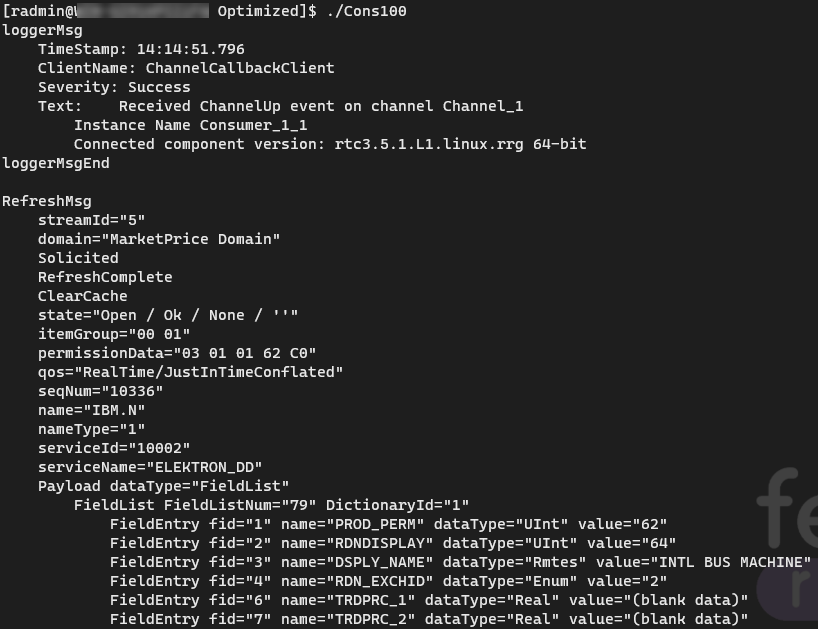
Editing the Linux Source in VS Code
Once I had an example running, the next step was to modify the code to test out a customer scenario.
As mentioned above, previously I would edit the code in Windows and then copy the file across to the relevant Linux directory before running the make command again.
However, once I discovered the Remote — WSL extension for VS Code, my workflow became much smoother.
There are a couple of different ways of utilizing the VS Code WSL integration.
Invoke VS Code From WSL Terminal
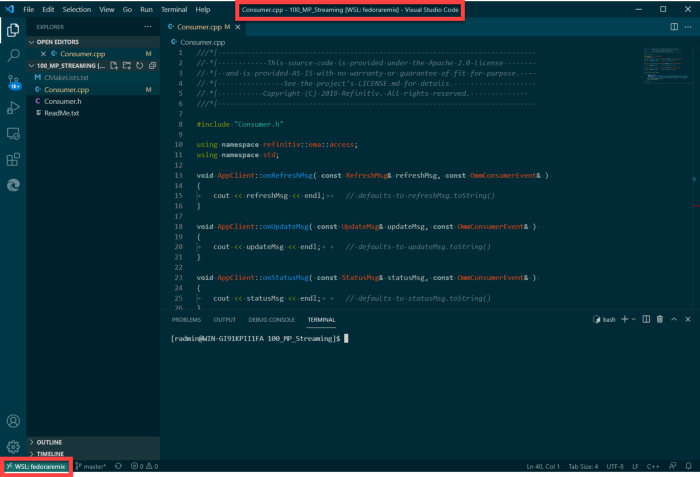
If you already have a WSL Terminal then you could invoke VS Code from the command line by typing code . from the directory where your source code is.

This should present Visual Studio code with the WSL directory opened up for you.
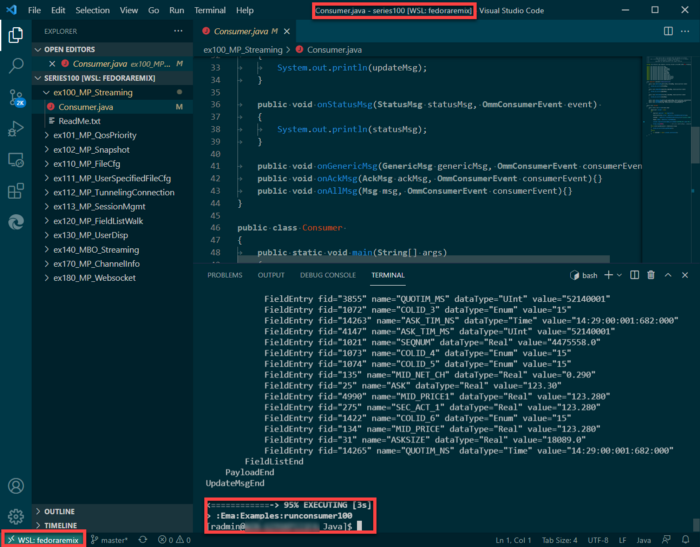
Note below the WSL Distro name is shown in the bottom left corner, and the title bar makes it clear you are editing a WSL file (as opposed to a local one).
If, however, you don’t have a WSL terminal open and perhaps you are already in VS Code or you just want to go straight to editing a source file, you can invoke WSL from VS Code.
Invoking WSL From VS Code
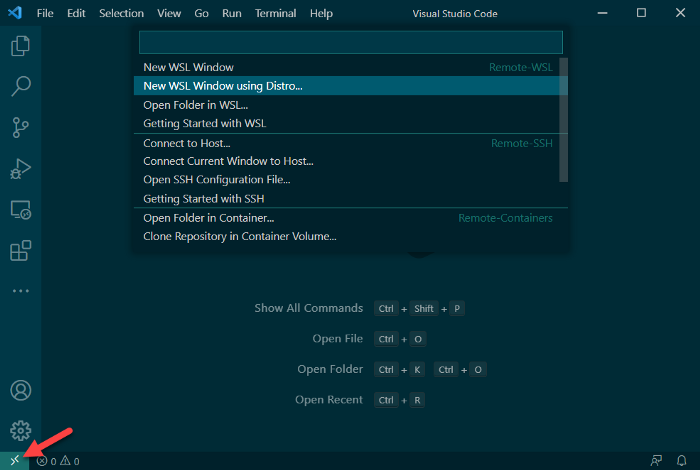
Click the WSL button in the bottom left-hand corner and choose the appropriate choice from the drop-down list presented by VS Code.
For example, if you only have one WSL distro installed or you want to use your default distro, you can just select New WSL Window.
If you have multiple distros, then you can select New WSL Window Using Distro… and choose the required Distro you wish to work with.
You can change the default WSL distro by opening a windows CMD prompt or Powershell and executing wslconfig /l to list your distros and then wslconfig /s <distroname> to change your default.
Building and Executing Code Direct From VS Code
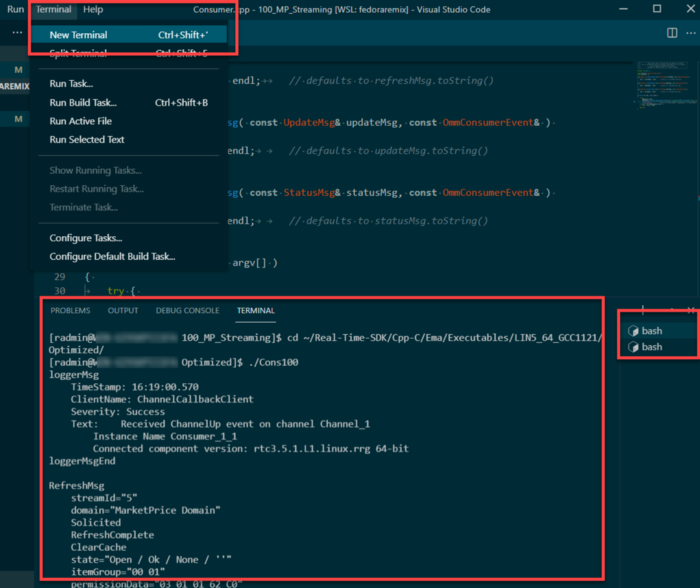
Once you have made your code changes, you can build and execute the application from within VS Code by opening a terminal inside VS Code and executing your make and run commands within the terminal.
I personally prefer to have two terminals open : one in the makefile folder (i.e., my rtbuild in this instance), and one in the executables folder, so I can easily make changes, build and execute. Note the two bash icons on the right-hand side which you can use to flick between the terminals.
As you can see, the WSL + VS Code Remote extension certainly makes it easier to code, edit and run C++ Linux applications on a Windows device.
As a next step, I plan to explore the newer features of Visual Studio 2019 and 2022 — which promise to provide an even simpler workflow. I will hopefully report back my findings here or in another article.
Setting up a Basic Java Development Environment on WSL?
Given that Java is designed to be "Write Once, Run Everywhere” I should NOT really need to set up a Java Linux dev environment on WSL.
However, for me, I just wanted to have the option to test the Java version of our RT-SDK on Linux. I recall several years ago, there was an incident with one of our older Java APIs where the customer issue could only be recreated on a Linux environment. I have never come across this with our newer RT-SDK . Nevertheless, I felt it was better to be prepared , just in case.
Building and Running a Java Example on My Fedora Remix WSL
Very little action was required in order to run one of the RT-SDK Java examples on my WSL.
I just did a search to see what packages were available, picked a version compatible with our RT-SDK, and installed it.
# get a list of available Java packages
sudo dnf search openjdk
# install a compatible development package
sudo dnf install java-11-openjdk-devel# build and run an RT-SDK example
cd ~/Real-Time-SDK/Java/# build the jar files (a once off)
./gradlew jar# Run consumer example 100
./gradlew runconsumer100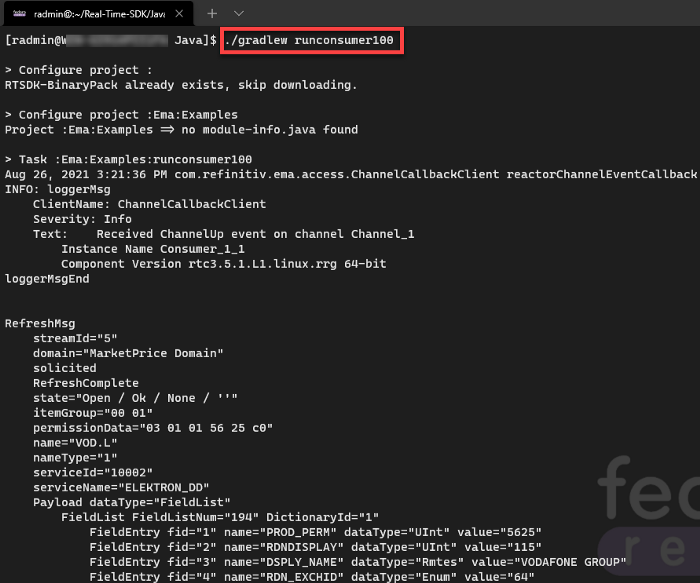
As before, I can also edit the code and run the example from VS Code as required.
Summary
As a Windows developer having to code and test under Linux, the combination of Windows Subsystem for Linux and Visual Studio Code really has made life simpler for me. I can do most of my work in my comfort zone of Windows and still easily recreate customer’s Linux-specific scenarios and test Linux versions of our examples with a minimum of effort.
I hope you found my experience useful and are able to apply some of the above in your own developer workflows.
Published at DZone with permission of Umer Nalla. See the original article here.
Opinions expressed by DZone contributors are their own.

Comments