Cloud Backends for Frontend Developers
Discover how full-stack developers can manage cloud backends for their applications without the undifferentiated heavy lifting.
Join the DZone community and get the full member experience.
Join For FreeIn the world of software development, the ability to wear different hats is a valuable skill. This is especially true when developing full-stack applications.
So, what is required when building a full-stack application? Firstly, one needs to design and build the application (frontend and backend) itself. Then one has to create and configure the backend infrastructure, and finally, host the application and connect the frontend and backend so users can access it.
In larger companies, this process is completed by multiple teams — often entire teams — with specialist skills in coding applications, configuring the backend cloud infrastructure, and connecting all the pieces before transferring them to a production environment. But what if you are in a small company and the only developer? Or are you working on a weekend project and don’t have access to the resources of a large company?
Although you might be solely responsible for designing, building, and hosting the application, treating the project as three separate activities is best. This might mean simply changing hats —being a designer in the morning and an infrastructure person in the afternoon — because although you have the tools and knowledge to do it all, it helps to break the process down this way.
With that in mind, let's walk through the journey of how front-end developers can quickly and easily build, ship, and host full-stack applications without requiring specialist cloud skills using AWS Amplify. For the rest of the article, a demo application that allows users to practice a spoken language will be used to expand on concepts.
Building the Application
Building a full-stack application begins with the design phase, where UI/UX designers create the look and feel of the application using tools like Figma. The design can then be imported into AWS Amplify to build the application's front end.
For instance, a UI/UX designer might create a user interface in Figma that includes a navigation bar, a main content area, and a footer. This design is imported into AWS Amplify using the “Design” tab in Amplify Studio and pulled locally with the amplify pull command. You can then start importing the components into your local React app using the components code generated by Amplify.
Let's build the language app by creating the UI using Figma and then generate usable React components using AWS Amplify Studio.
The UI is very simple. It displays flashcards with a target language (Spanish in this case) phrase, the user can hear the phrase — using Amazon Polly — by clicking on the play button, and then they can flip the card over to reveal the meaning of the phrase in the source language (Portuguese in this case).

Building the Frontend
With the Figma components ready, we use AWS Amplify Studio to make them into React components and use them in the React app.
A UI/UX designer creates the Figma file and copies that to Amplify Studio, that in turn creates the UI components with nice readable React code.
We can extend the components; for example, the sign-out button will sign the user out of the app, with similar functionality for the create deck button.
Here's how the components can be wired together:
- Play button = Polly plays the audio file of that phrase.
- To import into AWS Amplify, copy the link and paste it into the UI library.
- Now the components can be configured and assigned to data models.


You can view the code for the sample application here.
Building the Backend
AWS Amplify is a service, a library, a framework, and a set of tools that make it easy to build applications. After automatically creating the React UI components in the previous section, we will create the cloud backend to power our application.
While AWS releases multiple features and services, as a developer, it tends to be hard to keep up with new releases. One can connect with relevant AWS services using Amplify depending on your application's requirements.
Amplify allows developers to design the models for the backend, which are then deployed using AWS CloudFormation. Amplify makes it easier for us because we no longer need to think about each specific AWS service behind it.
Going back to the language application example, the following steps are undertaken:
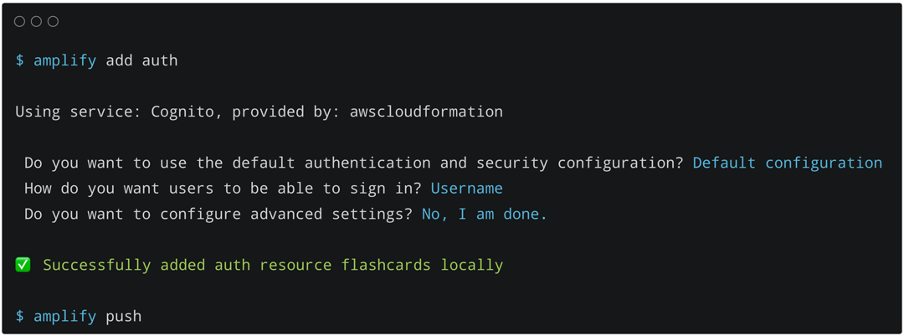
- Using theAmplify CLI authentication is added using
amplify add authwith the default configuration. - You can choose to authenticate with a username or email address
- Then run
amplify pushand send the local changes you made through the CLI to the app running on AWS.

Authentication, data, APIs, storage, and user management can be done through Amplify Studio, but Amplify CLI can be used for more advanced features.

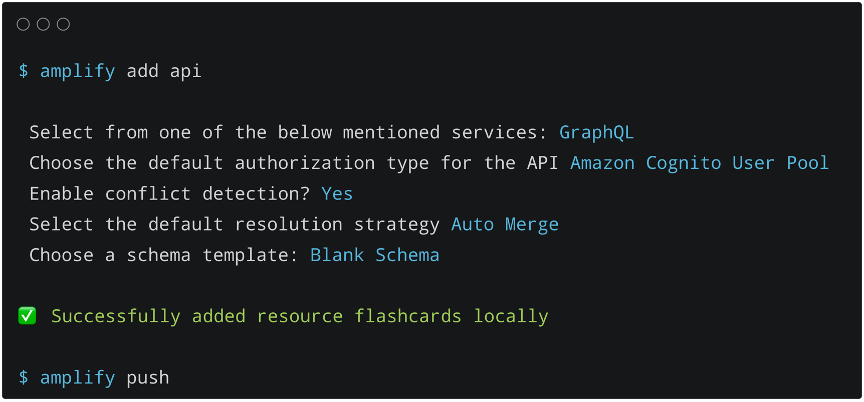
For instance, you might use AWS Amplify to create a GraphQL API and data model for your application. You can do this using the amplify add api command, which walks you through the steps of creating a new GraphQL API. Then, you can define your data model using the GraphQL Transform library, which provides a simple-to-use abstraction that helps you save time and effort by handling the common and repetitive tasks involved in building APIs.
Since we still have to wire up the API and the data, let's do that next.
- Run
amplify add api. Then select REST API or GraphQL API - You can add authentication to access the API—in this case, only logged-in users
- Enable conflict detection
- Use the provided schema or create your own.
- Run
amplify pushand it will send changes to the cloud and automatically generate code for the API.

You can now use the Amplify Studio Data Modeling page to connect the API to the data model representing the app. In this example, two DynamoDB tables, Deck and Card, are created with their respective fields.

At this stage, we have our app running locally, with the backend in the cloud, using a single AWS account. The next step is to get the app out into the world and attract users.
Although publishing the app to a domain using Amplify is possible, we want to take it one step further. We are going to use the AWS Cloud Development Kit (CDK), which allows us to treat our infrastructure as code. AWS CDK uses Python, Java, and Typescript, not YAML or JSON. It allows the use of advanced logic, conditionals, loops, and more.
Shipping Backend
Amplify allows exporting the backend created to CDK for deployment. This means that the code is not deployed to production every time a change is made — one person can write new code, create a new version of the app locally and test it. When they are ready, they hand it over to a colleague via CDK and onto the production environment — this removes clashes and avoids the problems we encountered.
This is useful when you have a multi-stage account setup for rolling out deployments. For the sake of simplicity, we assume there is a developer account for testing and another account for production.
Run the amplify export command to automatically create the backend configurations that can then be deployed to different AWS accounts.
Amplify Export generates a folder with CloudFormation templates so they can be used on the CDK project. Create your new Amplify exported backend from those files. Set up your environment name and let CDK know the path to the folder where Amplify placed all the information.

You can look at the exported infrastructure code here.
For example, you can use the cdk synth command to synthesize a CloudFormation template for your CDK app. This command produces a CloudFormation template for each stack defined in your CDK app and outputs it to the cdk.out directory. Then, you can use the cdk deploy command to deploy your backend infrastructure.
A big advantage of using infrastructure as code is that you can treat your infrastructure the same way you treat your code. You can roll it back, find out what’s happening and monitor how it is progressing. It automatically captures all the little changes and details.
Shipping Frontend
The front end, built with AWS Amplify, is then deployed. This involves configuring AWS credentials, installing Amplify, and running Amplify commands to pull the backend configuration and deploy the frontend.
For instance, you can use the amplify configure command to configure your AWS credentials, region, and output format. Then, you can use the amplify push command to push your local backend resources to the cloud. This command provisions cloud resources deploys your backend resources, and builds and publishes your frontend resources.
Using the Amplify console, you have a hosting part for the front end that connects to a GitHub repository or S3, which you can access from the “Hosting environments” tab in the Amplify service console. This allows you to deploy your front end in a visual manner and configure its CI/CD. There is a different tab the backend for managing the backend, which launches Amplify Studio.
Summary
In conclusion, developing a full-stack application involves wearing different hats — designing the UI/UX and building the front and back end to deploying the application using DevOps practices. AWS Amplify and AWS CDK provide powerful tools to streamline this process, allowing developers to build and deploy scalable cloud-powered applications quickly. Whether you're a UI/UX designer or a full-stack developer, understanding these processes and tools is crucial for building successful full-stack applications.
If you are interested, watch the on-demand session on this topic presented at AWS re:Invent 2022 here.
This article was authored by AWS Sr. Developer Advocate Mohammed Fazalullah Qudrath and AWS Solutions Architect Mirabela Dan and published with permission.
Opinions expressed by DZone contributors are their own.

Comments