Building Kafka Producer With Spring Boot
In this article, I am going to show you how to build Message Publisher using Apache Kafka and Spring Boot. First, we will talk about what Apache Kafka is.
Join the DZone community and get the full member experience.
Join For FreeIn this article, I am going to show you how to build Message Publisher using Apache Kafka and Spring Boot. First, we will talk about what Apache Kafka is.
Apache Kafka is an open-source, distributed streaming platform designed for real-time event processing. It provides a reliable, scalable, and fault-tolerant way to handle large volumes of data streams. Kafka allows you to publish and subscribe to data topics, making it ideal for building event-driven applications, log aggregation, and data pipelines.
Prerequisites
- Apache Kafka
- Java
- Apache Maven
- Any IDE (Intellij or STS or Eclipse)
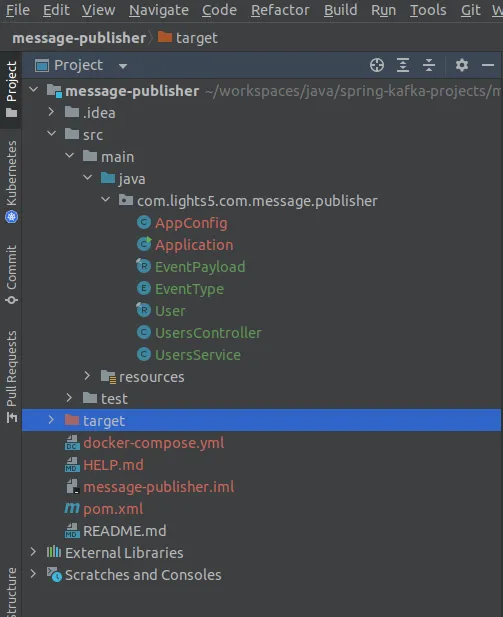
Project Structure

In this project, we will expose an endpoint to create a user and we will publish UserCreatedEvent to Kafka Topic.
application.yml file
spring:
  application:
    name: message-publisher

  kafka:
    producer:
      bootstrap-servers: localhost:9092
      key-serializer: org.apache.kafka.common.serialization.StringSerializer
      value-serializer: org.springframework.kafka.support.serializer.JsonSerializer

app:
  topic_name: users-topic

server:
port: 8089spring.application.nameis used to define the application name.bootstrap-serversspecifies the hostname and port number of Kafka.
Serializer specifies which serializer needs to be used to convert Java object to bytes before sending it to Kafka. Based on key type we can use StringSerializer or IntegerSerializer.
(Example: org.apache.kafka.common.serialization.StringSerializer)
key-serializeris used in a scenario when the same keys should go to the same partition.value-serializerspecifies which serializer needs to be used to convert Java objects to bytes before sending Kafka. If we are using a custom java class as value, then we can use JSONSerializer as value-serializer.
pom.xml
<?xml version="1.0" encoding="UTF-8"?>
<project xmlns="http://maven.apache.org/POM/4.0.0" xmlns:xsi="http://www.w3.org/2001/XMLSchema-instance"
 xsi:schemaLocation="http://maven.apache.org/POM/4.0.0 https://maven.apache.org/xsd/maven-4.0.0.xsd">
 <modelVersion>4.0.0</modelVersion>
 <parent>
  <groupId>org.springframework.boot</groupId>
  <artifactId>spring-boot-starter-parent</artifactId>
  <version>3.3.0</version>
  <relativePath/> <!-- lookup parent from repository -->
 </parent>
 <groupId>com.lights5.com</groupId>
 <artifactId>message-publisher</artifactId>
 <version>0.0.1-SNAPSHOT</version>
 <name>message-publisher</name>
 <description>Demo project for Kafka Producer using Spring Boot</description>
 <properties>
  <java.version>17</java.version>
 </properties>
 <dependencies>
  <dependency>
   <groupId>org.springframework.boot</groupId>
   <artifactId>spring-boot-starter-web</artifactId>
  </dependency>
  <dependency>
   <groupId>org.springframework.kafka</groupId>
   <artifactId>spring-kafka</artifactId>
  </dependency>

  <dependency>
   <groupId>org.projectlombok</groupId>
   <artifactId>lombok</artifactId>
   <optional>true</optional>
  </dependency>
 </dependencies>

 <build>
  <plugins>
   <plugin>
    <groupId>org.springframework.boot</groupId>
    <artifactId>spring-boot-maven-plugin</artifactId>
    <configuration>
     <excludes>
      <exclude>
       <groupId>org.projectlombok</groupId>
       <artifactId>lombok</artifactId>
      </exclude>
     </excludes>
    </configuration>
   </plugin>
  </plugins>
 </build>

</project>
spring web, spring kafka are required dependencies.
ApplicationConfiguration class
package com.lights5.com.message.publisher;

import lombok.Getter;
import lombok.Setter;
import org.springframework.boot.context.properties.ConfigurationProperties;
import org.springframework.context.annotation.Configuration;

@Getter
@Setter
@Configuration
@ConfigurationProperties(prefix = "app")
public class AppConfig {

    private String topicName;
}
This class is used to bind configuration values from application.yml file to the respective fields.
Application class
package com.lights5.com.message.publisher;

import lombok.RequiredArgsConstructor;
import org.apache.kafka.clients.admin.NewTopic;
import org.springframework.boot.SpringApplication;
import org.springframework.boot.autoconfigure.SpringBootApplication;
import org.springframework.context.annotation.Bean;
import org.springframework.kafka.config.TopicBuilder;

@SpringBootApplication
@RequiredArgsConstructor
public class Application {

 private final AppConfig appConfig;

 public static void main(String[] args) {
  SpringApplication.run(Application.class, args);
 }

 @Bean
 NewTopic usersTopic() {

  return TopicBuilder.name(appConfig.getTopicName())
    .partitions(3)
    .replicas(2)
    .build();
 }
}
NewTopic Bean is used to create a topic if the topic doesn’t exist already on the Kafka broker. We can configure the required number of partitions and replicas as we need.
Model Classes
User class
package com.lights5.com.message.publisher;

import java.time.LocalDateTime;

record User (
        String firstName,
        String lastName,
        String email,
        Long phoneNumber,
        Address address,
        LocalDateTime createdAt) {

    record Address (
            String city,
            String country,
            String zipcode) {

    }
}
EventType enum
package com.lights5.com.message.publisher;

enum EventType {

    USER_CREATED_EVENT;
}
EventPayload class
package com.lights5.com.message.publisher;

record EventPayload (
        EventType eventType,
        String payload) {

}
Endpoint to Create User (UserController class)
package com.lights5.com.message.publisher;

import lombok.RequiredArgsConstructor;
import org.springframework.http.HttpStatus;
import org.springframework.web.bind.annotation.*;

import static com.lights5.com.message.publisher.EventType.USER_CREATED_EVENT;

@RestController
@RequiredArgsConstructor
@RequestMapping("/v1/users")
class UsersController {

    private final UsersService usersService;

    @PostMapping
    @ResponseStatus(HttpStatus.CREATED)
    public void createUser(@RequestBody User user) {

        usersService.publishMessage(user, USER_CREATED_EVENT);
    }
}
UsersController class exposes the POST method to create a user, which in turn calls a method in the UsersService class.
UsersService class
package com.lights5.com.message.publisher;

import com.fasterxml.jackson.core.JsonProcessingException;
import com.fasterxml.jackson.databind.ObjectMapper;
import lombok.RequiredArgsConstructor;
import lombok.extern.slf4j.Slf4j;
import org.apache.kafka.common.serialization.StringSerializer;
import org.springframework.kafka.core.KafkaTemplate;
import org.springframework.stereotype.Service;

@Slf4j
@Service
@RequiredArgsConstructor
class UsersService {

    private final AppConfig appConfig;
    private final ObjectMapper objectMapper;
    private final KafkaTemplate<String, EventPayload> kafkaTemplate;

    public void publishMessage(User user, EventType eventType) {

        try {

            var userCreatedEventPayload = objectMapper.writeValueAsString(user);
            var eventPayload = new EventPayload(eventType, userCreatedEventPayload);
            kafkaTemplate.send(appConfig.getTopicName(), eventPayload);
        }
        catch (JsonProcessingException ex) {

            log.error("Exception occurred in processing JSON {}", ex.getMessage());
        }
    }
}
KafkaTemplate is used to send messages to Kafka. Spring Boot autoconfigures KafkaTemplate and injects to the required class.
KafkaTemplate<K, V> is of this form. Here K is the key type and V is the value type.
In our case key is String type and V is EventPayload class type. So we need to use StringSerializer for the key and JsonSerializer (EventPayload is the custom Java class type) for values.
kafkaTemplate.send() method takes topicName as 1st parameter and data to be published as 2nd argument.
Running Kafka in Local
To run this application locally, first, we need to run Kafka locally and then start the Spring Boot application.
Please use this docker-compose file to run Kafka locally.
version: '2.1'

services:
  zoo1:
    image: confluentinc/cp-zookeeper:7.3.2
    hostname: zoo1
    container_name: zoo1
    ports:
      - "2181:2181"
    environment:
      ZOOKEEPER_CLIENT_PORT: 2181
      ZOOKEEPER_SERVER_ID: 1
      ZOOKEEPER_SERVERS: zoo1:2888:3888


  kafka1:
    image: confluentinc/cp-kafka:7.3.2
    hostname: kafka1
    container_name: kafka1
    ports:
      - "9092:9092"
      - "29092:29092"
    environment:
      KAFKA_ADVERTISED_LISTENERS: INTERNAL://kafka1:19092,EXTERNAL://${DOCKER_HOST_IP:-127.0.0.1}:9092,DOCKER://host.docker.internal:29092
      KAFKA_LISTENER_SECURITY_PROTOCOL_MAP: INTERNAL:PLAINTEXT,EXTERNAL:PLAINTEXT,DOCKER:PLAINTEXT
      KAFKA_INTER_BROKER_LISTENER_NAME: INTERNAL
      KAFKA_ZOOKEEPER_CONNECT: "zoo1:2181"
      KAFKA_BROKER_ID: 5
      KAFKA_LOG4J_LOGGERS: "kafka.controller=INFO,kafka.producer.async.DefaultEventHandler=INFO,state.change.logger=INFO"
    depends_on:
      - zoo1

  kafka2:
    image: confluentinc/cp-kafka:7.3.2
    hostname: kafka2
    container_name: kafka2
    ports:
      - "9093:9093"
      - "29093:29093"
    environment:
      KAFKA_ADVERTISED_LISTENERS: INTERNAL://kafka2:19093,EXTERNAL://${DOCKER_HOST_IP:-127.0.0.1}:9093,DOCKER://host.docker.internal:29093
      KAFKA_LISTENER_SECURITY_PROTOCOL_MAP: INTERNAL:PLAINTEXT,EXTERNAL:PLAINTEXT,DOCKER:PLAINTEXT
      KAFKA_INTER_BROKER_LISTENER_NAME: INTERNAL
      KAFKA_ZOOKEEPER_CONNECT: "zoo1:2181"
      KAFKA_BROKER_ID: 6
      KAFKA_LOG4J_LOGGERS: "kafka.controller=INFO,kafka.producer.async.DefaultEventHandler=INFO,state.change.logger=INFO"
    depends_on:
      - zoo1


  kafka3:
    image: confluentinc/cp-kafka:7.3.2
    hostname: kafka3
    container_name: kafka3
    ports:
      - "9094:9094"
      - "29094:29094"
    environment:
      KAFKA_ADVERTISED_LISTENERS: INTERNAL://kafka3:19094,EXTERNAL://${DOCKER_HOST_IP:-127.0.0.1}:9094,DOCKER://host.docker.internal:29094
      KAFKA_LISTENER_SECURITY_PROTOCOL_MAP: INTERNAL:PLAINTEXT,EXTERNAL:PLAINTEXT,DOCKER:PLAINTEXT
      KAFKA_INTER_BROKER_LISTENER_NAME: INTERNAL
      KAFKA_ZOOKEEPER_CONNECT: "zoo1:2181"
      KAFKA_BROKER_ID: 7
      KAFKA_LOG4J_LOGGERS: "kafka.controller=INFO,kafka.producer.async.DefaultEventHandler=INFO,state.change.logger=INFO"
    depends_on:
      - zoo1
docker-compose -f up . Run this command in the directory where the compose file is located.
The above command starts the Kafka locally.
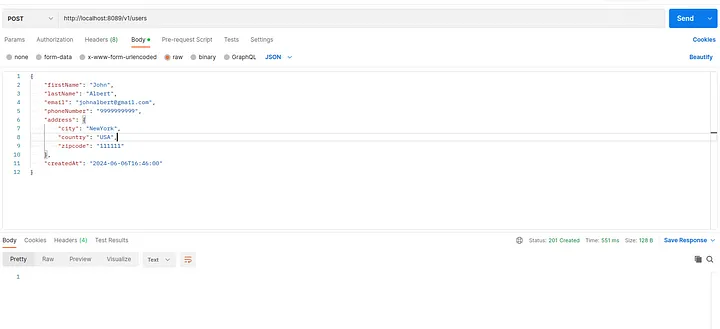
Testing Using Postman

Endpoint: (POST method)
Payload
{
    "firstName": "John",
    "lastName": "Albert",
    "email": "johnalbert@gmail.com",
    "phoneNumber": "9999999999",
    "address": {
        "city": "NewYork",
        "country": "USA",
        "zipcode": "111111"
    },
    "createdAt": "2024-06-06T16:46:00"
}
You can verify using kafka-console-consumer command whether the data is published or not.
Conclusion
Spring Boot provides easy integration with Kafka and helps us create pub sub-model applications easily with minimal configurations. We can develop Microservices event-driven applications easily with Spring Boot and Kafka.
Published at DZone with permission of Sai Krishna Reddy Chityala. See the original article here.
Opinions expressed by DZone contributors are their own.

Comments