Building Data Pipelines With Spring Cloud Data Flow
Learn how to use Spring Cloud Data Flow, a tool to build real-time data integration and data processing pipelines by stitching together Spring Boot applications.
Join the DZone community and get the full member experience.
Join For FreeSpring Cloud Data Flow provides a toolkit for building data pipelines. The idea is to build real-time data integration and data processing pipelines by stitching together Spring Boot applications that could be deployed on top of different runtimes (for example, Cloud Foundry). Spring Boot applications could be one of the starter apps or custom boot applications. With Spring Cloud Data Flow, we can create data pipelines for use cases like data ingestion, real-time analytics, and data import and export.
Logical View of a Streaming Pipeline
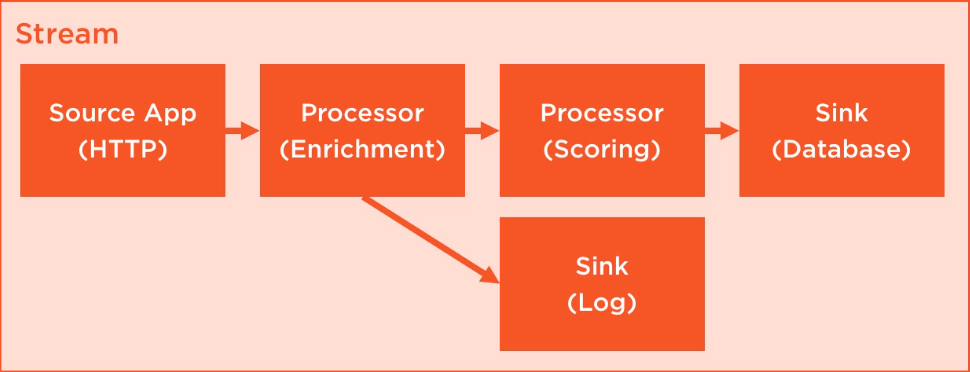
We have a source. It may take HTTP data, pull from a queue, pull from a file, or pull from an Amazon S3 bucket. It produces data either on a fixed rate or on demand so that some downstream component may consume it in the process. A processor, optionally, can take data in and do something with it. There may be a sink like a database that takes data in but does not produce anything out. We may have some sort of tap at one of the stages that takes data in and drops it into a log file or a data warehouse. These are just Spring Cloud Stream and Spring Cloud Task applications that are stitched together using Spring Cloud Data Flow.

Components of Spring Cloud Data Flow
- Messaging middleware.Spring Cloud Data Flow supports two messaging middleware broker engines — Apache Kafka and RabbitMQ — that these Spring Boot apps talk to and get connect via.
- RDBMS and Redis.Database for storing streams and tasks metadata. Redis is used for analytic applications.
- Maven repository.Applications are located from maven coordinates during runtime.
- Application runtime.Application runtimes could industry standard runtimes — Cloud Foundry, Apache Yarn, Apache Mesos, or a local server for development.
- Data Flow Server.It is responsible for preparing applications (custom and/or starter apps) and the messaging middleware so that the applications can be deployed on runtime using either the shell or the dashboard.
Installing Spring Cloud Data Flow
Download and start RabbitMQ. Follow the instructions provided here to install and start RabbitMQ server on Windows.
Download and start PostgreSQL. Follow the instructions provided here to install and start PostgreSQL on Windows.
Download and start Spring Cloud Data Flow local server.
wget https://repo.spring.io/libs-snapshot/org/springframework/cloud/spring-cloud-dataflow-server-local/1.3.0.M2/spring-cloud-dataflow-server-local-1.3.0.M2.jar

java -jar spring-cloud-dataflow-server-local-1.3.0.M2.jar \
        --spring.datasource.url=jdbc:postgresql://localhost:5432/<database-name> \
        --spring.datasource.username=<username> \
        --spring.datasource.password=<password> \
        --spring.datasource.driver-class=org.postgresql.Driver \
        --spring.rabbitmq.host=127.0.0.1 \
        --spring.rabbitmq.port=5672 \
        --spring.rabbitmq.username=guest \
        --spring.rabbitmq.password=guest
Download and start Spring Cloud Data Flow Shell.
wget http://repo.spring.io/snapshot/org/springframework/cloud/spring-cloud-dataflow-shell/1.3.0.BUILD-SNAPSHOT/spring-cloud-dataflow-shell-1.3.0.BUILD-SNAPSHOT.jar

java -jar spring-cloud-dataflow-shell-1.3.0.BUILD-SNAPSHOT.jar
Download Starter Apps. Import out of the box stream applications for RabbitMQ from here.
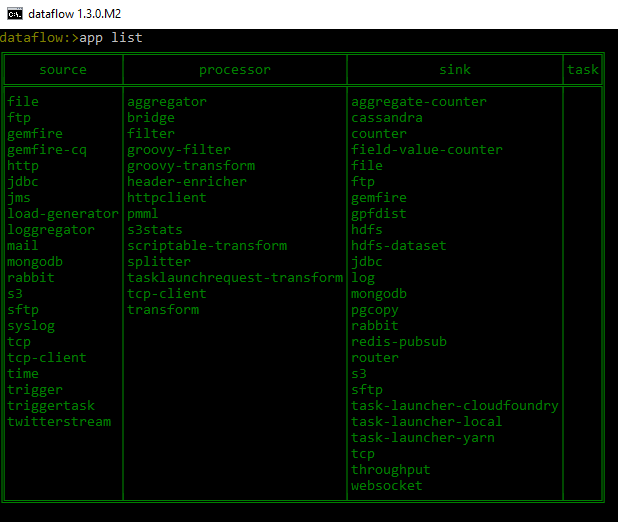
At this point, we should be able to interact with the Spring Cloud Data Flow local server using the shell. For example, app list will display all the registered apps available for you to build your stream.

Creating and Deploying Stream
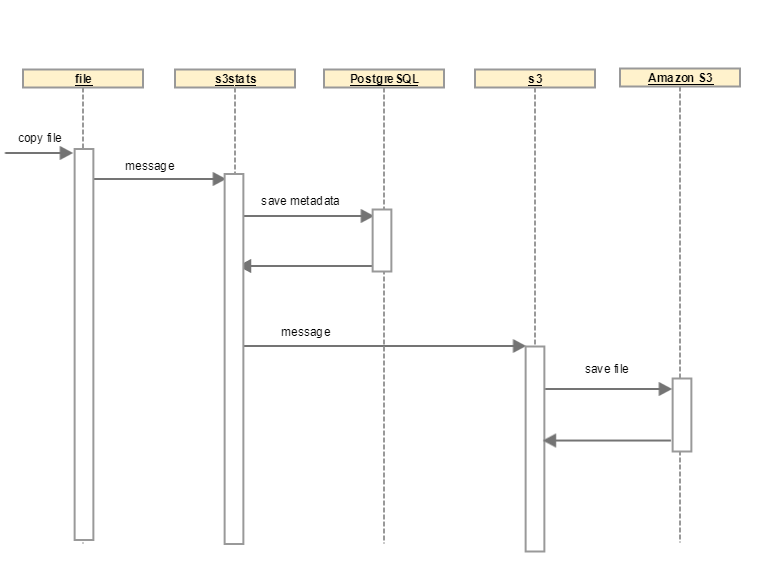
We are now ready to create a stream and deploy it. We'll create a data pipeline that reads a file from a given directory, processes it, and uploads the file to an Amazon S3 bucket.

Create custom stream applications: We'll use the
filesource application ands3sink application, both of which are available as starter applications. We will build our custom processor application to save some metadata about the file being uploaded. The custom processor is a Spring Boot application that reads the incoming message over the RabbitMQ channel, extracts metadata of interest, and persists them in a PostgreSQL database and returns the same message for further processing.@EnableBinding(Processor.class) @SpringBootApplication public class FileStatsApplication { @Autowired FileStatsRepository fileStatsRepository; public static void main(String[] args) { SpringApplication.run(FileStatsApplication.class, args); } @StreamListener(Processor.INPUT) @SendTo(Processor.OUTPUT) public Object saveFileStats(Message < ? > message) { System.out.println(message); MessageHeaders header = message.getHeaders(); FileStats fileStats = new FileStats(); fileStats.setName(header.get("file_name").toString()); fileStats.setPath(header.get("file_originalFile").toString()); fileStats.setTimestamp(LocalDateTime.now().toString()); byte[] body = (byte[]) message.getPayload(); fileStats.setSize(body.length); fileStatsRepository.save(fileStats); return message; } }Register custom stream applications: After building the Spring Boot application, register it as a processor application.
app register --name s3stats --type processor --uri maven://com.bhge:filestats:jar:0.0.1-SNAPSHOTOnce registered, we'll be able to see it in the
app listwith the names3stats.Compose stream from starter and/or custom stream applications: We now have all the three applications we need to build our stream pipeline. Go to the shell and create the stream.
stream create --definition --name s3Test "file --directory=F:\\Dev\\test --fixed-delay=5 | s3stats | s3 --cloud.aws.stack.auto=false \
                --cloud.aws.credentials.accessKey=<accessKey> \
                --cloud.aws.credentials.secretKey=<secretKey> \
                --cloud.aws.region.static=us-east-1 \
                --s3.bucket=<bucket-name> \
                --s3.key-expression=headers.file_name \
                --s3.acl=PublicReadWrite"
Open the dashboard (http://localhost:9393/dashboard) and look at the stream definition.

Deploy stream: Use either the dashboard or the shell to deploy the stream
s3Test.stream deploy s3Test
Test the Pipeline
To trigger the pipeline, copy a file into the directory configured in the file stream application.
- Verify that a message has been created and sent to the
s3statsapplication using the RabbitMQ Management Console. - Verify that a row has been added into the
filestatstable in the PostgreSQL database. - Verify that the file has been uploaded to Amazon S3 bucket.
Opinions expressed by DZone contributors are their own.

Comments