Building Cloud Native Apps With Spring
Here’s how powerful Spring Boot, Spring IO, Spring Data, and several Netflix OSS projects can be when used together to build microservices.
Join the DZone community and get the full member experience.
Join For FreeOne of the Spring projects that builds upon Boot and that has been rapidly evolving is Spring Cloud. The overall goal of the Spring Cloud project is to allow you to build cloud-native applications with Spring Boot.
Some of the features included in Spring Cloud are:
Distributed/versioned configuration.
Service registration and discovery.
Routing.
Service-to-service calls.
Load balancing.
Circuit Breakers.
Global locks.
Leadership election and cluster state.
Distributed messaging.
As you might be able to tell by this feature list, many of these features have to do with building cloud-native apps using microservices.
One of the more interesting projects under the Spring Cloud umbrella is Spring Cloud Netflix. Spring Cloud Netflix leverages a number of the Netflix OSS projects to provide some of the features listed above. There are a number of reasons why I find the Spring Cloud Netflix project useful. First off, Netflix has become the poster child of why microservices is a good way to build cloud applications. One of the reasons for this is because they have open-sourced a lot of code they have written to run one of the biggest, most robust, microservices applications out there under the Netflix OSS umbrella. This means that the code from Netflix is proven to work in a real-world use case, and I always like using code I know works. To make the Netflix projects easier to use, the Spring team has taken some of these projects and turned them into “starters” you can just include in your Spring Boot app, just like you would if you wanted to use JPA or AMQP. Some of the Spring Cloud Netflix projects are so simple to use that they just require you to add a couple of annotations to your Spring Boot app, the implementation is really nice and clean.
Some of the Netflix OSS projects used in Spring Cloud Netflix include
Eureka – for service discovery.
Hystrix – for all your circuit breaker needs.
Feign – allows you to define declarative REST clients.
Ribbon – client-side load balancing.
Zuul – for routing and filtering.
Getting started with Spring Cloud is relatively easy, especially if you are already familiar with Spring Boot. If you head over to start.spring.io you will be brought to a page that will basically bootstrap your Spring Boot app just by filling out a form. The Spring team has integrated the Spring Cloud projects into this tool, allowing you to use them in your Spring Boot app if you choose. In this article, we will create a basic microservice app using Spring Boot and Spring Cloud.
One of my interests outside of technology is obstacle course racing, so in the spirit of that interest, let’s create a web app that lists some upcoming obstacle course races and participants in those races. There will be three “services” that make up the app: one producing the list of races, one which produces the participants in those races, and one that serves clients (browsers) the front-end code.
Creating the Races Service
First, go to start.spring.io and fill out the form like the image below. The only check box you will need to check off is the one named “Web”.
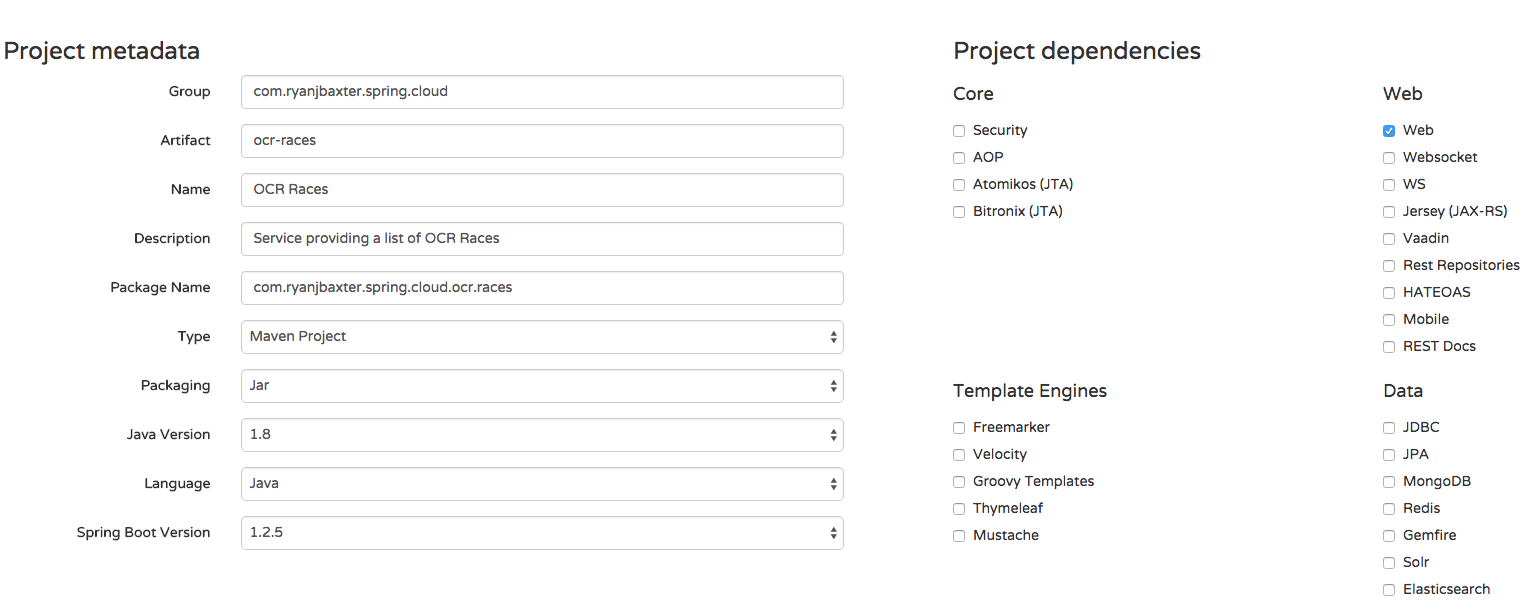
Then click the Generate button to download the zip file containing the source for your Spring Boot project. You can then import this project into your favorite IDE, I like to use STS, but you can use plain Eclipse or any other Java IDE as well as long as it supports Maven. There will be one source file in the package com.ryanjbaxter.spring.cloud.ocr.races called OcrRacesApplication.java. Open that up and copy the below code into it.
package com.ryanjbaxter.spring.cloud.ocr.races;

import java.util.ArrayList;
import java.util.List;

import org.springframework.boot.CommandLineRunner;
import org.springframework.boot.SpringApplication;
import org.springframework.boot.autoconfigure.SpringBootApplication;
import org.springframework.web.bind.annotation.RequestMapping;
import org.springframework.web.bind.annotation.RestController;

@SpringBootApplication
@RestController
public class OcrRacesApplication implements CommandLineRunner {

    private static List<Race> races = new ArrayList<Race>();

    public static void main(String[] args) {
        SpringApplication.run(OcrRacesApplication.class, args);
    }

    @Override
    public void run(String... arg0) throws Exception {
        races.add(new Race("Spartan Beast", "123", "MA", "Boston"));
        races.add(new Race("Tough Mudder RI", "456", "RI", "Providence"));
    }

    @RequestMapping("/")
    public List<Race> getRaces() {
        return races;
    }
}

class Race {
    private String name;
    private String id;
    private String state;
    private String city;

    public Race(String name, String id, String state, String city) {
        super();
        this.name = name;
        this.id = id;
        this.state = state;
        this.city = city;
    }
    public String getName() {
        return name;
    }
    public void setName(String name) {
        this.name = name;
    }
    public String getId() {
        return id;
    }
    public void setId(String id) {
        this.id = id;
    }
    public String getState() {
        return state;
    }
    public void setState(String state) {
        this.state = state;
    }
    public String getCity() {
        return city;
    }
    public void setCity(String city) {
        this.city = city;
    }
}
This code is pretty basic, it creates a single REST endpoint which returns all races. Right now races are just stored in a List in the class, this is just a basic sample, obviously there are more sophisticated ways of doing this. If you are using STS you can run this app easily by going to Run -> Run As -> Spring Boot Application. If you prefer you can also start the application via Maven from the command line at the root of the project by running
$ mvn spring-boot:runThe application will start on localhost using port 8080, so if you open your browser and go to http://localhost:8080/ you should see a JSON list returned with the race details.
We are going to have many services running at the same time on the same machine and they can’t all run on the same port, so lets customize the port the races service will run on. In the src/main/resources directory of the app there will be a file called application.properties. This is where you can set various properties of your Spring app. I prefer to use YAML files instead (less typing) so rename this file to application.yml. Then open the file and add the following two lines to it.
server:
  port: 8282
Now if you restart your app it should start on port 8282.
Creating The Participants Service
The next service we want to create is our race participants service. Again head back to start.spring.io and fill out the form like the image below.
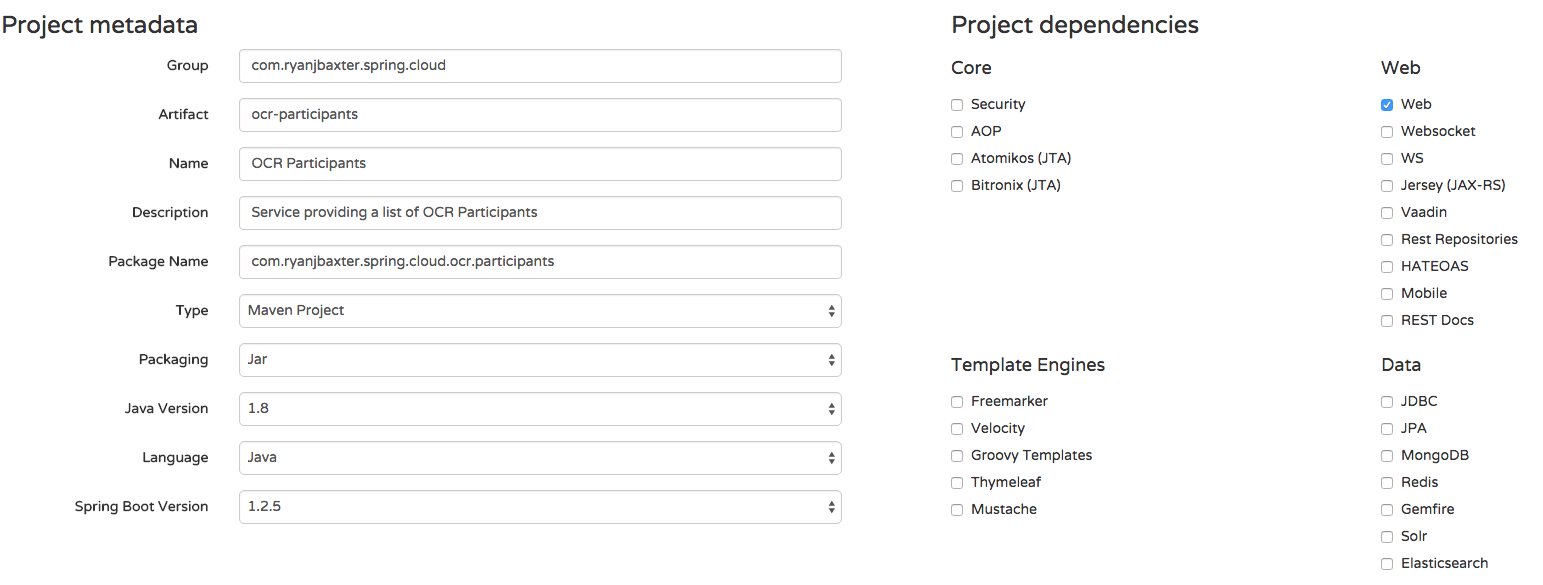
Click the Generate button to download the code for your project and import it into your IDE. Again, there will be a single source file in the package com.ryanjbaxter.spring.cloud.ocr.participants called OcrParticipantsApplication.java. Open this file and copy the code below into it.
package com.ryanjbaxter.spring.cloud.ocr.participants;

import java.util.ArrayList;
import java.util.Arrays;
import java.util.List;
import java.util.stream.Collectors;

import org.springframework.boot.CommandLineRunner;
import org.springframework.boot.SpringApplication;
import org.springframework.boot.autoconfigure.SpringBootApplication;
import org.springframework.web.bind.annotation.PathVariable;
import org.springframework.web.bind.annotation.RequestMapping;
import org.springframework.web.bind.annotation.RestController;

@RestController
@SpringBootApplication
public class OcrParticipantsApplication implements CommandLineRunner {

    private static List<Participant> participants = new ArrayList<Participant>();

    public static void main(String[] args) {
        SpringApplication.run(OcrParticipantsApplication.class, args);
    }

    @Override
    public void run(String... arg0) throws Exception {
        participants.add(new Participant("Ryan", "Baxter", "MA", "S", Arrays.asList("123", "456")));
        participants.add(new Participant("Stephanie", "Baxter", "MA", "S", Arrays.asList("456")));
    }

    @RequestMapping("/")
    public List<Participant> getParticipants() {
        return participants;
    }

    @RequestMapping("/races/{id}")
    public List<Participant> getParticipants(@PathVariable String id) {
        return participants.stream().filter(p -> p.getRaces().contains(id)).collect(Collectors.toList());
    }
}

class Participant {
    private String firstName;
    private String lastName;
    private String homeState;
    private String shirtSize;
    private List<String> races;
    public Participant(String firstName, String lastName, String homeState,
            String shirtSize, List<String> races) {
        super();
        this.firstName = firstName;
        this.lastName = lastName;
        this.homeState = homeState;
        this.shirtSize = shirtSize;
        this.races = races;
    }
    public String getFirstName() {
        return firstName;
    }
    public void setFirstName(String firstName) {
        this.firstName = firstName;
    }
    public String getLastName() {
        return lastName;
    }
    public void setLastName(String lastName) {
        this.lastName = lastName;
    }
    public String getHomeState() {
        return homeState;
    }
    public void setHomeState(String homeState) {
        this.homeState = homeState;
    }
    public String getShirtSize() {
        return shirtSize;
    }
    public void setShirtSize(String shirtSize) {
        this.shirtSize = shirtSize;
    }
    public List<String> getRaces() {
        return races;
    }
    public void setRaces(List<String> races) {
        this.races = races;
    }

}
This class is similar to the same class in the races service, except here we are working with participants. Again we don’t want this app to start on port 8080 so in src/main/resources rename application.properties to application.yml and add these two lines.
server:
  port: 8181
If you start this application and go to http://localhost:8181/ you will see all participants. In addition if you go to http://localhost:8181/races/123 you will see just the participants who will be racing in the race with id 123.
Creating The Web Service
The final service we are going to create is a service that serves the client-side browser code. Our web app will be built using Angular.js. Again, we will create a new project from start.spring.io. Fill out the form following the screenshot below.
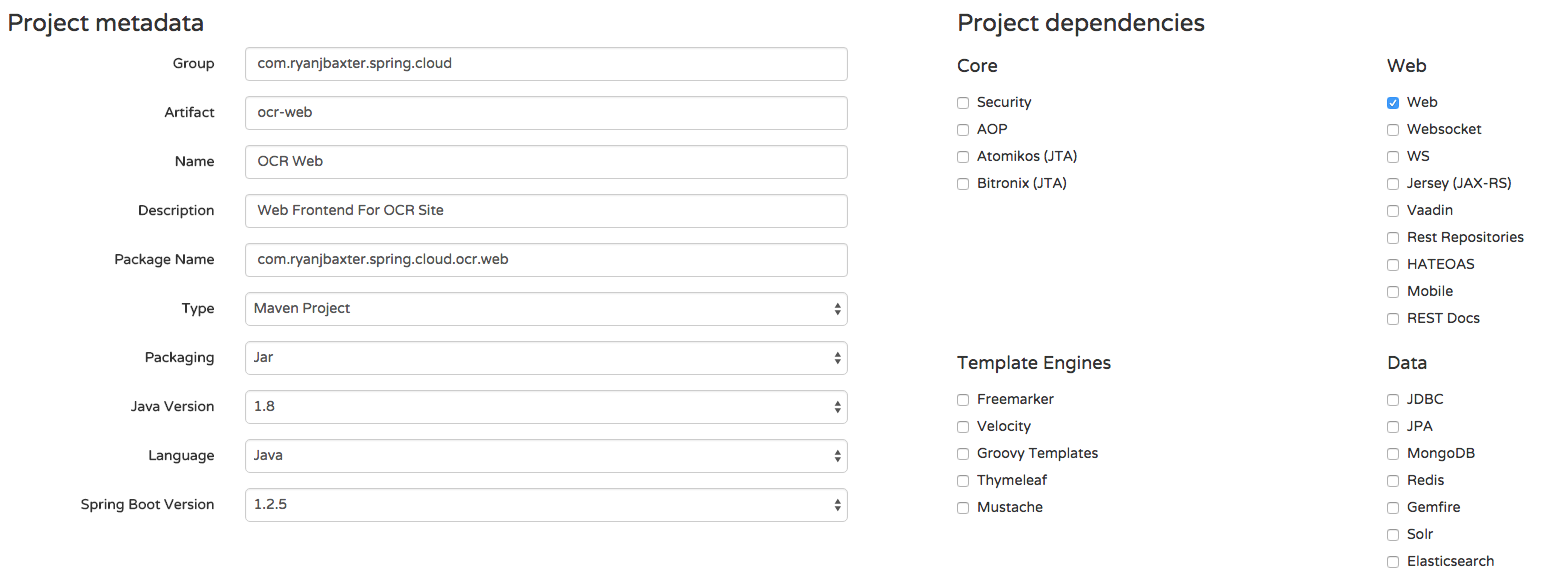
Open rename application.properties to application.yml and add the following two lines.
server:
  port: 8080
In src/main/resources/static create the directories scripts/controllers and views. In scripts/controllers create a new file called main.js and add the following code.
angular.module('ocrApp')
  .controller('MainCtrl', function ($scope, $http) {     });
In the scripts directory create a new file called app.js and add the following code.
angular
  .module('ocrApp', [
    'ngAnimate',
    'ngCookies',
    'ngResource',
    'ngRoute',
    'ngSanitize',
    'ngTouch'
  ])
  .config(function ($routeProvider) {
    $routeProvider
      .when('/', {
        templateUrl: 'views/main.html',
        controller: 'MainCtrl'
      })
      .otherwise({
        redirectTo: '/'
      });
  });
In the views directory create a file called main.html and add the following code.
<h1>hello world</h1>In the static directory create a new file called index.html and add the following code.
<!DOCTYPE html>
<html lang="en">
  <head>
    <meta charset="utf-8">
    <meta http-equiv="X-UA-Compatible" content="IE=edge">
    <meta name="viewport" content="width=device-width, initial-scale=1">
    <!-- The above 3 meta tags *must* come first in the head; any other head content must come *after* these tags -->
    <meta name="description" content="">
    <meta name="author" content="">
    <link rel="icon" href="../../favicon.ico">

    <title>OCR Races</title>

    <!-- Bootstrap core CSS -->
    <!-- Latest compiled and minified CSS -->
    <link rel="stylesheet" href="https://maxcdn.bootstrapcdn.com/bootstrap/3.3.5/css/bootstrap.min.css">

    <!-- Custom styles for this template -->
    <link href="http://getbootstrap.com/examples/jumbotron-narrow/jumbotron-narrow.css" rel="stylesheet">

    <!-- Just for debugging purposes. Don't actually copy these 2 lines! -->
    <!--[if lt IE 9]><script data-fr-src="../../assets/js/ie8-responsive-file-warning.js"></script><![endif]-->
    <script src="http://getbootstrap.com/assets/js/ie-emulation-modes-warning.js"></script>

    <!-- HTML5 shim and Respond.js for IE8 support of HTML5 elements and media queries -->
    <!--[if lt IE 9]>
      <script src="https://oss.maxcdn.com/html5shiv/3.7.2/html5shiv.min.js"></script>
      <script src="https://oss.maxcdn.com/respond/1.4.2/respond.min.js"></script>
    <![endif]-->
  </head>

  <body data-pinterest-extension-installed="cr1.38.4" class=" hasGoogleVoiceExt" ng-app="ocrApp">

    <div class="container">
      <div class="header clearfix">
        <nav>
        </nav>
        <h3 class="text-muted">OCR Races</h3>
      </div>

      <div ng-view=""></div>

      <footer class="footer">
        <p>© Company 2014</p>
      </footer>

    </div> <!-- /container -->


    <!-- IE10 viewport hack for Surface/desktop Windows 8 bug -->
    <script src="http://getbootstrap.com/assets/js/ie10-viewport-bug-workaround.js"></script>
    <script src="//ajax.googleapis.com/ajax/libs/jquery/1.11.3/jquery.min.js"></script>
    <script src="//cdnjs.cloudflare.com/ajax/libs/angular.js/1.4.5/angular.js"></script>
    <script src="//maxcdn.bootstrapcdn.com/bootstrap/3.3.5/js/bootstrap.min.js"></script>
    <script src="//cdnjs.cloudflare.com/ajax/libs/angular.js/1.4.5/angular-animate.js"></script>
    <script src="//cdnjs.cloudflare.com/ajax/libs/angular.js/1.4.5/angular-cookies.js"></script>
    <script src="//cdnjs.cloudflare.com/ajax/libs/angular.js/1.4.5/angular-resource.js"></script>
    <script src="//cdnjs.cloudflare.com/ajax/libs/angular.js/1.4.5/angular-route.js"></script>
    <script src="//cdnjs.cloudflare.com/ajax/libs/angular.js/1.4.5/angular-sanitize.js"></script>
    <script src="//cdnjs.cloudflare.com/ajax/libs/angular.js/1.4.5/angular-touch.js"></script>
    <script src="scripts/app.js"></script>
    <script src="scripts/controllers/main.js"></script>


</body></html>
If you start this application and go to http://localhost:8080 you will see a simple page that just says hello world.
Calling Our Races Service
Now it is time to try to leverage some of the services we created in our front-end. One of the first things we want to do is list all the races. In the web app service, open main.js and add the following code.
angular.module('ocrApp')
  .controller('MainCtrl', function ($scope, $http) {
      $http({
          method: 'GET',
          url: 'http://localhost:8282/races'
      }).then(function(response) {
          $scope.races = response.data;
      }, function(response) {
          console.error('Error requesting races');
      });
  });
Here all we are doing is calling our races service to get the list of races and assigning it to a variable in our scope. Start your races service app and the web app service and go to http://localhost:8080. If you open your browsers console you will see the following error.
Cross-Origin Request Blocked: The Same Origin Policy disallows reading the remote resource at http://localhost:8282/races. (Reason: CORS header ‘Access-Control-Allow-Origin’ missing).
If you are a web developer you are probably very familiar with this error. All modern browsers prevent AJAX requests to other domains unless the server on that domain has specifically allowed requests to come from your domain, this is called the same-origin policy. In this case we are making a request from localhost:8080 to localhost:8282 and the server at localhost:8282 has not said it allows requests coming from localhost:8080. We could enable CORS (cross-origin resource sharing) in our races service so we can make requests to it from localhost:8080, but this becomes quite messy. What happens when we deploy to production or test? Those are additional domains we have to enable as well. Since we can theoretically be talking to many, many microservices from the client side code we will have to do this for each service. In addition, it is not uncommon in a microservices application to have services evolve and change over time, so while the races service is located at a specific URL today, that might not be the case in the future. In short, hardcoding the URL to the service in our client side code and enabling CORS is just not going to cut it.
Luckily Spring Cloud has a very clean and robust solution available to us. To solve the problem of hard coding URLs in our client side code, or anywhere in our application, we will want to use service discovery. Service discovery allows services to query a central location for a complete list of services that are available and the URL(s) those services are available at.
To solve the cross-domain problem, it would be nice if we had a simple reverse proxy on the same domain as our web app that leveraged the service discovery service to route requests to the right service. We can use two projects that are part of Spring Cloud Netflix to do just that.
The first project, Eureka, will allow us to set up service discovery for all the services in our microservices app. Eureka has both server and client components. The Eureka server is what all the clients register with and what stores the list of available services and where they are located (their URLs). The Eureka client component is what we will integrate into each one of our microservices.
The second project, Zuul, integrates with Eureka and allows us to set up a reverse proxy to call our services from our web app.
Setting Up a Eureka Server
Head over to start.spring.io and fill out the form following the screenshot below.
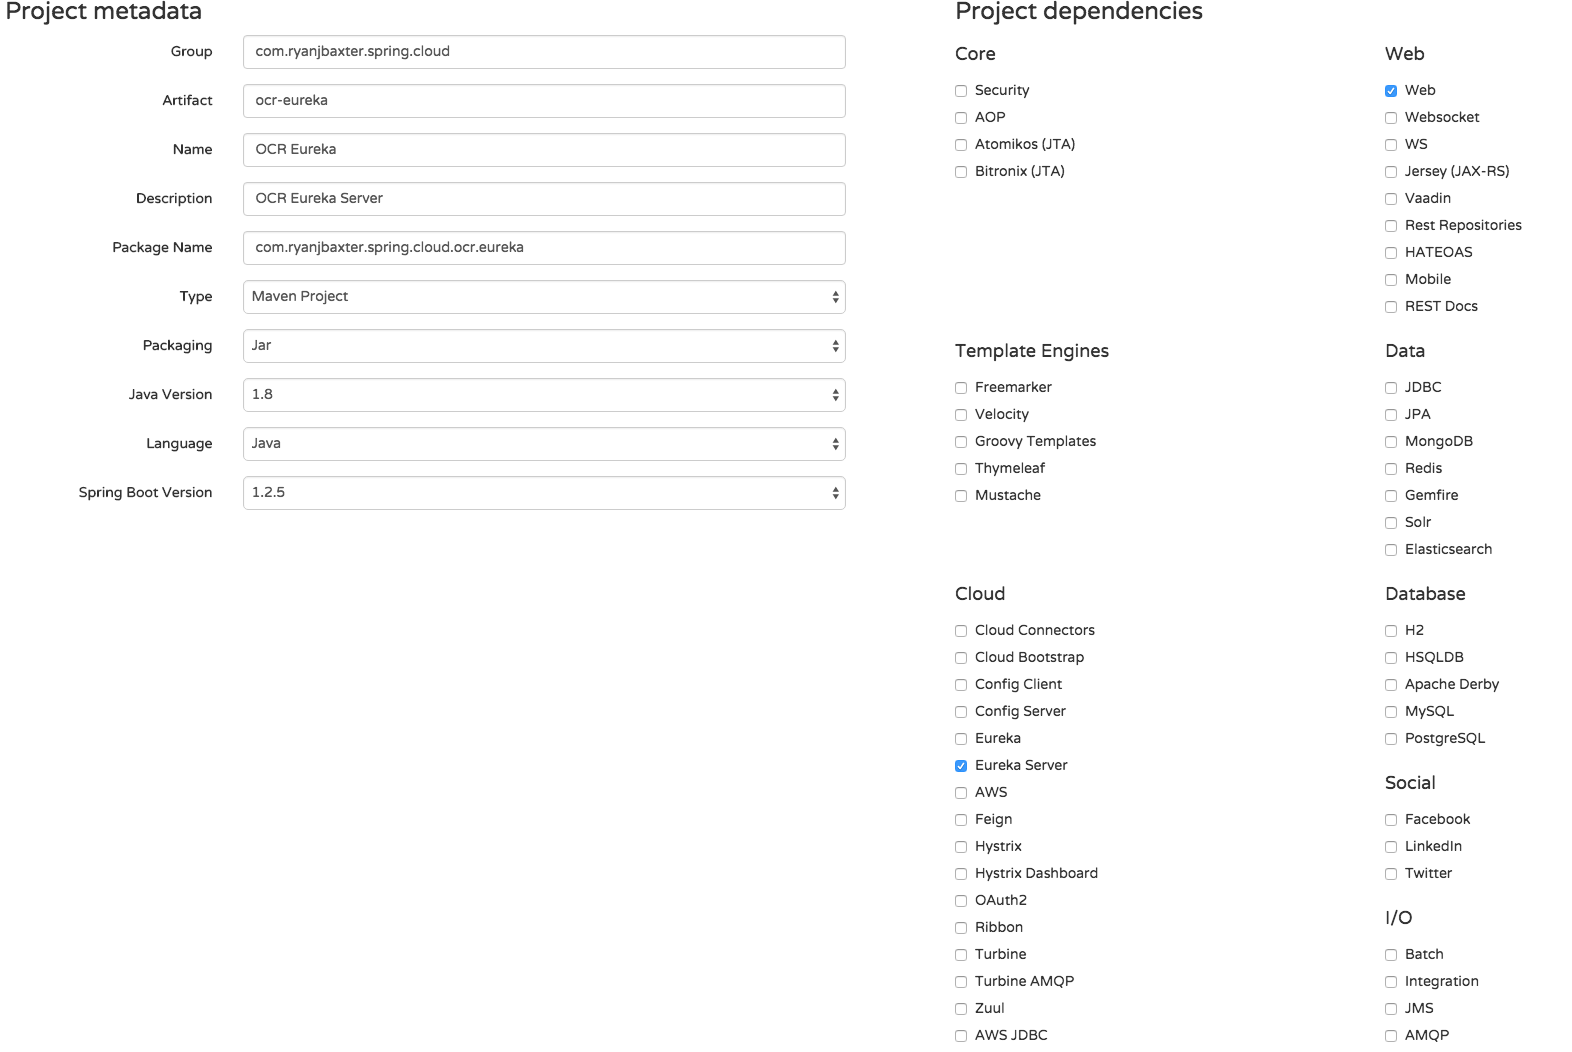
Click the Generate button to download the source code and then import the new project into your IDE. If you open the POM file for this new project you will notice the following dependency:
<dependency>
<groupId>org.springframework.cloud</groupId>
<artifactId>spring-cloud-starter-eureka-server</artifactId>
</dependency>
This is our first time seeing a Spring Cloud dependency. It works much like the other “starter” dependencies for Spring Boot. The versions are managed by the Spring Cloud starter parent, which you will find in the dependency management section of the POM as well.
To make this Spring Boot application act as a Eureka server all we need to do is add a single annotation to our application class and add a couple of properties to our application properties/YAML file. Open OcrEurekaApplication.java incom.ryanjbaxter.spring.cloud.ocr.eureka. At the top of the class file, either above or below@SpringBootApplication add @EnableEurekaServer. Your class file should look like this.
package com.ryanjbaxter.spring.cloud.ocr.eureka;

import org.springframework.boot.SpringApplication;
import org.springframework.boot.autoconfigure.SpringBootApplication;
import org.springframework.cloud.netflix.eureka.server.EnableEurekaServer;

@SpringBootApplication
@EnableEurekaServer
public class OcrEurekaApplication {

    public static void main(String[] args) {
        SpringApplication.run(OcrEurekaApplication.class, args);
    }
}
And that's it; no code to write at all!
Now go to src/main/resources and rename application.properties to application.yml and open the file application.yml. Add the following properties to your YAML file:
server:
  port: 8761

eureka:
  instance:
    hostname: localhost
  client:
    registerWithEureka: false
    fetchRegistry: false
    serviceUrl:
      defaultZone: http://${eureka.instance.hostname}:${server.port}/eureka/
Everything in the eureka section of the YAML file is technically optional but eliminates some unnecessary noise in the log files for now. Eureka out of the box is set up for high availability, so it expects that there will be a second Eureka server that can replicate information. Since we are just running locally for now, we don’t need to worry about this, so these properties are just disabling that replication. If you didn’t add these properties everything would still work fine, but you would see some errors in the logs.
To start our Eureka server just run the Spring Boot app. Once the app starts go to http://localhost:8761 and you should see a nice Eureka dashboard that will list all the services that are registered with Eureka. Currently, there are none so let's fix that.
Enabling Eureka Clients
Let's get our services configured to be Eureka clients. First, we need to name our services. By default, Spring Cloud Netflix will use the application name as the service name when registering services with Eureka. To give our application’s names we can set a specific Spring Boot property. In the src/main/resources folder of the races, participants, and web services create a file calledbootstrap.yml. Within the bootstrap.yml files add the following properties.
spring:
  application:
    name: web
The above code snippet is an example bootstrap.yml file from the web service (we are giving the app the name web). In the bootstrap.yml files for the races and participants services change the name property to races and participants respectively.
Now that our services have names lets add the Eureka client dependencies to them. In the POM files for the races, participants, and web services add the following dependency management section:
<dependencyManagement>
<dependencies>
<dependency>
<groupId>org.springframework.cloud</groupId>
<artifactId>spring-cloud-starter-parent</artifactId>
<version>Angel.SR3</version>
<type>pom</type>
<scope>import</scope>
</dependency>
</dependencies>
</dependencyManagement>
In addition, you will want to add the following dependency to all three POMs:
<dependency>
<groupId>org.springframework.cloud</groupId>
<artifactId>spring-cloud-starter-eureka</artifactId>
</dependency>
That takes care of our dependencies, now we can make each service a client by adding a single annotation to the application class file and adding some properties to the application’s properties file. Open the application class file for each service and add @EnableEurekaClient to the class file. For example, here is what the application class file for the web service:
package com.ryanjbaxter.spring.cloud.ocr.web;

import org.springframework.boot.SpringApplication;
import org.springframework.boot.autoconfigure.SpringBootApplication;
import org.springframework.cloud.client.discovery.EnableDiscoveryClient;

@SpringBootApplication
@EnableDiscoveryClient
public class OcrWebApplication {

    public static void main(String[] args) {
        SpringApplication.run(OcrWebApplication.class, args);
    }
}
Now open the application.yml file for each service and add the following properties:
eureka:
  client:
    serviceUrl:
      defaultZone: http://localhost:8761/eureka/
These properties just tell the Eureka client where the Eureka server is located so it knows where to register itself.
Start all the apps, the Eureka server, the races service, the participants service, and the web service. It takes a few minutes for all the services to register themselves with Eureka. If you watch the logs you should see an indication that registrations are taking place. For example here are the logs from the races service when it registers itself with Eureka.
2015-09-10 10:21:56.762  INFO 5149 --- [pool-3-thread-1] com.netflix.discovery.DiscoveryClient    : Disable delta property : false
2015-09-10 10:21:56.763  INFO 5149 --- [pool-3-thread-1] com.netflix.discovery.DiscoveryClient    : Single vip registry refresh property : null
2015-09-10 10:21:56.763  INFO 5149 --- [pool-3-thread-1] com.netflix.discovery.DiscoveryClient    : Force full registry fetch : false
2015-09-10 10:21:56.763  INFO 5149 --- [pool-3-thread-1] com.netflix.discovery.DiscoveryClient    : Application is null : false
2015-09-10 10:21:56.763  INFO 5149 --- [pool-3-thread-1] com.netflix.discovery.DiscoveryClient    : Registered Applications size is zero : true
2015-09-10 10:21:56.763  INFO 5149 --- [pool-3-thread-1] com.netflix.discovery.DiscoveryClient    : Application version is -1: false
2015-09-10 10:21:56.768  INFO 5149 --- [pool-3-thread-1] com.netflix.discovery.DiscoveryClient    : Getting all instance registry info from the eureka server
2015-09-10 10:21:56.769  INFO 5149 --- [pool-3-thread-1] com.netflix.discovery.DiscoveryClient    : The response status is 200
2015-09-10 10:21:56.851  INFO 5149 --- [pool-2-thread-1] com.netflix.discovery.DiscoveryClient    : DiscoveryClient_RACES/ryans-macbook-pro.local - Re-registering apps/RACES
2015-09-10 10:21:56.851  INFO 5149 --- [pool-2-thread-1] com.netflix.discovery.DiscoveryClient    : DiscoveryClient_RACES/ryans-macbook-pro.local: registering service...
2015-09-10 10:21:56.885  INFO 5149 --- [pool-2-thread-1] com.netflix.discovery.DiscoveryClient    : DiscoveryClient_RACES/ryans-macbook-pro.local - registration status: 204
2015-09-10 10:22:06.770  INFO 5149 --- [scoveryClient-2] com.netflix.discovery.DiscoveryClient    : DiscoveryClient_RACES/ryans-macbook-pro.local - retransmit instance info with status UP
2015-09-10 10:22:06.770  INFO 5149 --- [scoveryClient-2] com.netflix.discovery.DiscoveryClient    : DiscoveryClient_RACES/ryans-macbook-pro.local: registering service...
2015-09-10 10:22:06.779  INFO 5149 --- [scoveryClient-2] com.netflix.discovery.DiscoveryClient    : DiscoveryClient_RACES/ryans-macbook-pro.local - registration status: 204
If you see this in the logs of your services than you know things are working. Once you start seeing these logs you can go to http://localhost:8671 and check the Eureka dashboard. You should see something similar to the screenshot below with all the services registered.

Setting Up a Reverse Proxy with Zuul
Zuul will use the Eureka server in order to know how and where to route incoming requests. We will integrate Zuul into our web service so our client-side code can make requests back to the server on the same domain and avoid any cross-domain issues.
First, we need to add the Zuul starter dependency to the POM of our web service. Open the POM file and add the following dependency.
<dependency>
<groupId>org.springframework.cloud</groupId>
<artifactId>spring-cloud-starter-zuul</artifactId>
</dependency>
Again turning on Zuul in our application is as simple as adding another annotation to our application class file and adding some properties to our application’s properties file. OpenOcrWebApplication.java in com.ryanjbaxter.spring.cloud.ocr.web and add @EnableZuulProxy to the class file.
package com.ryanjbaxter.spring.cloud.ocr.web;

import org.springframework.boot.SpringApplication;
import org.springframework.boot.autoconfigure.SpringBootApplication;
import org.springframework.cloud.client.discovery.EnableDiscoveryClient;
import org.springframework.cloud.netflix.zuul.EnableZuulProxy;

@SpringBootApplication
@EnableZuulProxy
@EnableDiscoveryClient
public class OcrWebApplication {

    public static void main(String[] args) {
        SpringApplication.run(OcrWebApplication.class, args);
    }
}
By default, Zuul will forward requests to path xyz to service xzy. For example, if you were to make a request to http://localhost:8080/races it would forward that request to the races service and call http://localhost:8282/. However, if you were to make a request to http://localhost:8080/races/123 it would not know what to do with it because it doesn’t know about the additional path information. In the properties above we are just telling Zuul to forward all requests to /races/** to the races service and all requests to /participants/** to the participants service.
After making the above changes to the web service, restart the application. Once it has reregistered with Eureka, try using the reverse proxy to proxy requests to the services. For example, you should be able to open a browser and go to http://localhost:8080/races and get back the array of race information. It should look exactly the same as if you went to the service directly by going to http://localhost:8282. Similarly, you should be able to go to http://localhost:8080/participants and get back the array of participants. If those work than everything is setup correctly and you are good to go. We can now use the reverse proxy and Eureka to finish implementing our web app.
Implementing the Races View
First, let's make sure that we can fix the cross-domain issue we were having when we started.
Open main.js in the src/main/resources/static/controllers folder of your web service. Change the url property of the $http call to /races.
angular.module('ocrApp')
  .controller('MainCtrl', function ($scope, $http) {
  $http({
          method: 'GET',
          url: '/races'
      }).then(function(response) {
      $scope.races = response.data;
      }, function(response) {
      console.error('Error requesting races');
      });
  });
Make sure all the services are running and registered with Eureka and go to http://localhost:8080. If you open the console of your browser you should no longer see any cross-domain errors and your request to http://localhost:8080/races should complete successfully.
Now let's leverage the data we are getting back from the request in the view for the main controller. Open main.html in the src/main/resources/static/views folder of the web service and change to code to:
<h3>Races</h3>
<ul>
<li ng-repeat="race in races"><a ng-href="/#/participants/{{race.id}}">{{race.name}}</a></li>
</ul>
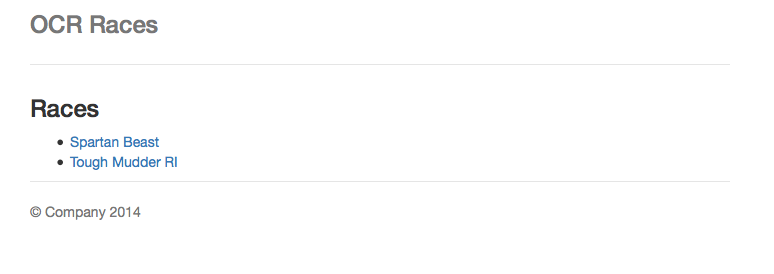
After saving this file, go to http://localhost:8080 and you should see a list of races.
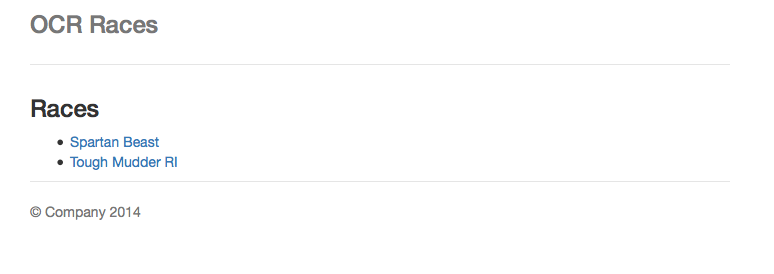
Clicking the links won’t work yet because we have not added the views or controllers to render the page, let's do that now.
Adding a Participants View
Create a new file called participants.js in src/main/resources/static/scripts/controllers and add the following code:
angular.module('ocrApp')
  .controller('ParticipantsCtrl', function ($scope, $http, $routeParams) {
  $http({
          method: 'GET',
          url: '/participants/races/' + $routeParams.raceId
      }).then(function (response) {
      $scope.participants = response.data;
      }, function(response) {
      console.error('Error requesting participants.')
      });
  });
This code just makes a request to our participants service (through Zuul) to get the list of participants for the race we clicked on. Now we need a view to render the participants names. Create a file called participants.html in src/main/resources/static/views and add the following code:
<h3>Participants</h3>
<ul>
<li ng-repeat="participant in participants">{{participant.firstName}} {{participant.lastName}}</li>
</ul>
Finally we need to tell Angular about the new participants view and controller. Open app.js insrc/main/resources/static/scripts and modify it so it looks like the following code:
angular
  .module('ocrApp', [
    'ngAnimate',
    'ngCookies',
    'ngResource',
    'ngRoute',
    'ngSanitize',
    'ngTouch'
  ])
  .config(function ($routeProvider) {
    $routeProvider
      .when('/', {
        templateUrl: 'views/main.html',
        controller: 'MainCtrl'
      })
      .when('/participants/:raceId', {
      templateUrl: 'views/participants.html',
      controller: 'ParticipantsCtrl'
      })
      .otherwise({
        redirectTo: '/'
      });
  });
Last but not least we need to include participants.js in our index.html page so the new JavaScript gets loaded. Open index.html in src/main/resources/static and at the bottom, right after all the other script tags, add the following script tag to the file:
<script data-fr-src="scripts/controllers/participants.js"></script>That's it! Refresh the page and try clicking on the links; they should all work now and you should be able to see every participant in each race.
Congratulations, you have built your first microservice app with Spring Boot and Spring Cloud! Granted, it is very simple and only works on your local machine, but it didn’t take much effort to do because Spring Boot and Spring Cloud make it easy to do what otherwise would be very complex tasks.
Additional Spring Cloud Netflix Features
There are a couple of additional features in Spring Cloud Netflix that are particularly useful and worth demonstrating.
Feign is a declarative web service client. It makes writing web service clients easier. To use Feign create an interface and annotate it. It has pluggable annotation support including Feign annotations and JAX-RS annotations. Feign also supports pluggable encoders and decoders. Spring Cloud adds support for Spring MVC annotations and for using the same HttpMessageConverters used by default in Spring Web. Spring Cloud integrates Ribbon and Eureka to provide a load-balanced http client when using Feign.
In summary, if you are looking to build a REST API client, Feign is your friend. Making REST API calls from one service to another is a very common pattern in microservice applications so this functionality will prove particularly useful. Also notice that Spring Cloud adds support for Ribbon and Eureka to Feign.
Ribbon is another project from Netflix OSS and is what amounts to a client-side load balancer. This is important for obvious reasons when we start to look at services distributed over different data centers and geographies. For example, Ribbon will use Eureka to figure out which instance of a service it should make a request to. We will talk about Ribbon more in a future blog post, for now just know that it will load balance our requests from our Feign clients.
Getting Started with Feign
Now that we know what Feign is and why we want to use it, let's leverage it in our sample application. Right now, to get the participants for races, we have to request to /races to get all the races and then request to /participants/races/{id} to get the participants for a given race. In some situations this might be OK, but maybe not for all situations. Consider the case where our app is being used on a mobile device. Since the network on a mobile device is typically a lot slower than a desktop we might want to limit the number of network requests we need to make in order to get all the data we need. In other words, a mobile client might want to make a single request to get all the race and participant data instead of multiple requests. Let's introduce a new API for mobile clients to use that does just that.
Our new API will need to use both the races service and the participants service. Since it is really returning data about races it makes sense for it to live in the races service. We need a way to call the participants service from the races service, this is where Feign comes in. First lets open the POM file for our races service and add the Feign dependency to our project. In the dependencies section of your POM add the following dependency:
<dependency>
    <groupId>org.springframework.cloud</groupId>
    <artifactId>spring-cloud-starter-feign</artifactId>
</dependency>
Now lets open OcrRacesApplication.java in com.ryanjbaxter.spring.cloud.ocr.races. Lets create a new interface that acts as our REST client for talking to the participants service. Create a new class called ParticipantsClient with the following code:
@FeignClient("participants")
interface ParticipantsClient {

    @RequestMapping(method = RequestMethod.GET, value="/races/{raceId}")
    List<Participant> getParticipants(@PathVariable("raceId") String raceId);

}
The first thing you notice is that this interface uses an annotation called @FeignClient. This annotation is telling Feign that we will be talking to a service called “participants”. Feign will use Eureka to figure out the correct URL for the participants service. The rest of the interface should look pretty familiar to you if you are familiar with Spring MVC. The @RequestMapping annotation on the getParticipants method is telling Feign to make a GET request to the participants service at the path /races/raceId.
At this point you will have compile errors in your interface because there is no class called Participant in the races service. If you are a seasoned Java developer, your first instinct will probably be to do some refactoring. You might go to the participants service extract out the Participant class into its own project. Then you would change the participants and races service so they depend on this new project. This has been engrained in our minds due to the DRY (do not repeat yourself) principal, which says we should not be copying and pasting code all over the place due to the fact that it will become unmaintainable. This is certainly a valid concern, however we have to balance the DRY principal along with other principals of microservices. The problem with this approach to refactoring our application is that we now have a common class used by 2 (or more) services. What happens when one service needs to make a change to that class? If the change is drastic enough, you can break the other service. This means that the services can’t evolve independently of each other, which is one of the benefits we are trying to achieve by using microservices.
At the end of the day, you have to make a decision that is right for you, your team, and your project. Do you want to share code between your microservices or do you want the benefit of being able to evolve your services independently of each other? In this case, we will NOT follow the DRY principle and create a new Participant class in our races service. Why? Think about how you would be working if you were building a real production-grade microservices application. You would be a developer on a team that is responsible for a single service. In theory, you will know nothing about the implementations of other services you depend on, the only thing you can rely on is their public API. They may not even be implemented in the same language that you are using. Based on that logic, it makes sense for you to create a Participant class in your service which corresponds to what their public API will return. In my opinion, when it comes to microservices, sharing code between services does not generally make sense.
In OcrRacesApplication.java, create a new Participant class:
class Participant {
    private String firstName;
    private String lastName;
    private String homeState;
    private String shirtSize;
    private List<String> races;
    public Participant(String firstName, String lastName, String homeState,
            String shirtSize, List<String> races) {
        super();
        this.firstName = firstName;
        this.lastName = lastName;
        this.homeState = homeState;
        this.shirtSize = shirtSize;
        this.races = races;
    }

    public Participant(){}
    public String getFirstName() {
        return firstName;
    }
    public void setFirstName(String firstName) {
        this.firstName = firstName;
    }
    public String getLastName() {
        return lastName;
    }
    public void setLastName(String lastName) {
        this.lastName = lastName;
    }
    public String getHomeState() {
        return homeState;
    }
    public void setHomeState(String homeState) {
        this.homeState = homeState;
    }
    public String getShirtSize() {
        return shirtSize;
    }
    public void setShirtSize(String shirtSize) {
        this.shirtSize = shirtSize;
    }
    public List<String> getRaces() {
        return races;
    }
    public void setRaces(List<String> races) {
        this.races = races;
    }
}
Finally, we will need a new Race class which contains the information about the participants in the race. Here, again we have a couple of options. We can add a list of participants to our existing Race class but doing this would result in this weird participants property in the JSON that is always an empty array when we make requests to /races. It seems odd to me as a consumer to have a property that seemingly never gets used until we call this new API we are creating. The second option is to create a subclass of Race that contains participants. Add a new class called RacesWithParticipants:
class RaceWithParticipants extends Race {
    private List<Participant> participants;

    public RaceWithParticipants(Race r, List<Participant> participants) {
        super(r.getName(), r.getId(), r.getState(), r.getCity());
        this.participants = participants;
    }

    public List<Participant> getParticipants() {
        return participants;
    }

    public void setParticipants(List<Participant> participants) {
        this.participants = participants;
    }
}
Using the Feign Client
Now we are ready to create our new API which will return race data including participant information. In the OcrRacesApplication class where we have our existing getRaces API create a new API called getRacesWithParticipants. But before we do that we will need an instance of ParticipantsClient which we will use in the new API to call the participants service. Add a new variable to the class:
@Autowired
private ParticipantsClient participantsClient;
Now add the new API:
@RequestMapping("/participants")
    public List<RaceWithParticipants> getRacesWithParticipants() {
        List<RaceWithParticipants> returnRaces = new ArrayList<RaceWithParticipants>();
        for(Race r : races) {
            returnRaces.add(new RaceWithParticipants(r, participantsClient.getParticipants(r.getId())));
        }
        return returnRaces;
    }
That is all the code we need to write, now lets test out our new API. Start the eureka, races, participants, and web services and go to http://localhost:8080/races/participants. (Make sure you let all the services register themselves with Eureka before trying the API.) This should return some JSON that looks like this:
[
   {
      "name":"Spartan Beast",
      "id":"123",
      "state":"MA",
      "city":"Boston",
      "participants":[
         {
            "firstName":"Ryan",
            "lastName":"Baxter",
            "homeState":"MA",
            "shirtSize":"S",
            "races":[
               "123",
               "456"
            ]
         }
      ]
   },
   {
      "name":"Tough Mudder RI",
      "id":"456",
      "state":"RI",
      "city":"Providence",
      "participants":[
         {
            "firstName":"Ryan",
            "lastName":"Baxter",
            "homeState":"MA",
            "shirtSize":"S",
            "races":[
               "123",
               "456"
            ]
         },
         {
            "firstName":"Stephanie",
            "lastName":"Baxter",
            "homeState":"MA",
            "shirtSize":"S",
            "races":[
               "456"
            ]
         }
      ]
   }
]
At the same time, you can also continue to use the /races API at http://localhost:8080/races to just get the race data.
As you can see Feign makes it very easy to build REST clients for other services in your microservices app. Just by using a few annotations and minimal Java code you can easily construct a REST client for any service you want.
Circuit Breakers in Microservice Apps
One of the inherent problems when you have a distributed app like a microservice app is cascading failures across services. Since the application is composed of several distributed services, there are more chances for failure when making remote calls. In addition, distributed apps often tend to chain together service calls, so any problem with a service at the end of the chain can cause problems for all the services further up the chain.
As a service owner, we want to insulate ourselves from problems in our dependent services, so how do we do that? One solution is to use the circuit breaker pattern which was introduced by Michael Nygard in his book, "Release It."
In the circuit breaker pattern, calls to remote services are protected by what is called a circuit breaker. As long as there are no errors, the circuit stays closed and the remote calls are made as normal. If the circuit detects a problem with the remote call, then the circuit breaker is tripped and the circuit is opened stopping the remote call from being made. Once the circuit detects that the remote call can successfully be made again the circuit will be closed allowing the remote call to be made.
In the Netflix and Spring Cloud world, the tool for implementing circuit breakers is called Hystrix. Lets look at how we protect the remote service calls in our app using Hystrix.
Adding Circuit Breakers to Our Code
There are two places in our app where one service is calling another service. The first place that should come to mind is where we are using the Zuul proxy. The Zuul proxy is used in our web app to proxy our JavaScript calls from our web app to the other microservices. Luckily Spring Cloud automatically protects all these calls with circuit breakers for you so there is nothing we really have to do.
In this API we make a request to our Participants service from our Races service. If for whatever reason our Participants service is down or not responding fast enough, our Races service will suffer. Rather than have our Races service break because of issues with the Participants service, we can protect the remote call with a circuit breaker and actually return something back to our clients even if there is a problem with the Participants service. What we respond back with might not be ideal or have all the information our clients need, but it is better than the call failing or timing out. Lets take a look at how we use Hystrix in our Races service.
In order to use Hystrix we need to add the Hystrix dependency to our Races service. Open the POM file for the Races service and add the following dependency in the dependencies section.
<dependency>
  <groupId>org.springframework.cloud</groupId>
  <artifactId>spring-cloud-starter-hystrix</artifactId>
</dependency>
Now that we have our dependency in place, we can start using Hystrix. Above we created a Feign client to make remote calls to the Participants service and added a new REST API at /participants which used the Feign client to get participant information and add it to the race data. We need to protect this call from potential failures, so the obvious solution would be to add a circuit breaker around the REST API. Unfortunately, right now we cannot wrap a REST Controller in a circuit breaker (see this GitHub issue). Because of this limitation, we will need to break out the call to the Feign client into its own Bean.
Open OcrRacesApplication.java and update the OcrRacesApplication class and add a new bean called ParticipantsBean.
@SpringBootApplication
@RestController
@EnableEurekaClient
@EnableFeignClients
@EnableCircuitBreaker
public class OcrRacesApplication implements CommandLineRunner {

    private static List<Race> races = new ArrayList<Race>();
    @Autowired
    private ParticipantsBean participantsBean;

    public static void main(String[] args) {
        SpringApplication.run(OcrRacesApplication.class, args);
    }

    @Override
    public void run(String... arg0) throws Exception {
        races.add(new Race("Spartan Beast", "123", "MA", "Boston"));
        races.add(new Race("Tough Mudder RI", "456", "RI", "Providence"));
    }

    @RequestMapping("/")
    public List<Race> getRaces() {
        return races;
    }

    @RequestMapping("/participants")
    public List<RaceWithParticipants> getRacesWithParticipants() {
        List<RaceWithParticipants> returnRaces = new ArrayList<RaceWithParticipants>();
        for(Race r : races) {
            returnRaces.add(new RaceWithParticipants(r, participantsBean.getParticipants(r.getId())));
        }
        return returnRaces;
    }
}

 @Component
class ParticipantsBean {
    @Autowired
    private ParticipantsClient participantsClient;

    @HystrixCommand(fallbackMethod = "defaultParticipants")
    public List<Participant> getParticipants(String raceId) {
        return participantsClient.getParticipants(raceId);
    }

    public List<Participant> defaultParticipants(String raceId) {
        return new ArrayList<Participant>();
    }
}
In the OcrRacesApplication class we have added the @EnableCircuitBreaker annotation to enable circuit breakers in our application. The next change to this class is in our /participants API where we are now calling our new bean instead of the Feign client directly. In the new bean we just wrap the call to the Feign client in a method called getParticipants. This is the method we wrap in a circuit breaker since it is the one using the remote service. We enable the circuit breaker functionality by using the @HystrixCommand annotation on the method. In the annotation we specify a fallback method to call if the circuit is open. If the circuit is open we call the method in our bean called defaultParticipants which just returns an empty list. You can do whatever you want in your fallback method, and generally it would be more sophisticated than returning an empty list, but for this sample an empty list is good enough. In a production application, maybe our Races services would cache participants data so we have something to return if the circuit is ever open.
That is all we have to do! Nnow our remote call to the Participants service is protected by a circuit breaker.
Hystrix Dashboard
Having circuit breakers in our services is nice, but how do we know the state of the circuits? Luckily Netflix and Spring Cloud provide a web application called the Hystrix Dashboard that gives us the information we need. This dashboard gives developers and operations insight into various statistics about the circuits in their applications such as success and failure rates. In addition to the Hystrix Dashboard, Netflix and Spring Cloud also offer another tool called Turbine. Turbine helps aggregate various streams of Hystrix data into a single stream so you don’t have to continuously switch streams in the dashboard to view data from different instances of a service.
To take advantage of these tools in our application, let's add a new service to our app to host them. Go to start.spring.io and create a new project based on the following image.
Make sure you add the Hystrix Dashboard and Turbine starters. Once you have the form filled out, click Generate Project to download the zip and import the project into your workspace. To enable the Hystrix Dashboard, we need to add a single annotation in com.ryanjbaxter.spring.cloud.ocr.hystrix.HystrixDashboardApplication. Open this class file and add @EnableHystrixDashboard to the class file.
package com.ryanjbaxter.spring.cloud.ocr.hystrix;

import org.springframework.boot.SpringApplication;
import org.springframework.boot.autoconfigure.SpringBootApplication;
import org.springframework.cloud.netflix.hystrix.dashboard.EnableHystrixDashboard;
import org.springframework.cloud.netflix.turbine.EnableTurbine;

@SpringBootApplication
@EnableHystrixDashboard
public class HystrixDashboardApplication {

    public static void main(String[] args) {
        SpringApplication.run(HystrixDashboardApplication.class, args);
    }
}
The only other thing we have to do now is a little configuration. We want to change the port our Hystrix Dashboard and Turbine services will be running on so go to src/main/resources in the new project and rename application.properties to application.yml. Then add the following properties to the YAML file.
server:
  port: 8383
Start the application, which will be running on port 8383, and go to http://localhost:8383/hystrix. You should see a page that looks like this.
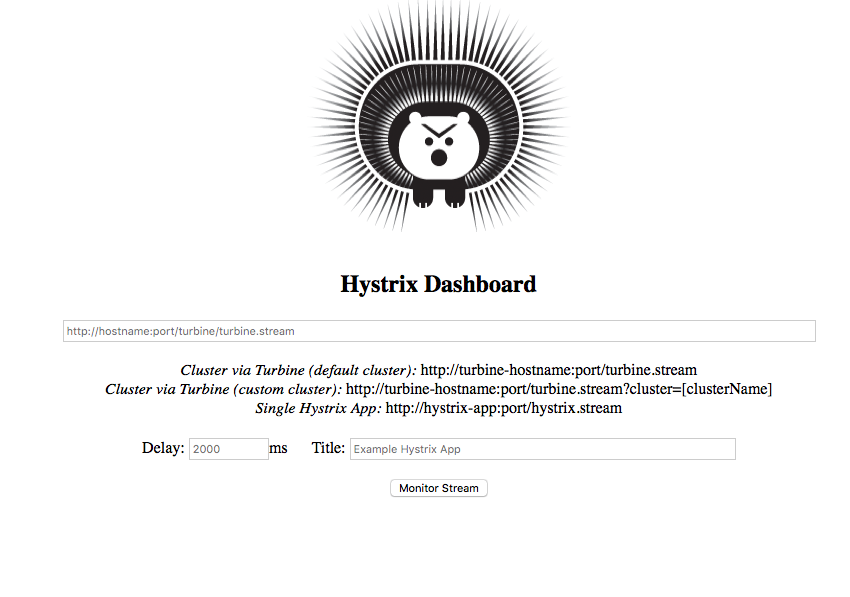
The one required field in this form is a URL to either a Hystrix or Turbine stream. We have not yet configured Turbine, so lets try a Hystrix stream. Start up all the other services for the app (Eureka, Races, Participants, and Web) and wait for everything to register itself with Eureka.
Once everything is registered go to the web app at http://localhost:8080 and click on a race to view the participants. This step is necessary in order to see any interesting statistics regarding the circuit breakers in Zuul. Now go back to your Hystrix Dashboard, enter the URL http://localhost:8080/hystrix.stream, and click Monitor Stream. The resulting dashboard should look something like the screenshot below.

You will notice we have two circuit breakers, one for the call to proxy requests to the Races service, and the other for the call to proxy requests to the Participants service. If you start refreshing the web app you will notice the dashboard change as it monitors requests through the circuit breakers. However, you typically cannot do a very good job simulating load on a service by refreshing a page manually in a browser. One tool that can better simulate load on our services is called Siege. You can install Siege via your favorite package manager (Homebrew, Yum, Apt-Get, etc). Once installed it is pretty easy to use. For example, to hit the Races service through our Zuul proxy you would just do:
$ siege http://localhost:8080/racesOnce you do this, take a look at the Hystrix dashboard and you will notice some more interesting data in the dashboard.

For information about what all the numbers mean in the dashboard take a look at the Hystrix wiki page on GitHub.
What about monitoring the circuit breaker we added in the Races service? First, let's make sure we hit the API so we have some data. Go to http://localhost:8282/participants. Then back on the Hystrix Dashboard landing page (http://localhost:8383/hystrix) enter the URL http://localhost:8282/hystrix.stream and click Monitor Stream. When you do this you should get an error in the dashboard, but why?

This is because the stream functionality hasn’t been enabled in the application yet (Zuul automatically has it enabled, that is why it worked out of the box in our Web service). To add the Hystrix Stream to the app we need to add the Spring Boot Actuator starter to the Races service (as specified in the Spring Cloud Netflix documentation). Open the POM file for the Races service and add the following dependency in the dependencies section.
<dependency>
  <groupId>org.springframework.boot</groupId>
  <artifactId>spring-boot-starter-actuator</artifactId>
</dependency>
Save the POM and restart the Races service. Again hit the /participants API in your browser by going to http://localhost:8282/participants. Now back on the Hystrix Dashboard landing page enter http://localhost:8282/hystrix.stream and click Monitor Stream. Now you should see information about our getParticipants method protected by our circuit breaker.
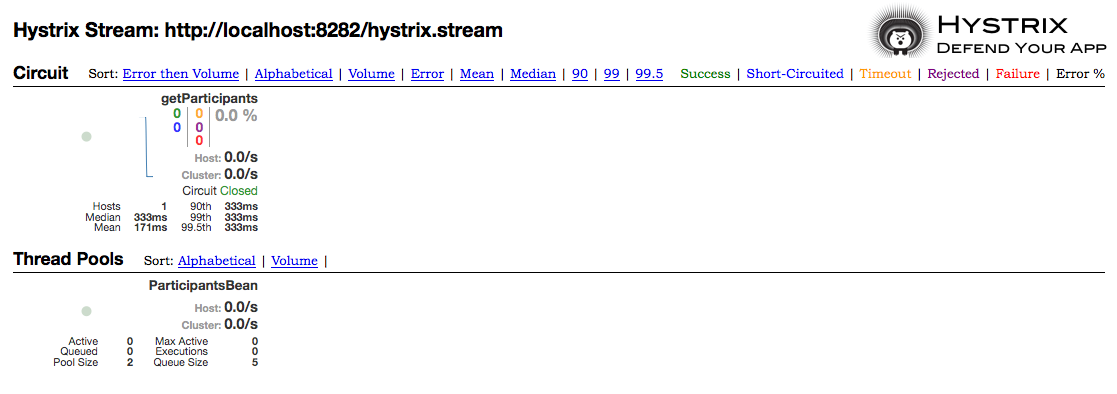
Again if you put the API under seige you will start to see more interesting data. But what happens in the failure case? If you shut down the Participants service, just by stopping it from running, and then hit the API or put the API under seige you should see the circuit open and the number of failures in the dashboard go up.
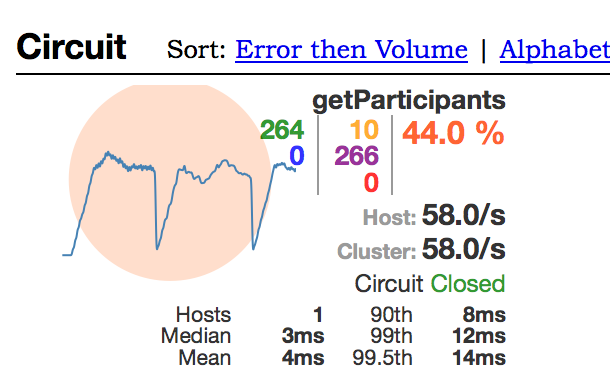
In the above screenshot, we see a number of requests have started failing (the purple number) and our error rate is starting to go up however the circuit is still closed. In the below screenshot the circuit has finally opened due to the number of failing requests.

The number in blue (548) is the number of calls that have been short-circuited or have gone to our fallback method defined in our @HystrixCommand. Since the circuit is open, if we hit the API in the browser we should see empty lists come back for the participants data since that is the behavior we defined in our fallback method. Go to http://localhost:8282/participants. Notice the data returned will look like this:
[
   {
      "name":"Spartan Beast",
      "id":"123",
      "state":"MA",
      "city":"Boston",
      "participants":[

      ]
   },
   {
      "name":"Tough Mudder RI",
      "id":"456",
      "state":"RI",
      "city":"Providence",
      "participants":[

      ]
   }
]
No participant data as expected.
Now if we start the Participants service back up the circuit should close and our requests should again succeed. But how does the circuit know the service is back up? Periodically the circuit will let a couple of requests through to see if they succeed or not. Notice the 2 failures (in red) in the screenshot below. When these requests start succeeding then the circuit will be closed and the requests will be let through.
Now that the service is back up everything gets back to normal and we see the circuit close.
Using Turbine
This is all nice, but switching between various Hystrix Streams can be a pain, it would be nice to be able to see streams based on service id. This is where Turbine comes in. When we created our Hystrix Dashboard project on start.spring.io we added the Turbine dependency to our project so we have all the dependencies we need already in our POM. To enable Turbine we need to add a single annotation to com.ryanjbaxter.spring.cloud.ocr.hystrix.HystrixDashboardApplication. Open the class file and add @EnableTurbine:
package com.ryanjbaxter.spring.cloud.ocr.hystrix;

import org.springframework.boot.SpringApplication;
import org.springframework.boot.autoconfigure.SpringBootApplication;
import org.springframework.cloud.netflix.hystrix.dashboard.EnableHystrixDashboard;
import org.springframework.cloud.netflix.turbine.EnableTurbine;

@SpringBootApplication
@EnableHystrixDashboard
@EnableTurbine
public class HystrixDashboardApplication {

    public static void main(String[] args) {
        SpringApplication.run(HystrixDashboardApplication.class, args);
    }
}
Now we need to tell Turbine which services we want it to aggregate the information for. Open src/main/resources/application.yml and add the following configuration properties.
server:
  port: 8383

turbine:
  appConfig: web,races
  aggregator:
    clusterConfig: WEB,RACES
The turbine.appConfig property specifies the service names that you would like to aggregate. These values just need to match the service IDs we have already configured with Eureka. The turbine.aggregator.clusterConfig parameter are cluster names and they need to match the service IDs as well, the only difference being that they MUST be uppercase.
After adding the new annotation and the additional config restart the Hystrix Dashboard app. Once the app is back up, head to the Hystrix Dashboard again (http://localhost:8383/hystrix). Now instead of entering URLs to the individual Hystrix streams of our services, lets use Turbine. Enter the URL http://localhost:8383/turbine.stream?cluster=WEB and click Monitor Stream. This should bring up all the circuit breakers in the Web service (the one using our Zuul proxy). You should see the circuit breakers for the Participants and Races routes displayed in the dashboard just like if you were monitoring the Hystrix Stream of the individual service.
What if we want to look at the circuit breakers for the Races service? All we have to do is adjust the cluster query parameter in the Turbine URL to point to the Races cluster. Go back to the Hystrix landing page by either clicking the back button in your browser or going to back to http://localhost:8383/hystrix. Now enter the same Turbine URL but with the Races query parameter, http://localhost:8383/turbine.stream?cluster=RACES. Again what you will see should be the same as if we were pointing at the Races Hystrix stream. The obvious benefit here is we can monitor Hystrix streams based on service ID as opposed to URL. The other benefit, which is less obvious, is that if we were to scale these services horizontally we would see statistics about all instances of that service instead of just an individual service. This will be more useful when our application is running in the cloud…don’t worry we will get there eventually.
As you can see, circuit breakers play a very important role in a microservices application, and as usual Spring Cloud makes it easy to not only use them in your application but monitor the state of them in your application.
Our ultimate goal is to not run the application locally but instead run it in the cloud; after all, we are building a cloud-native application. my cloud of choice is IBM Bluemix. However, the changes described in this post should work in any cloud foundry deployment, but I have only tested them on Bluemix. (Spring Cloud is not biased toward any cloud platform; however, the way you configure and deploy your Spring Cloud applications may depend on the cloud you are targeting.)
The first step in getting our application to the cloud is not going to involve writing code; instead, we are going to look at setting up an environment for maintaining and deploying our app that will allow us to automate as much as possible. If our application is truly a cloud native application, then it should also be a 12-factor application. The first rule of being a 12-factor application is that our code should be in version control. Another property of a 12-factor application is that they have strictly separate build, release, and run stages. Luckily Bluemix provides devops services integrated into the platform which provides us with a Git repo for version control and build and deploy tools where we can set up a build and deploy pipeline to build, release, and run our application on Bluemix.
We have one critical choice to make at this point before we get down and dirty: do we want to put all of our services in one Git repo or have a separate Git repo for each service? When I first thought about what to do, I wanted to put everything in one Git repo just to simplify things. However, after heading down that path, I realized that it was the wrong decision and instead decided placing each service in its own Git repo was the right way to go. While initially this will require more setup time, it allows each service to evolve independently of each other in a true microservice and cloud native fashion. Take for example if we need to create a branch to work on a defect for one service, we don’t want a branch for all the other services as well, the only way to do this is if each service is in its own Git repo.
We are going to walk through how to deploy our Eureka server to the cloud since it is somewhat different than the other services in our application.
Create a Git Repo for Our Eureka Server
Let's get started by creating a new project in ibm devops services. Head to IBM DevOps Services, login, and click the create project button. give your project the name ocr-eureka. Choose the option to create a new repository, then select your location. I suggest you either create a Git repo on Bluemix or on github. If you want to initialize the repository with a readme and license file you can, I chose not to select that option. You can also choose to make the project private if you want, and add scrum development features, however that is not really important for this exercise. You should check off make this a Bluemix project and then select the region, organization, and space you will want to deploy the application to. this step will be important later on when we setup our build and deploy pipeline. below are screenshots of the configuration for my project.
Finally, click the create button to create your new Git repo.
We now want to get our code into this new Git repo. Open a terminal window and navigate to the directory containing the ocr-eureka project. (you should navigate to the root of the project, the folder containing your pom file.) Before we do anything with Git we will want to create a .gitignore file so we don’t add files we don’t want in our repo. Using your favorite text editor create a file called .gitignore and add the following content to it.
.settings
target
.classpath
.project
Once you have saved that file, run the following set of commands.
$ git init
$ git add .
$ git commit -m "initial commit"
$ git remote add origin <url to git repo on bluemix>
$ git push origin master
All we are doing above is initializing a local Git repo, adding all our code to it, committing it, adding our new remote Git repo, and than pushing all the code we committed locally to our remote Git repo in Bluemix. This should be nothing new to you if you are familiar with git. Once the code has been committed to the remote Git repo in Bluemix, you can refresh the repository page in ibm devops services and you should see all your code.
Configuring Eureka to Run in the Cloud
If you look at the application.yml file for our Eureka server you will notice that the hostname is hard coded to be localhost. Obviously, we will need to change that when Eureka gets deployed to Bluemix. Luckily this should be a simple change, but how will we know the right URL to use?
There are a number of solutions to figuring out the right url to use. One solution would be to set an environment variable to the URL for your Eureka server when you deploy the application to Bluemix and then use that environment variable in your application.yml file. However, Bluemix (and cloud foundry) already provides us with an environment variable with the uris of the application. the vcap_application environment variable, made available to the application by Bluemix (cloud foundry), has a uris property containing an array of all the URLs mapped to the application. So, instead of creating our own environment variable, we can just use the value in vcap_application instead. Below is a sample of what the vcap_application environment variable looks like.
"vcap_application": {
  "application_name": "ocr-eureka",
  "application_uris": [
   "ocr-eureka.mybluemix.net"
  ],
  "application_version": "a20e5183-2627-48af-90bf-d11e4248a2f8",
  "limits": {
   "disk": 1024,
   "fds": 16384,
   "mem": 1024
  },
  "name": "ocr-eureka",
  "space_id": "10d307d3-8f7e-4d5c-8d95-6e3785e90738",
  "space_name": "ryanjbaxter",
  "uris": [
   "ocr-eureka.mybluemix.net"
  ],
  "users": null,
  "version": "a20e5183-2627-48af-90bf-d11e4248a2f8"
 }
}
Open your application.yml file for your eureka server and copy the below yaml into your file.
server:
  port: 8761

eureka:
  instance:
    hostname: ${vcap.application.uris[0]:localhost}
  client:
    registerwitheureka: false
    fetchregistry: false
    serviceurl:
      defaultzone: http://${eureka.instance.hostname}:${server.port}/eureka/
Some of you might not be familiar with the syntax used in the hostname property. The ${value} syntax is a placeholder that lets us reference environment variables. Spring boot does some magic when it is running in a cloud foundry environment to flatten out the json of the vcap_application environment variable so we can reference values via the dot (.) syntax in the placeholder name. The colon in-between vcap.application.uris[0] and localhost is kind of like an if else statement. It basically says if the environment variable vcap_application contains a uris property use the first item in that array as the hostname value, if not use localhost. By using this if-else syntax we can run our application locally or in the cloud without much effort (assuming you don’t have a vcap_application environment variable set in your local dev environment). You could use spring profiles to do the same thing, but this keeps our yaml file a little cleaner, so I like this syntax better.
Make sure you commit and push these changes to your remote git repo in Bluemix.
Setting Up a Build and Deploy Pipeline for Eureka
Now let's configure the build and deploy stages for our Eureka service on Bluemix. Back in the project on IBM Devops Services click the build and deploy button. click the add stage button to add a new stage. give the stage the name build . for the input type, select scm repository, this should automatically populate the Git url field. Make sure master is selected under the branch drop down. In the stage trigger section select “run jobs whenever a change is pushed to git.”
Next click on the jobs tab. click the add job button and select build. Under the builder type select maven. The defaults for the build should be fine, we just need to make a small change to the shell script. Our code is using java 1.8 but by default the build will use java 1.7. to fix this problem change we need to change the java_home environment variable to point to java 1.8.
#!/bin/bash
export java_home=~/java8
mvn -b package
Click save to save the build stage.
Back on the build and deploy page click the add stage button again to add another stage. Give the stage a name of deploy. Under input type select build artifacts. By selecting build artifacts for the input type this stage will be provided with the build artifacts from another stage. In the stage and job drop downs select build. Under stage trigger, select “ run jobs when the previous stage is completed” so that our deploy stage will run automatically after the build stage finishes.
Next, click the jobs tab. Click add job and select deploy. Under deployer type select cloud foundry. Under target, pick the datacenter you want to deploy to. Then select the organization and space you want to deploy the application to. We will need to modify the deploy script slightly to point at the jar file we want to deploy. In addition to adding the jar to deploy you probably will also want to configure the hostname for the Eureka server. If you don’t you can run into failures when you deploy the application if the hostname is already in use. Change the deploy script as follows.
#!/bin/bash
cf push "${cf_app}" -p ocr-eureka-0.0.1-snapshot.jar -n ocr-eureka -m 512m
You will want to change the value of the -n option in your script to be a unique hostname of your choosing.
Click save to return to the build and deploy screen.
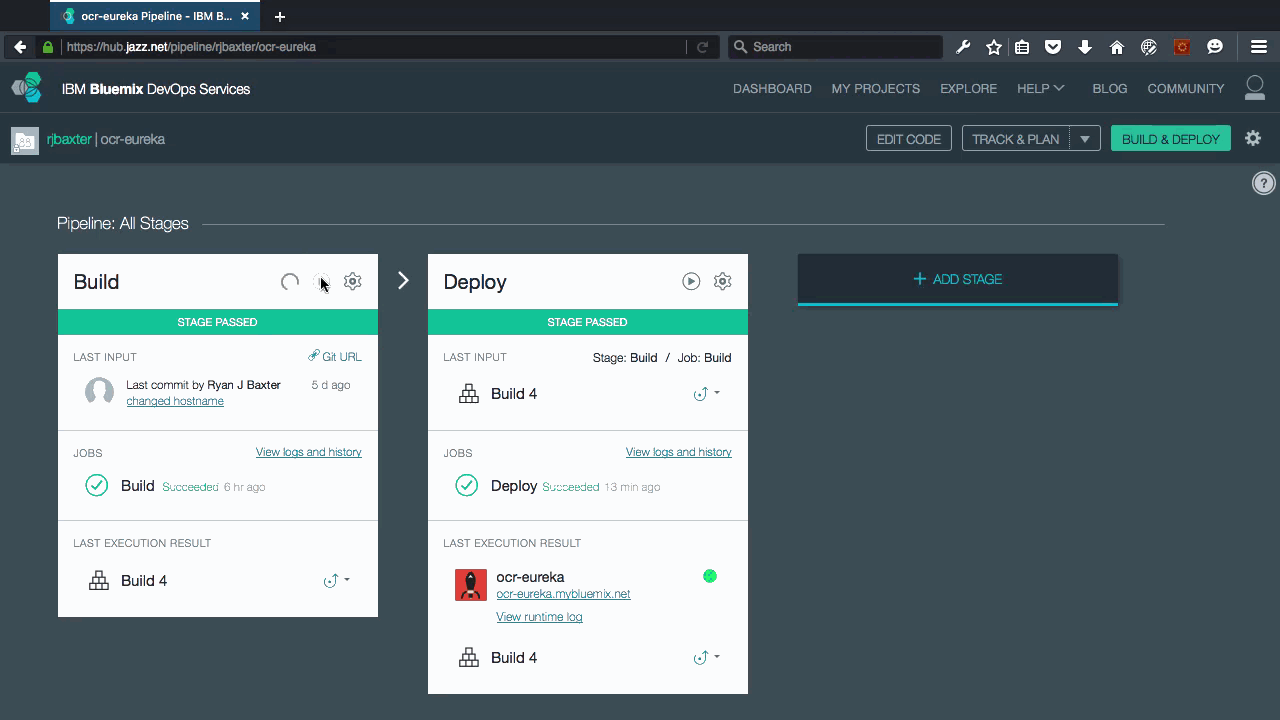
Now you can test everything out by clicking the play button on the build stage. This will pre-form the build and then do the deployment to Bluemix. If you would like to watch the build and deploy stages you can click the view logs and history links to see real-time logs of what is happening during each stage. After the deployment finishes the deploy stage will contain a link to the running Eureka server. Click it to make sure the app is running. You should see the familiar Eureka ui.
Eureka User-Provided Service
Our other services (races, participants, web, and hystrix/turbine) will all need to use Eureka. Up until this point, we just hard-coded the URL to the Eureka server in the application.yml files of these services, However, in the cloud, we want to do something a little more resilient. Bluemix (and cloud foundry) have a concept of services, somewhat different than a microservice, but along the same lines (the term service is overloaded these days). these are things like databases, message queues, etc. Besides the services provided by the cloud platform, users can also create their own services for use in apps they deploy to the platform, these are called user-provided services.
For our cloud deployment, we will create a user-provided service for our Eureka server that other apps (microservices) can then bind to. This gives us a nice abstraction layer between our Eureka server and the apps using that server. To create a user-provided service we need to use the cloud foundry command line tool. Once you have the cloud foundry cli installed, run the following command to authenticate with Bluemix and target the space and organization your Eureka server is deployed to.
$ cf login -a api.ng.bluemix.netThen run the cf cups command to create a user-provided service called ocr-eureka.
$ cf cups ocr-eureka -p '{"uri": "http://ocr-eureka.mybluemix.net/eureka/"}'Make sure you replace the hostname in the uri property in the command above with the correct uri to your eureka server. It is very important that your uri ends in “/eureka/” . If you don’t construct the uri properly your microservices will fail to register themselves with Eureka.
You should now be able to see the service in your Bluemix dashboard or if you do $ cf services from the command line.
Now that our Eureka server is deployed to the cloud we can deploy the services which leverage Eureka. In this blog post I will walk through how to do this for the Participants service, but the process will be the same for the other services as well. Once you have successfully deployed the Participants service just follow the same steps for the other services (Races, Web, and Hystrix).
Let’s create a Git repo in IBM DevOps Services for our Participants service. Go to jazzhub.net, sign in, and click the Create Project button. Select the option to Create a new repository, and select the option to either create a Git repo on Bluemix or GitHub. The only other option that is required for you to select is Make this a Bluemix project. When you select this option make sure you pick the same organization and space where you deployed your Eureka server to. If you would like, you can select/deselect the other options on this page based on what you want to do. Finally, click the Create button to create the repository.
Before we put the code in the Git repo we need to create a .gitignore file to ignore the files we don’t need in the repo. Open a terminal window and navigate to the root directory of your Participants service (the folder containing the POM). Open your favorite text editor, create a new file called .gitignore and add the following content.
.settings
target
.classpath
.project
Once you have saved the .gitignore file run the following set of commands.
$ git init
$ git add .
$ git commit -m "initial commit"
$ git remote add origin <url to git repo on Bluemix>
$ git push origin master
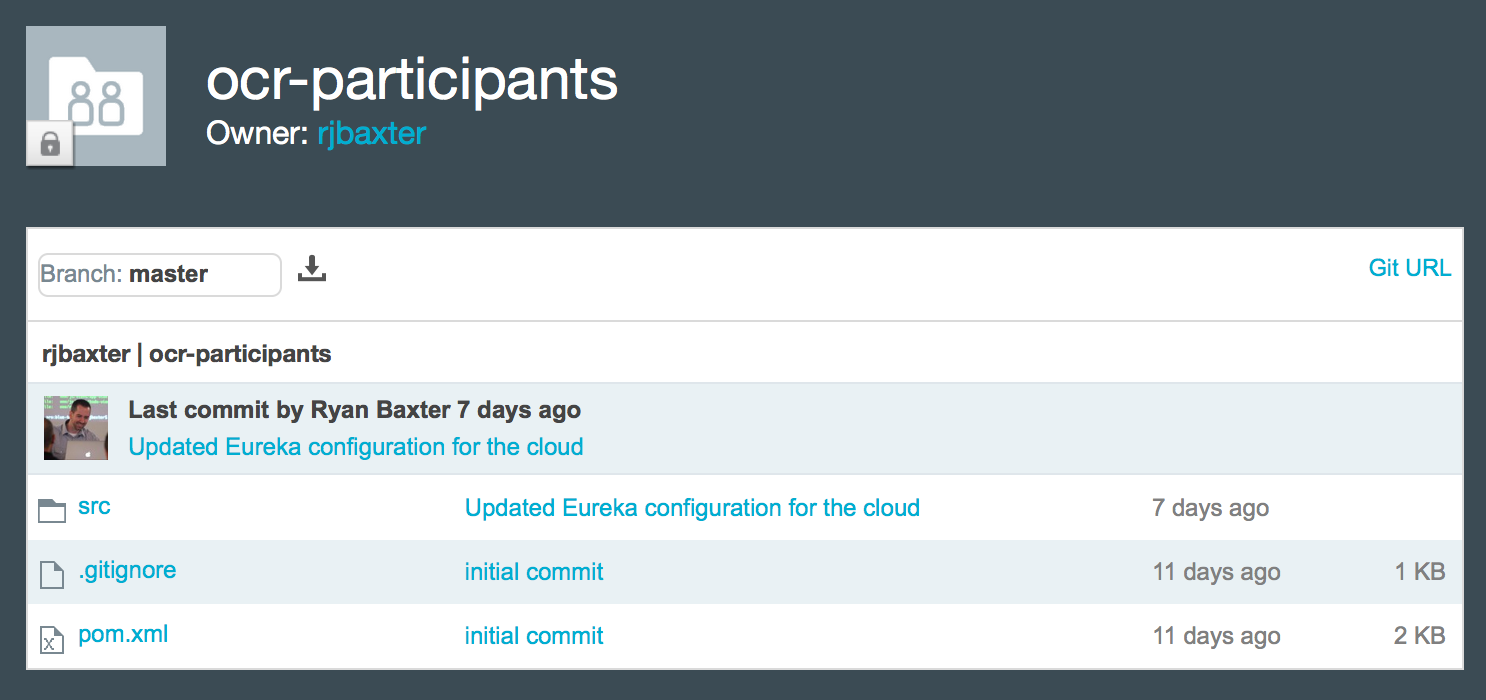
All we are doing above is initializing a local Git repo, adding all our code to it, committing it, adding our new remote Git repo, and than pushing all the code we committed locally to our remote Git repo in Bluemix. This should be nothing new to you if you are familiar with Git. Once the code has been committed to the remote Git repo in Bluemix, you can refresh the repository page in IBM DevOps Services and you should see all your code.
Configuring a Service to Run in the Cloud
Right now all of our services are configured to look for the Eureka server at http://localhost:8761/eureka/. We will need to change this URL to point to our Eureka server in the cloud. We could hardcode the URL into the application.yml, but being good Cloud Foundry developers we are going to use the user-provided service we created for Eureka earlier.
In addition to changing the location of the Eureka server in the application.yml, file we need to give Eureka more information about the Participants service. Eureka will need to know the correct hostname of the service when the service registers with Eureka and we also need to give Eureka a unique instance id for each individual instance of the service. The unique instance id is specifically important for when we scale the services horizontally, ie we have 2 instances of the Participants service running.
Finally, we need to specifically configure the port we are running on in the cloud. By default Spring Cloud uses the port the server starts on. When we are running in Bluemix and Cloud Foundry the port the application is running on behind the Cloud Foundry router is a random port. However, the Cloud Foundry router serves the application on port 80 and 443, so we need to tell Eureka that the service is running on pot 80 instead of the port the app container is running on behind the Cloud Foundry router. To solve this problem we add a Spring Profile to our application.yml file which will only get activated when we deploy the application to the cloud.
Open the application.yml file for your Participants service and change the Eureka section to have the following properties.
eureka:
  client:
    serviceUrl:
      defaultZone: ${vcap.services.ocr-eureka.credentials.uri:http://localhost:8761/eureka/}
  instance:
    hostname: ${vcap.application.uris[0]:localhost}
    metadataMap:
      instanceId: ${vcap.application.instance_id:${spring.application.name}:${spring.application.instance_id:${server.port}}}

---
spring:
  profiles: cloud
eureka:
  instance:
    nonSecurePort: 80
Make sure you commit and push the changes you made to your application.yml file to Bluemix before continuing.
Setting Up a Build and Deploy Pipeline
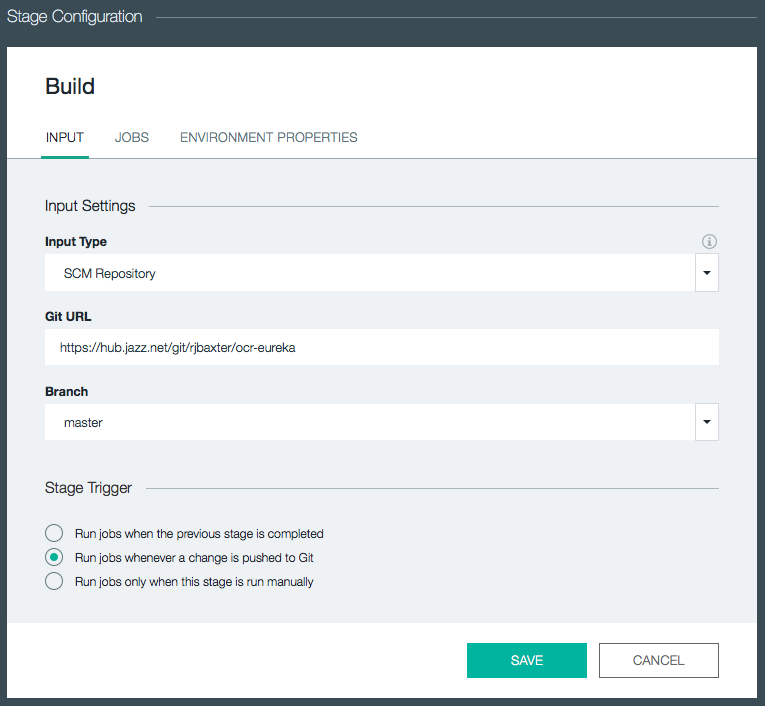
Now lets configure the build and deploy stages for our Participants service on Bluemix. Back in the the project on IBM DevOps Services click the Build and Deploy button. Click the Add Stage button to add a new stage. Give the stage the name Build. For the Input Type, select SCM Repository, this should automatically populate the Git URL field. Make sure master is selected under the Branch drop down. In the Stage Trigger section select “Run jobs whenever a change is pushed to Git”.
Next click on the Jobs tab. Click the ADD JOB button and select Build. Under the Builder Type select Maven. The defaults for the build should be fine, we just need to make a small change to the shell script. Our code is using Java 1.8 but by default the build will use Java 1.7. To fix this problem change we need to change the JAVA_HOME environment variable to point to Java 1.8.
#!/bin/bash
export JAVA_HOME=~/java8
mvn -B package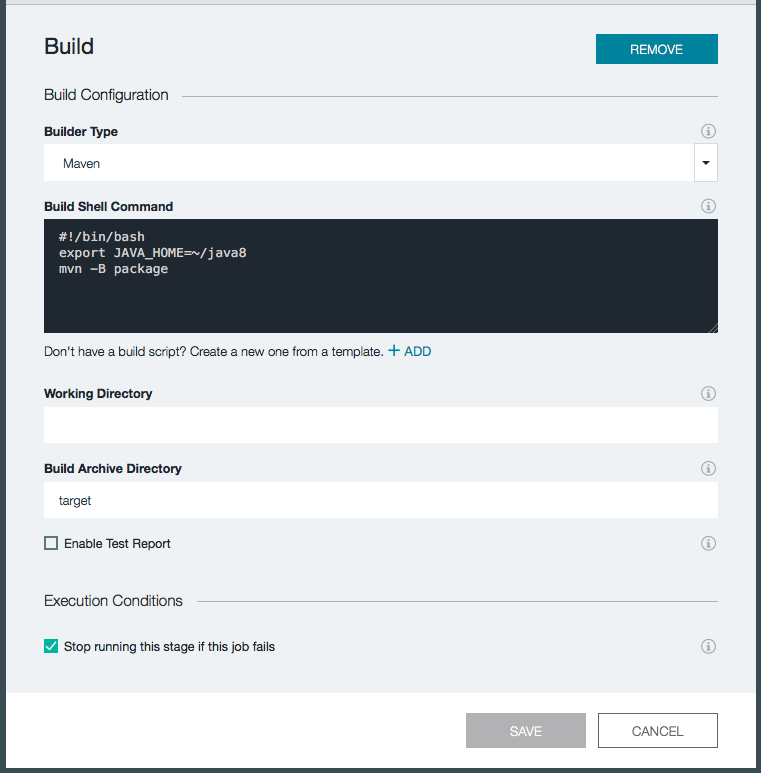
Click Save to save the Build stage.
Back on the Build and Deploy page click the Add Stage button again to add another stage. Give the stage a name of Deploy. Under Input Type select Build Artifacts. By selecting Build Artifacts for the Input Type this stage will be provided with the build artifacts from another stage. In the Stage and Job drop downs select Build. Under stage trigger, select “Run jobs when the previous stage is completed” so that our deploy stage will run automatically after the Build stage finishes.
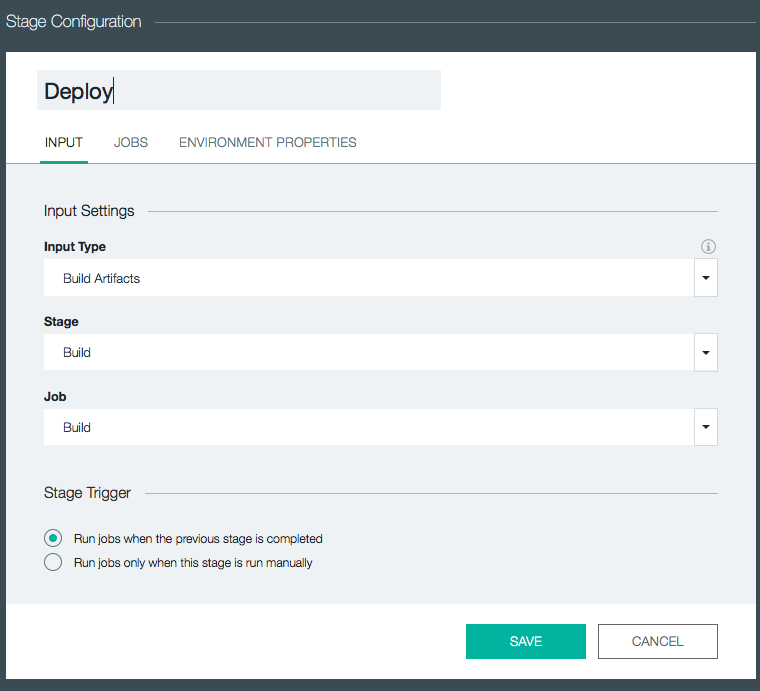
Next click the JOBS tab. Click ADD JOB and select Deploy. Under Deployer Type select Cloud Foundry. Under Target pick the datacenter you want to deploy to. Then select the Organization and Space you want to deploy the application to. We will need to modify the deploy script slightly to point at the Jar file we want to deploy. In addition to adding the Jar to deploy you probably will also want to configure the hostname for the Participants service. If you don’t you can run into failures when you deploy the application if the hostname is already in use.
After we push the jar file we then set an environment variable called SPRING_PROFILES_ACTIVE to cloud. This will enable the cloud profile in our application so our cloud configuration in our application.yml file becomes active. Lastly we bind to our ocr-eureka service, which we created earlier. This ocr-eureka service provides our application with the URL to our Eureka server.
Change the Deploy Script as follows.
#!/bin/bash
cf push "${CF_APP}" -p ocr-participants-0.0.1-SNAPSHOT.jar -n ocr-participants -m 512M --no-start
cf set-env "${CF_APP}" SPRING_PROFILES_ACTIVE cloud
cf bind-service "${CF_APP}" ocr-eureka
cf start "${CF_APP}"
You will want to change the value of the -n option in your script to be a unique hostname of your choosing.
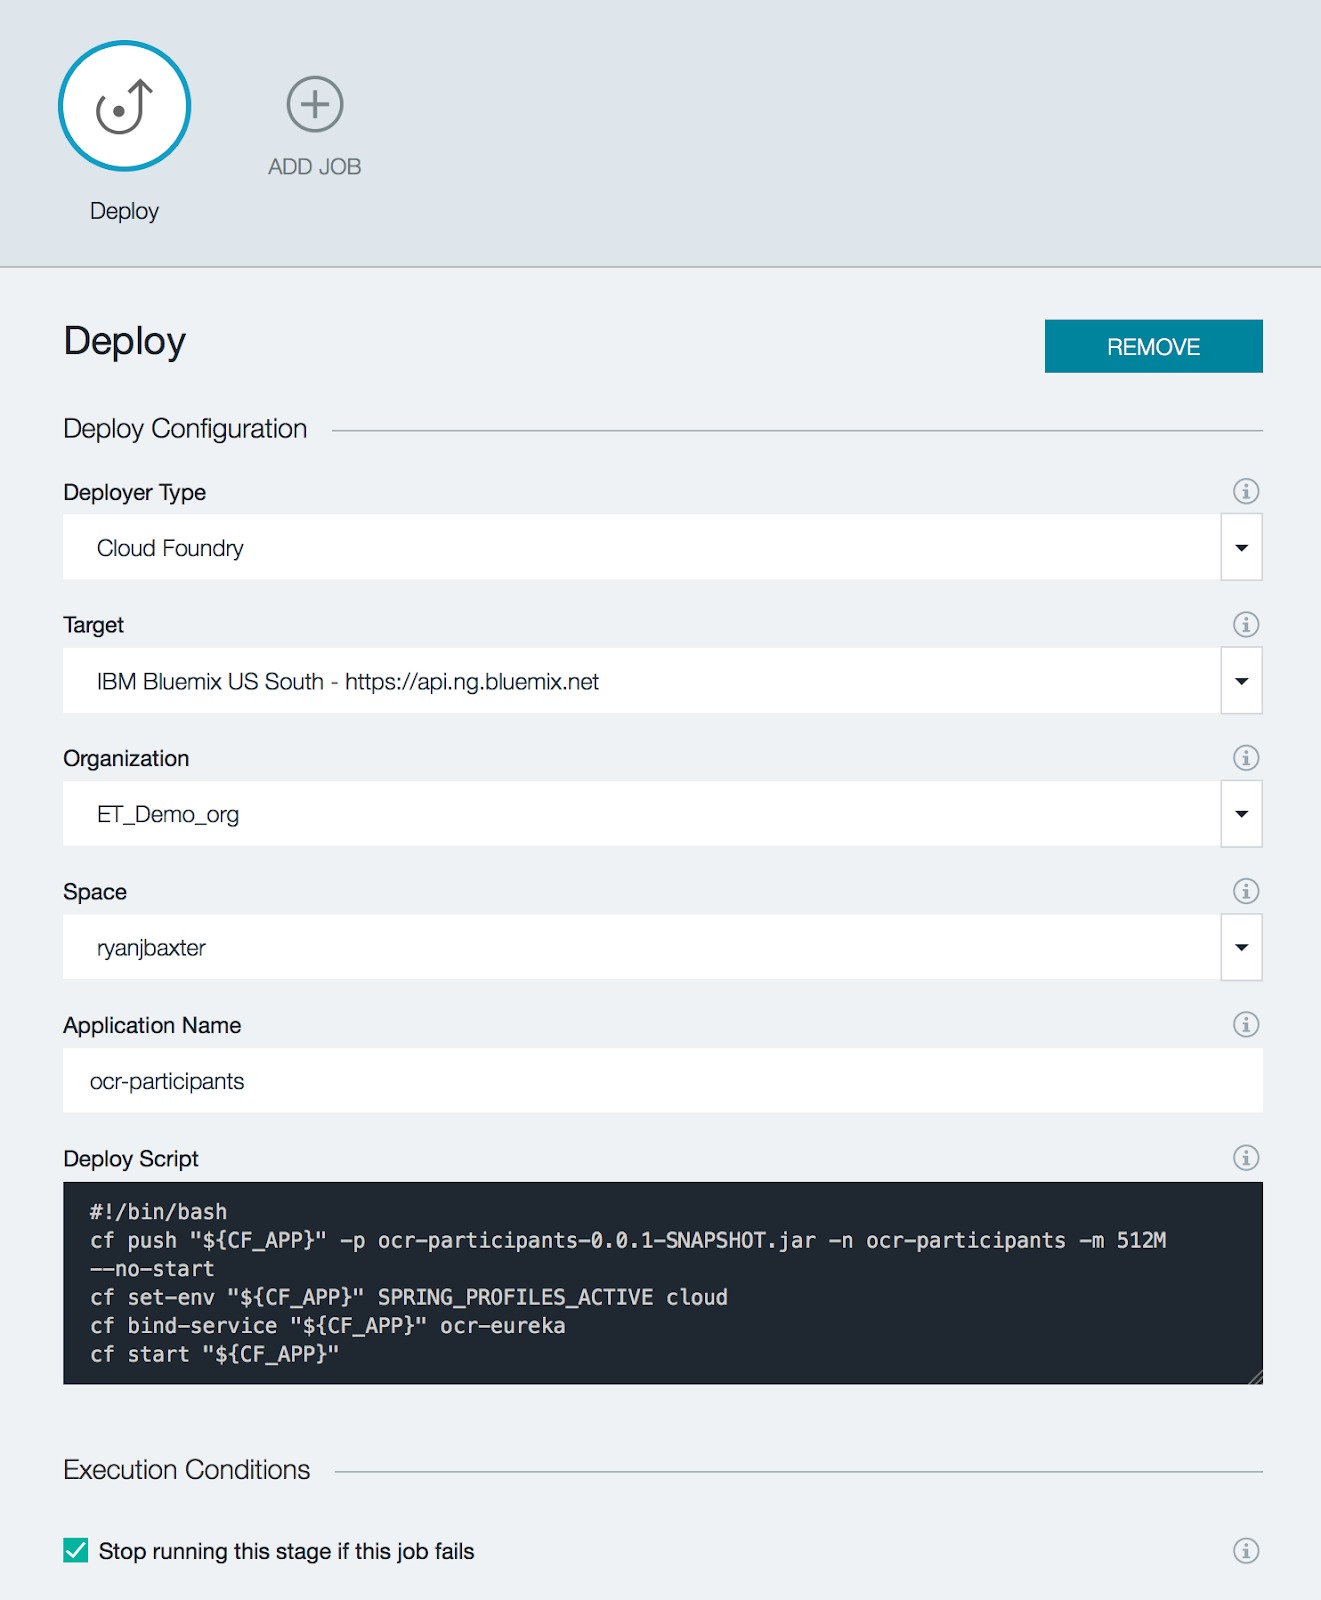
Click Save to return to the Build and Deploy screen.
Now you can test everything out by clicking the play button on the Build stage. This will preform the build and then do the deployment to Bluemix. If you would like to watch the Build and Deploy stages you can click the View logs and history links to see realtime logs of what is happening during each stage. After the deployment finishes the Deploy stage will contain a link to the running Participants service. Click the link and it should open a new tab and return the JSON for all the participants in the Participants service. In addition, the Participants service should register itself with Eureka in the cloud. If you open your Eureka server running in the cloud you should see the Participants service registered.

Deploying the Other Services
Now that we have the Participants service setup and deployed follow the same process for the other services (Races, Web, and Hystrix) as well. After everything is up and deployed you should now have a running web app deployed to the cloud.
Testing Your Application
If you go to the URL bound to your ocr-web application in Bluemix you should see a list of races displayed and be able to select those races to see participants. If you do, you have successfully deployed your first cloud native application! In addition Eureka should contain a list of all the services we have running in the cloud.

Finally you should now be able to go to your Hystrix dashboard running in the cloud and view data about your circuit breakers. Open the URL bound to your Hystrix application (don’t forget to add /hystrix to the end of it) and enter your Turbine URL. You should see your circuit breakers displayed in your Hystrix dashboard!
Published at DZone with permission of Ryan Baxter, DZone MVB. See the original article here.
Opinions expressed by DZone contributors are their own.

Comments