Building a Slackbot to Answer Analytics Questions From Your Database
See how to build a Slackbot to answer analytics questions from your database.
Join the DZone community and get the full member experience.
Join For FreeAny business, whatever size or industry, runs on information. A persistent challenge for the DevOps team is finding faster, easier, and better ways of getting information into the hands of business users when and where they need it. This used to require using a business intelligence (BI) solution or running custom queries against the database. What if it were as simple as asking a chatbot? No need to worry about reports or queries. The chatbot can answer a question right there in the channel where your whole team can see it.
Kajabi, providers of a digital product delivery platform, solved this problem by developing a simple chatbot to answer business questions. Anyone from the engineering or marketing team can get the latest data simply by asking the chatbot. It’s smart enough to look up data in the database to answer questions.
The following diagram shows how the solution works. When the chatbot receives a message from a Slack user, a request is sent to a pre-established dataclip, which responds with real-time data fetched directly from the production database. The results are displayed in the chat window, nicely formatted for the user. Once the chatbot is set up, new requests are easy to create and share with the relevant business audience for their use.
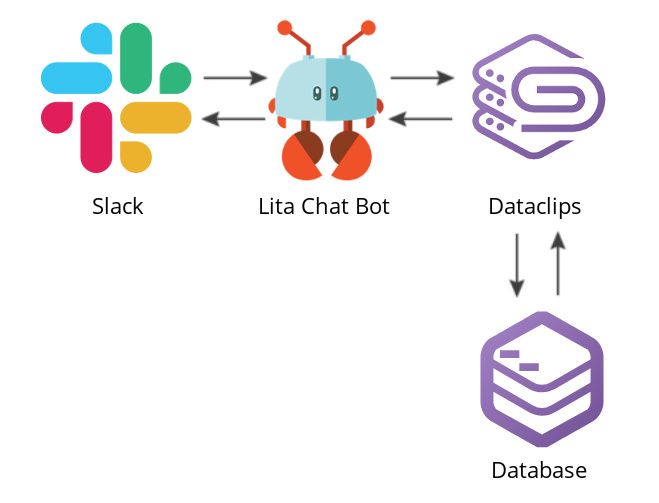
Illustration of Lita chatbot fetching data from Dataclips
A Cost-Saving Alternative to BI and Dashboards
The chatbot approach offers an alternative to writing ad-hoc analytical queries and creating an entire infrastructure to expose them. Most companies address the demand for timely business data with full-fledged business intelligence solutions or by building dashboards that end up being web applications—both of which are very costly in terms of development and maintenance.
Dashboards require the DevOps team to deploy, maintain and upgrade your application and databases, while the development team is forced into updating the pipeline as well as adding features down the line to satisfy the more complex use cases. People also have to look at a physical dashboard in the office or pull up a separate report to see the latest results, which limits visibility.
A chatbot makes the data instantly visible to your team right in the chat room where everyone is already looking, both in-office and remote staff. When you are discussing a topic and have a question, you can see and share that insight with everyone in the group. There’s no need to click a link to open up a separate report. Now business users in marketing, finance, and operations, for example, benefit from ready access to insights they need to help the company grow.
Furthermore, instead of creating custom data dumps and reports, this frees up the DevOps team to work on higher value projects. It will take time to initially set up the chatbot, but adding additional prompts is relatively quick.
How to Create Your Own Chatbot
Lita makes it easy to create your own chatbots using Ruby. It can query data from the database using a dataclip. With Dataclips, anyone on your team familiar with SQL can easily create reports against live production data and securely share the results within your organization using a unique URL. The chatbot component makes it easy for business users to run the queries against Dataclips. The chatbot extracts the results from that URL and displays it within the Slack conversation.
With this tutorial, you’ll learn how to replicate Kajabi’s setup by creating a chatbot that can access your databases through Dataclips and provide your end users with relevant insights.
Creating a Dataclip
In this tutorial, our example business is tracking clicks from various sources, including social networks and websites. The dataclip will be used to provide the top sources of clicks. This step of the tutorial assumes that you have access to a Heroku Postgres database.
-- Top sources of clicks
SELECT
  button_id,
  SUM(clicks) AS clicks
FROM button_click
GROUP BY button_id
ORDER BY clicks DESC LIMIT 10;
If you are missing a schema to run analytical queries on, you can use the example one that will be used across this blog post:
CREATE TABLE button_click (
  id serial PRIMARY KEY,
  "uuid" VARCHAR(37),
  button_id VARCHAR(90),
  created_date TIMESTAMP NOT NULL DEFAULT now(),
  clicks integer
);
And you can populate with insert queries like the following:
INSERT INTO button_click(
  "uuid",
  button_id,
  created_date,
  clicks)
VALUES (
  'b2344e6d-b864-418f-91e7-28748bb94487',
  'facebook',
  '2019-04-19T20:11:49-07:00',
  '3');
Now, proceed to access your Dataclips page and click on New Dataclip, assign it a name, and select a datastore (your database). Then fill the query section on the page with the previous query:
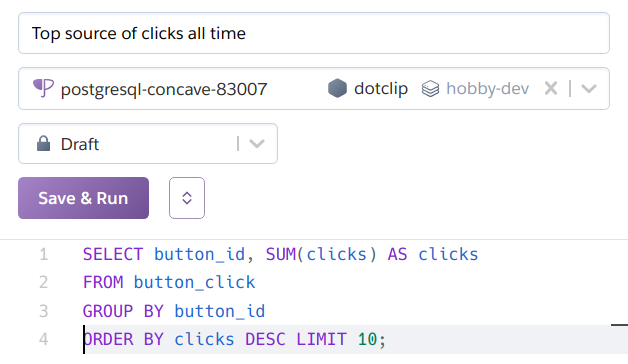
Click Save & Run and the query is now presented in a table format with data, as well as the option to view it as a chart:
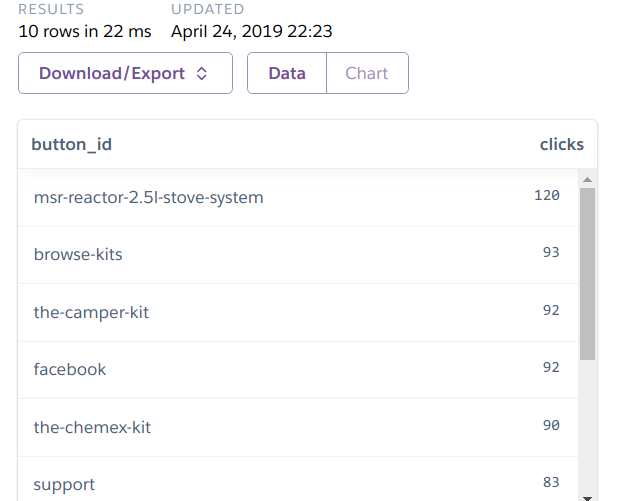
Finally, copy the URL by clicking on Download/Export and selecting the text field JSON URL:
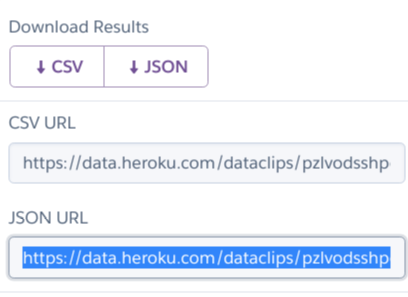
Take a note of the URL or export it to the environment variable DOT_API_URL (you’ll use it when developing the chatbot).
Setting up Lita
There are a lot of libraries out there to create a chatbot. In this tutorial, you’ll learn to use Lita, a framework that dramatically simplifies the process while offering great extensibility. The installation process requires the following software:
- Ruby (this tutorial uses version 2.6.1)
- RubyGems
- Bundler version 2 (Ruby gem)
- Redis
- Access to a Slack workspace as admin
- The previously created dataclip
Install Lita 4.7.1 (the version used for this tutorial) by running:
$ gem install lita --version 4.7.1
Successfully installed lita-4.7.1
1 gem installed
Then, create a Lita project named “Dot,” which will serve as baseline to which you will add the Ruby code for the bot:
$ lita new dot
create dot
create dot/Gemfile
create dot/lita_config.rb
Run cd dot and reconfigure the Gemfile to include the required dependencies:
source "https://rubygems.org"ruby ">= 2.6.1"
gem "lita", "~> 4.7.1"
gem "lita-slack", "~> 1.8.0"
gem "httparty", "~> 0.17.0"
Finally, install the dependencies by using bundle install. The two additional gems present in the Gemfile are:
- lita-slack, a Slack adapter for Lita
- httparty, a simple HTTP client for Ruby
The last step of the setup involves changing Lita’s configuration file lita_config.rb to use the Slack adapter and to access the Redis database (needed to run Lita):
Lita.configure do |config|
  # This is your bot name
  config.robot.name = "Dot"

  config.robot.locale = :en

  config.robot.log_level = :info
  config.robot.admins = [ENV.fetch("DOT_ADMIN_ID")]

  config.robot.adapter = :slack
  config.adapters.slack.token = ENV.fetch("DOT_SLACK_TOKEN")

  config.http.port = ENV["PORT"] || 3000
  config.redis = { url: ENV.fetch("REDIS_URL") }

  dataclip = config.handlers.dataclip_handler
  dataclip.top_clicks_all_time_url = ENV.fetch("DOT_API_URL")
end
Additionally, you will need to set these environment variables when launching the application:
- DOT_ADMIN_ID is your user ID on Slack
- DOT_SLACK_TOKEN is the token obtained by adding Lita integration to your Slack workspace
- PORT is used by Lita to run a tiny web server to allow the bot to accept input over HTTP, as well as creating nicely-formatted web pages that you can provide as responses to some commands
- REDIS_URL is a string that specifies the details for connecting to your Redis server using the redis-url format
- DOT_API_URL is the url you copied previously when setting up the dataclip; it is used by the bot to provide the answer to the user request
Writing the Handler
After configuring Lita, it’s time to add functionality to respond to the chat command “Top source of clicks.” To get there, make these changes:
- Add at the top of your lita_config.rb file the line require_relative "./dataclip_handler"
- Create the file dataclip_handler.rb
The file dataclip_handler.rb is a handler in Lita’s terms, which allows your bot to respond to chat commands and events and write chat messages in response. Paste the following code in the file:
module Lita
  module Handlers
    class DataclipHandler < Handler
      config :top_clicks_all_time_url

      route(/products\shave\sthe\smost\sclicks/, command: true) do |response|
        url = config.top_clicks_all_time_url
        http_response = HTTParty.get(url, follow_redirects: true)
        data = JSON.
          parse(http_response.body).
          fetch("values").
          lazy.
          map { |arr| ({ name: arr[0], clicks: arr[1] }) }.
          take(5)

        msg = "The products with the most clicks are:\n"
        data.each do |source|
          msg << "- *#{source[:name]}* with #{source[:clicks]} clicks\n"
        end

        response.reply(msg)
      end
    end

    Lita.register_handler(DataclipHandler)
  end
end
Let’s go over each relevant line:
class DataclipHandler < Handler
The Handler class will provide various class methods, the most interesting one being route, which allows listening to chat messages.
config :top_clicks_all_time_url
This line allows the handler to accept a configuration option, which is provided in lita_config.rb. You fetch an environment variable with the following code:
dataclip = config.handlers.dataclip_handler
dataclip.top_clicks_all_time_url = ENV.fetch("DOT_API_URL")
The next line is:
route(/products\shave\sthe\smost\sclicks/, command: true) do |response|
It instructs Lita to listen to chat messages addressed directly to the bot (command: true option) that contain the sentence “products have the most clicks” and to skip general unaddressed messages. A valid chat message would be:
@dot What products have the most clicks?
The answer to the query is determined by the content of the do block. In this case, the next line states:
url = config.top_clicks_all_time_url
http_response = HTTParty.get(url, follow_redirects: true)
The http_response contains a string in JSON format that looks like:
{
  "title": "Top source of clicks all time",
  "values": [
    ["msr-reactor-2.5l-stove-system", 120],
    ["browse-kits", 93],
    ["the-camper-kit", 92],
    ["facebook", 92],
    ["the-chemex-kit", 90],
    ["support", 83],
    ["chemex-classic-6-cup-coffee-maker", 81],
    ["the-french-press-kit", 66],
    ["contact-us", 58],
    ["the-pour-over-kit", 50]
  ],
  "fields": ["button_id", "clicks"],
  "types": [1043, 20],
  "type_names": ["text", "integer"],
  "started_at": "2019-04-21 02:10:09 +0000",
  "finished_at": "2019-04-21 02:10:09 +0000",
  "checksum": "cf491f4dd64f044eb2e41f04676f5dca"
}
So the following lines will be used to extract the results from the values key and expose them in a more usable format:
data = JSON.
  parse(http_response.body).
  fetch("values").
  lazy.
  map { |arr| ({ name: arr[0], clicks: arr[1] }) }.
  take(5)
First, the response body is parsed, and the values are extracted. Then, each entry of the array is converted to a hash with the format { name: “source_name_here”, clicks: 123 }. Last, only the first five results are displayed to prevent overrunning the chat room.
With the data fetched and nicely prepared, it’s possible to create the chat message that the bot will write:
msg = "The products with the most clicks are:\n"
data.each do |source|
  msg << "- *#{source[:name]}* with #{source[:clicks]} clicks\n"
end
This code is straightforward: it creates a chat message in the variable msg and fills it with a bullet list made up of the five leading entries and the number of clicks.
The last line is:
response.reply(msg)
This commands the bot to reply with the previously built chat message.
There is another important line in the file which is outside the route block:
Lita.register_handler(DataclipHandler)
This instructs Lita to load the handler on boot, so that the code can be executed.
Interacting With Your Chatbot
If you followed this tutorial up to this point, you are ready to test your application. Inside the Dot folder, run the following command:
$ bundle exec lita start
[2019-04-25 06:18:10 UTC] INFO: Connected to Slack.
The application will start and greet you with a log entry stating “Connected to Slack.”
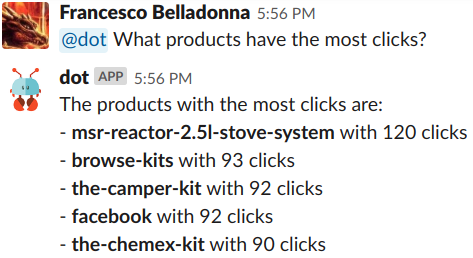
Access your Slack workspace, invite the chatbot in a room and send a chat message addressed to it with the content:
@dot What products have the most clicks?
The bot will respond based on the content of your dataclip:
You can extend the functionality of your chatbot by adding the ability to turn Slack messages into SQL queries using Seekwell.io. This lets your team experiment before creating the dataclip and simplifies customization.
Better Visibility for Business Insights
With this tutorial, you were able to create a dataclip and connect it to a Slackbot so that every marketing team member could access the query at any time. This configuration is not only extremely simple, but it also provides a much higher degree of visibility for your business analytics by injecting the process seamlessly into the users’ existing workflow.
Opinions expressed by DZone contributors are their own.

Comments