Building a Multi-Feature Pipeline With OpenShift Pipelines
Does your team work with multiple feature branches? Let's see how to create one generic pipeline for all the features created using Openshift Pipelines.
Join the DZone community and get the full member experience.
Join For FreeHi, all! Some Development/Agile/Git workflows make use of multiple feature branches to coordinate their Sprints/Development cycles.
One thing that I saw while working with certain clients is that for every feature, they created a pipeline. This process (although automated in most places) generated a ton of useless and repetitive pipelines.
In this article, I'll show how to create a generic enough pipeline using OpenShift Pipelines while exploring some advanced concepts about the technology. For that, we're going to re-use the Scala application developer from the previous article, and build on the foundational pipeline that we created.
Tekton Triggers
It's important that we know the Tekton Trigger is a "component that allows you to detect and extract information from events from a variety of sources and deterministically instantiate and execute TaskRuns and PipelineRuns based on that information."
More importantly, however, is to know that it is by changing some custom resources created by the Trigger that we're going to be able to fully customize our pipeline to this use case.
Adding a Trigger
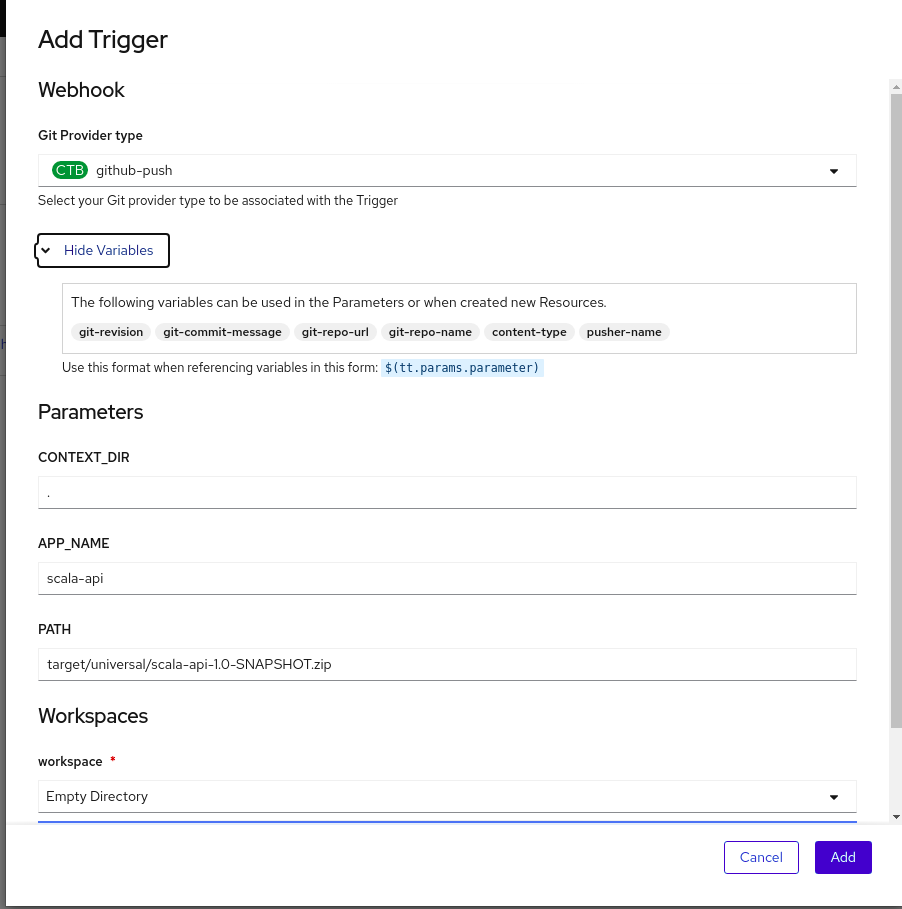
For adding a Trigger to the pipeline, we're going to use the graphical interface for this. Follow the screenshots below:

Add Trigger

Right off the bat, we see that we don't have the branch name. That should be used with the APP_NAME parameter that will be used as the name of our DeploymentConfig. For that, we'll go to customize one object called TriggerBinding.
Customizing the TriggerBinding
The TriggerBinding is a simple object that has the name of the parameters and where to fetch this from. Below is the code for the ClusterTriggerBinding (a CTB is available to all namespaces).
apiVersion: triggers.tekton.dev/v1alpha1
kind: ClusterTriggerBinding
metadata:
  name: github-push
  namespace: scala-api
spec:
  params:
    - name: git-revision
      value: $(body.head_commit.id)
    - name: git-commit-message
      value: $(body.head_commit.message)
    - name: git-repo-url
      value: $(body.repository.url)
    - name: git-repo-name
      value: $(body.repository.name)
    - name: content-type
      value: $(header.Content-Type)
    - name: pusher-name
      value: $(body.pusher.name)
Now we need to add the branch name. If we take a closer look at the GitHub payload, we see that it comes like that in the body:
{
  "ref": "refs/heads/main",
  .....
 }
Therefore, what happens is, we can't just add $(body.refs)on the TriggerBinding, because we just need the name of the branch, which in that case is "main".
Fortunately, Tekton has the concepts of Interceptors, and we're creating one for this.
Tekton Interceptors
Tekton has a great explanation about interceptors, and I encourage all to read this link to get a better understanding of what we're doing.
In short, we're going to intercept the payload (hence the name Interceptor) before the TriggerBinding is resolved and to some operations with the body.
What we need to do is simply assign body.ref.split(''/'')[2] to a variable so we can add to the TriggerBinding, so as to use it inside our pipeline. How do we do that? With a CEL Interceptor.
Here I'm quoting the docs:
"A CEL Interceptor allows you to filter and modify the payloads of incoming events using the CEL expression language. CEL Interceptors support overlays, which are CEL expressions that Tekton Triggers adds to the event payload in the top-level extensions field. Overlays are accessible from TriggerBindings."
Therefore, we're going to add a CEL Interceptor inside our EventListener object to get the payload, apply our expression to it, and add to the extensions field and our branch name.
Here's what it looks like this interceptor:
interceptors:
  - params:
      - name: overlays
        value:
          - expression: 'body.ref.split(''/'')[2]'
            key: branch
    ref:
      kind: ClusterInterceptor
      name: cel
Now we're good to create our custom TriggerBinding, and to use the branch name as a parameter in our pipeline.
Creating the Custom TriggerBinding
We basically copy and paste the Github push ClusterTriggerBinding. By adding our branch name that is on the extensions fields, the TriggerBidding will look like this:
apiVersion: triggers.tekton.dev/v1alpha1
kind: TriggerBinding
metadata:
  name: custom-github-push-trigger-binding
  namespace: scala-api
spec:
  params:
    - name: git-revision
      value: $(body.head_commit.id)
    - name: git-commit-message
      value: $(body.head_commit.message)
    - name: git-repo-url
      value: $(body.repository.url)
    - name: git-repo-name
      value: $(body.repository.name)
    - name: content-type
      value: $(header.Content-Type)
    - name: pusher-name
      value: $(body.pusher.name)
    - name: git-branch-name
      value: $(extensions.branch)
With that out of our way, let's finally add the Trigger to our pipeline.
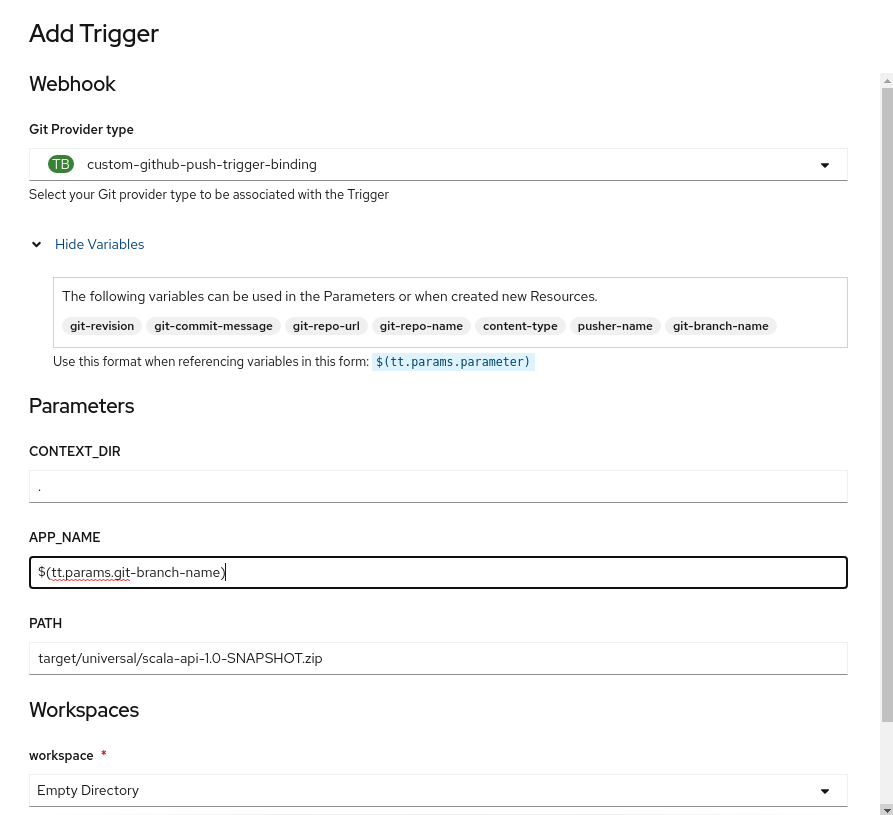
Adding the Trigger (Again)
Now we select our custom Trigger, see that we have the branch name to use as we please, and pass as the parameter APP_NAME to our pipeline execution.

Executing the Pipeline
For this to be idempotent, we're going to leverage the concept of Templates and package everything we need for our app to run. This includes the following resources: BuildConfig, DeploymentConfig, Service, and Route.
The power of using templates is that we can parameterize all the inputs. By doing OC, apply if the object exists. If so, it's only going to be updated. The template is located at the app Github repo with the name template.yaml.
In the end, we can use the OC-CLI task to just execute.
oc process -f template.yaml -p APP_NAME=$(params.APP_NAME) | oc apply -f - &&
oc start-build $(params.APP_NAME) --from-archive=$(params.CONTEXT_DIR)/$(params.PATH) --wait=true &&
oc rollout latest $(params.APP_NAME)
Configuring GitHub Webhook
To configure the GitHub Webhook to send all the push events to our pipeline, we need to get the route from the event listener:
oc get routes | grep event-listener | awk '{print "http://"$2}'
Get the output of the above command and go to the application repo Settings -> Webhooks -> Add Webhook.
In Payload URL, put the output of the command above (eg. http://el-event-listener-q1eys2-scala-api.apps.cluster-5b29.5b29.example.opentlc.com).
Content-Type is application/json.
Finally, add Webhook.
Now every push event to any branch will start our pipeline. If the Deployment for that branch doesn't exist, it will create a new BuildConfig, ImageStream, DeploymentConfig, Service, and Route for our Application.
That's it for this article! Hoping this can help you automate further tasks and workflows with these insights into interceptors, Triggers, and custom tasks.
Enjoy!!!
Opinions expressed by DZone contributors are their own.

Comments