Build Your RPA Using Robin
We will use Robin to extract web data and show how to utilize Robin to build your own automation scripts through a C# console application.
Join the DZone community and get the full member experience.
Join For Free
Introduction
Robotic-process automation (RPA) is a field where mundane and repetitive processes are decomposed into multiple machine-related tasks and executed automatically by RPA products. We propose another alternative, the use of a dedicated scripting language. Robin is a domain-specific language for RPA that offers simplicity and feature richness. No programming language experience is necessary.
This creates new opportunities and facilitates a dynamic trend in automation programming: RPA developers. Robin gives a plethora of options for automation using multiple modules/actions, data-types, statements, functions, conditions, loops, exception handling, control flow and the appropriate syntax. The interested reader is referred to our official documentation here .
We will use Robin to extract web data, a popular use-case among the RPA community. We will also show how to utilize Robin to build your own automation scripts through a C# console application.
Web-Data Extraction
A common scenario among RPA developers is web data extraction. We will visit a website that publishes stocks from various stock markets, retrieve some data and store it locally.
Robin has a simple syntax. By following the best practices below we can make our scripts intelligible, dynamic and maintainable. Robin also provides a tool for UI and Web Automation, UISpy that allows selector creation for web and/or desktop control manipulation.
A common scenario among RPA developers is web data extraction. We will visit a website that publishes stocks from various stock markets, retrieve some data and store it locally.
Robin has a simple syntax. By following the best practices below we can make our scripts intelligible, dynamic and maintainable. Robin also provides a tool for UI and Web Automation,
UISpy that allows selector creation for web and/or desktop control manipulation.
Let’s follow some steps:
- Visit the following website
- Launch UISpy
- In UISpy click “Add Control”
- Position your mouse over an element of the United States table
- Hold “Ctrl + Shift” and scroll down until the table element is highlighted
Please note that the Robin version used for the specific example is 0.9.2.5567.
Depending on the Robin version you have installed,
the script might need some changes in order to function as expected.
 6. Hold Ctrl and left click to capture the HTMLTable.
7. Hit “DONE”.
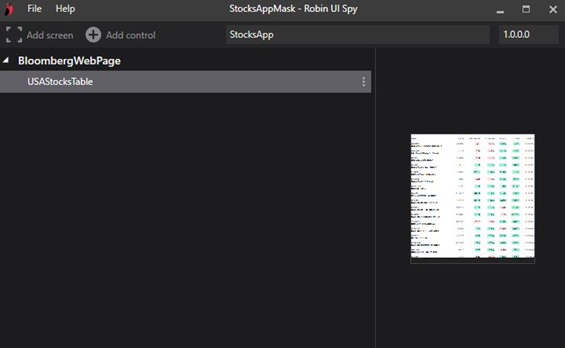
Note we renamed the .appmask (the file where the generated selector(s) are stored), the application name, the window name and the selector for clarity.
8. Save the file.
Sidenote
Click “Edit Selectors."
Modification of selectors is possible through the selector builder. The default selector is sufficient in most cases. The best approach is to first experiment with the autogenerated selector and then modify it accordingly.
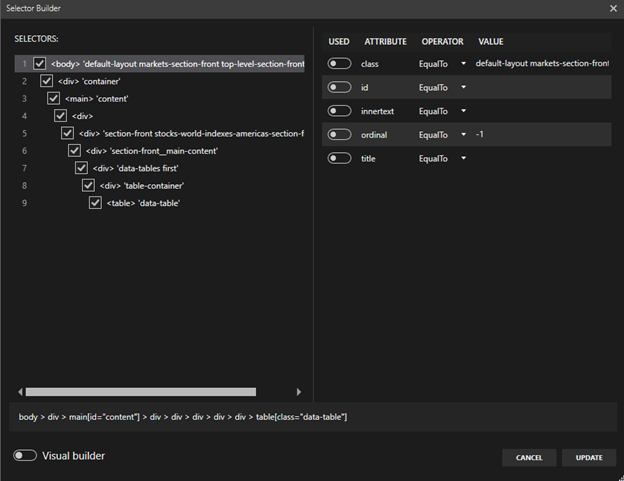
To follow the guide step-by-step, leave the selector as it was generated.
9. Open Robin’s editor.
.appmask files must be imported at the top of the script.

Selectors are now available. The syntax to reference a selector is:
[.appmask file].[application].[screen/window].[control]
10. Selectors should be stored in variables for convenience.
 11. Store the website URL.
 Functionality in Robin comes in the form of modules and actions. Modules are essentially groups dedicated to a category (e.g.Excel). Nested in modules are sets of actions. Those actions might be grouped in categories/subcategories etc. By writing Excel.Launch, we utilize Excel’s Launch action.
12. Utilize the WebAutomation.LaunchChrome action and pass the Website variable.

Sidenote
Code formatting of action inputs that are generated:
- Separate inputs, leaving one per line, using the special character ‘\’ which marks line chang
- Align them
- Remove autogenerated inputs, if unmodified
The action should look like this:

13. Now we can use the WebAutomation.DataExtraction.ExtractHtmlTableInExcel action
to extract and write data to an excel instance.

14. We store the excel instance and close the web browser.
15. Press “Run.”
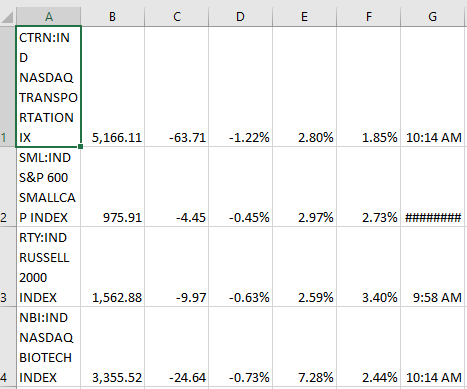
After the execution finishes, an .xlsx file is available in the declared folder. By opening the file we see its cells populated with the extracted values.
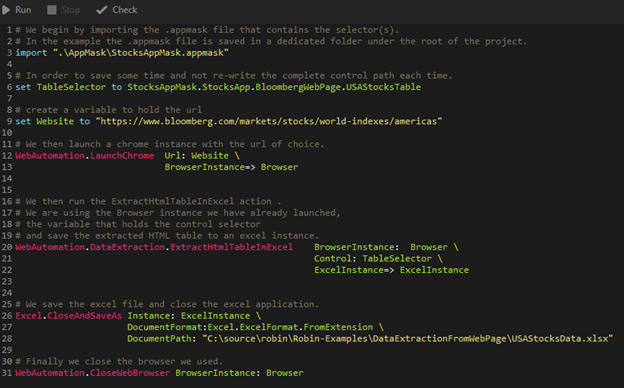
This is how the whole script looks:
Utilizing Robin Scripts Using C#
After compiling a C# application (for example a console application), an .exe file or a .dll file is produced. We can then distribute these .exe files to anyone we want (colleagues inside our company for instance). This allows for the standardized execution of scripts. A very simple C# Console application (.net core) is shown below.
We are launching a CMD and passing Robin commands as arguments. Three methods have been created, one dedicated to the help command and another one that is called for both Check and Run commands:
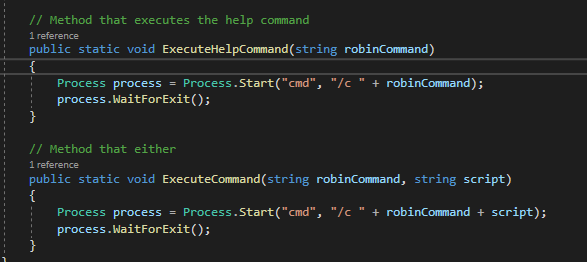
The third method retrieves all the .robin files from a designated folder. This way you don’t have to hard-code your scripts each time.

These methods are then called by the main method of the program:
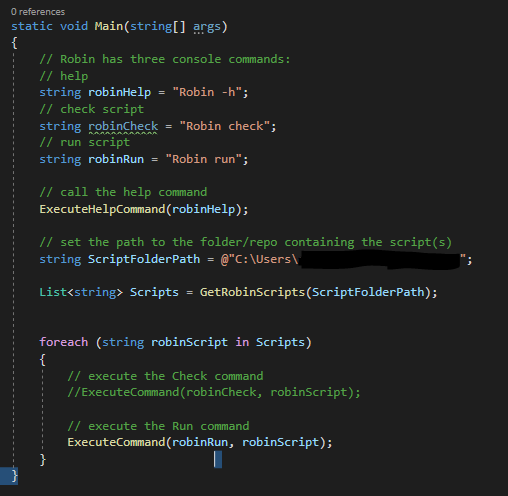
Four string variables have been created. Three that hold the commands and one that holds the path to the folder that contains the automation scripts.
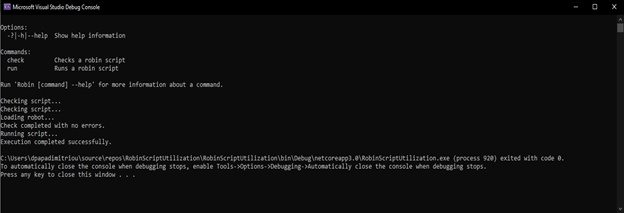
An .exe has also been generated. It resides in our Debug or Release folder depending on the state you have marked our project. C# is our language of choice but since we are utilizing the CLI, other languages could also be used.
Complete source:
xxxxxxxxxx
using System;
using System.Collections.Generic;
using System.Diagnostics;
using System.IO;
namespace RobinScriptUtilization
{
class Program
{
static void Main(string[] args)
{
// Robin has three console commands:
// help
string robinHelp = "Robin -h";
// check script
string robinCheck = "Robin check";
// run script
string robinRun = "Robin run";
// call the help command
ExecuteHelpCommand(robinHelp);
// set the path to the folder/repo containing the script(s)
string ScriptFolderPath = "C:\Users\RobinScripts\";
List<string> Scripts = GetRobinScripts(ScriptFolderPath);
foreach (string robinScript in Scripts)
{
// execute the Check command
//ExecuteCommand(robinCheck, robinScript);
// execute the Run command
ExecuteCommand(robinRun, robinScript);
}
}
// Method that retrieves all the .robin files from a specified directory
public static List<string> GetRobinScripts(string folderPath)
{
DirectoryInfo directory = new DirectoryInfo(folderPath);
FileInfo[] Files = directory.GetFiles("*.robin"); //Getting Robin scripts
List<string> ScriptsList = new List<string>();
string script;
foreach (FileInfo file in Files)
{
script = " {folderPath}\{file.Name}";
ScriptsList.Add(script);
}
return ScriptsList;
}
// Method that executes the help command
public static void ExecuteHelpCommand(string robinCommand)
{
Process process = Process.Start("cmd", "/c " + robinCommand);
process.WaitForExit();
}
// Method that either runs or checks a command
public static void ExecuteCommand(string robinCommand, string script)
{
Process process = Process.Start("cmd", "/c " + robinCommand + script);
process.WaitForExit();
}
}
}
The possibilities are endless. We could also automate, for example, our Robin scripts to be executed under regular time-intervals or under the occurrence of specific events. In the case of Windows workstations, a simple way to do this is to utilize the generated executables using the Windows’ Task Scheduler at user-defined intervals or events.
Conclusion
Robin is a simple yet effective scripting language for RPA. We’ve created a script that extracts web data and used a C# console application to execute our script(s) automatically. The possibilities are countless and it’s up to you to explore.
Opinions expressed by DZone contributors are their own.

Comments