Bootstrap K3S Data: For Beginners
Let’s take a look at how to create an initially well created cluster for managing bootstrap data with a description of K3S and High availability (HA) clusters.
Join the DZone community and get the full member experience.
Join For FreeFor Kubernetes users, handling data management tasks and other analysis needs can become difficult with the inclusion of edge-based devices. Internet of Things (IoT) as a whole is designed to complement online services for devices commonly used by people such as air conditioning units, speakers, refrigerators, etc.
To implement such applications, users can look forward to K3S- a fully reliable lightweight Kubernetes distribution that hinges on a reasonably low memory footprint. K3S was created to help users deal with the problems of on-time analytics and real-time deployment needs. This makes it a perfect addition for those working in applications surrounding edge devices.
Let’s take a clearer look at how you too can create an initially well-created cluster for managing bootstrap data along with a description of K3S and High availability (HA) clusters.
What Exactly Is Bootstrap Data?
In the context of K3S, bootstrap data is any organized set of tabular information pertaining to sensitivity and confidentiality. From the perspective of IoT devices and projects, bootstrapping can be described as the process by which the state of a device, a subsystem, a network, or an application transits from an operational to not operational state. Secure bootstrapping remains a problem for the industry and users at large, especially for resource-constrained devices.
A few examples of these sensitive datasets can include information such as:
- etcd server ca (cert,key)
- etcd peer ca (cert,key)
- server ca (cert,key)
- client ca (cert,key)
- passwd file
- requestheader ca (cert,key)
- ipsec key for flannel backend
- encryption config file
In order to ensure that all certificates by K3S are signed by the same CA certificates, it should match the HA servers for all elements in the cluster, addition to any encryption files that may contain information for encryption keys (as enabled by the user).

The Importance of HA and Clustering
It’s a common question that usually comes up. What exactly is the whole point behind HA? To make it clearer, the smallest possible K3s cluster that can be created is done so by deploying a K3s server on a VM with a public-facing IP address.
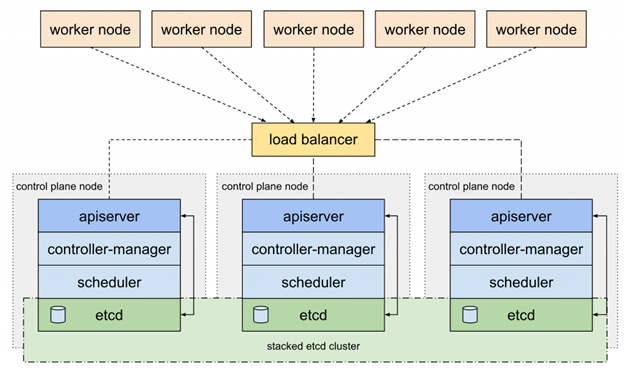
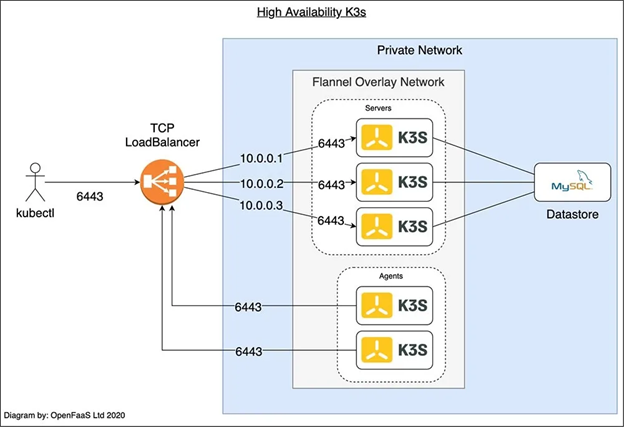
Unfortunately, if that VM crashes, our application will also fail. To avoid these possibilities, it’s common for systems to add multiple servers and configure them to coordinate together. This can thus allow the clusters to tolerate the failure for one or more nodes in a format known as high availability (HA).
On the control plane for K3s as of 1.19, there are two main options for HA:-
- An SQL datastore: As the name implies, this is a SQL database that is used to store the state of the cluster. The database must also be run in the same state through a high-availability configuration for the datastore to be effective.
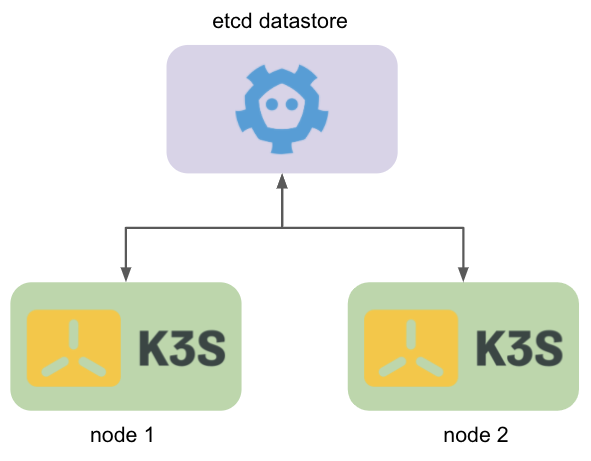
- Embedded etc: A form most similar to how Kubernetes is traditionally configured with tools such as kops and kubeadm.

Leading on To Token Management
Users will first need to generate a token, in order for the K3S to start for various projects. This can be applied by using the --token flag, however, if the user didn’t supply a token via the command line interface, a randomized token will be created for the server and saved in <data-dir>/server/token directory.
For users, this token plays an important role in setting up the initial server and encrypting the bootstrap data detailed in the previous sections, saving it in the data store.

After starting the K3S server you can inspect the bootstrap data saved in the datastore using the following commands:
- Type in etcd backend to start the K3s server:
curl -sfL <https://get.k3s.io> | sh -s - "server --token test --cluster-init"
Note that using --cluster-init will allow the server to use etcd backend as the default data store.
- Inspecting the bootstrap using etcdctl
ETCDCTL_API=3 etcdctl --cert /var/lib/rancher/k3s/server/tls/etcd/server-client.crt --key /var/lib/rancher/k3s/server/tls/etcd/server-client.key --endpoints <https://127.0.0.1:2379> --cacert /var/lib/rancher/k3s/server/tls/etcd/server-ca.crt get --prefix /bootstrap --keys-only /bootstrap/9f86d081884c
The above command will use etcdctl to list the keys in etcd datastore with prefix /bootstrap. This is the prefix that will be used to save the bootstrap data key, followed by a hash portion of the token which is passed to the K3s server.
It is possible to view the content of the bootstrap data using the same etcdctl element without using the--keys-only option:-
ETCDCTL_API=3 etcdctl --cert /var/lib/rancher/k3s/server/tls/etcd/server-client.crt --key /var/lib/rancher/k3s/server/tls/etcd/server-client.key --endpoints <https://127.0.0.1:2379> --cacert /var/lib/rancher/k3s/server/tls/etcd/server-ca.crt get --prefix /bootstrap /bootstrap/9f86d081884c
6f0de9faf483a501:WC/bhDCHs1gAMm6DoLg1WIumyAb8SR6JLdZkawfD8qKw3j+........
Proceeding Ahead With Decryption
By looking through the documentation for K3S, one will realize just how simple the decryption process is entire. By initializing a function that takes in decryption parameters, token ids, and performs a scan of the entire network, users will be met with a response from the K3S command line interface.
After decrypting, the system will return a series of digits and keys for the ClientCA and the ClientCAKey. The system will also generate an ETCDPeerCAKey and ETCDServerCAKey.
Additionally, the system will also generate a IPSECKey, PasswdFile, RequestHeaderCA, RequestHeaderCAKey, ServerCA, ServerCAKey, and ServiceKey.
These data are base64 encoded and after decoding it will generate the actual keys and certificates for the K3S server. With this, users now have successfully run a simulation for bootstrapping data using K3S.
Simulating a Failure After Final Simulations
To simulate a failure, terminate the K3s service on one or more of the K3s servers, then run the ‘kubectl get nodes’ command:
ssh root@SERVER1 'systemctl stop k3s'
ssh root@SERVER2 'systemctl stop k3s'
The third server will take over at this point for the entire mainframe.
kubectl get nodes
Users can then restart the services on the other two servers:
ssh root@SERVER1 'systemctl start k3s'
ssh root@SERVER2 'systemctl start k3s'
Users can now use the cluster to deploy an application or proceed ahead and clean up the system so that they’re not charged for using any of the additional resources.
Cleaning Up and Exiting
Users can delete the program and exit using the following command:
doctl compute droplet rm --tag-name k3s
To apply the load balance and the database, you will need to obtain the ID and then use the delete commands:
doctl compute load-balancer list/delete
doctl databases list/delete
Tune in to the next articles as we do a review of some of the lesser-known applications that users can look forward to implementing in their tech stack. And as always, readers are urged to check out the actual repo documentation for K3s to get a better hang of how the system operates.
Learn the difference between k3s and k8s here. Learn how to optimize cloud costs.
Happy Learning!
Published at DZone with permission of Hrittik Roy. See the original article here.
Opinions expressed by DZone contributors are their own.

Comments