Best Practices To Create High Available (HA) Applications in Mule 4
In this blog, I would like to share a few best practices for creating High Available (HA) Applications in Mule 4 from an infrastructure perspective.
Join the DZone community and get the full member experience.
Join For FreeIn this blog, I would like to share a few best practices for creating High Available (HA) Applications in Mule 4 from an infrastructure perspective ONLY (CloudHub in this article refers to CloudHub 1.0 ONLY).
Most of the configuration details (only relevant to HA) shared here are taken from MuleSoft Documentation/Articles/Blogs.
1. Horizontal Scaling
Scaling horizontally means adding more servers so that the load is distributed across multiple nodes. Scaling horizontally usually requires more effort than vertical scaling, but it is easier to scale indefinitely once set up.
CloudHub (CH)
Add multiple CloudHub worker nodes.
CloudHub (CH) provides high availability (HA) and disaster recovery against application and hardware failures.
CH uses Amazon AWS for its cloud infrastructure, so availability is dependent on Amazon. The availability and deployments in CH are separated into different regions, which in turn point to the corresponding Amazon regions.
If an Amazon region goes down, the applications within the region are unavailable and not automatically replicated in other regions.
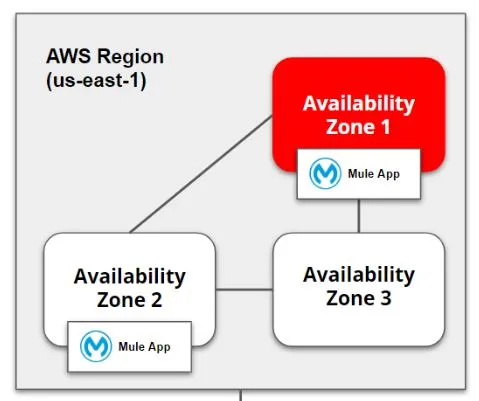
Deploy on Multiple Workers (Single Region)
In order to achieve HA, add multiple CH workers to your Mule application to make it horizontally scale. CH automatically distributes multiple workers for the same application for maximum reliability.
When deploying your application to two or more workers, the HTTP load balancing service distributes requests across these workers, allowing you to scale your services horizontally. Requests are distributed on a round-robin basis.
Note: HTTP load balancing can be implemented by an internal reverse proxy server. Requests to the application (domain) URL http://appname.cloudhub.io are automatically load-balanced between all the application’s worker URLs.
Deploy on Multiple Regions (for Disaster Recovery (DR) also)
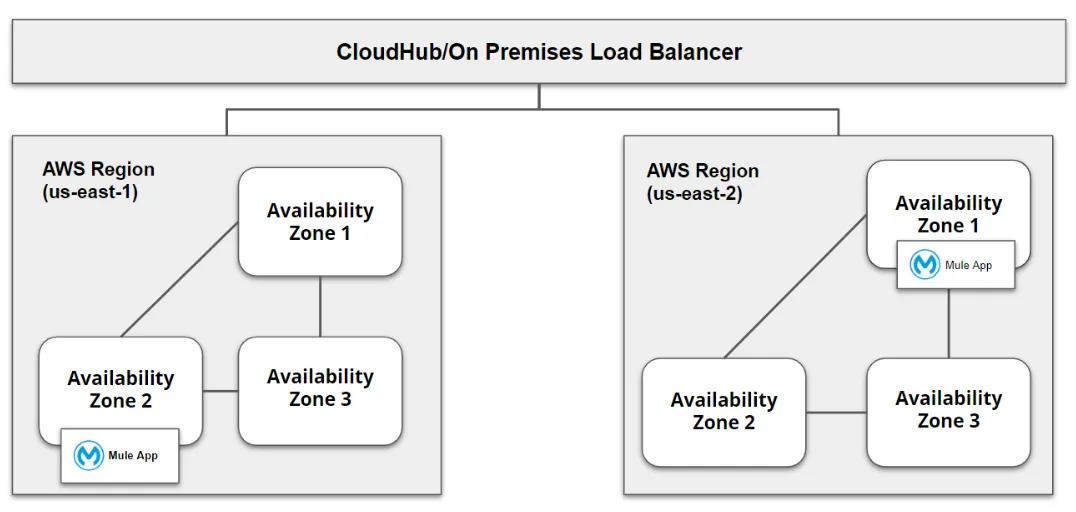
Application deployed to multiple regions provides better disaster recovery (DR) strategy along with HA. Generally, the region never goes down, but in the case of any natural calamities, the region may fail. If you have a requirement for DR, you can deploy the application to multiple regions and implement the CloudHub load balancer or any external load balancer (see below).
Enable CloudHub HA features
CloudHub's High Availability (HA) features provide scalability, workload distribution, & added reliability to your applications on CloudHub. This functionality is powered by CloudHub’s scalable load-balancing service, worker scale-out, and persistent queues features.
Note: You can enable HA features on a per-application basis using the Anypoint Runtime Manager console when either deploying a new application or redeploying an existing application.
Worker Scale-Out
Refer to ‘Deploy on Multiple Workers (Single Region)’ above.
Persistent Queues
Persistent queues ensure zero message loss and let you distribute workloads across a set of workers.
If your application is deployed to more than one worker, persistent queues allow communication between workers and workload distribution.
How To Enable Cloudhub HA Features
You can enable and disable either or both of the above features of CloudHub HA in one of two ways:
- When you deploy an application to CloudHub for the first time using the Runtime Manager console.
- By accessing the Deployment tab in the Runtime Manager console for a previously deployed application.
Steps To Follow
- Next to Workers, select options from the drop-down menus to define the number and type of workers assigned to your application.
- Click an application to see the overview and click Manage Application. Click Settings and click the Persistent Queues checkbox to enable queue persistence.
If your application is already deployed, you must redeploy it for your new settings to take effect.
On-Premises
Create multiple Standalone Mule runtime instances (nodes) & then create a Cluster out of them.
When you deploy applications on-premises, you are responsible for the installation and configuration of the Mule runtime instances that run your Mule applications.
Mule Enterprise Edition supports scalable clustering to provide high availability (HA) for deployed applications.
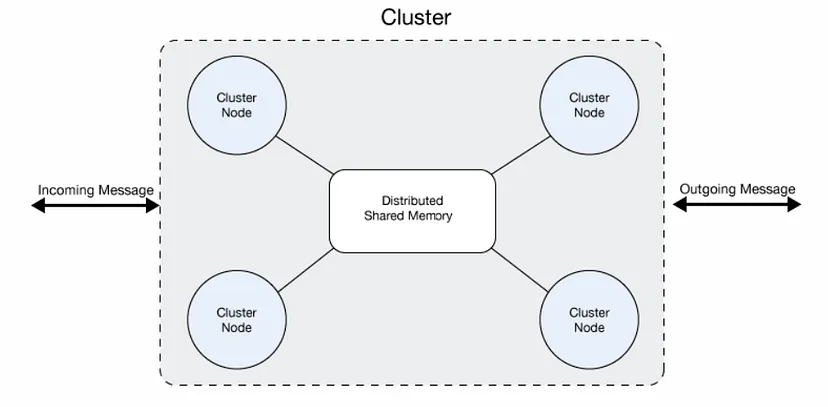
A cluster is a set of Mule runtime engines that acts as a unit. In other words, a cluster is a virtual server composed of multiple nodes (Mule runtime engines). The nodes in a cluster communicate and share information through a distributed shared memory grid. This means that the data is replicated across memory in different machines.
Setup Single Data Center Multi-Node Cluster
By default, clustering Mule runtime engines ensures high availability (HA).
If a Mule runtime engine node becomes unavailable due to failure or planned downtime, another node in the cluster can assume the workload and continue to process existing events and messages. The following figure illustrates the processing of incoming messages by a cluster of two nodes. As shown in the following figure, the load is balanced across nodes: Node 1 processes message 1 while Node 2 simultaneously processed message 2.

If one node fails, the other available nodes pick up the work of the failing node. As shown in the following figure, if Node 2 fails, Node 1 processes both message 1 and message 2.

How To Add Servers/Nodes to Runtime Manager (Applicable to Deployment Options Where Control Plane Is either Anypoint Platform or On-Prem)
- Your enterprise license is current.
- You are running Mule 3.6.0 or later, and API gateway 2.1 or later.
- If you want to download the RM Agent, you must have an Enterprise support account.
- If the server is already registered with another Runtime Manager instance, remove that registration first.
Notes:
- For Mule 3.6.x, install the Runtime Manager agent.
- For Mule 3.7.x and later Mule 3.x versions, you can optionally update the Runtime Manager agent to the latest version to take advantage of all bug fixes and new features.
- For info on RM Agent installation, refer here.
Steps To Follow
In order to add a Mule server to the Runtime Manager so that you can manage it, you must first register it with the Runtime Manager agent.
Note: Use the amc_setup script to configure the Runtime Manager agent to communicate with Runtime Manager.
- From Anypoint Platform, select Runtime Manager.
- Click Servers in the left menu.
- Click the Add Server button.
- Enter a name for your server.
Notes:
- Server names can contain up to 60 alphanumeric characters (a-z, A-Z, 0–9), periods (.), hyphens (-), and underscores (_), but not spaces or other special characters. Runtime Manager supports Unicode characters in server names.
- The server name must be unique in the environment, but it can be the same for the same organization in different environments.
- Runtime Manager generates the
amc_setupcommand. This command includes the server name you specified (server-name) and the registration token (token) required to register Mule in your environment. The registration token includes your organization ID and the current environment.
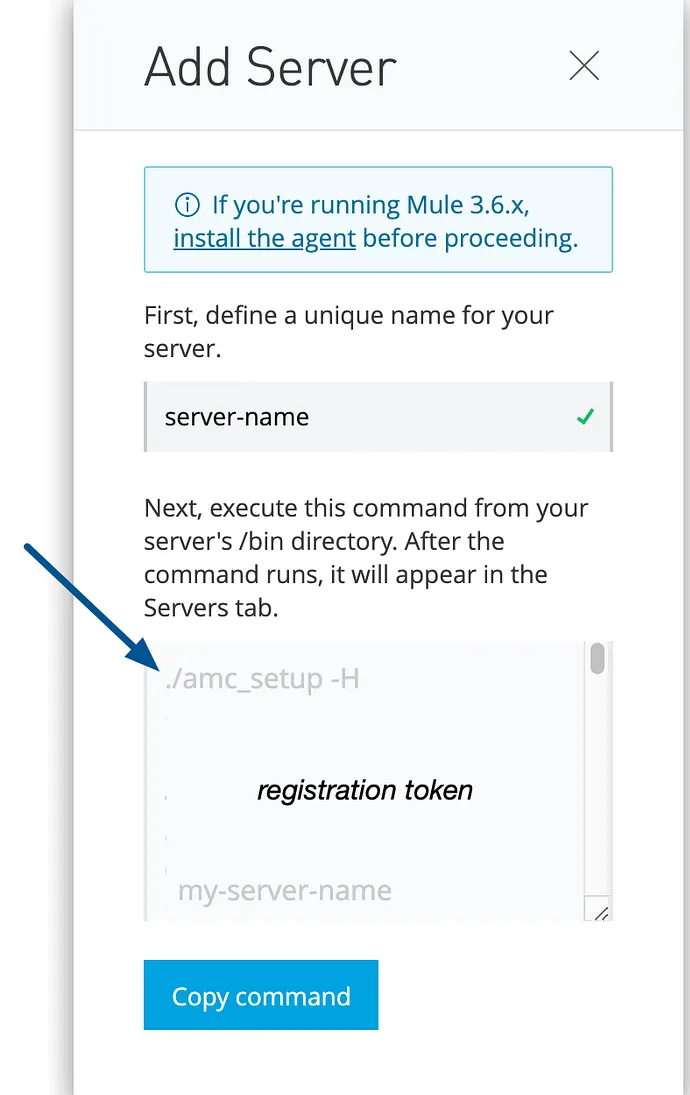
amc_setup command in the Add Server window
- Click Copy command to copy the
amc_setupcommand. This button appears only if the server name you specify is valid. - In a terminal window, change to the
$MULE_HOME/bindirectory for the Mule instance that you’re registering. - Paste the command on the command line.
- Include any other parameters on the
amc_setupcommand line. For more info on parameters, refer here. - If your environment requires all outbound calls to go through a proxy, specify proxy settings in either the
$MULE_HOME/conf/mule-agent.ymlfile or the$MULE_HOME/conf/wrapper.conffile.
amc_setup the command completes successfully, you see the below messages:
Mule Agent configured successfully Connecting to Access Management to extract client_id and client_secret Credentials extracted correctly, updating wrapper conf file After the script completes successfully, the name of your server appears on the Servers tab of Runtime Manager with a status of Created.
Note: If the server was running when you ran the amc_setup script, restart the server to reconnect with Runtime Manager.
Setup Two Data Centers (Primary-Secondary) Multi-Node Clusters (Applicable for Disaster Recovery (DR) Also)
To achieve high availability (HA), you can select from two deployment topology options — a two-data centers architecture (see below) or a three-data centers architecture. You would set up your Mule application the same way in a highly available cluster configuration in both the primary and the secondary data centers.
Use Active-Active Configuration ONLY
This configuration provides higher availability with minimal human involvement. Requests are served from both data centers. You should configure the load balancer with appropriate timeout and retry logic to automatically route the request to the second data center if a failure occurs in the first data center environment.
Benefits of Active-Active configuration are reduced recovery time objective (RTO) and recovery point objective (RPO).
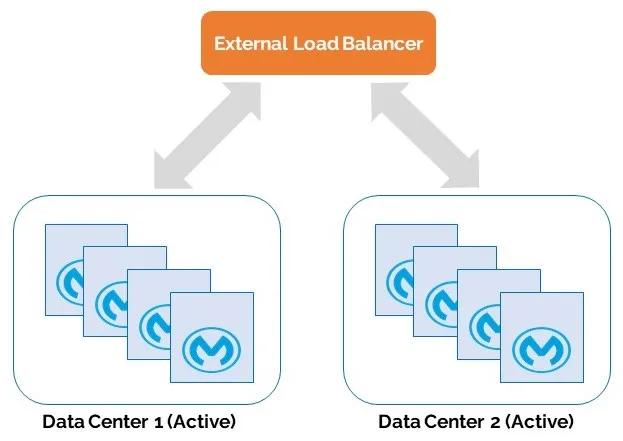
For the RPO requirement, data synchronization between the two active data centers must be extremely timely to allow seamless request flow.
Use External Load Balancer
When Mule clusters are used to serve TCP requests (where TCP includes SSL/TLS, UDP, Multicast, HTTP, and HTTPS), some load balancing is needed to distribute the requests among the clustered instances. There are various software load balancers available. Many hardware load balancers can also route both TCP and HTTP or HTTPS traffic.
RTF (Runtime Fabric)
Runtime Fabric Clusters
These are clusters at the node level (worker level) using Kubernetes (K8s). They are different from Mule runtime clusters (on-prem) as they lack below clustering features:
- Distributed shared memory
- Shared state
- Shared VM queues
In RTF clusters, Mule runtimes are not aware of each other. They are comparable to a CloudHub environment with two or more workers.
Add More Workers or Controller Nodes to the Cluster
This management of nodes has to be carried out in the Kubernetes side and not in MuleSoft Control Plane — Anypoint Platform Runtime Manager.
There are two main ways to have nodes added to the cluster:
- The kubelet on a node self-registers to the control plane.
- Manually add a Node object using kubectl.
After you create a Node object, or the kubelet on a node self-registers, the control plane checks whether the new Node object is valid.
Note: For more info, refer to the documentation available on Kubernetes.
Add More Pod Replicas to the Same Worker Node
This management of pod replicas can be carried out in Anypoint Platform Runtime Manager.
Steps To Follow
- Log in to Anypoint Platform using your Enterprise Mule credentials, and go to Runtime Manager.
- Select your application.
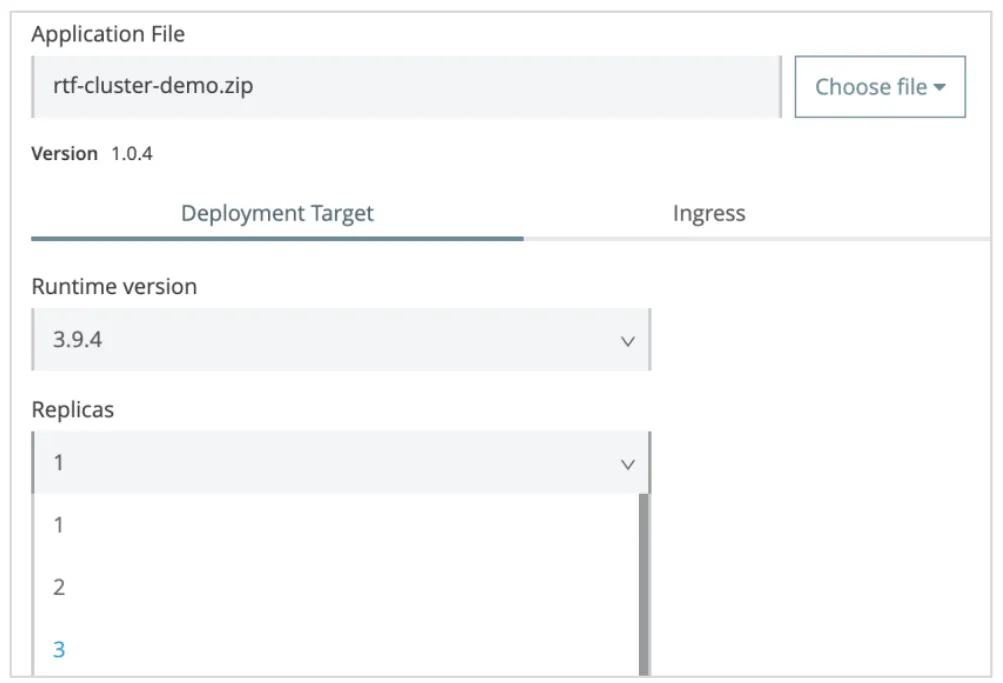
- Click tab Deployment Target.
- Locate Replicas dropdown.
- Change the number of replicas to desired number.
- Select the option Run in Runtime Cluster Mode.
- Click Apply changes.
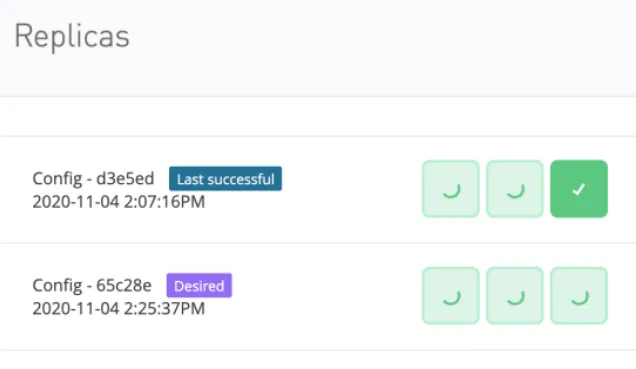
- Click View Status
2. Load Balancing
Load Balancers are one or more specialized servers that intercept requests intended for a group of (backend) systems, distributing traffic among them for optimum performance. If one backend system fails, these load balancers automatically redirect incoming requests to the other systems.
By distributing incoming requests across multiple systems, you enable the still-operational systems to take over when one system fails, hence achieving High Availability (HA).
CloudHub (CH)
Shared Load Balancer (SLB) is available within a Region & serves all the CH customers within that Region, hence you have no control over it. Instead create an Anypoint VPC first & then a Dedicated Load Balancer (DLB) within the VPC.
Create a Dedicated Load Balancer (DLB) Within an Anypoint Virtual Private Cloud (VPC)
Prerequisites:
- Ensure that your profile is authorized to perform this action by adding the CloudHub Network Administrator permission to the profile of the organization where you are creating the load balancer.
- Create an Anypoint Virtual Private Cloud (Anypoint VPC) in the organization where you want to create a load balancer.
- Create at least one certificate and private key for your certificate.
There are 3 ways to create and configure a DLB for your Anypoint VPC:
- Using Runtime Manager
- Using CLI
- Using CloudHub REST API
Steps To Follow (Using Runtime Manager)
- From Anypoint Platform, click Runtime Manager.
- Click Load Balancers > Create Load Balancer.
- Enter a name for your load balancer.
Note: The CloudHub DLB name must be unique across all DLBs defined in Anypoint Platform (by all MuleSoft customers)
- Select a target Anypoint VPC from the drop-down list.
- Specify the amount of time the DLB waits for a response from the Mule application in the Timeout in Seconds field. The default value is 300 seconds.
- Add any allow-listed classless inter-domain routing (CIDR) as required. The IP addresses you specify here are the only IP addresses that can access the load balancer. The default value is
0.0.0.0/0. - Select the inbound HTTP mode for the load balancer. This property specifies the behavior of the load balancer when receiving an HTTP request. Values to use for HA:
- On: Accepts the inbound request on the default SSL endpoint using the HTTP protocol.
- Redirect: Redirects the request to the same URL using the HTTPS protocol.
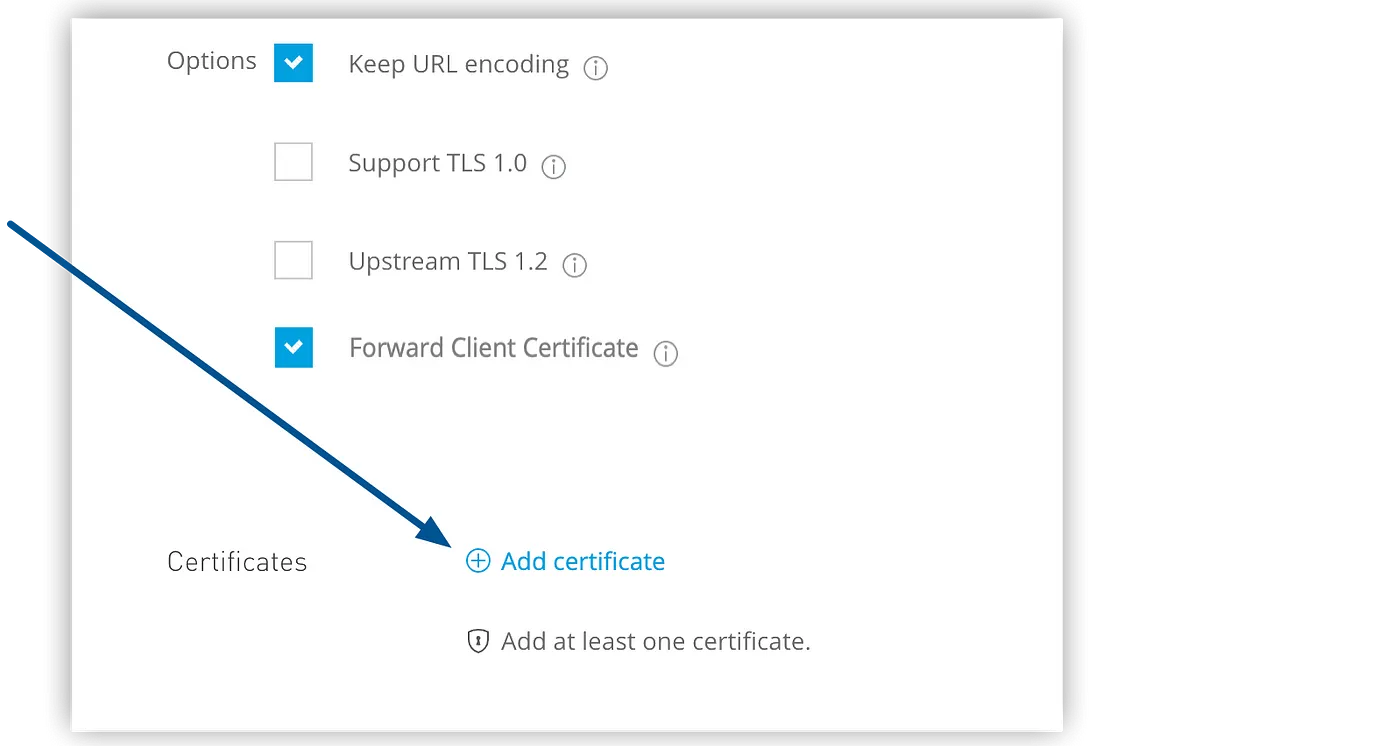
- Specify options:
- Enable Static IPs specifies to use static IPs, which persist when the DLB restarts.
- Keep URL encoding specifies that the DLB passes only the
%20and%23characters as is. If you deselect this option, the DLB decodes the encoded part of the request URI before passing it to the CloudHub worker. - Support TLS 1.0 specifies to support TLS 1.0 between the client and the DLB.
- Upstream TLS 1.2 specifies to force TLS 1.2 between the DLB and the upstream CloudHub worker.
- Forward Client Certificate specifies that the DLB forwards the client certificate to the CloudHub worker.
- Add a certificate:
- Click Add Certificate
- On the Create Load Balancer | Add certificate page, select Choose File to upload both public key and private key files.
- If you want to add a client certificate, click Choose File to upload the file.
- If you want to add URL mapping rules, click the > icon to display the options.

- Click Add New Rule, and then specify the input path, target app, output path, and protocol.
- Click Save Certificate.
- Click Create Load Balancer.
On-Premises
When On-Prem Mule clusters are used to serve TCP requests (where TCP includes SSL/TLS, UDP, Multicast, HTTP, and HTTPS), some external load balancing is needed to distribute the requests among the clustered instances. There are various third-party software load balancers available; two of them, which MuleSoft recommends, are:
- NGINX, an open-source HTTP server and reverse proxy. You can use NGINX’s
HttpUpstreamModulefor HTTP(S) load balancing. - The Apache web server, which can also be used as an HTTP(S) load balancer.
Many hardware load balancers can also route both TCP and HTTP or HTTPS traffic.
I will not get into more details as it is up to your/customer's discretion to decide. Refer to the documentation of whichever load balancer you decide for configuration details.
RTF (Runtime Fabric)
Deploy Ingress Controllers (For Both Internal and External Calls)
Runtime Fabric supports any ingress controller that is compatible with your Kubernetes environment and supports a deployment model where a separate ingress resource is created per application deployment. In general, most off-the-shelf ingress controllers support this model.
The ingress controller is not part of the product offering. Customers need to choose and configure the ingress controller on RTF on self-managed (BYOK).
Runtime Fabric creates a separate Ingress resource for each application deployed. The default ingress controller in any cloud (AWS, Azure or GCP) creates a separate HTTP(s) load balancer for each Ingress resource in the K8s cluster.
Prerequisite(s)
- RTF Cluster is up and running.
Steps To Follow
- Create the internal and external Ingress Controllers.
kubectl apply -f nginx-ingress.yaml
kubectl apply -f nginx-ingress-internal-v2.yaml
- Validate that Ingress Controllers are created with external & internal IP.
kubectl get services --all-namespaces 
- Create the Ingress Templates.
kubectl apply -f ingress-template.yaml
kubectl apply -f ingress-template-internal.yaml
Note: For info on how to create templates, refer here.
- Validate that Ingress Controllers are created.
kubectl get ing --all-namespaces
- Deploy your Mule application.
- In the Ingress section of the deployed application, you should be able to add endpoints for both internal and external.
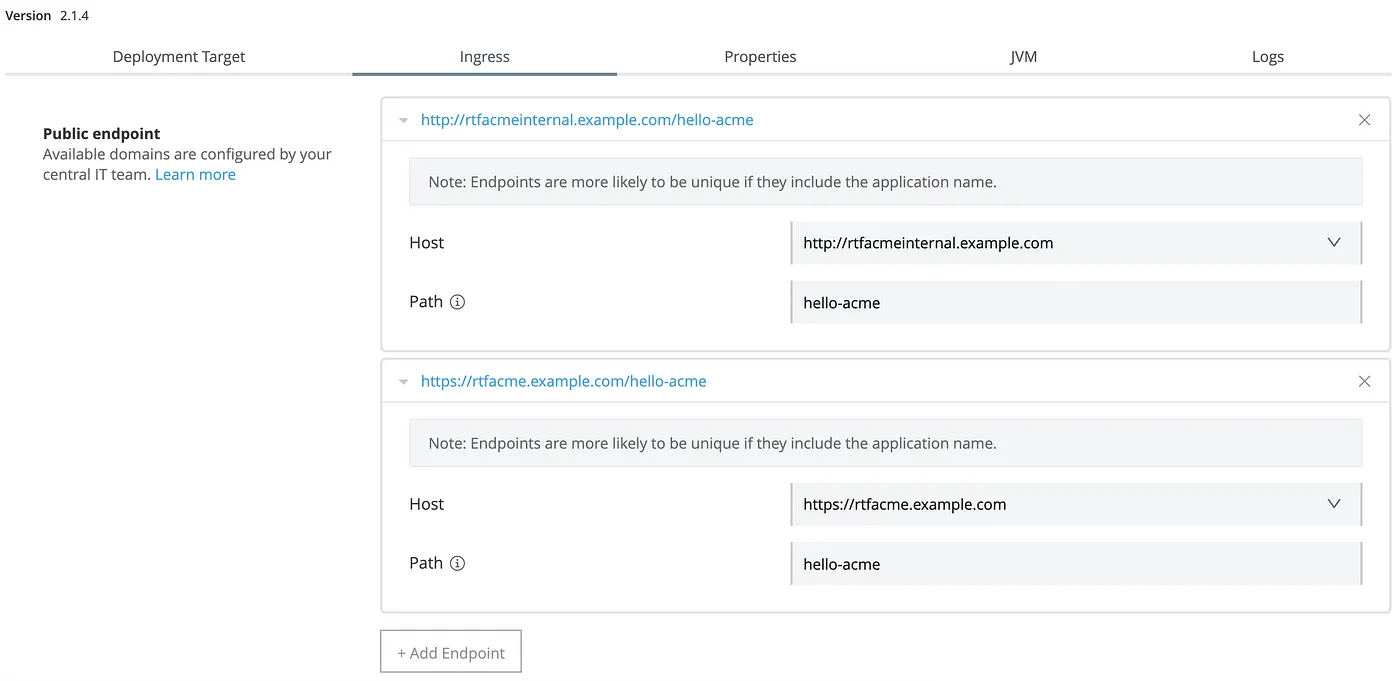
- External endpoint testing: Execute a cURL command from your own machine.
- Internal endpoint testing: A good way of testing is spawning a container inside the K8s cluster, accessing it and then executing a cURL command from there.
Deploy External Load Balancers
If you want your Mule applications to be externally accessible, you must add a external load balancer to your K8s cluster. Load balancers create a gateway for external connections to access your cluster, provided that the user knows the load balancer’s IP address and the application’s port number.
When running multiple ingress controllers, you must have an external load balancer outside Runtime Fabric to front each of the ingress controllers. The external load balancer must support TCP load balancing and must be configured with a server pool containing the IP addresses of each controller.
A health check must be configured on the external load balancer, listening on port 443.
This configuration of the external load balancer provides the following:
- High availability.
- Protection against failure.
- Automatic failover (if a replica of the internal load balancer restarts or is evicted and rescheduled on another controller).
Note: For info on which external load balancer (as per MuleSoft recommendations) to use, refer above ‘Load Balancing — On-Premises.’
3. Managing Server Groups (Applicable to Hybrid Deployment Option Only — Runtime Plane Is On-Prem and Control Plane Is Anypoint Platform)
A server group is a set of servers that act as a single deployment target for applications so that you don’t have to deploy applications to each server individually.
Unlike clusters, application instances in a server group run in isolation from the application instances running on the other servers in the group.
Deploying applications to servers in server groups provides redundancy so you can restore applications more seamlessly and quickly, with less downtime and hence High Availability (HA).
Create Server Groups
Prerequisites
- All servers in a server group must be running the same version of the Mule runtime engine and the same version of the Runtime Manager agent.
- You can create a server group with servers with the Running, Created, or Disconnected status, but you cannot have a server group with mixed servers.
- In order to add a server on which existing applications are currently running to a server group, you must first stop and delete the applications from the server.
Add Servers to Runtime Manager (RM)
Refer to ‘How to add servers/nodes to Runtime Manager’ above.
Create Server Groups
To deploy applications to a server group, you can either add the servers to Runtime Manager first and then create the server group, or you can create the group and add servers to it later.
Steps To Follow
- From Anypoint Platform, select Runtime Manager.
- Select Servers in the left menu.
- Click the Create Group button.
- In the Create Server Group page, enter the name of the server group. Group names can contain between 3–40 alphanumeric characters (a-z, A-Z, 0–9) and hyphens (-). They cannot start or end with a hyphen and cannot contain spaces or other characters.
- Select the servers to include in your new server group.
- Click the Create Group button.
Note: The new server group appears in the Servers list. The servers no longer appear in the Servers list. To see the list of servers in the group, click the server group name
Add Servers to a Server Group
Prerequisites
- At least one server is configured.
- The server group is created.
- No applications are deployed on the server that you are adding to the server group.
Steps To Follow
- From Anypoint Platform, select Runtime Manager.
- Select Servers in the left menu.
- Click Group in the Type column to display the details pane.
- Click the Add Server button:
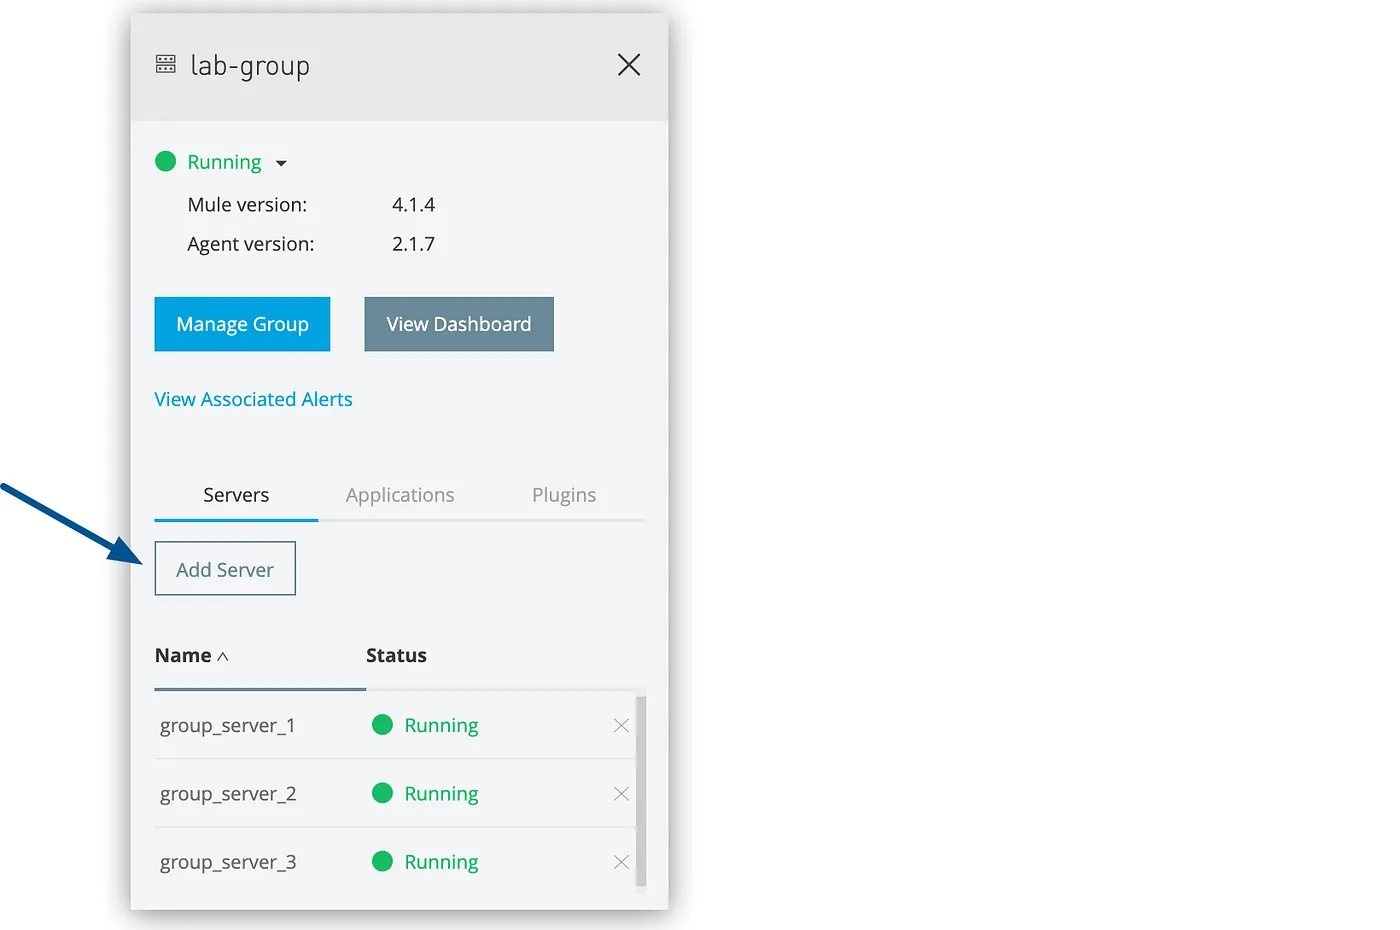
- A list of available servers appears.
- Select the servers to add to the group, and click the Add Servers button.
Note: The servers no longer appear in the Servers list. To see the list of servers in the server group, click the group name.
4. Managing Clusters (Applicable to On-Premises Deployment Model Only)
A cluster is a set of up to eight servers that act as a single deployment target and high-availability processing unit. Unlike in server groups, application instances in a cluster are aware of each other, share common information, and synchronize statuses. If one server fails, another server takes over processing applications. A cluster can run multiple applications.
Note: Before creating a cluster, you must create the Mule runtime engine instances and add the Mule servers to Anypoint Runtime Manager.
Features That Help in Achieving HA
Clusters Management
To deploy applications to a cluster, you can either add the servers to Runtime Manager first and then create the cluster, or you can create the cluster and add servers to it later.
There are two ways to create and manage clusters:
- Using Runtime Manager
- Manually, using a configuration file
Prerequisites/Restrictions
- Do not mix cluster management tools
- All nodes in a cluster must have the same Mule runtime engine and Runtime Manager agent version
Manual cluster configuration is not synced to Anypoint Runtime Manager, so any change you make in the platform overrides the cluster configuration files. To avoid this scenario, use only one method for creating and managing your clusters: either manual configuration or configuration using Anypoint Runtime Manager.
If you are using a cumulative patch release, such as 4.3.0–20210322, all instances of Mule must be the same cumulative patch version
How To Create Clusters Manually
- Ensure that the node is not running; that is, the Mule Runtime Server is stopped.
- Create a file named
mule-cluster.propertiesinside the node’s$MULE_HOME/.muledirectory. - Edit the file with parameter = value pairs, one per line (See below).
Note: mule.clusterId and mule.clusterNodeId must be in the properties file.
...
mule.cluster.nodes=192.168.10.21,192.168.10.22,192.168.10.23
mule.cluster.multicastenabled=false
mule.clusterId=<Cluster_ID>
mule.clusterNodeId=<Cluster_Node_ID>
...- Repeat this procedure for all Mule servers that you want to be in the cluster.
- Start the Mule servers in the nodes.
How To Manage Clusters Manually
Manual management of a cluster is only possible for clusters that have been manually created.
- Stop the node’s Mule server.
- Edit the node’s
mule-cluster.propertiesas desired, then save the file. - Restart the node’s Mule server.
How To Create Clusters in Runtime Manager
To deploy applications to a cluster, you can either add the servers to Runtime Manager first and then create the cluster, or you can create the cluster and add servers to it later.
Prerequisites
- Servers cannot contain any previously deployed applications.
- Servers cannot belong to another cluster or server group.
- Multicast servers can be in the Running or Disconnected state.
- Unicast servers must be in the Running state.
- All servers in a cluster must be running the same Mule runtime engine version (including monthly update) and Runtime Manager agent version.
Steps To Follow
- From Anypoint Platform, select Runtime Manager.
- Select Servers in the left menu.
- Click the Create Cluster button:

- In the Create Cluster page, enter the name for the cluster.
Note: Cluster names can contain between 3–40 alphanumeric characters (a-z, A-Z, 0–9) and hyphens (-). They cannot start or end with a hyphen and cannot contain spaces or other characters.
- Select Unicast or Multicast.
- Select the servers to include in your new cluster.
- Click the Create Cluster button.
Note: The new cluster appears in the Servers list. The servers no longer appear in the Servers list. To see the list of servers in the cluster, click the cluster name.
Add Servers to Runtime Manager
Refer to ‘How to add servers/nodes to Runtime Manager’ above.
Multicast Clusters
Enable Multicast for your clusters to achieve better HA.
A multicast cluster comprises servers that automatically detect each other. Servers that are part of a multicast cluster must be on the same network segment.
Advantages
- The server status doesn’t need to be Running to configure it as a node in a cluster.
- You can add nodes to the cluster dynamically without restarting the cluster.
Ports/IP address config prerequisites
- If you configure your cluster via Runtime Manager & you use the default ports, then keep TCP ports
5701,5702, and5703open. - If you configure custom ports instead, then keep the custom ports open.
- Ensure communication between nodes is open through port
5701. - Keep UDP port
54327open. - Enable the multicast IP address:
224.2.2.3.
Data Grid (In-Memory)
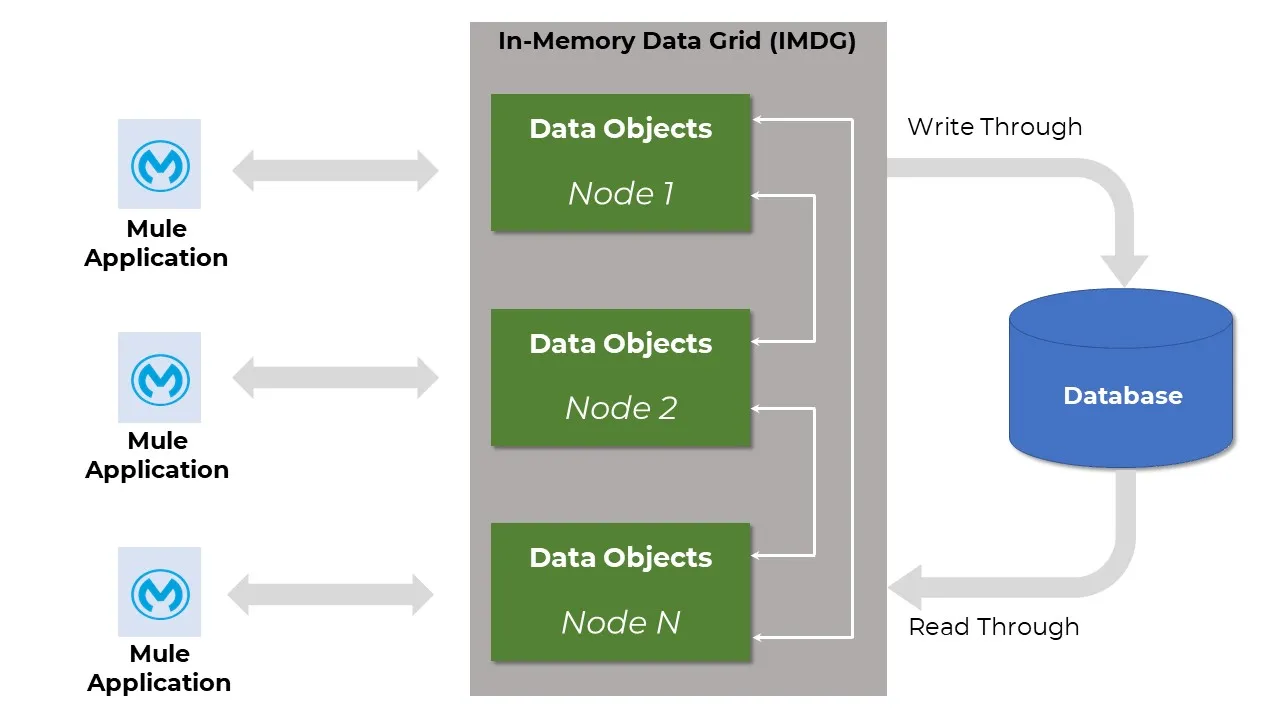
An in-memory data grid (IMDG) is a set of networked/clustered nodes that pool together their random access memory (RAM) to let applications share data with other applications running in the cluster.
Mule clusters have a shared memory based in Hazelcast IMDG. There are different ways in which Mule share information between nodes, thereby achieving HA:
Notes:
- Some transports share information to ensure a single node is polling for resources. For example, in a cluster there is a single FTP inbound endpoint polling for files.
- VM queues are shared between the nodes, so, if you put a message in a VM queue, potentially any node can grab it and continue processing the message.
- Object Store is shared between the cluster nodes.
- For more info, refer here.
Data Sharing/Data Replication
Data Sharing is the ability to distribute the same sets of data resources with multiple applications while maintaining data fidelity across all entities consuming the data.
Data Replication is a method of copying data to ensure that all information stays identical in real-time between all data resources.
The nodes in a cluster communicate and share information through a distributed shared memory grid IMDG (see below). This means that the data is replicated across memory in different machines.
Fault Tolerance (FT)
Fault Tolerance means ensuring recovery from failure of an underlying component.
By default, clustering Mule runtime engines ensures high availability (HA). If a Mule runtime engine node becomes unavailable due to failure or planned downtime, another node in the cluster can assume the workload and continue to process existing events and messages.
Note: For more info, refer to ‘Setup Single Data Center Multi-node Cluster’ above under ‘Horizontal Scaling#On-Premises’
Also, JMS can be used to achieve HA & FT by routing messages through JMS Queues. In this case, each message is routed through a JMS queue whenever it moves from component to component.
Active-Active Configuration
Refer to ‘Use Active-Active Configuration ONLY’ above under ‘Horizontal Scaling#On-Premises’
Quorum Management
Quorum feature is only valid for components that use Object Store.
When managing a manually configured cluster, you can now set a minimum quorum of machines required for the cluster to be operational.
When partitioning a network, clusters are available by default. However, by setting a minimum quorum size, you can configure your cluster to reject updates that do not pass a minimum threshold.
This helps you achieve better consistency and protects your cluster in case of an unexpected loss of one of your nodes, hence HA.
Under normal circumstances, if a node were to die in the cluster, you may still have enough memory available to store your data, but the number of threads available to process requests would be reduced as you now would have fewer nodes available, and the partition threads in the cluster could quickly become overwhelmed. This could lead to:
- Clients left without threads to process their requests.
- The remaining members of the cluster become so overwhelmed with requests that they’re unable to respond and are forced out of the cluster on the assumption that they are dead.
To protect the rest of the cluster in the event of member loss, you can set a minimum quorum size to stop concurrent updates to your nodes and throw a QuorumException whenever the number of active nodes in the cluster is below your configured value.
Note: To enable quorum, place in the cluster configurations file {MULE_HOME}/.mule/mule-cluster.properties the mule.cluster.quorumsize property, and then define the minimum number of nodes of the cluster to remain in an operational state.
Ensure you catch QuorumExceptions when configuring a Quorum Size for your cluster, and then make any decision as to send an email, stop a process, perform some logging, activate retry strategies, etc.
Primary Node
In an active-active model, there is no primary node.
In the Active-Active model, one of the nodes acts as the primary polling node. This means that sources can be configured to only be used by the primary polling node so that no other node reads messages from that source.
This feature works differently depending on the source type:
- Scheduler source: only runs in the primary polling node.
- Any other source: defined by the
primaryNodeOnlyattribute. Check each connector’s documentation to know which is the default value forprimaryNodeOnlyin that connector.
<flow name="jmsListener">
    <jms:listener config-ref="config" destination="listen-queue" primaryNodeOnly="true"/>
    <logger message="#[payload]"/>
</flow>
Object Store Persistence
You can persistently store JDBC data in a central system that is accessible by all cluster nodes when using Mule runtime engine on-premises.
The following relational database systems are supported:
- MySQL 5.5+
- PostgreSQL 9
- Microsoft SQL Server 2014
To enable object store persistence, create a database and define its configuration values in the {MULE_HOME}/.mule/mule-cluster.properties file:
mule.cluster.jdbcstoreurl: JDBC URL for connection to the database
mule.cluster.jdbcstoreusername: Database username
mule.cluster.jdbcstorepassword: Database user password
mule.cluster.jdbcstoredriver: JDBC Driver class name
mule.cluster.jdbcstorequerystrategy: SQL dialect
Two tables are created per object store:
- One table stores data
- Another table stores partitions
Recommendations
- You create a dedicated database/schema that will only be used for JDBC store.
- The database username needs to have permission to:
- Create objects in the database (
DDL),CREATEandDROPfor tables. - Access and manage the objects it creates (
DML),INSERT,UPDATE,DELETE, andSELECT.
- Create objects in the database (
- Always keep in mind that the data storage needs to be hosted in a centralized DB reachable from all nodes. Don’t use more than one database per cluster.
- Some relational databases have certain constraints regarding the name length of tables. Use the
mule.cluster.jdbcstoretableNametransformerstrategyproperty to transform long table names into shorter values. - The persistent object store uses a database connection pool based on the
ComboPooledDataSourceJava class. The Mule runtime engine does not set any explicit values for the connection pool behavior. The standard configuration uses the default value for each property. For example, the default value formaxIdleTimeis 0, which means that idle connections never expire and are not removed from the pool. Idle connections remain connected to the database in an idle state. You can configure the connection pool behavior by passing your desired parameter values to the runtime, using either of the following options:- Pass multiple parameters in the command line when starting Mule:
$MULE_HOME/bin/mule start \
-M-Dc3p0.maxIdleTime=<value> \
-M Dc3p0.maxIdleTimeExcessConnections=<value>
Replace <value> with your desired value in milliseconds.
- Add multiple lines to the
$MULE_HOME/conf/wrapper.conffile:
wrapper.java.additional.<n>=-Dc3p0.maxIdleTime=<value>
wrapper.java.additional.<n>=-Dc3p0.maxIdleTimeExcessConnections=<value>
Replace <n> with the next highest sequential value from the wrapper.conf file.
Conclusion
This is an effort to collate good practices to achieve High Availability (HA) in one place. Mule developers keen on building highly available applications can refer to the exhaustive list above.
Thank you for reading!! Hope you find this article helpful in whatever possible. Please don’t forget to like, share & feel free to share your thoughts in the comments section.
If interested, please go through my previous blogs on Best Practices
Published at DZone with permission of PRAVEEN SUNDAR. See the original article here.
Opinions expressed by DZone contributors are their own.

Comments