Automatic 1111: Sketch-to-Image Workflow
With Stable Diffusion Web UI Automatic 1111, create custom workflows for converting Sketches into photo-realistic images using diffusion and ControlNet models.
Join the DZone community and get the full member experience.
Join For FreeIn this article, we will be discussing how to convert hand-drawn or digital sketches into photorealistic images using stable diffusion models with the help of ControlNet. We will be extending the Automatic 1111's txt2img feature to develop this custom workflow.
Prerequisites
Before diving in, let's make sure we have the following prerequisites covered:
1. ControlNet Extension Installed
If the ControlNet extension isn't already installed in Automatic 1111 (Stable Diffusion Web UI), you'll need to do that first. If it's already set up, feel free to skip the following instructions.
Installing ControlNet Extension
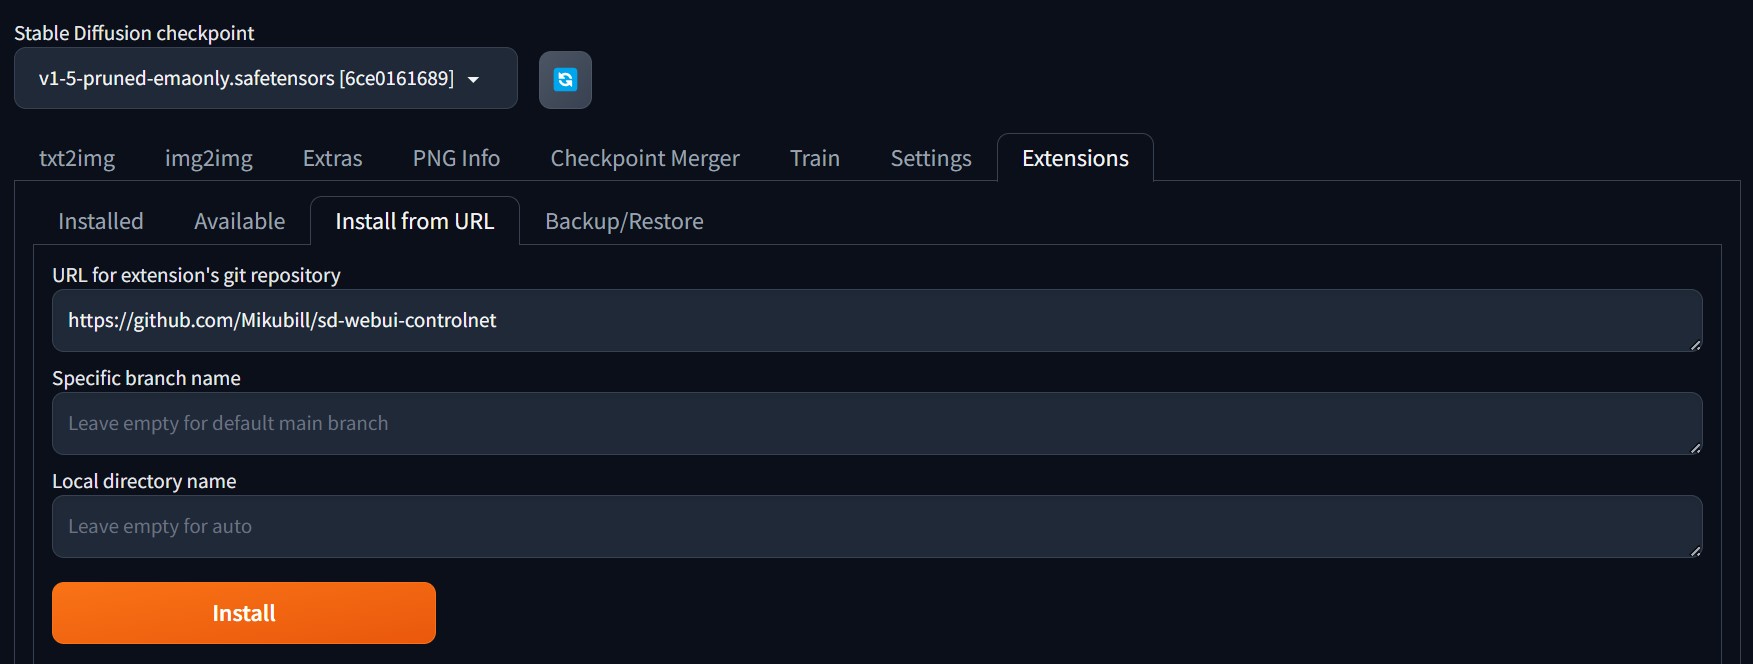
- Click on the
Extensionstab on Stable Diffusion Web UI. - Navigate to the
Install from URLtab. - Paste the following link in
URL for extension's git repositoryinput field and click install.![Install Stable Diffusion checkpoint]()
- After the successful installation, restart the application by closing and reopening the
run.batfile if you're a PC user; Mac users may need to run./webui.shinstead. - After restarting the application, the ControlNet dropdown will become visible under the Generation tab in the txt2img screen.
![ControlNet dropdown]()
2. Download the Following Models
We need the following Diffusion and ControlNet models to be downloaded and added to Automatic 1111 as prerequisites.
- RealVisXL_V4.0_Lightning (huggingface.co): Copy this model to the Stable Diffusion models folder which is under the project root directory:
/models/Stable-diffusion. - diffusers_xl_canny_full (huggingface.co): Copy the downloaded model to
/extensions/sd-webui-controlnet.
We are using the RealVisXL_V4.0_Lightning model here for faster image generation. As the name of the model says itself, the model is a lightning version, which takes a smaller number of steps and consumes very less time for generations when compared to other Stable Diffusion models. We will talk about the ControlNet model in a bit after understanding its basic features and purposes. Skip this section if you're well versed with ControlNet models.
ControlNet Models
ControlNet constitutes a neural network architecture meticulously crafted to augment pre-trained diffusion models through the integration of supplementary controls. This integration empowers more precise and adaptable content generation. They are originally introduced in the context of text-to-image generation to expand the capabilities of diffusion models by enabling them to respond to additional input conditions, such as edge maps, depth maps, or other structured data. This approach allows for the manipulation of output images in a more controlled, precise, and predictable manner, making it highly valuable for applications where accuracy and specificity are crucial.
Basic Features
- Integration with diffusion models: Enhances diffusion models by adding control channels for more targeted outputs
- Multi-conditional inputs: Supports various input types like sketches, depth maps, or poses for better content control
- Enhanced precision: Improves output accuracy, especially for detailed or specific content placement
- Flexibility: Adaptable for tasks beyond image generation, including video and 3D model creation
- Compatibility with existing models: Works with pre-trained models, saving time and resources for deployment
Some Real-Life Use Cases
- Digital art and design: ControlNet enables artists to generate detailed images from sketches, poses, or styles, streamlining the creative process.
- 3D model generation: ControlNet creates 3D models from sketches, aiding rapid and precise model development in gaming and animation.
- Medical imaging: ControlNet enhances medical imaging by generating accurate scans based on specific anatomical inputs, aiding diagnosis and treatment planning.
- Robotics and automation: ControlNet helps generate environment maps or scenarios for autonomous systems, improving navigation in complex settings.
- Interactive storytelling: ControlNet enables dynamic scene and character generation based on narrative cues, enriching interactive media experiences.
Sketch-to-Image Workflow
Open the Stable Diffusion web UI, navigate to txt2img tab and start making the following changes.
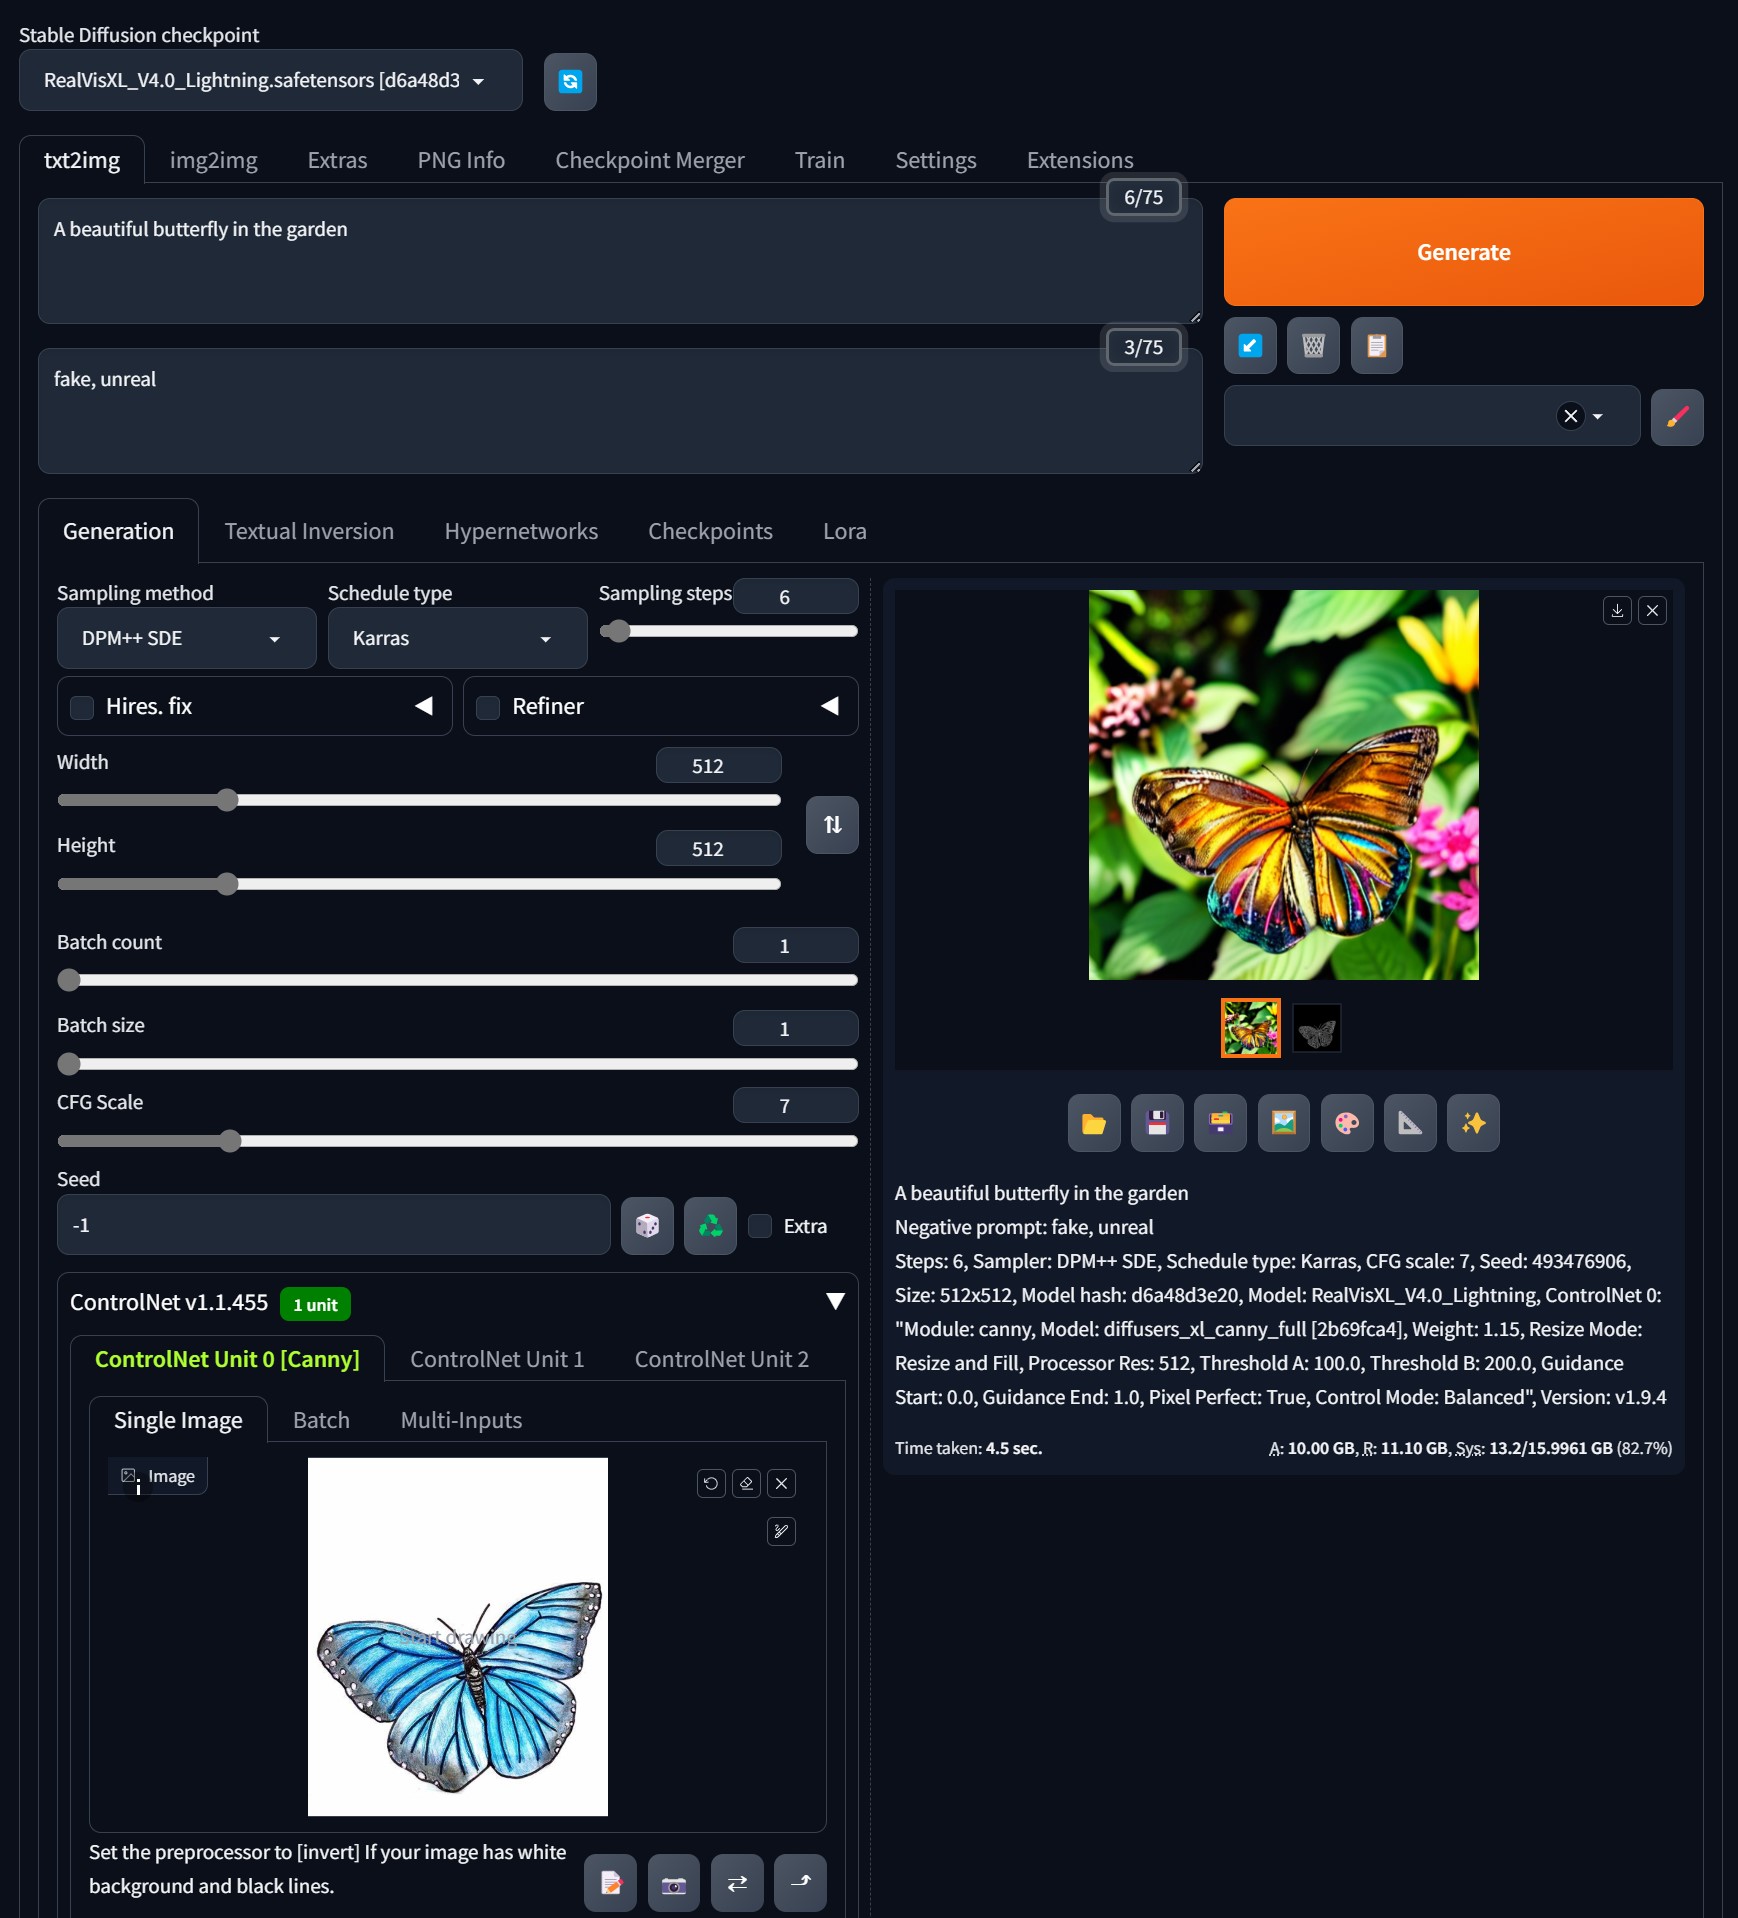
- Key in the positive and negative prompts describing what the generation should look like and what objects to avoid during the generation. Use something like this:
- Prompt: A photorealistic image of a beautiful butterfly in the garden
- Negative Prompt: fake, unreal, low quality, blurry
- Sampling Method: DPM++ SDE
- Scheduler: Karras
- Sampling steps: 6
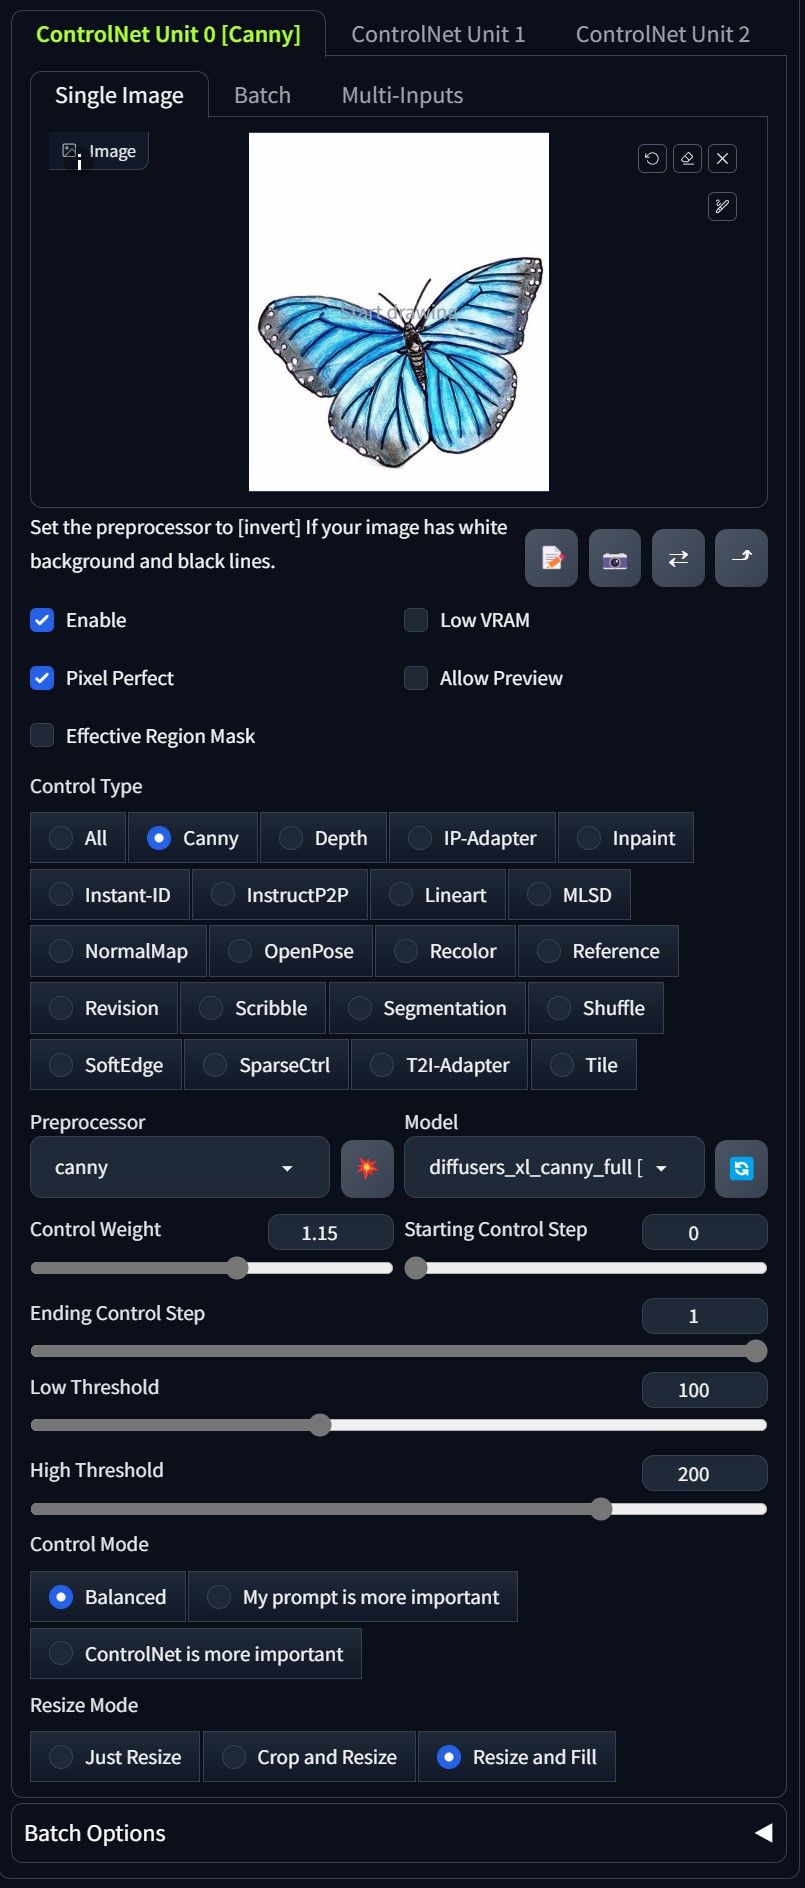
- Expand the ControlNet section and upload the sketch in the Single Image tab. You can use your own sketch or from internet downloads. The one I used in this example is downloaded from the American Museum of Natural History site.
- Check the Enable and Pixel Perfect checkboxes.
- Control Type: Canny
- Processor: canny
- Model: diffusers_xl_canny_full
- Control Weight: 1.15
- Control Mode: Balanced
- Resize Mode: Resize and Fill
Those are all the changes we need to make! Click on Generate to see your sketches converted to photorealistic images. The screenshots below are for your reference.

Conclusion
We've explored how to integrate diffusion and ControlNet models into the Stable Diffusion Web UI, and we've also demonstrated how to transform hand-drawn or digital sketches into photorealistic images using the RealVisXL_V4.0_Lightening model, powered by the diffusers_xl_canny_full ControlNet model.
In the upcoming article, we'll dive into creating a custom sketch-to-image workflow using the Stable Diffusion Web UI APIs.
Hope you found something useful in this article. See you soon in our next article. Happy learning!
Opinions expressed by DZone contributors are their own.


Comments