AR and Java By Hand (Part 1): Introduction
Learn more about beginning your own AR project with Java.
Join the DZone community and get the full member experience.
Join For FreeChances are, you have already at least heard the term "augmented reality." The very generic definition says that augmented reality is real-world-enhanced, computer-generated information. This mini-series will be about enhancing the captured image or video by adding a 3D model into it. Like in this video.
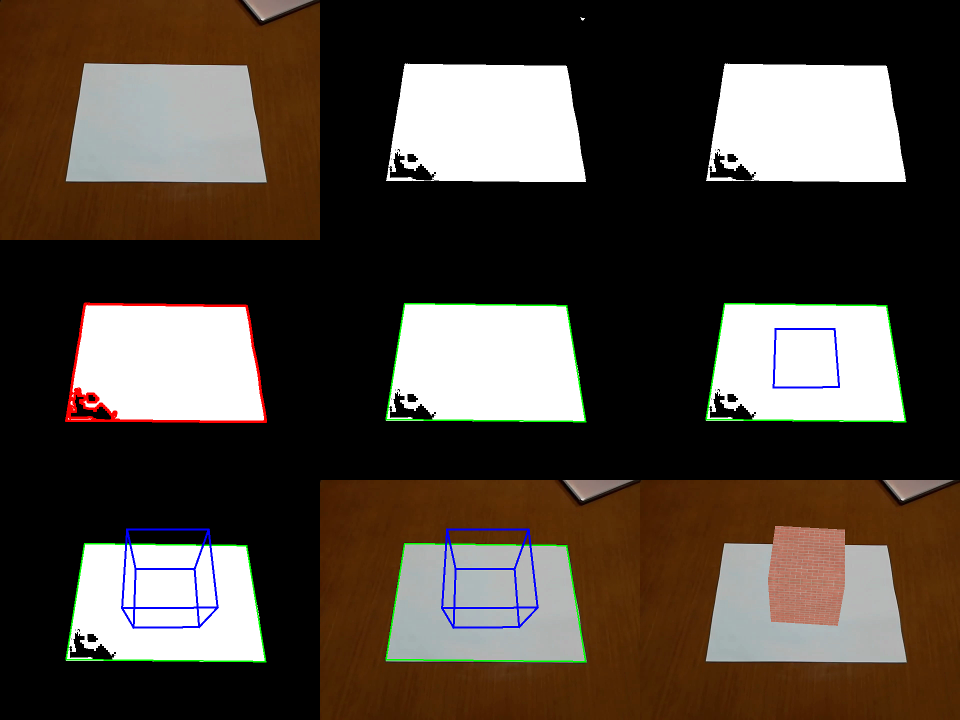
If you want to know how this works, then keep reading. I will walk you through all the steps. The following image is the rough summarization of the steps.

Now, in simple terms, the final goal is to display a cube on top of the white A4 paper. The process to do that starts by thresholding the pixels to find the white ones. This produces several blobs — assuming the A4 paper is the biggest of them. Others are suppressed. The next step is to identify contour, edge lines, and corners of the paper. Then, the planar transformation is computed. Planar transformation is used to compute a projection matrix, which allows drawing 3D objects to the original image. Finally, the projection matrix is transformed into the OpenGL compatible form. Then, you can do anything with that.
Sounds trivial, right? Maybe. Still, it takes some effort to go through the details; therefore, I have prepared the following sections.
- Introduction (you are reading it now)
- Plane detection and tracking
- Homography
- Camera pose
- Video & OpenGL
In addition, there is an example project accompanying this series, which you can find under the "Download the Project" button.
Code is written in Java (+ few OpenGL shaders) and build by Maven. As soon as you understand these, you should be able to build the project and run the test applications. Test applications are executable classes within test sources. Additionally, our main classes are CameraPoseVideoTestApp and CameraPoseJoglTestApp.
Regarding the expected level of knowledge, it will be very helpful if you have some knowledge about linear algebra, homogenous coordinates, RGB image representation, pinhole camera model, and perspective projection. Although I will try to keep the required level to the minimum, it is too much to explain every little thing in detail.
Now, let me make a note about the quality of the result. There are two main factors which affect quality – implementation and environment. I will cover one type of implementation, and I will let you judge how good it is. Please leave me comments, especially if you have a concrete idea to improve. The second factor which matters is the environment. This includes everything from camera quality, noise, distractions in the scene, lighting, occlusion, until the time you can spend on the processing each frame. Even today’s state of the art algorithms will fail under the crappy environment. Please keep this in mind when you do your own experiments.
Some extra reading? I used these resources (valid as of August 2019).
- https://bitesofcode.wordpress.com/2017/09/12/augmented-reality-with-python-and-opencv-part-1/
- http://ksimek.github.io/2012/08/13/introduction/
- http://www.uco.es/investiga/grupos/ava/node/26
- http://www.cse.psu.edu/~rtc12/CSE486/lecture16.pdf
- https://en.wikipedia.org/wiki/Camera_resectioning
- https://docs.opencv.org/3.4.3/dc/dbb/tutorial_py_calibration.html
- Gordon, V. Scott. Computer Graphics Programming in OpenGL with JAVA Second Edition
- Solem, Jan Erik. Programming Computer Vision with Python
Summary
This article gave you an overall idea of the project. Stay tuned for the next chapter where we tell you how to track the plane.
Published at DZone with permission of Radek Hecl, DZone MVB. See the original article here.
Opinions expressed by DZone contributors are their own.

Comments