Deep Learning-Based Pose Estimation
This article is about pose estimation with deep learning, implementation of pose estimation, and application of pose estimation that has solved a real-world problem.
Join the DZone community and get the full member experience.
Join For FreeWhat Is Human Pose Estimation?
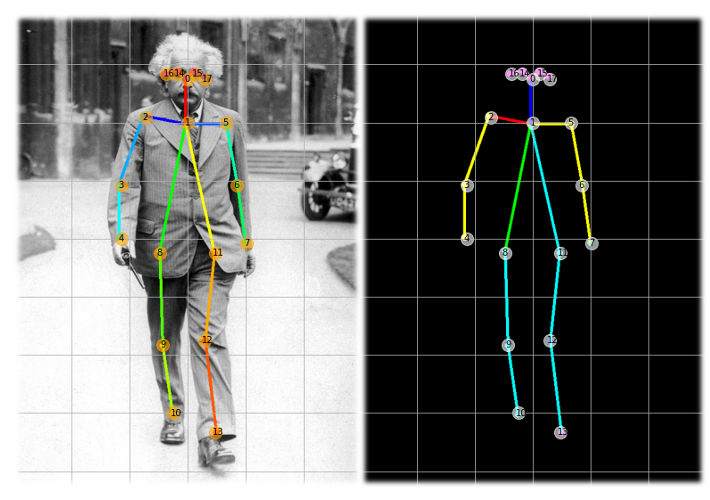
Human pose estimation is the process of detecting and estimating the pose of a person in an image or video. It involves detecting the key points or joints of a person's body, such as the head, shoulders, elbows, wrists, hips, knees, and ankles, and estimating their positions in the image. This can be done using various computer vision techniques, such as feature detection and machine learning algorithms.

Approaches to Estimate the Pose of Humans
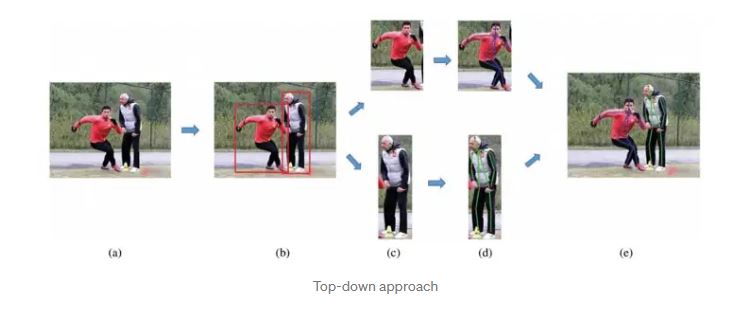
1. Top-down approach
2. Bottom-up approach
Top-Down Approach

In a top-down approach to human pose estimation, the algorithm first detects the person in an image or video frame and then estimates the pose of the person by analyzing the detected person's body parts and their relationships to each other.
This approach typically involves detecting the person's head, torso, and limbs and then using this information to estimate the pose of the person. It may also involve using information about the person's body proportions and the location of key points on the body, such as joints, to refine the pose estimate.
Top-down approaches can be effective at estimating the pose of a single person in an image or video frame but may be less effective at handling occlusions or multiple people in the same frame. They may also be more computationally intensive than bottom-up approaches, which analyze local features of the image or video frame to estimate the pose.
Bottom-Up Approach
In a bottom-up approach to human pose estimation, the algorithm starts by analyzing local features in the image or video frame, such as edges and corners, and then uses this information to detect and track individual body parts. The detected body parts are then combined to estimate the pose of the person or persons in the frame.
Bottom-up approaches are typically faster and more efficient than top-down approaches, as they do not require the initial detection of the person or the use of information about body proportions and key points on the body. However, they may be less accurate than top-down approaches, particularly in cases where the local features are ambiguous, or the person's pose is highly variable.
Bottom-up approaches can also be more robust to occlusions and multiple people in the same frame, as they do not rely on the detection of the entire person. However, they may struggle to accurately estimate the pose of a person who is partially or completely occluded.
Working of Bottom-Up Approach
 Fig. 3: Components of Pose Estimation
The above figure shows the different components involved in estimating the pose of a person from images. Let's go through each component in detail.
Parts Confidence Maps
The first step in human pose estimation is to detect the locations of the body joints in the image or video. This is typically done using a combination of machine learning algorithms and computer vision techniques. One popular approach is to use a convolutional neural network (CNN) to classify the pixels in the image into different body parts. The CNN is trained on a large dataset of annotated images, which includes information about the locations and orientations of the body joints.
Parts Affinity Fields
Is a representation of the relationships between different body parts. It is used to model the connectivity between body parts and to provide a means of estimating the pose of a person in an image or video frame. A PAF is typically represented as a 2D array, with each element in the array representing the likelihood that a body part is connected to a particular location in the image. The PAF is typically generated using a convolutional neural network (CNN) or other machine learning model trained on a large dataset of annotated images or videos of people in various poses. To generate a PAF, the CNN processes the input image and produces a set of feature maps, which are then passed through a series of convolutional and pooling layers to extract the relevant information about the relationships between body parts. For example, to estimate the pose of a person's arm, the algorithm might use the PAF to determine the likely location of the shoulder joint based on the presence of an elbow joint and then use this information to estimate the pose of the rest of the arm.PAFs are widely used in human pose estimation because they are able to capture complex relationships between body parts and can handle occlusions and variable poses more effectively than alternative approaches. However, they can be computationally intensive to generate and may require a large dataset of annotated images or videos for training.
Bipartite Matching
Is used to ensure that the key points of one person are not mismatched with the key points of another person in the same image. This is done by calculating the Hamming distance between key points and mapping them based on the minimum distance, and of the popular algorithms are the Hungarian algorithm
Parsing Result
The final step in the process is parsing the result, which involves displaying the mapped key points for each individual in the image. This helps to visualize the body pose of each person.
Hands-On Pose Estimation in Python
Google has released a framework named media pipe that is easy to import and run. The framework is available in several programming languages. In this tutorial, I will show how to use a trained pose estimation model with a mediapipe. The pose estimation model is optimized to run on lightweight devices. At the end of the tutorial, readers can use the program to input an image containing humans and estimate the pose of humans in the image and interpret the results.
Install Mediapipe
pip install mediapipe
Read an image and convert the image to a matrix
#Read an image
img = cv2.imread("image.jpg")
Convert the image from RGB to BGR in a way to be acceptable by mediapipe.
img = cv2.cvtColor(raw_img, cv2.COLOR_BGR2RGB)Feed the image matrix to the mediapipe pose estimation and store the result.
# Run MediaPipe Pose and draw pose landmarks.
with mp_pose.Pose(static_image_mode=True, min_detection_confidence=0.5, model_complexity=2) as pose:
	# Convert the BGR image to RGB and process it with MediaPipe Pose.
    results = pose.process(cv2.cvtColor(img, cv2.COLOR_BGR2RGB))
Convert world coordinates to image coordinates.
 # Print nose landmark.
    image_hight, image_width, _ = img.shape
    if not results.pose_landmarks:
      continue
    print(
      f'Nose coordinates: ('
      f'{results.pose_landmarks.landmark[mp_pose.PoseLandmark.NOSE].x * image_width}, '
      f'{results.pose_landmarks.landmark[mp_pose.PoseLandmark.NOSE].y * image_hight})'
    )
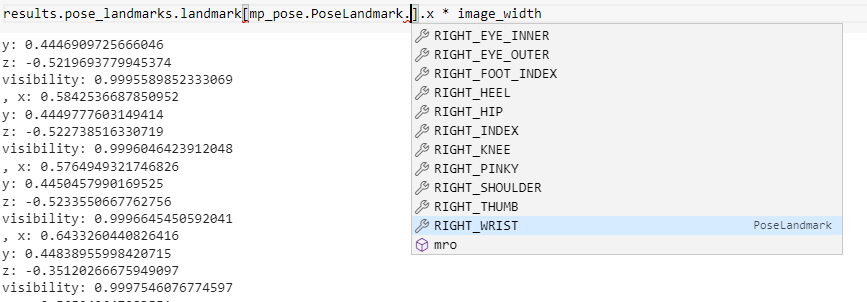
The result object with landmark variable in the class has the coordinates stored in world coordinates and not in the exact image coordinates. The print statement in the above snippet shows the conversion and prints the actual coordinates on the image.
Visualizing the Result
# Draw pose landmarks.
    print(f'Pose landmarks of {name}:')
    annotated_image = raw_img.copy()
    mp_drawing.draw_landmarks(
        annotated_image,
        results.pose_landmarks,
        mp_pose.POSE_CONNECTIONS,
        landmark_drawing_spec=mp_drawing_styles.get_default_pose_landmarks_style())
    cv2.imshow(annotated_image)
    cv2.waitKey(0)
The above code will help in visualizing the pose of the person with skeleton key points.
Interpreting the Results

The above figure shows where the coordinates of every point on the body are stored. Pose estimation in a business use case is useful if the exact coordinates can be retrieved to reuse to solve a business problem, like using head coordinates to estimate the count of a specific fitness exercise or checking the hand coordinates to see the angle of the stroke while swimming.
Complete Code
#Import all dependencies
#Source - https://google.github.io/mediapipe/solutions/pose.html
import cv2 #For all image processing related information
import math
import numpy as np #For matrix operations
import mediapipe as mp #Importing the library to run pose estimation

#Read an image
raw_img = cv2.imread("image.jpg")
img = cv2.cvtColor(raw_img, cv2.COLOR_BGR2RGB)

# Run MediaPipe Pose and draw pose landmarks.
with mp_pose.Pose(static_image_mode=True, min_detection_confidence=0.5, model_complexity=2) as pose:
	# Convert the BGR image to RGB and process it with MediaPipe Pose.
    results = pose.process(cv2.cvtColor(img, cv2.COLOR_BGR2RGB))

    # Print nose landmark.
    image_hight, image_width, _ = img.shape
    if not results.pose_landmarks:
      continue
    print(
      f'Nose coordinates: ('
      f'{results.pose_landmarks.landmark[mp_pose.PoseLandmark.NOSE].x * image_width}, '
      f'{results.pose_landmarks.landmark[mp_pose.PoseLandmark.NOSE].y * image_hight})'
    )

    # Draw pose landmarks.
    print(f'Pose landmarks of {name}:')
    annotated_image = raw_img.copy()
    mp_drawing.draw_landmarks(
        annotated_image,
        results.pose_landmarks,
        mp_pose.POSE_CONNECTIONS,
        landmark_drawing_spec=mp_drawing_styles.get_default_pose_landmarks_style())
    cv2.imshow(annotated_image)
    cv2.waitKey(0)
Application of Pose Estimation in Fifa 2022

Pose estimation has been very famous, and it is being used in various business cases. Some of them are in healthcare, retail, fitness, and sports. Very recently held, Fifa Worldcup 2022 also used pose estimation to identify offside using visual sensors and hardware sensors.
Offside is a rule in football that requires offensive players to be behind the last two players from the opponent's team before the ball is passed. These two players are typically goalkeepers and a defender. Errors in calling offside can occur because the game moves very quickly, and the referee must be in close proximity to make the call. Additionally, the assistant referees may not be able to make a decision with precision, leading to incorrect calls. Errors made by referees and assistant referees can cause losses for the losing team, and these errors often involve offside calls and determining whether a goal has been scored with precision. According to research, referees make errors on approximately 20-26% of offside calls. Let's take a deep dive into how Fifa uses pose estimation to identify offside.
Cameras

FIFA World Cup 2022 uses 12 hawk eye cameras per stadium, placed around the entire field. The cameras are calibrated in the field to identify both local and global coordinates. The frames from the cameras also have manual lines marked to help identify the lines on the field.
Ball Sensors

In addition to the 12 cameras that are used to track the movement of players on the field, sensors are often placed on the ball to help accurately track its position. The use of sensors on the ball allows the system to track its movement with a high degree of accuracy, even when it is moving at high speeds.
One reason for using sensors on the ball is to improve the accuracy of the system in detecting the ball's position on the field. Cameras alone may not be sufficient to accurately track the ball's movement at all times, especially if it is moving quickly or if it is partially obscured from view by players or other objects on the field. By using sensors, the system can more accurately detect the ball's position and movement, even in challenging conditions.
Sensors can also be used to measure other characteristics of the ball, such as its rotation and spin, which can be important for certain types of plays, such as free kicks and penalty kicks. By accurately tracking these characteristics, the system can provide additional information to the VAR that may be useful in making decisions during a match.
Video Assistant Referee (VAR)

It consists of a control room, known as the VAR box, which has access to all camera views of the match, as well as a team of video assistant referees (VARs) who are in constant communication with the main referee on the field.
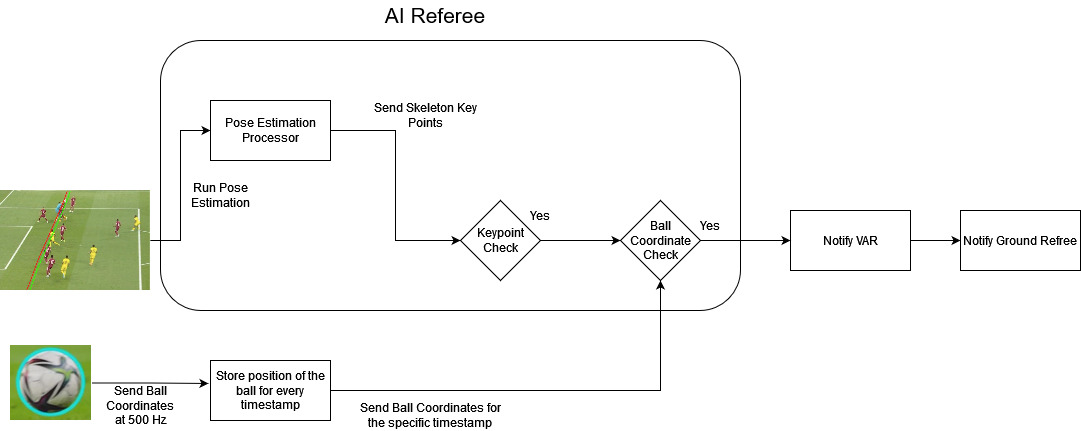
AI Referee: Bringing It All Together

Every frame from Hawk-Eye cameras is passed through the Pose Estimation Processor, which predicts the skeleton key points of the players in the frame. In parallel, the ball coordinates are continuously recorded with a time stamp. The Key Point Checker compares the predicted key points of the attacking player (the one attempting to score a goal) to those of the defending player (the one trying to prevent the goal). If the attacking player's key points are closer to the goal line than both the ball and the defending player's key points, an offside situation may be present. If the Key Point Checker determines that an offside situation may be present, it retrieves the ball coordinates from the specific time stamp and checks for offside relative to the ball. If all of the conditions are met, and an offside situation is confirmed, the decision is sent to the VAR team. The VAR team can then review the footage and provide the ground referee with additional information to help them make a more informed decision.
Conclusion
In this article, we learned about the concept of pose estimation with deep learning, implementation of pose estimation using google mediapipe, and application of pose estimation that has solved a real-world problem.
Opinions expressed by DZone contributors are their own.

Comments