API Lifecycle in Anypoint Platform
In this article, we go over a tutorial on how to work with the newer versions of Mule's Anypoint Platform to develop an API from beginning to end.
Join the DZone community and get the full member experience.
Join For FreeIntroduction
With the release of Mule 4 came some major changes in the API Development process. The previous process of API development has changed with the introduction of the Design Center. If you want to know how it used, you can follow this link. Here, in this article, I am going to write briefly on how to design and deploy an API.
The Roadmap
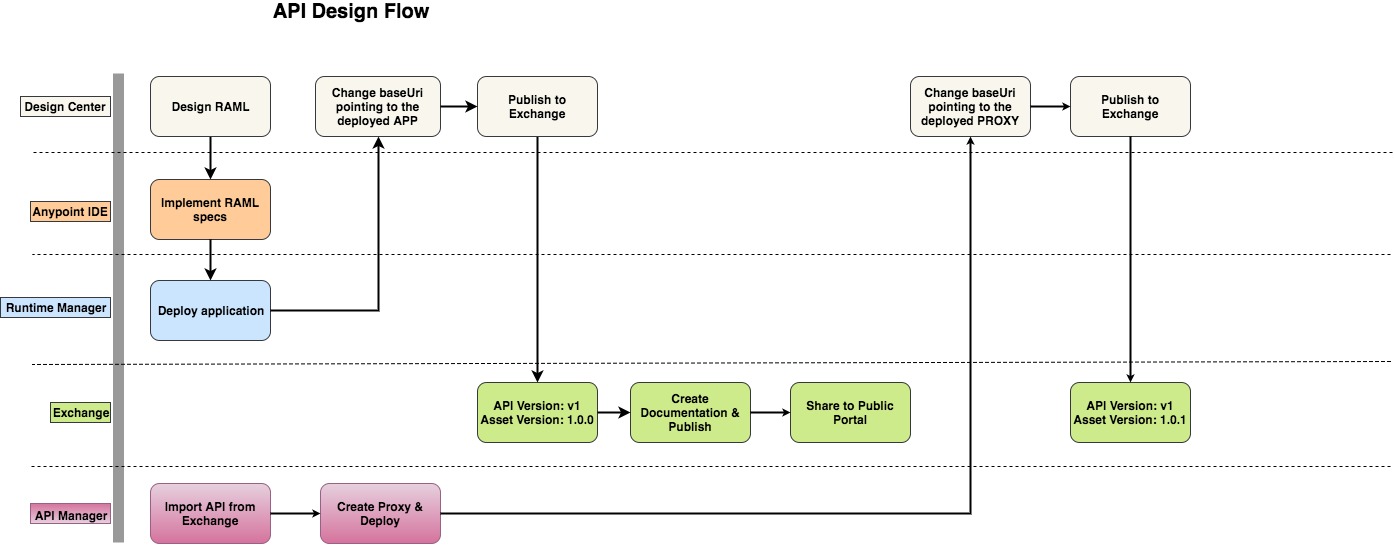
Below is a simple roadmap of API development:
 In the following sections, I will explain every block of the above diagram.
Design Center
The API is born in the Design Center. Here you create and mock the API specification in RAML. Here is a snapshot of the process:

Anypoint IDE
After designing the API, you can either copy it to your Anypoint IDE project or you can import it directly to your Anypoint IDE project. Then you can implement the specifications.

Runtime Manager
Once the implementation of the API specification is complete, deploy the application in Cloudhub either through the IDE or manually.
Exchange
Now go back to the Design Center. Update the baseUri to the actual implementation URI of the application. The actual implementation URI can be retrieved from the previous step. Finally, publish the API to Exchange. Here is a screenshot,

In the Exchange, you can add necessary documentation for the API. Once you are done with the documentation you can publish it by clicking the Publish button as shown below:

Now if the API is an Experience API you might want it to be publicly visible. For that, you can add this portal to Public Portal by clicking the Share button. Note that the Share button appears only after you publish the API.

Once the portal is published to the Public Portal you can view the public portal. Here is how to do it:

At this point, everything is up and running and you are practically done. The assets of your organization are visible under your organization name. For mocking, I put the organization name as Amazon. Here you can see that our asset (RAML) is available as a REST API as well as a Connector. (It's a new feature)
API Manager
Now let's say, for example, that you want to manage the API and apply security policies, SLA layers, etc. For doing this you have to use the API Manager. The below screenshot shows how you can import an existing API from the Exchange.

Once you save the configurations you can see the below information (ID, Name, and Version). It's really important when you use the API Autodiscovery operations.

The next step is to create a proxy. A proxy is a very simple application that is deployed in the runtime. It has a single flow with an HTTP component calling the actual application. Proxy is required to apply security policies, SLA tiers, etc. An API is registered as active only when it has a proxy deployed and running in the runtime.
After deploying the Proxy, you can see that the status of the API is Active:

Wrapping Up
Now, at this point, everything is looking pretty good. Let's check our Exchange and try out our API:

Check the base URI. It's still pointing to the actual application that was deployed in the runtime. We have to change it to point to the proxy URI. So, we go to the Design Center, edit the RAML, and modify the baseUri. After that, we simply publish a new version of the asset to the Exchange. Now, if we go to Exchange and test the API we can see the correct URI.
Conclusion
In this article, I have described how to follow a simple roadmap to create and manage APIs. There are a lot of other important things that I did not cover in detail here. For that please wait for my next articles.
Cheers!
Opinions expressed by DZone contributors are their own.

Comments