Four Steps for Beginning to Learn jQuery
From a beginner’s perspective, I have chalked out four important steps which will help to get started right away with jQuery.
Join the DZone community and get the full member experience.
Join For FreeToday, jQuery is an essential JavaScript library to learn. Many beginners often ask how to start with jQuery, and, in this tutorial, I'll do my best to provide an answer. I hope you guys find this tutorial useful.
What Is jQuery?
It is a programming script that runs in the web browser. In technical terms, jQuery is a JavaScript library—and I find it very useful and easy to use.
You can learn jQuery not within days but within hours.
 Some of the things which I like about jquery are:
It makes my code very short.
I can do complex tasks like manipulating the HTML structure of the web page (also known as DOM Manipulation) in just a few lines of code.
Event Handling is much easier than in vanilla JavaScript.
AJAX calls are very simple.
Learn jQuery in 4 Steps
As a beginner, you probably want to hop in and try out new things—like testing functionalities and performance. From a beginner’s perspective, I have chalked out four important steps which will help you to get started with jQuery right away. Let's discuss these four steps one by one...
Step 1 – Add a jQuery Reference
When working with jQuery, the first thing to do is to add its reference. Reference is provided in the page head. The reference is given below:
<script src="https://ajax.googleapis.com/ajax/libs/jquery/3.1.0/jquery.min.js"></script>In the above line, I referenced jQuery CDN from Google Hosted Libraries.
"If you are working in a place where there is no Internet then the above reference will not work. In that case, you can download jQuery in your Local PC and reference it from there. The jQuery download link is https://jquery.com/download/"
If you have downloaded jQuery on your local PC then you add it to your website's folder and reference it like:
<script type="text/javascript" src="JS/jquery.min.js"></script>Step 2 – jQuery Event Handling
Events like Button Clicks, keyup, keydown, mouseout, focus, jQuery Uncheck Checkbox events, etc., can be programmed very easily.
For example, here I'll show how to program the button click event in jQuery:
HTML of Page
<button id="myButton">Click Here</button>

<script type="text/javascript" src="JS/jquery.min.js"></script>
<script type="text/javascript">
    $(document).ready(function () {
        $("#myButton").click(function (e) {
            alert("Button is Clicked")
        });
    });
</script>
In the above code, I have placed the button click event inside $(document).ready(function () { }. This is because it tells jQuery to run after the page is fully loaded.
Remember that all your jQuery code should be kept inside it.
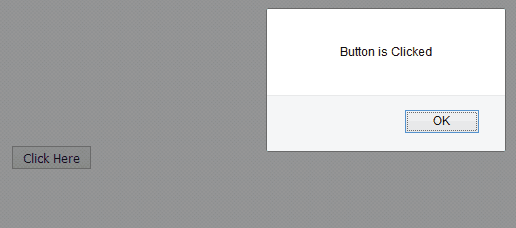
When you run your page in the browser and click the button you will get an alert message box as shown in the below image:

Let’s take another example to check if the letter 'Y' is pressed anywhere on our page, and then show an alert message. Below is the code for it:
$(document).keyup(function (event) {
    if(event.which==89)
    {
        alert("Letter 'Y' is pressed");
    }
});
Note that 89 is the key event for the letter ‘Y’.
Step 3 – DOM Manipulation With jQuery
We can make a lot of changes in the DOM with jQuery, very easily. If you have ever tried doing this with JavaScript then, most likely, you will know how difficult it is. With jQuery, it is a piece of cake.
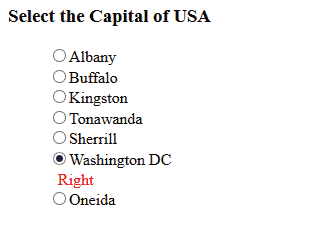
Let's do a simple DOM manipulation to test ourselves. Here, a person has to select the capital of the USA out of 7 options. The options are given in radio buttons. When the person selects the wrong one then the text “Wrong” shows up. When they select the right one (Washington DC) then the text “Right” will appear.
We make this happen upon the click event of the radio button and add a 'paragraph' with the text "Right" or "Wrong", next to the radio button.
 <ul style="list-style:none">
         <li><input type="radio" value="Albany" name="rdo">Albany</li>
         <li><input type="radio" value="Buffalo" name="rdo">Buffalo</li>
         <li><input type="radio" value="Kingston" name="rdo">Kingston</li>
         <li><input type="radio" value="Tonawanda" name="rdo">Tonawanda</li>
         <li><input type="radio" value="Sherrill" name="rdo">Sherrill</li>
         <li><input type="radio" value="Washington DC" name="rdo">Washington DC</li>
         <li><input type="radio" value="Oneida" name="rdo">Oneida</li>
     </ul>
 </div>

 <script type="text/javascript" src="JS/jquery.min.js"></script>
 <script type="text/javascript">
     $(document).ready(function () {
         $("input[type='radio']").click(function (e) {
             if($(this).val()=="Washington DC")
                 $(this).parent().append('<p style="margin:0;padding-left:10px;color:red;">Right</p>');
             else
                 $(this).parent().append('<p style="margin:0;padding-left:10px;color:red;">Wrong</p>');
         });
     });
 </script>
Note that in the above jQuery code I check the value of the radio button, when it is clicked, and then find its parent (which is the “li” element). To this parent, I add the paragraph with an appropriate text.

Step 4 – jQuery AJAX
Partial postback is accomplished with an AJAX request. With jQuery, we can easily make AJAX requests and call the server-side functions (like calling PHP or C# functions) with jQuery code. Then show the returned values of these function inside the page HTML.
Sometimes you may need to query our database for records (like finding customer details from the database based on a name). Here, we can use jQuery to call our PHP/ASP function (which returns the customer details), and then show the details in a div.
The important thing to note here is that you do this in partial postback.
The jQuery AJAX Code
<input type="text" id="nameInput"/><br/>
<div id="customerDetails"></div>
<input type="submit" id="submitButton" value="Submit"/>
<script type="text/javascript" src="JS/jquery.min.js"></script>
<script type="text/javascript">
    $(document).ready(function () {
        $("#submitButton").click(function (e) {
            var result = ValidateAll();
            if (result == true) {
                $.ajax({
                    type: "POST",
                    url: "jquery-ajax.aspx/GetCustomer",
                    contentType: "application/json; charset=utf-8",
                    data: '{"name":"' + $("#nameInput").val() + '"}',
                    dataType: "json",
                    success: function (msg) {
                        if (msg.d) {
                            $("#customerDetails").html(msg.d);
                        }
                    },
                    error: function (req, status, error) {
                        alert("Error try again");
                    }
                });
            }
            return false;
        });
    });
</script>
Note that in the above code I called the GetCustomer function of the page “jquery-ajax.aspx” and passed on to it the customer name as a parameter.
The work of this function is to get the customer details of the person from the database and return it to the jQuery function. This information is shown inside a div called customerDetails.
Summary
I hope you find my tutorial useful and after reading it you can go forward with developing jQuery functions for the web applications and websites.
Feel free to contact me via the comments section if you have any questions regarding jQuery.
Sharing is caring, share this article with your friends on Facebook and Twitter.
Opinions expressed by DZone contributors are their own.

Comments